Import contacts from another system
Settings- Installation
You can import contact records automatically from your old system into CCH iFirm. This involves creating a comma-delimited text (.csv) file, which is a spreadsheet containing your contacts data.
Contents
Download the .csv file template from CCH iFirm
Before you can import any data into CCH iFirm we suggest that you download the .csv file provided by CCH iFirm. The .csv file acts as a template for you to use because it contains the field headings that match the CCH iFirm system.
- Click Installation > Import Clients if using your Admin login; or
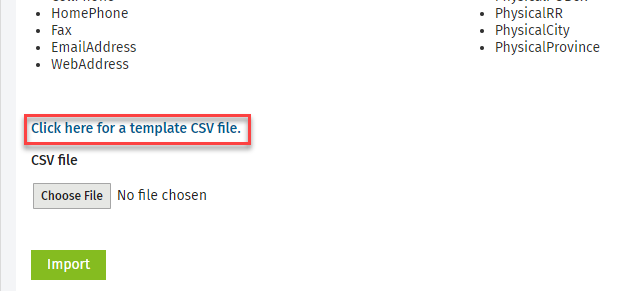
Click Settings > Installation > Import Clients if using your User login. - Click Click here for a template CSV file link to download the .csv file template to your computer.
- Save the .csv file to your computer - it will open in Microsoft® Excel®.
Export the data from your old system
Next, you need to export your client data from your old system to a .csv file. This process differs from system to system. If you are unsure of how to do this, contact you software supplier for help. After you have done this, you will have two .csv files; the .csv file template from CCH iFirm and the .csv file exported from your old system.
Prepare the data
You may want prepare and import a .csv file containing only a few of your contact records, to test that it imports correctly. Once the .csv file imports without error, and you are happy with the imported data, you can proceed to import all of your other contact records.
- Open both .csv files.
- Compare the field headings in your old system's .csv file to those in the .csv file template. Using the .csv file template as a template, consider what fields and related data from your old system you want to keep. Ensure that you find a match with the field headings that you must use in CCH iFirm - use the Guide for preparing a .csv file for contact records for help with this.
- Use this opportunity to tidy up your data. For example, you could change your client code convention, if required, or archive deleted or inactive clients.
- Copy and paste the columns of data from your old system's .csv file into the appropriate columns of the .csv file template .
Note: If the FirstNames or LastNames columns are populated with data, this is what will be imported into CCH iFirm as the Contact name, not the data from the Name column. So, if you want the Name column to populate the Contact name in CCH iFirm, do not key in any data in the FirstNames or LastNames columns.
- Delete any columns that you do not want to use.
- This will ensure you do not get any error messages during the import process that relate to data you do not have or want to use.
- For example, the Guide for preparing a .csv file for contact records tells you that the ChargeMonthlyDisbursement column requires data in the format of YES/NO, Yes/No, yes/no, Y/N, or y/n. Therefore, if you do not have any data in this column, you will get an error message when you try to import the file (see below).
- Set the Contact Type using the Client/Prospect/Lead column, so you do not have to set this manually in Contacts later.
- For example, you can specify contacts as Leads, as opposed to Clients. If you do not enter data in this column, the Contact Type field will be set as blank.
- You can also use this column in conjunction with the Supplier column. For example, if you can enter Lead into the Client/Prospect/Lead column, and Supplier into the Supplier column, when you import the .csv file the Contact Type field will be set as Lead & Supplier.
- Ensure that your data is in the correct format because if your data does not match this format it cannot be imported into CCH iFirm - use the Guide for preparing a .csv file for contact records for help. If your data does not match the required format, it cannot be imported into CCH iFirm.
- Save the file.
Tips to avoid issues later on:
- Remove carriage returns, commas, and spaces.
- Ensure that there are no duplicate records - there should only be one line for each client code.
- You must have a Code column.
- You must have an Entity column (e.g. Corporation, Individual, Non-Profit Organisation, Other, Partnership, Sole Proprietor, Trust & Estate - Testamentary, Trust - Inter-Vivos] ).
- The date format is Mmm dd yyyy.
- Fields requiring an amount must be populated with numbers only, not letters and not alphanumeric. For example, use 21 not twenty-one.
- Columns that have numbers, such as mobile phone numbers that commence with a 0 need to be formatted as text fields not numerical fields. This will hold the 0 at the beginning of the number.
- Do not use any special characters (for example %, &, !, etc.). You can use Notepad Plus Plus to help you identify if any special characters are embedded in your .csv file.
Import the .csv file into CCH iFirm
- Click Installation > Import Clients if using your Admin login; or
Click Settings > Installation > Import Clients if using your User login. - Click Choose File or Browse (the button label may be different depending on the browser you use) to locate your .csv file.
- Click Import.
- Resolve any errors.
- If there are any errors, they will be displayed on the bottom left-hand side of the screen.
- Use the Guide for preparing a .csv file for contact records for help.
- Go back to your .csv file, make the necessary amendments, save and close the file. Then, re-import the .csv file.
- Click Contacts then click the appropriate contact type menu when the importation process is complete.
- Look at your imported contacts and check that they have imported correctly.
If you want to change some of your data after it has been imported, you can go back to your .csv file, edit the data, save and close the file. Then re-import the .csv file into your CCH iFirm site. You can also click the contact to edit the data directly in the Contact Details page.