ePay
Creating your Merchant Account
Before you can set up the ePay feature in CCH iFirm, you must create a merchant account with a payment services provider (PSP). CCH iFirm integrates with the following PSP:
- Braintree, a PayPal service. Sign up for a Braintree account at https://www.braintreepayments.com.
-
CPACharge, an AffiniPay solution. Sign up for a CPACharge account at https://www.cpacharge.com.
-
Stripe. Sign up for a Stripe account at https://stripe.com/en-ca.
When you set up your merchant account, note the following information if it is provided:
- Merchant ID
-
Public (publishable) API key
-
Private (secret) API key
-
Username/password
Important: Almost all Canadian credit cards issuers require CVV verification to process transactions on their network. Therefore, you must ensure that the Card Verification toggle button is enabled in Braintree. Card verification is a strong first line defense against potentially fraudulent cards. It ensures that the credit card number provided is associated with a valid, open account and can be stored in the Braintree Vault and charged successfully. Braintree can verify the following with the customer’s bank: the card number, card expiration date, street address and postal code. For more information, consult the following Knowledge base article: https://support.cch.com/canada/solution/000122561/Errors-processing-payment-via-ePay?language=en.
After setting up your merchant account, follow the instructions in Configuring ePay Options in CCH iFirm.
Configuring ePay Options in CCH iFirm
After you created a merchant account, use the following procedure to configure the ePay options in CCH iFirm. This process includes:
- Entering information provided by the payment services provider (such as the merchant ID, public API key and private API key, private API key, username and password).
- Customizing the payments page that customers see when they click a payment link.
- Entering the contact information that customers can use to contact the firm with billing questions.
To configure the ePay options, proceed as follows:
- Got to Settings > Firm Settings > ePay.
- Select Allow ePay on invoices.
- Click Configure.
- With the PSP Details tab selected, click Settings for your PSP.
- Complete the set up for your PSP.
- PayPal (Braintree)
- Enter your Merchant ID, Public API key and Private API key. This information is provided by Braintree.
- If needed, clear the Sandbox account check box.
- Click Verify.
- Click Submit.
- If you have billing sub-accounts, verify that the default sub-account is selected.
CPACharge
Click Authorize.
You will be prompted to enter your CPACharge username and password.
Click Authorize.
Click Submit.
Stripe
Enter your publishable API key and secret API key. This information is provided by Stripe.
If needed, clear the Test mode check box.Click Verify.
Click Submit.
Important: If your firm uses a testing environment or sandbox account, make sure to clear the Sandbox account or the Test account check box before sending ePay links to your customers. - PayPal (Braintree)
- Click Merchant Setup.
- On the Display Name tab, do the following, as applicable:
- Add a logo. A logo is not required. If you add one, it displays next to the firm name on the payment page.
- Click Browse next to the Upload new logo image box.
- Navigate to and select the logo image file.
- For optimal display on both large and small screens, your logo should be no larger than 350 pixels by 120 pixels.
- Change how your firm name displays. By default, the Display name field is populated with your firm's name. You can modify the text and use the text formatting tools to change its appearance on the payment page.
- Click the Contact Information tab.
- Enter the contact information that should be used by your clients to contact your firm if they have questions about their invoice.
Note: A message containing this contact information will display if a client encounters an issue using the ePay system. If nothing is entered there, the message will instead instruct the client to contact the firm, with no contact information. - Click Submit.
Setting a Payment Provider as Default
If you have multiple payment provider accounts set up, you can select one payment provider as the default option. To do this:
- Go to Settings > Firm Settings > ePay.
- Select Allow ePay on invoices.
- Click Configure.
- Click Settings next to the provider you would like to be the default option.
- Click Make default.
Invoices sent from your firm will use the default payment provider in most cases.
If the original payment provider is still set up and validated in CCH iFirm, it will be used to process that payment. If that payment provider is not currently set up in CCH iFirm, your default provider will be used.
If you change your payment services provider, we recommend letting your customers know, so they are aware you are using a different provider.
Payment Options
The following payment options currently work with CCH iFirm:
- Credit cards (Braintree, Stripe, CPACharge)
- Google Pay (Stripe)
- Apple Pay (Stripe)
- Pre-authorized debits (Stripe)
- Your payment limits are defined by your payment provider.
- Your pre-authorized debit limit will be the same limit for all payment types (depending on the account set up).
Payment Failures
Stripe
If there is an error when the customer is trying to pay an invoice, this will not be reflected in the Accounts Receivable in CCH iFirm. Only successful payments will be reflected.
CPACharge and Braintree
If there is an error when the customer is trying to pay an invoice, this will be reflected in the Accounts Receivable for that client as a “0.00” entry, which will prevent you from unfinalizing the invoice.
- Each billing entity can have their own ePay configuration. To override, go to Settings > Jobs & Billing > Billing Entities > Manage Billing Entity for the selected entity, select the ePay (override) option, select the option Allow ePay on invoices and follow the above described steps to complete the configuration. To disable ePay on invoices for one specific billing entity you can simply leave the Allow ePay on invoices option unselected.
If you have only one Billing Entity set up, you do not need to use the ePay (override) option. It is recommended to leave this option unselected.
Pre-authorized debit payments
Stripe
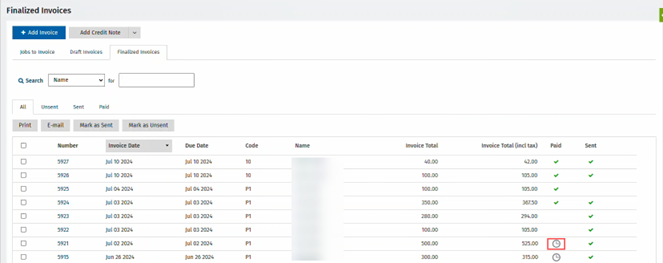
When a customer pays an invoice using pre-authorized debit in Canada, the payment will be Pending in the Accounts Receivable Transaction and Finalized Invoices lists. Once the payment has been cleared by the customer’s financial institution, the status will be updated to Succeeded. If the payment fails, the status will be updated to Failed. The failed payment will be released, and the customer will then be able to submit a new payment with the original invoice link.
Finalized Invoices
Account Receivable Transactions
![]()