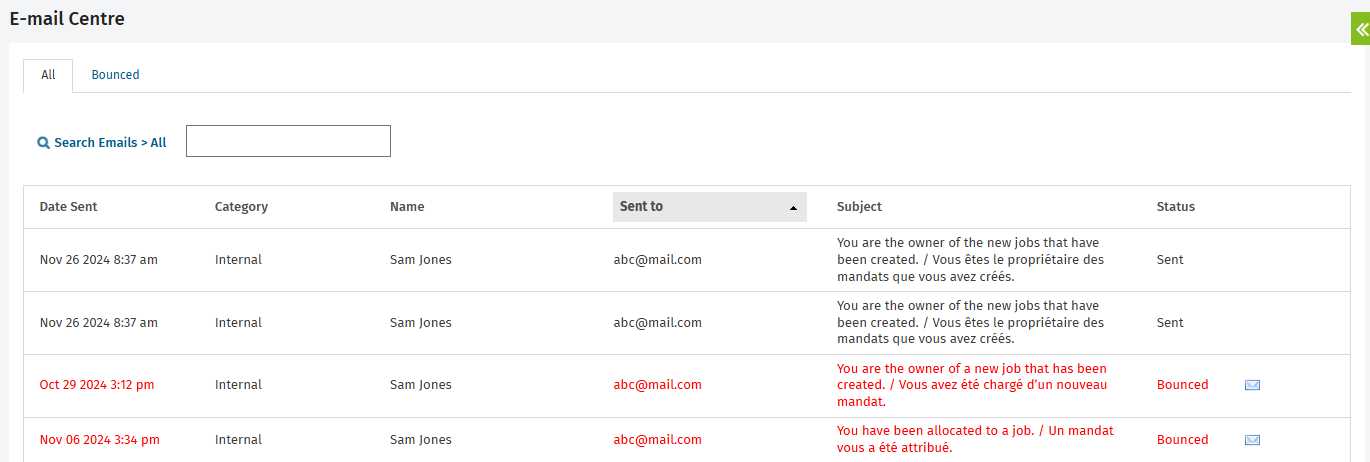
Learn about the E-mail Centre
The E-mail Centre displays client-related e-mails as well as some key internal e-mails.
There are two security roles relating to the E-mail Centre:
- E-mail Centre - View Header Info and Resend - this is a limited role. Users can access the e-mail centre, view the header information of the list of e-mails, and resend undelivered e-mails.
- E-mail Centre - View Email Content and Resend - this role gives users full access to the E-mail Centre where they can view the header information for e-mails, view the content of e-mails and resend e-mails.
To access the E-mail Centre, click Settings > E-mail Centre.
The types of e-mails that are displayed may include: invoices and statements sent to clients from Jobs & Billing, registration requests sent from Portal and internal e-mails sent by CCH iFirm to its users, such as when a new user is added or when a password is reset, client note reminders and Jobs & Billing progress alerts.
All e-mails have a status. When a user clicks the Send button on an e-mail form, a row is added to the E-mail Centre grid. If CCH iFirm determines that the e-mail address is not valid, the status is set to Invalid. While the e-mail is being sent, the status is pending, but as soon as the e-mail service has reported that an e-mail was sent, the status is changed to Sent. If the e-mail is undelivered, the status is changed to Error.
You can do a search in the E-mail Centre by entering the name of a person to find all the e-mails that have been sent to that person. You can expand the search box to filter the grid by category, so you can see the e-mails that are most relevant to you.
The All tab displays the e-mails of all statuses. The Bounced tab only shows e-mails with the Error status, so you can easily see what needs to be resent and then resend the e-mails in bulk.
You can click any column header to sort the e-mails:
- Date Sent - the date and time a user clicked the Send button on the e-mail form. The list is in descending order.
- Category - shows the area of CCH iFirm that the e-mail was sent from. For example, e-mails created in Jobs & Billing > Invoices will be shown here as Invoices.
- Name - the name of the person to whom the e-mail was sent to. You can click the name to open the contact record.
- Sent to - the e-mail address(es) that the e-mail was sent to.
- Subject - the information from the subject field of the e-mail.
- Status - the status of the e-mail.
