About CCH iFirm Taxprep Web API
The Web API module allows you to interact with the CCH iFirm Taxprep module externally from the application using HTTP requests. With this module, you can trigger different actions in CCH iFirm Taxprep such as extracting data, setting data, creating returns and more without the need to be in a browser. This way, you can enhance your firm’s workflow by creating your own home made solutions integrated with CCH iFirm Taxprep or simply integrate your existing tools with CCH iFirm Taxprep.
Authentication
There are 2 types of authentication methods to validate the access to the API: the Web API Keys and the OAuth 2.0 authentication.
By default, all firms use the Web API Keys method which provides access to all the API endpoints when using the read/write key.
Only one of the authentication methods can be used in the application at a time. In order to switch from the default authentication method to OAuth 2.0, an online support request can be submitted at https://support.cch.com/oss/canada/login. The following configuration steps are applicable depending on your site’s authentication method:
Web API Keys Authentication (Default method)
In order to use the Web API, a Web API key is required to authenticate yourself on the site. The key must be included as part of the HTTP request in an x-api-key header.
To manage the Web API keys, click Settings from the left-hand menu, then click Taxprep, then the Taxprep API Administration option.
Note: The Tax – Settings - Taxprep API Administration - Access security role is required to display the option in the Taxprep settings.
Manage Web API keys
Web API keys must be generated on first access. To do so, click the Click here to create keys link.

After clicking the link, two types of keys will be available for use by your firm:
- A read-write type key, which allows you to get data and metadata, in addition to setting data or metadata in the different tax elements;
- A read-only type key that allows you to get data and metadata from the different elements on your site.

You can manage the keys using the different interface buttons:
- Copy the Web API key to the clipboard;
- Regenerate the Web API key;
- Revoke the Web API key.
A link that points to the API specifications is available in this page so that you can review our different endpoints. For more details, consult the API Specifications and discovery tool section.
OAuth 2.0 Authentication (On demand activation method)
OAuth adds several security layers by validating against all the different levels of CCH iFirm security: API access, Security Roles, Contact Security and Document Visibility. This authentication method checks the security requirements of each endpoint against the given access of a user.
-
When accessing the endpoints using OAuth, the system will read the access and refresh tokens which are generated automatically every 20 minutes and 24 hours respectively. The access token provides access to the Web API; it can be used several times. The refresh token is valid for one time only; it is used to obtain new access and refresh tokens. If the tokens are expired, or the user has an invalid username, password or session, an error 401: Unauthorized is displayed.
-
In order to trigger any endpoint, the system validates whether the user has access to the API Administration security role which is inherited from the global iFirm Web API. In case the user fails to obtain access, an error 401: Unauthorized is displayed.
-
When attempting to trigger a certain endpoint, OAuth 2.0 validates all the below levels where applicable:
-
Security roles
-
Contact security
-
Document visibility
-
NB: The list of security layers above will differ from one endpoint to another; for more details, please refer to each endpoint’s specifications.
Once OAuth has been activated after submitting a support ticket, the client must configure the Application Integration under the Firm Settings. The Scope must be set as Taxprep and the Grant Type is Authorization Code. For more details on the Application Integration configuration, please refer to the page How do I implement Oauth2 token authentication for CCH iFirm API?
Web API identity
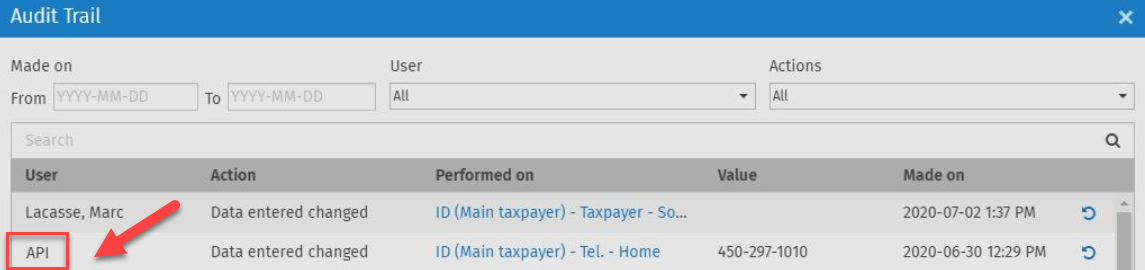
Some of the actions performed using the Web API create an entry in the document’s audit trail. For example, whenever the value of a cell is modified using the Web API, the audit trail displays this modification and the user associated with the action performed is displayed as API in case the user is adopting the API Keys authentication method:
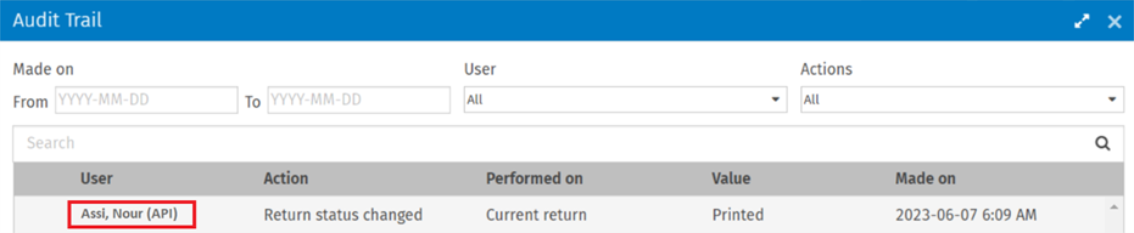
In case the user is adopting the OAuth 2.0 authentication method, any action made via the API is captured in the Audit Trail with the user’s information:
CCH iFirm Taxprep Web API endpoints
- Breaking changes;
- Audit Trail Endpoint;
- EFILE Information Endpoints;
- Return Statuses Endpoints;
- Preparer Profiles Endpoints;
- Print Endpoints;
- Roll Forward Endpoints;
- Tasks Endpoint;
- Cells Endpoints;
- Environments Endpoints;
- Groups Endpoints;
- Labels Endpoints;
- Lock and Unlock Endpoints;
- T1 - Documents Endpoints;
- T2 - Documents Endpoints;
- T3 - Documents Endpoints;
- TF - Documents Endpoints.
Errors and messages (response body)
The Web API endpoints can return different errors in the response body depending on the context of the request. For more information about our different error messages, consult the List of errors and messages.
HTTP errors and messages
With the Web API, you might receive an HTTP error, for example, a 404 Not found error. In many scenarios, different messages were included to help you troubleshoot your requests. For more information, consult the list of HTTP error messages.
Rate Limiting
Different types of Web API requests of CCH iFirm Taxprep module are subject to different rate limits. The endpoints are separated in two categories which are Group A and Group B. You can consult the list of available endpoints to validate in which category they belong in this section : https://support.cchifirm.ca/en/content/cch_ifirm/web_api/api_about_cch_ifirm_tax_web_api.htm?Highlight=tax%20api#Endpoints
The maximum number of requests is dependent on the subscription package. The Group A of requests vary from a maximum of 30 requests per minute and 3000 requests per day to a maximum of 100 requests per minute and 144 000 requests per day. The Group B of requests vary from a maximum of 6 requests per minute and 125 requests per day to a maximum of 20 requests per minute and 6000 requests per day. Other plans are also available. Contact your solution consultant for more information.
Each time an endpoint is triggered successfully or unsuccessfully, its limit is decreased. The day and minute limits are displayed in the Response Headers of the triggered endpoint; the properties x-requests-left-day and x-requests-left-minute display the number of remaining requests allowed per timeframe. The property x-request-type displays the type of request: group-a or group-b.
|
Response Headers |
{ "access-control-allow-origin": "https://mysite.cchifirm.ca", "cache-control": "no-cache", "connection": "keep-alive", "content-encoding": "gzip", "content-length": "500", "content-type": "application/json; charset=utf-8", "date": "Mon, 06 May 2024 20:24:34 GMT", "expires": "-1", "pragma": "no-cache", "strict-transport-security": "max-age=31536000", "vary": "Origin,Accept-Encoding", "x-cdn": "Imperva", "x-content-type-options": "nosniff", "x-frame-options": "SAMEORIGIN", "x-iinfo": "59-62987292-62993697 NNNY CT(15 21 0) RT(1715027013679 60388) q(0 0 0 -1) r(2 2) U2", "x-request-type": "group-a", "x-requests-left-day": "9995", "x-requests-left-minute": "24", "x-s": "02", "x-serverx": "CA-LT-W2", "x-ua-compatible": "IE=Edge,chrome=1", "x-xss-protection": "1; mode=block" } |
A 429 HTTP status code (i.e. Too many requests), is returned when the maximum number of requests per minute or day is reached. In addition, once the limit per timeframe is reached, all endpoints within the same category (group-a or group-b) are blocked until the retry-after header timeframe passes.
|
Response Body |
{ "errors": [ { "type": "Minute", "maxNumberOfRequestsAllowedInTimeFrame": 25, "errorMessage": "Request limit has been reached. Try again later." } ] } |
|
Response Code |
429 |
|
Response Headers |
{ "access-control-allow-origin": " https://mysite.cchifirm.ca ", "cache-control": "no-cache", "connection": "keep-alive", "content-encoding": "gzip", "content-type": "application/json; charset=utf-8", "date": "Mon, 06 May 2024 19:52:20 GMT", "expires": "-1", "pragma": "no-cache", "retry-after": "Mon, 06 May 2024 19:53:09 GMT", "strict-transport-security": "max-age=31536000", "transfer-encoding": "chunked", "vary": "Origin", "x-cdn": "Imperva", "x-content-type-options": "nosniff", "x-frame-options": "SAMEORIGIN", "x-iinfo": "60-65034142-65043412 SNYN RT(1715025056484 83688) q(0 0 0 -1) r(1 1) U2", "x-s": "02", "x-ua-compatible": "IE=Edge,chrome=1", "x-xss-protection": "1; mode=block" } |
Please note that the rate-limit algorithm that tracks the number of requests for the CCH iFirm Taxprep Web API includes a margin of error that may lead to imperfect count before you get an error for exceeding a threshold.
Web API Endpoints classification
In the API classification table below, you will be able to identify the Group A or Group B endpoints offered:
|
Group |
Type |
URL |
Category |
|
Audit Trail |
GET |
/api/partner/1.0/{product}/documents/{documentId}/auditTrail/{dateFilter} |
Group A |
|
Custom filters |
GET |
/api/partner/1.0/{product}/customReturnManagerFilters/{Year} |
Group A |
|
EFILE |
GET |
/api/partner/1.0/{product}/documents/{documentId}/efileinfo |
Group A |
|
EFILE |
GET |
/api/partner/1.0/efileIdentificationProfiles |
Group A |
|
Return statuses |
PUT |
/api/partner/1.0/{product}/documents/{documentId}/returnStatus |
Group A |
|
Return statuses |
GET |
/api/partner/1.0/{product}/returnStatuses |
Group A |
|
Return statuses |
PUT |
/api/partner/1.0/{product}/documents/returnStatuses |
Group A |
|
Preparer profiles |
GET |
/api/partner/1.0/{product}/preparerProfiles |
Group A |
|
Preparer profiles |
PUT |
/api/partner/1.0/{product}/documents/preparerProfile |
Group A |
|
|
GET |
/api/partner/1.0/{product}/printFormats |
Group A |
|
|
GET |
/api/partner/1.0/{product}/documents/{documentId}/applicableForms |
Group A |
|
|
POST |
/api/partner/1.0/{product}/print |
Group B |
|
|
POST |
/api/partner/1.0/{product}/documents/{documentId}/printslips |
Group B |
|
|
GET |
/api/partner/1.0/print/{resultId} |
Group A |
|
Publish |
POST |
/api/partner/1.0/{product}/publish |
Group B |
|
Publish |
POST |
/api/partner/1.0/{product}/documents/{documentId}/publishslips |
Group B |
|
Publish |
POST |
/api/partner/1.0/publish/{resultId} |
Group A |
|
Return assignees |
PUT |
/api/partner/1.0/{product}/documents/assignees |
Group A |
|
Roll forward |
POST |
/api/partner/1.0/{product}/rollforward |
Group B |
|
Roll forward |
GET |
/api/partner/1.0/rollforward/{resultId} |
Group A |
|
Tasks |
GET |
/api/partner/1.0/tasks/{taskId} |
Group A |
|
Cells |
POST |
/api/partner/1.0/{product}/documents/{documentId}/cells/getdata |
Group A |
|
Cells |
POST |
/api/partner/1.0/{product}/documents/{documentId}/cells/getdata/reviewfilter |
Group A |
|
Cells |
GET |
/api/partner/1.0/{product}/reviewcustomfilters/{year} |
Group A |
|
Cells |
POST |
/api/partner/1.0/{product}/documents/{documentId}/cells/setdata |
Group A |
|
Details |
Put |
/api/partner/1.0/{product}/documents/details |
Group A |
|
Environments |
GET |
/api/partner/1.0/environments |
Group A |
|
File |
GET |
/api/partner/1.0/files/{fileId} |
Group A |
|
Groups |
GET |
/api/partner/1.0/groups |
Group A |
|
Labels |
GET |
/api/partner/1.0/{product}/labels |
Group A |
|
Labels |
PUT |
/api/partner/1.0/{product}/documents/labels |
Group A |
|
Lock |
POST |
/api/partner/1.0/{product}/documents/{documentId}/lock |
Group B |
|
Lock |
GET |
/api/partner/1.0/lock/{resultId} |
Group A |
|
Unlock |
POST |
/api/partner/1.0/{product}/documents/{documentId}/unlock |
Group A |
|
T1 - Documents |
POST |
/api/partner/1.0/t1/documents |
Group A |
|
T1 - Documents |
POST |
/api/partner/1.0/t1/documents/getList |
Group A |
|
T1 - Documents |
GET |
/api/partner/1.0/t1/documents/recycleBin |
Group A |
|
T1 - Documents |
GET |
/api/partner/1.0/t1/documents/{documentId} |
Group A |
|
T1 - Documents |
POST |
/api/partner/1.0/t1/documents/{documentId}/copy |
Group A |
|
T1 - Documents |
POST |
/api/partner/1.0/t1/documents/delete |
Group A |
|
T1 - Documents |
POST |
/api/partner/1.0/t1/documents/{documentId}/couple |
Group B |
|
T1 - Documents |
POST |
/api/partner/1.0/t1/documents/{documentId}/uncouple |
Group B |
|
T2 - Documents |
POST |
/api/partner/1.0/t2/documents |
Group A |
|
T2 - Documents |
POST |
/api/partner/1.0/t2/documents/getList |
Group A |
|
T2 - Documents |
GET |
/api/partner/1.0/t2/documents/recycleBin |
Group A |
|
T2 - Documents |
GET |
/api/partner/1.0/t2/documents/{documentId} |
Group A |
|
T2 - Documents |
POST |
/api/partner/1.0/t2/documents/{documentId}/copy |
Group A |
|
T2 - Documents |
POST |
/api/partner/1.0/t2/documents/delete |
Group A |
|
T3 - Documents |
POST |
/api/partner/1.0/t3/documents |
Group A |
|
T3 - Documents |
POST |
/api/partner/1.0/t3/documents/getList |
Group A |
|
T3 - Documents |
GET |
/api/partner/1.0/t3/documents/recyclebin |
Group A |
|
T3 - Documents |
GET |
/api/partner/1.0/t3/documents/{documentId} |
Group A |
|
T3 - Documents |
POST |
/api/partner/1.0/t3/documents/{documentId}/copy |
Group A |
|
T3 - Documents |
POST |
/api/partner/1.0/t3/documents/delete |
Group A |
|
TF - Documents |
POST |
/api/partner/1.0/tf/documents |
Group A |
|
TF - Documents |
POST |
/api/partner/1.0/tf/documents/getList |
Group A |
|
TF - Documents |
GET |
/api/partner/1.0/tf/documents/recycleBin |
Group A |
|
TF - Documents |
GET |
/api/partner/1.0/tf/documents/{documentId} |
Group A |
|
TF - Documents |
POST |
/api/partner/1.0/tf/documents/{documentId}/copy |
Group A |
|
TF - Documents |
POST |
/api/partner/1.0/tf/documents/delete |
Group A |
HTTP errors and messages
With the Web API, you might receive an HTTP error, for example, a 404 Not found error. In many scenarios, different messages were included to help you troubleshoot your requests. For more information, consult the list of HTTP error messages.
API specifications and discovery tool
In the API specifications, you will be able to discover the different endpoints offered with the Web API and to experiment with different requests to observe their behaviour.
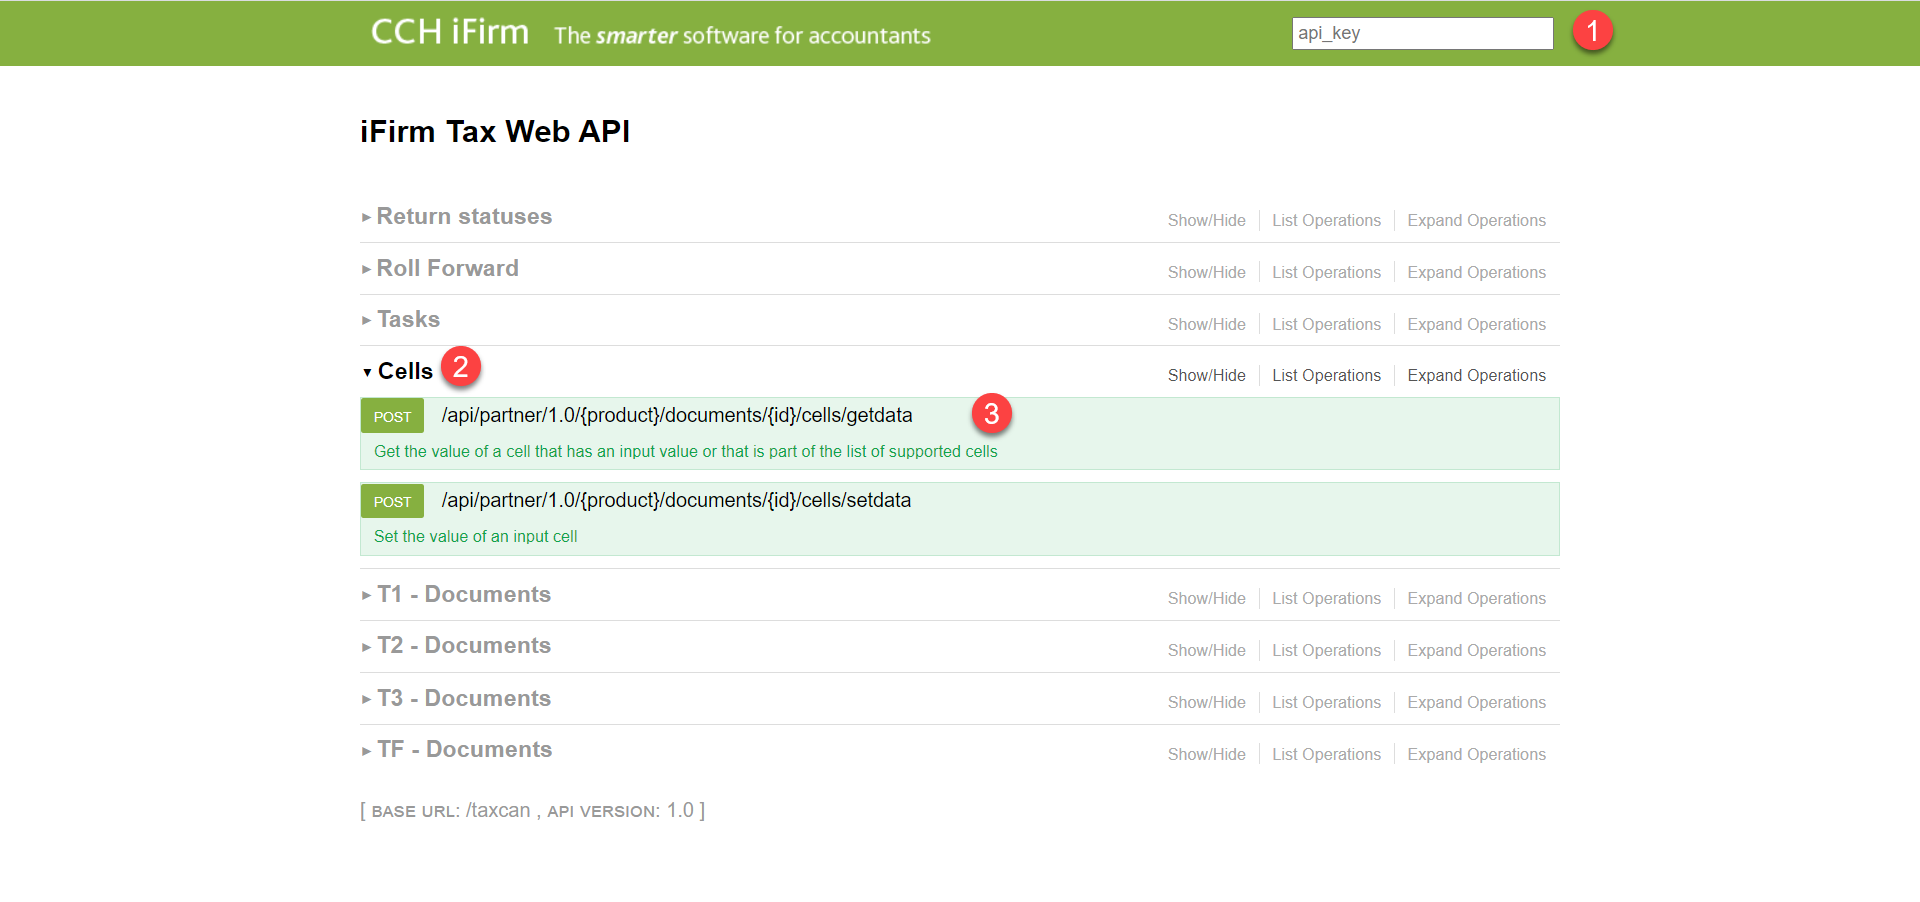
Here is a quick guide using the GetData endpoint to explain how you can experiment with the different endpoints using the API specifications:
-
If you are accessing the API with the Keys authentication method, enter one of the Web API keys that were created for your site in the “api_key” field. Please note that for an action such as setting a value in a cell, you will be required to use a read-write key. In case you are using OAuth 2.0 as an authentication method for the Web API, then the validation process is automatically done through the session’s cookies.
- Expand the section corresponding to the action you would like to perform with the Web API.
- Expand the endpoint in which you are interested to try out.
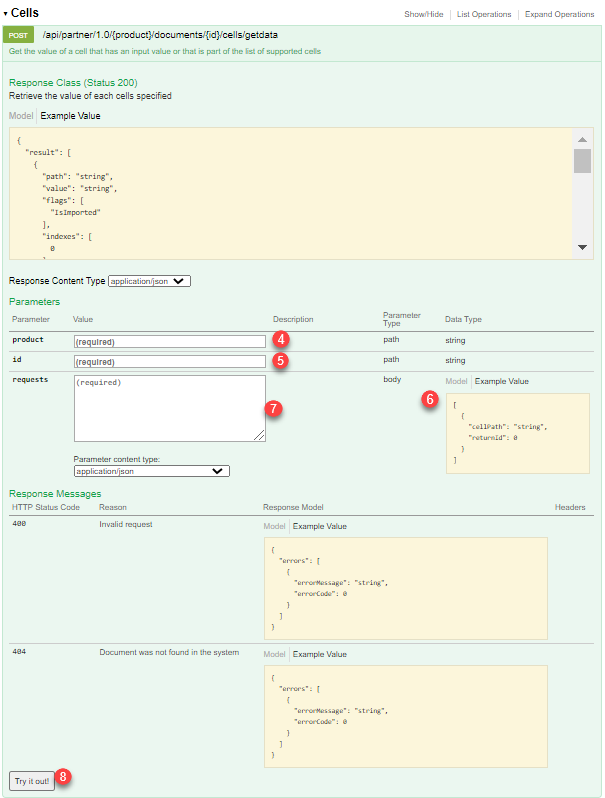
- Complete the product field (e.g., T1, T2, T3 or TF).
- Complete the id field, which represents the GUID of the document you would like to modify.
- Click the example value of the body (optional), to paste the example into the requests field—this will allow you to start with an already valid structure.
- Complete the requests field and make sure that, if you used the body example at point 6, the placeholders such as ‘string’ in the above example are replaced.
- To launch the request, click the Try it out! button.
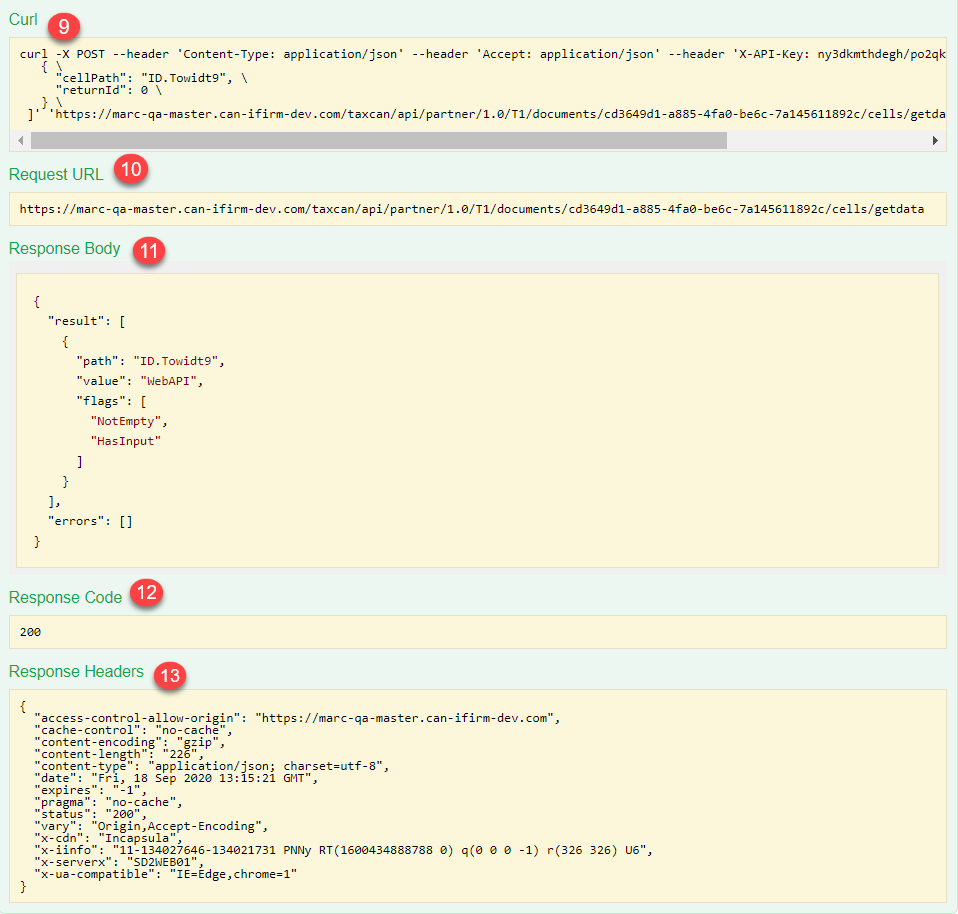
Once the request has been completed, the following information is provided:
- A curl example of your request.
- The URL of your request, including the parameters that were set at points 4 and 5.
- The response body.
- The response code.
- The different response headers.
Web API Sample
Authentication
Only one of the authentication methods can be used at a time on your site: the Web API Keys (default method) or the OAuth 2.0 authentication method (activated on demand). In order to switch from the default authentication method to OAuth 2.0, an online support request can be submitted at https://support.cch.com/oss/canada/login.
The Web API Sample supports both authentication methods and can be used to interact with iFirm Taxprep endpoints. In order to switch between the different authentication methods of the Sample Code, the user must modify the configuration in the app.config file inside the PartnerApi.Demo.sln which is included in the downloadable demo sample provided below.
Please note that the selected method in the Sample should be correlated with the authentication method selected in the Web API mentioned above; in other words, when OAuth 2.0 is activated in the Web API, the user should use OAuth 2.0 in the Sample and vice versa. In case the selected method in the Web API is different than that configured in the Sample file, an error Unauthorized is triggered. For more information on the authentication methods available for the Web API, please refer to the Authentication section above.
To use the Web API Keys default site configuration, the firm should set the value of ActiveConfiguration to 1 as per the below screenshot. The value of BaseUrl, ApiKey and ClientCode must also be filled.

Alternatively, if the OAuth 2.0 authentication has been configured for your site following a support request, the firm should set the value of ActiveConfiguration to 2 as per the below screenshot. The value of BaseUrl, ClientId, ClientSecret, AccessToken and RefreshToken must also be filled.
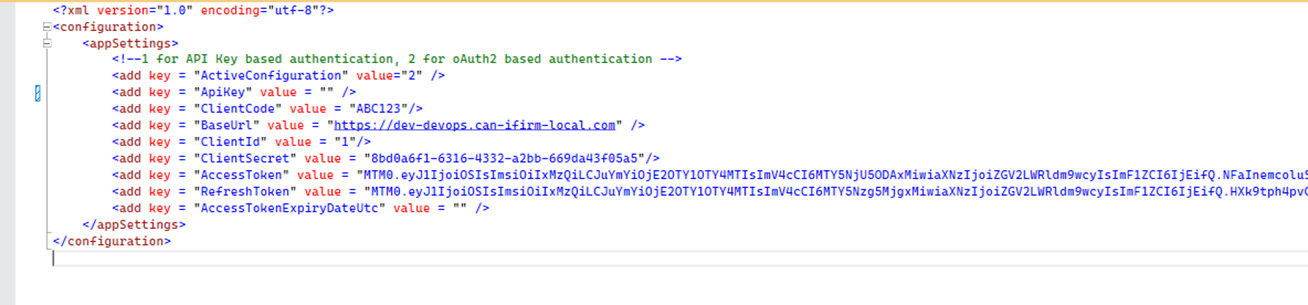
In case the OAuth 2.0 is active, and the Web API key's special fields are filled, the system will automatically discard these values. Similarly, if the Web API Keys authentication method is active and the fields corresponding to OAuth are configured, the system will automatically discard their values.
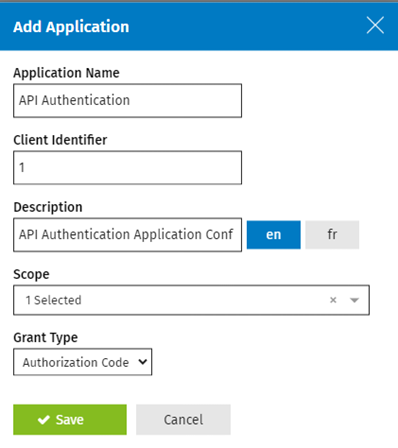
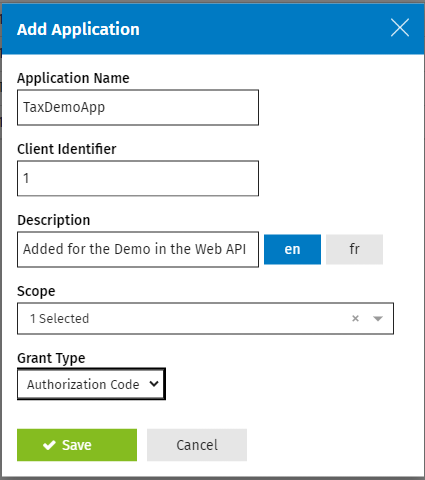
Another important step is required on the User Interface’s level in order to activate OAuth 2.0. The user should configure a new Application Integration entry under the Firm Settings. The value of the Application Name and Description fields is optional. The Client Identifier should match the ClientId provided in the configuration above. In addition, the Scope should be set as Taxprep while the Grant Type should be set as Authorization Code. Once saved, the configuration will automatically generate a GUID for this record which will be set as the value of ClientSecret in the configuration file above.
Demo Sample
To download the C# language demo sample click here.
This demo sample covers many scenarios and endpoints, it is provided to demonstrate how to use the CCH iFirm Taxprep Web API. To get started, please read the README file provided with the solution.