About CCH iFirm Taxprep Webhook
Cette page est en cours de traduction. Elle sera mise à jour dès que son contenu sera disponible en français.
The Webhook module allows you to receive information from the CCH iFirm Taxprep module externally from the application. With this module, CCH iFirm Taxprep will send information to a specific URL that you provide every time a configured event is triggered. Those events won’t impact your Web API limit. This way, you can enhance your firm’s workflow by creating homemade solutions integrated with CCH iFirm Taxprep or simply by integrating your existing tools with CCH iFirm Taxprep.
Note: The Tax – Settings – Taxprep API Administration – Access security role is required to display the Webhook tab that can be found in the Taxprep API Administration page of the settings.
Creating a CCH iFirm Taxprep Webhook subscription
Follow these instructions to create a CCH iFirm Taxprep Webhook subscription:
-
In CCH iFirm, click Setting, then Taxprep.
-
In the Firm Configuration section, click Taxprep API Administration.

-
Click the Webhook tab.

-
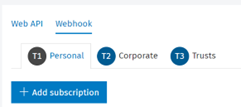
Select the product for which you want to add a subscription, then click the Add subscription button.

-
Leave the Create from field blank or select an existing subscription in the drop-down menu, then click the Add button.
Note: If you are using an existing subscription, the Details page will be filled with information from the existing subscription. You will only need to add a name for the subscription.
-
The Details page is displayed. Fill the required fields (Name, URL and Events) to continue.
-
Click the Save button.
Here is a description of the different fields that can be customized:

|
1 |
Name |
Name given to the subscription. This field is required to configure the subscription. |
|
2 |
Description |
Enter a description of what this subscription is used for. This field can be left blank. |
|
3 |
URL |
Enter the URL of the server that will receive the content of the different events. This field is required to configure the subscription. |
|
4 |
Events |
Select the events for which information will be sent. At least one event is required to configure the subscription. |
|
5 |
Default header |
Information that can be sent in the request header by default (e.g., a key used to validate the origin of the request). This field can be left blank. |
Configuration
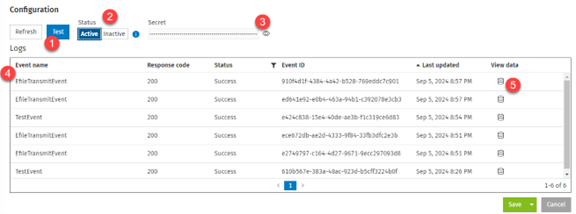
Once a subscription has been correctly added, the Configuration section will be displayed for this subscription.

|
1 |
Test |
This button is used to test the URL linked to the subscription. When clicking the Test button, a test event will be triggered and sent to your server. |
|
2 |
Status |
These buttons are used to activate or deactivate a subscription. When the Active button is selected, information will be sent to the configured URL when a selected event is triggered in CCH iFirm Taxprep. Note: The URL needs to be tested before the subscription can be activated. This button is disabled until the test event has been successfully received by your server. Important: When too many events have failed consecutively, the subscription status will automatically be set to Inactive. You will need to redo the activation process for this subscription. |
|
3 |
Secret |
The secret key is generated when a subscription is added. It is unique and used to authenticate the events sent to the URL. This key is fixed and cannot be modified. |
|
4 |
Logs |
The logs keep track of the events sent to a subscription. |
|
5 |
View data |
This column allows you to see the data sent for a specific event. |
How to activate a subscription
-
Click the Test button.

-
Verify that you received the test event in your application. Make sure that:
-
The value of the Event property is TestEvent.
-
The value of the Message property is TestNotification.
-
-
Click the Refresh button. A TestEvent will be displayed in the Logs.

-
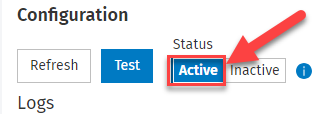
If the test was properly executed, the Status option will be available. Select the Active button.

-
Click the Save button.

Global properties
Here are the global properties received when an event is triggered:
|
Property |
Type |
Description |
|
createdAt |
String |
Provides the time at which the event was created after the action had been performed. Note: This time can differ from when the notification is received since there can be a delay between the creation of the event and the moment the notification is sent. |
|
data |
JSON object |
Contains the specific information related to the event. |
|
eventName |
String |
Name of the event (e.g., EfileTransmitEvent) |
|
product |
String |
Provides the name of the product for which this event happened. |
|
productYear |
String |
For CCH iFirm Taxprep T1: Provides the taxation year during which the event has been triggered. For CCH iFirm Taxprep T2, T3 and Forms: Provides the taxation year end during which the event has been triggered. |
Logs response code
The response codes used for the logs are the standard HTTP response codes. In addition to the standard codes, the following custom codes have been added to handle some specific cases.
|
Code |
Description |
|
600 |
Generic code used in the case of an unexpected error. |
|
601 |
Code used when our system didn’t receive any response code from your system. |