Import disbursement charges
Disbursements - View, Add and Edit Disbursements
You can import disbursement charges data into Jobs & Billing, so you do not have to enter them manually one by one or guess what to charge your clients. You can import the disbursement data using a .csv file that you created yourself or with the template provided in CCH iFirm or one that was exported from other software products. The import process creates the disbursement for the relevant clients and, where possible, assigns it to a job so they can be easily invoiced.
Contents
Download the .csv file template
We recommend that you prepare your disbursement data prior to importing it into CCH iFirm. This will minimize the time taken to correct any errors later. Depending on where you source your data, the preparation process will be different. You can prepare a .csv file of your disbursement data records using the template provided in CCH iFirm
- Click Jobs & Billing > Disbursements.
- On the Disbursements page, click Import Disbursements.
- Click the Click here for a template CSV file. link to download the .csv file template to your computer.
- Save the .csv file to your computer - it will open with Microsoft® Excel®.
Prepare the disbursements .csv file
Next, you need to populate the .csv file template with your data.
You can use this table as a guide to prepare the .csv file of your disbursement records.
|
Column Description |
Data Format |
Information |
|---|---|---|
|
Date |
Use the Mmm dd yyyy date format |
This is used as the date for the created disbursement. |
|
DisbursementCode |
Example: PHO |
You must enter an active disbursement code (available under Settings> Jobs & Billing > Disbursement Codes). |
|
Amount |
Example: 25.50 |
This will be used as the amount for the created disbursement. |
|
Description |
|
You can leave this field blank. If you enter a description, it will override the description defined for the disbursement code (available under Settings> Jobs & Billing > Disbursement Codes) and will show against the created disbursement. |
|
ClientCode |
Example: CLT001 |
The client code must match the code of a contact in the system. You can have many rows for one client code in the file. |
|
JobType |
Example: GEN |
You need to enter an already existing job type for the contact. Which means that if you write GEN, the contact needs to already have a GEN job created for the import to go through and not generate an error. If you leave this column blank, the disbursements will be unallocated in Jobs & Billing but will be assigned to the contact. |
Import the disbursement .csv file
To import the .csv file containing the disbursements:
- Click Jobs & Billing > Disbursements.
- On the Disbursements page, click Import Disbursements.
- Click Choose File or Browseto locate and select the .csv file containing the disbursements.
- Select which job to assign the disbursement to (if you have two or more jobs matching the job type): Newest Job or Oldest Job (default).
- Click Next to import your .csv file into CCH iFirm.
Review data, fix errors, or discard data
When your .csv file is imported, your data will be displayed on the screen. You can review and edit your data (fix errors) before the disbursements are created, or you can discard the data. You can batch edit your data by row or by column, see below.
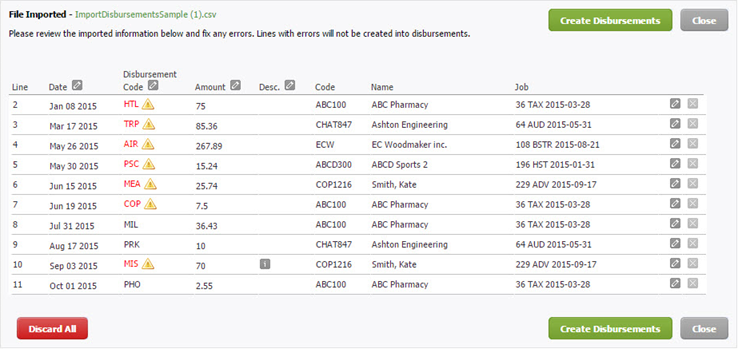
- The column titles correspond to the field headings in the .csv file.
- The Line column corresponds to the line in the .csv file (spreadsheet). There is no line 1 for data because this is where the field headings were.
- The exclamation mark
 icon illustrates missing data or data with an error. Hover over this icon for more information.
 - If you see the text Don't allocate to a job in the Job column, it means you imported data without a job type.
- You can click the filename .csv link beside File Imported at the top left of the screen to open your .csv file in Microsoft® Excel®. This is for reference purposes only. If you make any changes to this file you will have to save it and re-import it.
- You can click Close at any time to exit out of Import Disbursements page and go back to Disbursements page. The data will be saved. Click Import Disbursements again to continue editing data.
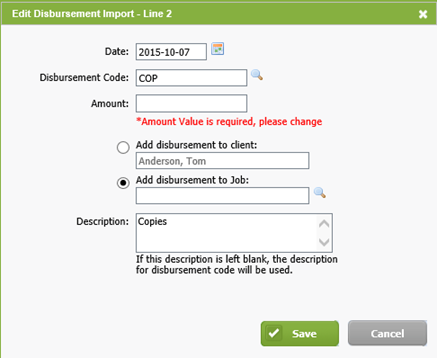
Batch edit by row
To edit imported data by row, proceed as follows:
- Click the edit details
 icon at the end of the row of data you want to edit.
The Edit Disbursement Import dialog box is displayed. - Click
 to edit the date.
 - Click
 to look up the correct information for the disbursement code.
 - Edit the amount, if required.
- Select Add disbursement to client (disbursement will be unallocated) or Add disbursement to Job (click to allocate the disbursement to a job).
- Edit the description, if required.
- Click Save.
Batch edit by column
To batch edit imported data by column, proceed as follows:
- Click the edit details icon beside the column title Date, Disbursement Code, Amount or Desc. (description).
The Change Column Options dialog box is displayed. - Click to edit the date, click to look up the correct information for the disbursement code, or type in the correct information for amount and description.
- In the Apply change toarea, select All rows in the column or Only the rows with an error.
- Click Save.
Discard the data
You can discard the data you imported if you want to import a different .csv file. Click Discard All to return to the Import Disbursements page. Alternatively, you can discard an individual disbursement by clicking the delete  icon at the end of the row.
Create the disbursements
Once you are satisfied with the data and corrected all of the errors, click Create Disbursements. You will see your disbursements in the Allocated Disbursements panel in the client's Job Details.
Even if you have not fixed all of the errors, you can still click Create Disbursements. The disbursements without errors will be created. The disbursements that still have errors will remain on the Import Disbursements page until you fix the errors and click Create Disbursements again.