Configuration Guide for CCH iFirm Tracking
This document describes the steps to follow to successfully deploy CCH iFirm Tracking.
The configuration of CCH iFirm Tracking, which integrates with Personal Taxprep in order for this program to exchange data with CCH iFirm Tracking, must be performed by a CCH iFirm Tracking administrator. No additional step is required on the workstations of staff members using only CCH iFirm Tracking.
We recommend that you first perform a small-scale deployment of CCH iFirm Tracking. Form a core group of users to perform the initial configuration of CCH iFirm Tracking, and once the program is configured in accordance with the income return preparation process of your firm, continue the deployment with all users.
Minimum requirements
- The minimum requirements for CCH iFirm Tracking are the same as those for CCH iFirm.
Before you start
It is important to define the different settings such as return processing steps of CCH iFirm Tracking. This will ensure that you do not have to create the dashboard cards linked to client files again in order for the changes to the settings to be applied.
Configuration of CCH iFirm Tracking on the workstation of the user with an administrator account
Required users' rights: Access the dashboard and settings management
- Define CCH iFirm Tracking settings
As theCCH iFirm Tracking administrator, you must first configure the different CCH iFirm Tracking settings. To do so, access your CCH iFirm site, click the Settings menu, followed by CCH iFirm Tracking.
Check the default settings suggested by CCH iFirm Tracking (General Settings section), and, if required, modify them so they comply with your firm's requirements. For example, if you want each card in the dashboard to represent a return rather than a client file, select Taxpayer for the Displaying Cards option.
Afterward, verify, in the following order, the offices (Office Management section), the roles involved in the processing cycle (Role Management section ), the different return categories (Return Categories section) and, lastly, the tax returns processing cycle (Mapping of Status section) of your firm.
Important: If you have to modify the CCH iFirm Tracking configuration after having created user accounts or linked client files in the program, you might have to perform these operations again in order for the modifications to the configuration of CCH iFirm Tracking to be taken into account. - Create user accounts
Once the CCH iFirm Tracking settings are defined, you can create user accounts. In the Settings/CCH iFirm Tracking menu, click User Management. For each user account, enter the personal information, then set the user rights and roles. For a Personal Taxprep user, indicate if the Client File Info dialog box that allows the synchronization of data between CCH iFirm Tracking and Personal Taxprep must display when opening and/or closing a client file. To obtain the most recent information in the dashboard, we suggest that you authorize the display of this box, at least when opening or closing an account, and encourage users to update the return status as soon as the return can move to the next step of the processing cycle.
Once the user account is created, an e-mail will be sent to the user so they can set the password for their user account. - Rolling forward Taxprep client files
CCH iFirm Tracking imports assignations for partners, reviewers and preparers defined in client files. If you want to keep the assignations that were defined in last year's returns, it is important, before rolling forward the client files, to convert your preparer profile and make sure that the check boxes Keep the reviewer's name and Keep the preparer's name are selected in the Data Options in the options and settings of Personal Taxprep.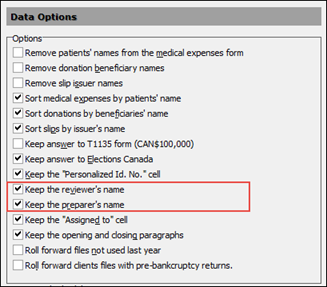
- Link Taxprep client files
Before performing this operation, make sure that the CCH iFirm Tracking settings are correctly defined.
Important: You must assign roles (preparer, reviewer or any other role) to staff members prior to executing the Link Client Files command. If roles are not assigned, the users’ names will not appear in the users’ drop-down list. For more information on how to assign roles, consult the following article: Configure roles to make it easier to allocate cards to a person or a group of persons based on the status or complexity of the return.
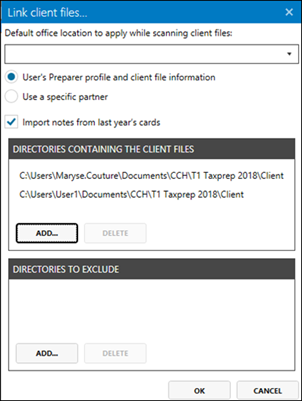
For each group (formerly known as Office) that has to be associated with client files when linking (creation of cards in CCH iFirm Tracking), select one or more folders containing these client files.
If you do not intend to link any groups to client files, make sure that you do not select any in the Link Client Files dialog box. Therefore, no office will be defined for the cards.- If the client files are stored in a network location that is common to all users, this operation will need to be performed only once. All CCH iFirm Tracking users will have access to all the returns from the cards.
- If the client files are stored in different locations (for example, a local folder on the workstation of each user), this operation will have to be performed on each workstations in order for a card to be created for each client file of your firm. In this situation, a CCH iFirm Tracking user will only have access to returns stored in his or her local folder.
During this operation, you can also import the notes from last year's cards. The Import notes from last year's cards option of the Link client files dialog box is selected by default. Importing notes can be beneficial if you took notes relating to your clients’ tax situation or particularities. If the notes in last year's cards were imported and you want to clear the notes in the cards, select the option Clear notes imported from last year. Note that this option will only clear the notes that have not been modified since their import. If you do not want to perform one of these operations, select the option Do not import or clear notes.
In addition, CCH iFirm Tracking will try to link the users based on their assigned roles in the Settings/Users section of your CCH iFirm site. If the correspondences cannot be established automatically by CCH iFirm Tracking, the Link Users dialog box will allow you to immediately correct the situation. Click Save to save the new correspondences and create the cards, or, if you want to correct correspondence problems later, click Cancel to go directly to the creation of cards.
We recommend that you manually establish the correspondences when linking client files. If you decide to not manually establish the correspondences at this step, use the Link Users command available in the CCH iFirm Tracking menu of Personal Taxprep.
Configuration of CCH iFirm Tracking on users' workstations
Once the installation and deployment of CCH iFirm Tracking are performed on the administrator’s workstation, he or she must repeat the following operations on the workstation of each user of Personal Taxprep and CCH iFirm Tracking:
- Link client files to CCH iFirm Tracking, if required.
- Link users, if required.
Questions and Answers
Yes, you can delete the cards in CCH iFirm Tracking. To delete a card, display it and click the Delete button. Click Yes to confirm the deletion.
When linking client files to CCH iFirm Tracking, you may exclude directories. The directories indicated in the Directories to exclude section of the Link client files dialog box will not be considered by CCH iFirm Tracking for card creation purposes.
We recommend the use of Google Chrome.
In the Return categories section of the CCH iFirm Tracking's settings, the tags are each linked with a category. By default,CCH iFirm Tracking classifies each return in a category based on the return tags; the category selected for a given return is the first category in the left portion of the settings to which is associated at least one return tags. However, note that you can modify the category selected by default for a card with the Category list.
Make sure that the folder where the client file is stored can be accessed by you as a user and can be accessed via CCH iFirm Tracking (local folder on the user's workstation or a network location).