Add and edit transactions
Receivables - View, Add and Edit Transactions
You can add and edit payments, credits, write-offs, discounts, debits, interest transactions, and invoice transactions.
Contents
Learn about receivable transactions
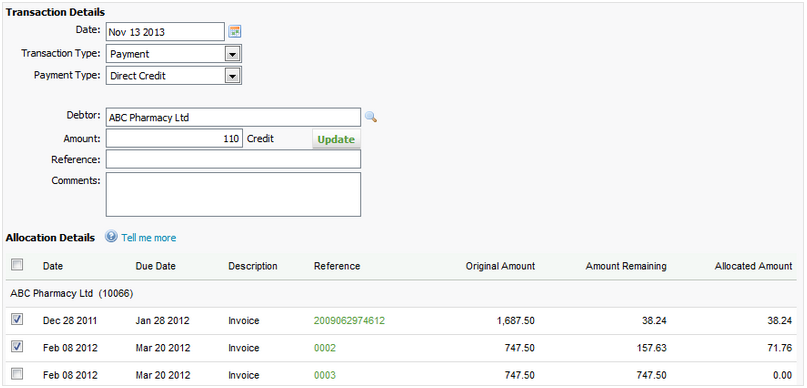
When you add a transaction against a receivable and click Update, Jobs & Billing automatically allocates the transaction against their outstanding transactions. For example, if you add a payment transaction of $1,217.00 against ABC Pharmacy and they have an outstanding invoice of $1,217.00, Jobs & Billing allocates the payment to the outstanding invoice.
Jobs & Billing automatically allocates transactions in this order:
- It checks for an exact match from the outstanding transactions.
- If there are more than one exact match, the oldest matching transaction is selected.
- If there are no matches, it allocates the transaction to the oldest outstanding transaction.
- If there is still an amount remaining after the first allocation, the balance is allocated to the next oldest transaction and so on until the transaction is fully allocated.
- You can override the automatic allocation of transactions by selecting a different transaction. You can also choose not to allocate a transaction.
- The order in which the items are selected determines the order in which the transaction will be allocated.
If the selected debtor is a member of a contact/billing group, Jobs & Billing will also check any outstanding transactions within that group.
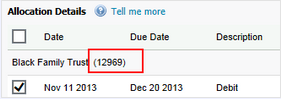
Note: When you add transactions, the allocation screen shows the client code. This makes it easier for you to identify relevant clients in a group situation.
Process a payment
- Click Jobs & Billing > Accounts Receivable.
- On the Accounts Receivable page, select the billing entity (if required), then click Add Transaction.
- Select the date.
- Select Payment as the Transaction Type.
- Select the Payment Type.
- If you select Cheque as the payment type, enter the Account name, Bank, and Branch.
- If you do not want to re-enter these details when next you add a cheque payment for this client, select the Save bank details to receivable check box.
- Select the receivable using either one of these methods:
- Enter the first few letters of their name in the Receivable field, then select them from the list.
- Click the search
 icon, then locate and select the required client.
- Enter the amount paid.
- Click Update or move to the next field to update the page.
- Enter a Reference for the payment.
- Enter comments about the payment, if required.
- Adjust the automatic allocations, if applicable.
Note: Click the Tell me more link on the page to learn how Jobs & Billing automatically allocated payments.
- Select one of these save options:
- Click Save and add another to retain your changes and process another transaction - the date, transaction type, and payment type from this transaction will be retained.
- Click the arrow on the Save and add another button, then select Save to save your changes and make more changes to the current transaction.
- Click Save and exit to save your changes and close the page you are on.
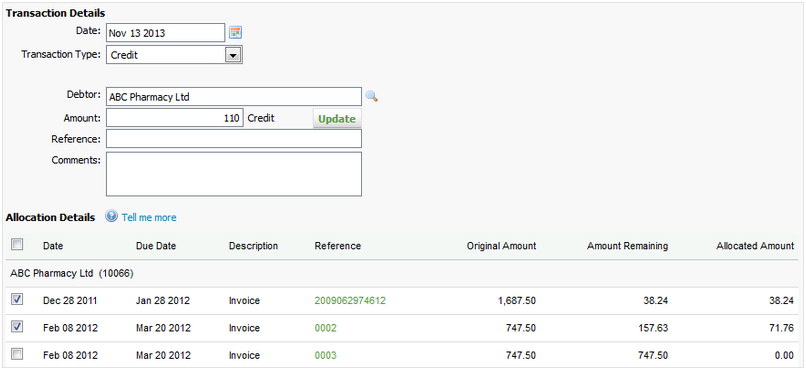
Process a credit
You can make an internal credit adjustment for situations such as when you give a refund to client or you offer a month of free services.
If the adjustment relates to an amount for which taxes are calculated and must be reduced, we recommend that you use the option Add credit note instead of processing an internal credit adjustment which is not considering taxes separately for journal entry purposes. By using the credit note, the taxes amount will be adjusted as well.
- Click Jobs & Billing > Accounts Receivable.
- On the Accounts Receivable page, select the billing entity (if required), then click Add Transaction.
- Select the date.
- Select Credit as the transaction type.
- Select the receivable using either one of these methods:
- Enter the first few letters of their name in the Receivable field, then select them from the list.
- Click the search icon, then locate and select the required client.
- Enter the credit amount paid.
- Click Update or move to the next field to update the page.
- Enter a reference for the credit.
- Enter comments about the credit, if required.
- Adjust the automatic allocations, if applicable..
Note: Click the Tell me more link on the page to learn how Jobs & Billing automatically allocated payments.
- Select one of these save options:
- Click Save and add another to retain your changes and process another transaction - the date, transaction type, and payment type from this transaction will be retained.
- Click the arrow on the Save and add another button, then select Save to save your changes and make more changes to the current transaction.
- Click Save and exit to save your changes and close the page you are on.
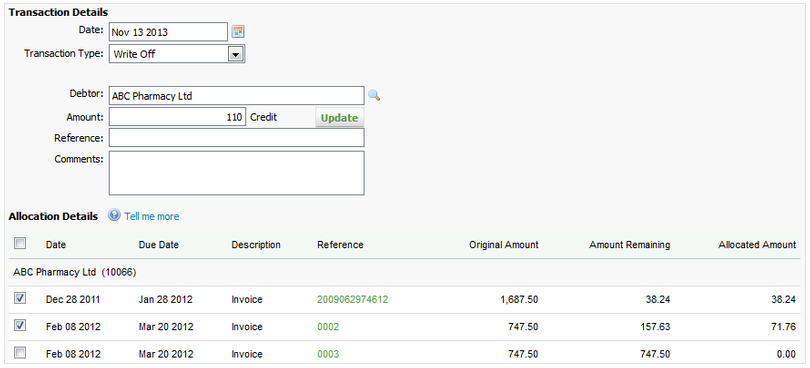
Process a write-off
If you have invoiced a client and they have declined to pay it, you can write-off the invoice. To do this, open the receivable and add a write-off transaction for the relevant amount. When you do this, the outstanding invoices for the client will be listed. A transaction will be added to the receivables account that takes the invoice amount off their amount due but still keeps the invoice in the system for historical reporting.
If the transaction relates to an amount for which taxes are calculated and must be reduced, we recommend to use the option Add credit note instead of processing a write-off transaction which is not considering taxes separately for journal entry purposes. By using the credit note, the taxes amount will be adjusted as well.
- Click Jobs & Billing > Accounts Receivable.
- On the Accounts Receivable page, select the billing entity (if required), then click Add Transaction.
- Select the date.
- Select Write Off as the transaction type.
- Select the receivable using either one of these methods:
- Enter the first few letters of their name in the Receivable field, then select them from the list.
- Click the search icon, then locate and select the required client.
- Enter the write-off amount paid.
- Click Update or move to the next field to update the page.
- Enter a reference for the write-off .
- Enter comments about the write-off, if required.
- Adjust the automatic allocations, if applicable.
Note: Click the Tell me more link on the page to learn how Jobs & Billing automatically allocated payments.
- Select one of these save options:
- Click Save and add another to retain your changes and process another transaction - the date, transaction type, and payment type from this transaction will be retained.
- Click the arrow on the Save and add another button, then select Save to save your changes and make more changes to the current transaction.
- Click Save and exit to save your changes and close the page you are on.
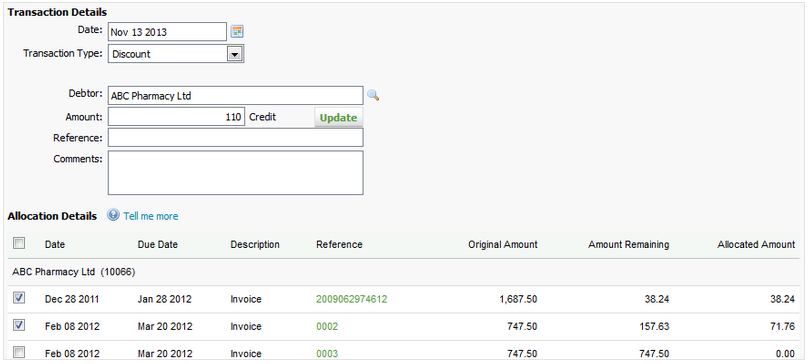
Process a discount
To process a discounted invoice in the Accounts Receivable area, you need to enter both a payment transaction and a discount transaction to clear the invoiced amount. In addition to the payment you recorded, you must also record the discount transaction, as follows:
If the transaction relates to an amount for which taxes are calculated and must be reduced, we recommend to use the option Add credit note instead of processing a discount transaction which is not considering taxes separately for journal entry purposes. By using the credit note, the taxes amount will be adjusted as well.
- Click Jobs & Billing > Accounts Receivable.
- On the Accounts Receivable page, select the billing entity (if required), then click Add Transaction.
- Select the date.
- Select Discount as the transaction type.
- Select the receivable using either one of these methods:
- Enter the first few letters of their name in the Receivable field, then select them from the list.
- Click the search icon, then locate and select the required client.
- Enter the discount amount.
- Click Update or move to the next field to update the page.
- Enter a reference for the discount .
- Enter comments about the discount, if required.
- Adjust the automatic allocations, if applicable.
Note: Click the Tell me more link on the page to learn how Jobs & Billing automatically allocated payments.
- Select one of these save options:
- Click Save and add another to retain your changes and process another transaction - the date, transaction type, and payment type from this transaction will be retained.
- Click the arrow on the Save and add another button, then select Save to save your changes and make more changes to the current transaction.
- Click Save and exit to save your changes and close the page you are on.
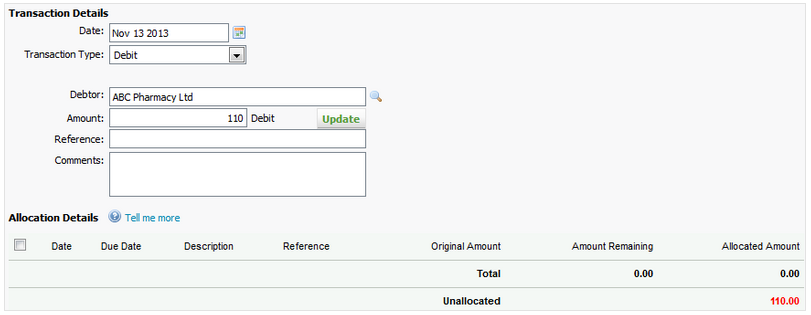
Process a debit
You can make an internal debit adjustment.
If the adjustment relates to an amount for which sales taxes are applicable, we recommend that you create an invoice rather than make an internal debit adjustment. Such an adjustment does not allow you to process taxes separately for journal entry purposes. Using an invoice allows you to process sales taxes when applicable.
- Click Jobs & Billing > Accounts Receivable.
- On the Accounts Receivable page, select the billing entity (if required), then click Add Transaction.
- Select the date.
- Select Debit as the transaction type.
- Select the receivable using either one of these methods:
- Enter the first few letters of their name in the Receivable field, then select them from the list.
- Click the search icon, then locate and select the required client.
- Enter the debit amount.
- Click Update or move to the next field to update the page.
- Enter a reference for the debit .
- Enter comments about the debit, if required.
- Adjust the automatic allocations, if applicable.
Note: Click the Tell me more link on the page to learn how Jobs & Billing automatically allocated payments.
- Select one of these save options:
- Click Save and add another to retain your changes and process another transaction - the date, transaction type, and payment type from this transaction will be retained.
- Click the arrow on the Save and add another button, then select Save to save your changes and make more changes to the current transaction.
- Click Save and exit to save your changes and close the page you are on.
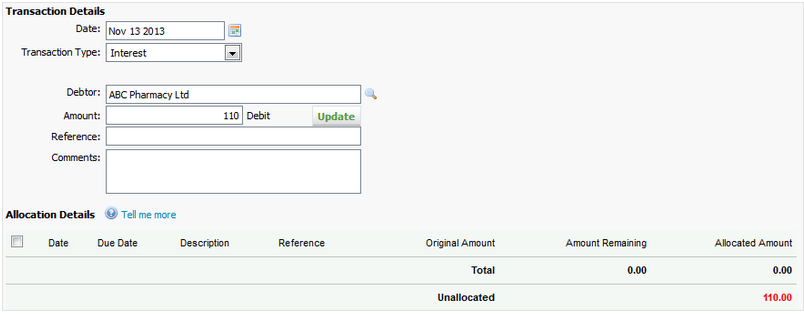
Process an interest transaction
- Click Jobs & Billing > Accounts Receivable.
- On the Accounts Receivable page, select the billing entity (if required), then click Add Transaction.
- Select the date.
- Select Interest as the transaction type.
- Select the receivable using either one of these methods:
- Enter the first few letters of their name in the Receivable field, then select them from the list.
- Click the search icon, then locate and select the required client.
- Enter the interest amount paid.
- Click Update or move to the next field to update the screen.
- Enter a reference for the interest transaction.
- Enter comments about the interest transaction, if required.
- Adjust the automatic allocations, if applicable.
Note: Click the Tell me more link on the page to learn how Jobs & Billing automatically allocated payments.
- Select one of these save options:
- Click Save and add another to retain your changes and process another transaction - the date, transaction type, and payment type from this transaction will be retained.
- Click the arrow on the Save and add another button, then select Save to save your changes and make more changes to the current transaction.
- Click Save and exit to save your changes and close the page you are on.
Edit a transaction
Receivables - View, Add and Edit Transactions
You can edit a transaction, unless it has automatically been added to the Accounts Receivable area, for example a finalized invoice (in this situation, only the comments of a finalized invoice can be edited).
- Click Jobs & Billing > Accounts Receivable.
- Select the billing entity that you want to view, if required.
- Select the receivable using either one of these methods:
- Type the first few letters of the receivable's name in the Search for receivables box, press Enter, then click the required receivable.
- Click the icon, use the search filters and click Search, then click the required receivable.
- Click the row of the transaction you want to edit.
- Make the required amendments.
- Select one of these save options:
- Click Save and add another to retain your changes and process another transaction - the date, transaction type, and payment type from this transaction will be retained.
- Click the arrow on the Save and add another button, then select Save to save your changes and make more changes to the current transaction.
- Click Save and exit to save your changes and close the page you are on.
Print transactions
Rather than going to the Reports area and running the Receivables Transaction report for all clients or a group of clients, you can print transactions from within a client's receivable page.
- Click Jobs & Billing > Accounts Receivable.
- Select the billing entity that you want to view, if required.
- On the Accounts Receivable page. click the All tab.
- Select the receivable using either one of these methods:
- Type the first few letters of the receivable's name in the Search for receivables box, press Enter, then click the required receivable.
- Click the icon, use the search filters and click Search, then click the required receivable.
- Click Print Transactions - the Accounts Receivable Transaction Report is displayed.
Delete a transaction
Receivables - Delete Transactions
If you have made a mistake in a transaction you have added, you might want to delete, rather than edit, the transaction.
- Click Jobs & Billing > Accounts Receivable.
- Select the billing entity that you want to view, if required.
- On the Accounts Receivable page, click the All tab.
- Click the required receivable.
- On the Accounts Receivable Transaction page, click the Delete Transaction button
 on the row of the transaction you want to delete.
 - Click Yes to confirm.