Customize the standard billing template
Once you have prepared the billing template for editing, you can customize it to suit your firm's needs. We recommend that you only make cosmetic changes to the templates. You can add your branding to the template, such as your company logo and preferred font, and edit the default text and layout. Be careful not to delete any important bookmarks or merge fields, as these are placeholders for information extracted from your Jobs & Billing system.
When you are finished, save the template with a new name, (such as your firm's name), as a .doc or .docx file. You can then proceed to upload your customized template back to Jobs & Billing.
Contents
Add your company logo
If you want to add a logo to your templates, ensure that you resize the image prior to inserting it into the template, to minimize the file size. The image requirements are:
- File type .png or .jpg.
- File size below 500 KB (the smaller the better - if the template is too big, the invoice will either not print or will not print with the logo showing)
- Resolution 300 DPI.
The template before an image is inserted:

Insert the logo in an area that will not affect the overall layout of the template; top right or top left are the preferred areas. Below are two examples of what you could do.
Example 1
Your logo includes your company name, so you do not need the «companyname» merge field.
- Delete the «companyname» merge field.
- Click Insert > Pictures, browse to locate and select the required image file, then click Insert.
- Change the default alignment, if required (click the Home menu then select the required alignment option in the Paragraph section).

Example 2
Your logo does not include your company name, so you want to insert it near the «companyname» merge field.
- Place the cursor in the row that contains the «companyname» merge field.
- Right-click then click Split Cells, then click OK to select the default number of columns (2) and rows (1).
- Place the cursor in the empty right cell.
- Click Insert > Pictures, browse to locate and select the required image file, then click Insert.
- Change the default alignment, if required (click the Home menu then select the required alignment option in the Paragraph section).

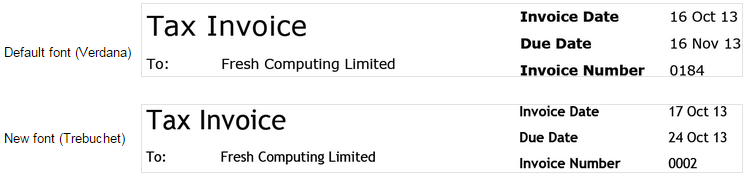
Change the font
You can change the text font type and size if you like. Refer to the Microsoft typography page, which lists the font types that Jobs & Billing currently supports. Be aware that a large amount of information in the body, or large font size, may cause the letter to print over two pages.
Edit the default text
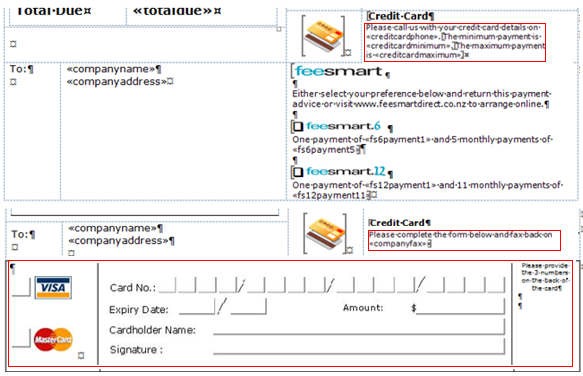
You can edit any of the text in the standard templates to suit your needs. For example, you could change the default text of Total to the terminology used in your company, such as Amount Due.

Another example is to change the default text in the Credit Card payment option section and then insert an area where clients can fill out their credit card details. Note that this requires the default layout to be edited.
Edit the default layout
Once the table gridlines are visible, you can adjust the tables to reorganize the contents of the template. This may include splitting or merging cells, or adding or deleting rows or columns. You can then cut and paste the contents to new locations. Be careful not to delete any bookmarks or merge fields. Below is an example of reorganizing the layout of the header.
Edit the merge fields
Merge fields are placeholders that direct Microsoft® Word® where to insert specific information obtained from Jobs & Billing. You can identify merge fields in the document by the open and close markers as follows «mergefield». Each template uses merge fields relevant to the type of invoice or statement it prints.
Delete a merge field
We recommend that you do not delete any merge fields in the template, unless you are sure you do not require the information it relates to. If you do want to delete a field, ensure that you only delete that field and not the one next to it. For example, if you want to delete the «itemdate» field, ensure you do not delete the «TableStart:Details» field next to it. This common mistake will cause the rest of information to be displayed incorrectly when the invoice is printed.

Add a merge field
You can add a merge field if you accidentally delete one or if you want to use an additional one, but we suggest you take great care in doing so.
- Place the cursor where you want to position the merge field.
- Click the Insert menu.
- Click Quick Parts in the Text group.
- Click Field.
- Select Mergefield in the Field names list.
- Type the name of the merge field (from the available merge fields list) in the Field name box.
- Click OK.

Edit a merge field
Again, take great care in editing any merge fields. Changing the field name as it displays in the document will not update the merge field, you must do this in the field editing area.
- Right-click on the merge field.
- Click Edit Field.
- Change the field name and format as required.
- Click OK.
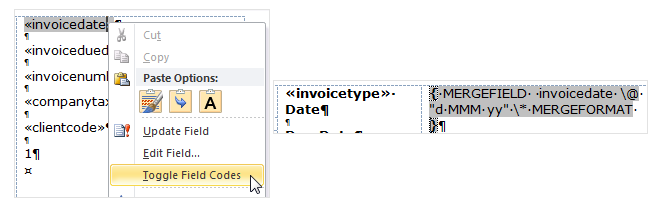
Change the format of date fields
- Right-click the merge field, for example «invoicedate».
- Click Toggle Field Codes to view the format of the merge field in the document.
- Change the current date format dd/MM/yyyy (prints as 31/03/2024) to another format (view the date formatting options available).