Update the job status
Job statuses enable you to keep track of jobs as they move through stages. This helps your firm run as smoothly as possible. A progress indicator displays the current status of each job.
You update the status of a job as you work on it to ensure that everyone knows how each job is progressing. If you chose to activate the Change job status to Complete on close setting, when a job is closed and its status is other than Complete, CCH iFirm automatically updates the status to Complete. This applies to jobs that are closed individually and in bulk.
Click here to learn how to customize job statuses to suit your business needs.
Contents
Learn about the job status stages
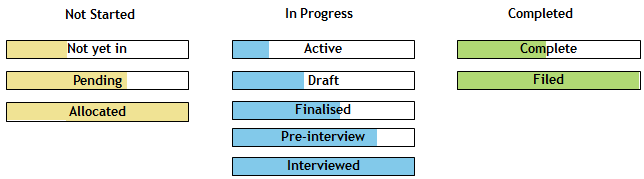
To help make managing jobs easier, the job statuses are grouped into stages. You can quickly view the progress of a job through a stage by looking at the progress indicator.
- Not Yet Started - yellow - this is for any statuses before Active.
- In Progress - blue - this is for any statuses between Active and Complete.
- Completed - green - this is for any statuses from Complete onwards.
Change the status of an individual job
Jobs - View, Add and Edit Jobs
You need to change the status of a job as your work on it progresses. For example, when you start working on a job, you change the job status to Active. Doing so indicates to others in your firm that you have begun working on the job and enables you to add timesheet entries for the job.
Job statuses are used to filter reports, to monitor and track jobs and to trigger processes such as variance reporting. Therefore, it is important to update the status as a job progresses, to ensure that it is always up to date and current. When you update the status for a job, you can also change the person currently responsible for it. You can update the status of an individual job or do a bulk update for multiple jobs of the same type. If you want to assign a job status going backwards, your user account need to have the Jobs - View, Add and Edit Jobs security role, as this operation (change to the workflow) requires that a manager or staff member with a higher security role should be consulted.
- Click Jobs & Billing > Jobs.
- Click a row to open the required job.
- Click Update Status.
- Select the required status - the job type determines which status options are available.
- Click OK.
Note: The security roles Jobs - View All Jobs and Jobs - View My Jobs allow users to change the job status only for a job status going forward. Because assigning a job status going backwards implies a change in the workflow, a manager or staff member with a higher security role must be consulted before performing this operation.
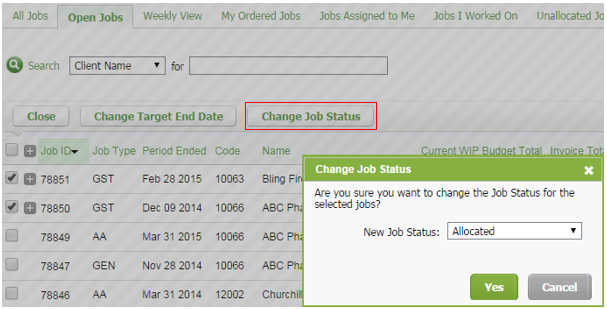
Change the status of multiple jobs in bulk
Jobs - View, Add and Edit Jobs
- Click Jobs & Billing > Jobs.
- In the Open Jobs tab, select the jobs which have the same job type that you want to change using the check boxes.
- Click Change Job Status.
- Select the new job status that will apply to all the selected jobs.
- Click Yes to confirm.
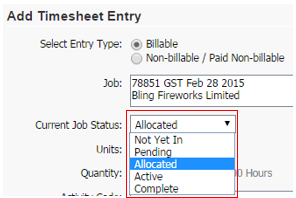
Change the status of a job in a timesheet
Timesheets - View, Add and Edit My Timesheet
When recording time against a job, it is a good opportunity to think about the job status and update it accordingly.
- Click Jobs & Billing > Jobs.
- Click a row to open the required job.
- Click Add Time.
- On the My Timesheet page, update the Current Job Status field.
- Click Add.