Use timesheet timers
You can use timers to keep track of your work. The recorded time can then be used to create timesheets. This makes it easier for you to account for the time you have spent on a job and therefore, you can establish more accurate fees for your clients.
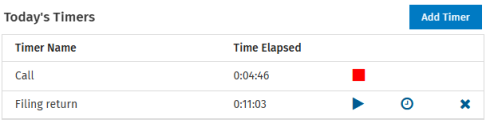
The timer can be started quickly and will use the default name Timer 1. You can stop the timer if another task interrupts the current one, and you can add a timer for that new task. You can have multiple timers which can be stopped, started and deleted as required.
To use this feature, you must firstly enable it in the timesheet settings.
Add a timer
- Click the Timers button in the top corner.
- Click Add Timer to immediately start recording the time.
- Repeat the above steps to begin a new timer, when required.

Stop and restart a timer
When a timer is active, click the Stop button  to stop recording the time. This button also works as a pause button, as you can restart the timer later in the day to continue recording the time spent on a particular task. An active timer will stop automatically if you add a new timer. To restart a timer, click the Start
  button.
Edit the timer name
Each timer is assigned a default name in ascending numerical order. You can change the name of a timer at any stage.
To edit the timer name, click it, type the new name, then press Enter.
Edit the time elapsed
Once a timer is stopped you can edit the elapsed time that was recorded. Click the time elapsed, enter the new time and press Enter.
Create a timesheet entry from a timer
Once a timer is stopped you can create a timesheet entry from it. The entry is added to the timesheet page that matches the timer date. It will display a timer icon: hovering over the icon will let you know which timer it was generated from.
- Click the Timesheet button
 at the of the timer's row.
 - Add the timesheet entry details.
- Click Add.
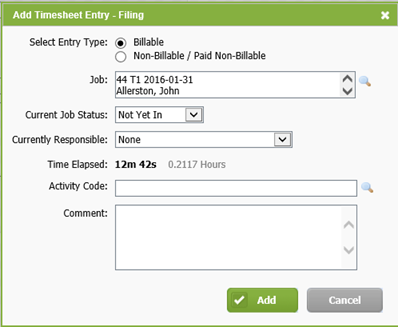
Note: The entry method for the user's timesheets (actual time or units) will be taken into account at the time the timesheet entry is created. For example, if it is indicated in the user profile that the actual time is used to enter timesheet entries, the time recorded by the timer will be entered in the timesheet. However, if it is indicated that time units are used to enter timesheet entries, a number of units rounded-up to the greater whole number of units will be entered in the timesheet.
Delete a timer
To delete a timer, click the Delete button  and click Yes to confirm.