Month-End Closing
In order to proceed with the month-end closing in CCH iFirm, we suggest that you do the following.
Content
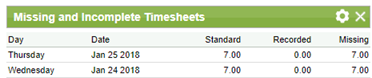
Step 1 - Missing and incomplete timesheets
Complete all timesheet entries for the billing period. You can check outstanding timesheets using the following report: Missing and Incomplete Timesheets. To do so, proceed as follows:
- Click Reports > All Reports.
- Click the Jobs & Billing tab.
- Under the Employee Reports section, select Missing and Incomplete Timesheets.
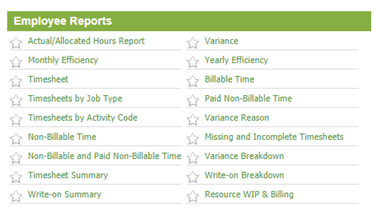
- Communicate with each user for which timesheets are missing or incomplete to correct their timesheets.
The report is also available in your dashboard (depending on your security settings).
Step 2 - Interest calculation
If applicable, calculate interest on accounts receivable. To do so, proceed as follows:
- Click Jobs & Billing > Accounts Receivable.
- In the Accounts Receivable page, click the Calculate Interest button.

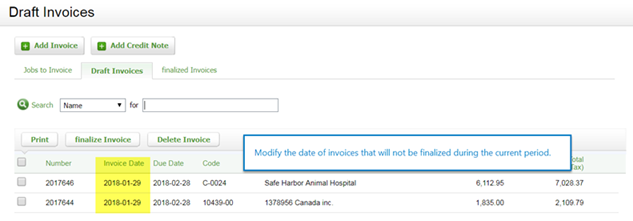
Step 3 - Finalized invoices
Ensure that all invoices dated for the current month have been finalized. If they are not going to be finalized for that month, make sure that the date is changed accordingly.
Step 4 - Searching for missing information in open or closed jobs
To have good control over data in reports, make sure that all contacts and jobs, whether they are open or closed, include the name of a partner or a manager and, where applicable, all filters / firm groups are up to date. Edit data if required.
Update contacts
To verify if a partner or a manager has been added to the contact record, proceed as follows.
- Go to the Contacts page and click Search.
- In the Partner drop-down list, select None.
- Click the Search button.
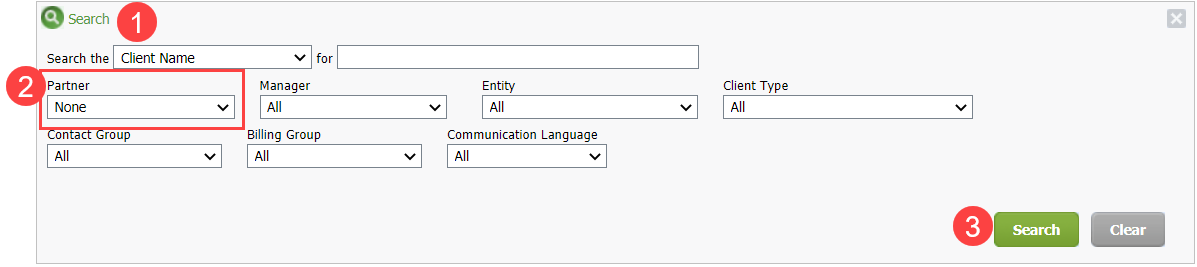
The search results will be displayed under the Search section. Make the required modifications and, where applicable, perform the same search in the Manager field.
Update jobs
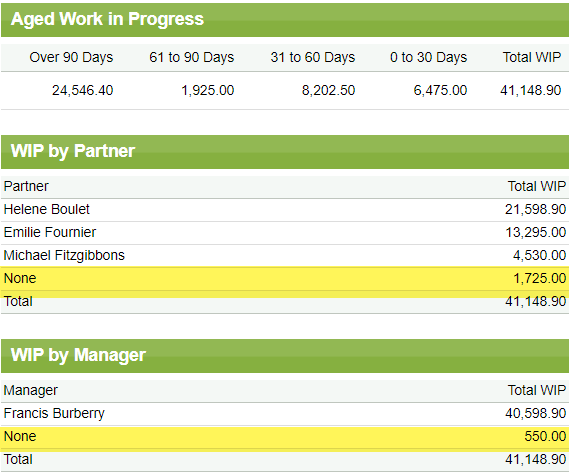
Click Jobs & Billing > Work in Progress. In the WIP by Partner section, check to see if WIP items appear on the line None. If this is the case, it means no partner has been added to the contact record, even if a partner has been added to the job.
To display the jobs, click the line None. Where applicable, add a partner to the contact record and to the job. You can perform the same operation for WIP not linked to managers if required.
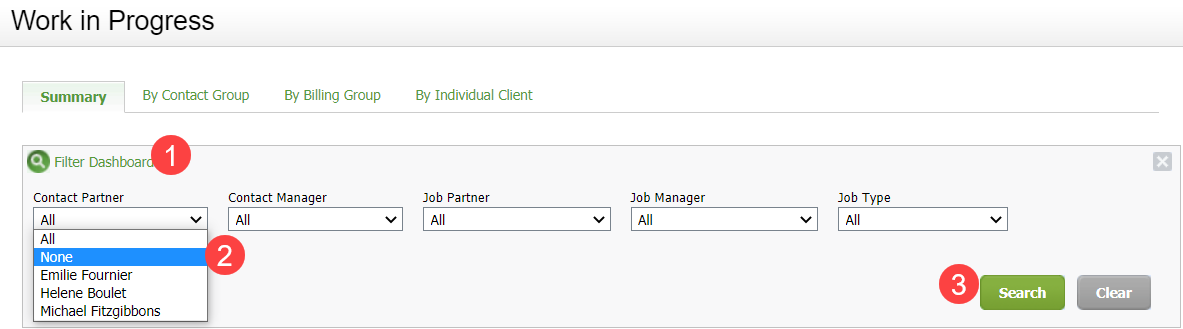
In this table you also have to ability to search for contacts and jobs that are not linked to any partner or manager. Click Filter Dashboard and perform searches using the various options available:
Step 5 - Reviewing jobs of Imported WIP or IMPWIP type
- Click Jobs & Billing > Jobs. On the Jobs page, the Open Jobs tab is selected by default.
- Click the Search icon.
- In the Job Type drop-down menu, select Imported WIP only.
- Click the Search button.
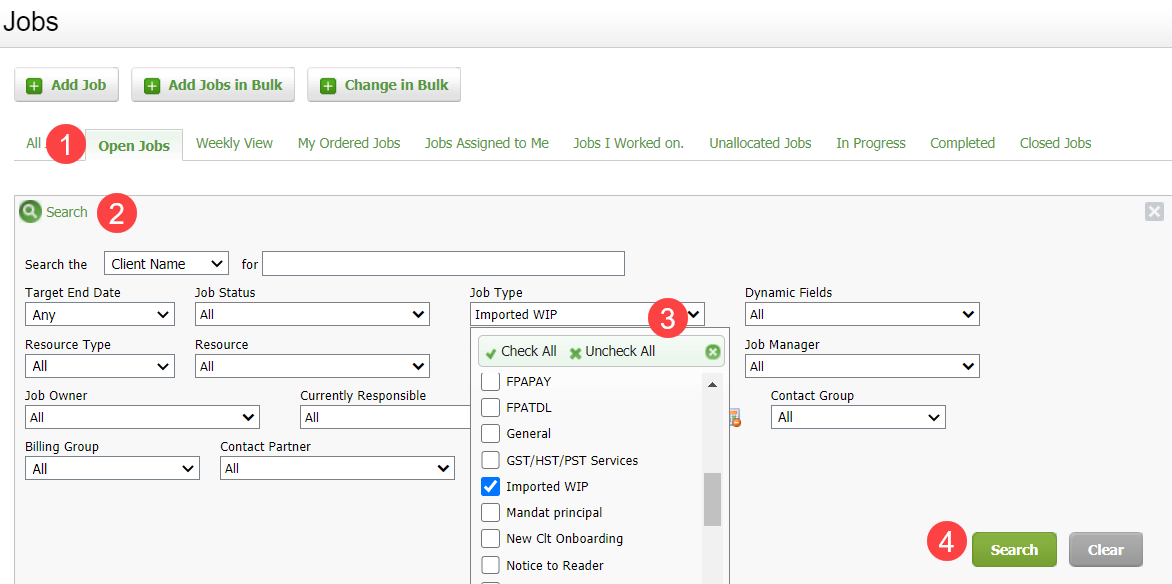
The search results will be displayed under the Search section.
Suggestions
If the job includes WIP
Edit the job type Imported WIP for a specific job type.
OR
Transfer WIP to an open job. In that case, you must also close the imported WIP job.
If the job includes no WIP
Step 6 - Reviewing closed jobs
Review closed jobs to see if any jobs have been closed where WIP has been left on them.
If there are closed jobs with WIP on them, then decide if these are to be transferred to a different job or if they need to be written off/on. If this is the case, the adjustments can be added to the job and should be allocated to the correct reporting period. To do so, proceed as follows:
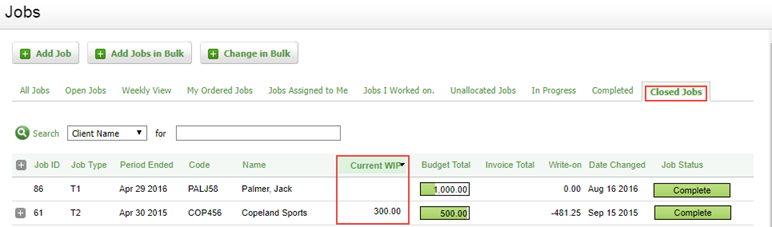
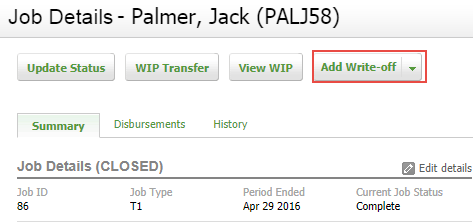
- Click Jobs & Billing > Jobs.
- In the Jobs page, click the Closed Jobs tab. You can click the Current WIP column header to sort the jobs by WIP amounts in descending order. The adjustments will also be displayed.
- Select the desired job and click the Add Write-off button.
Step 7 - Locking WIP and timesheets
Once all the above-described steps have been followed, lock the WIPs and timesheets for the current reporting period.
Why lock the WIP?
- To prevent disbursements from being added, deleted or edited prior to the lock date.
- To prevent invoices from being finalized with an invoice date prior to the lock date.
- To prevent jobs with an effective closed date from being reopened prior to the lock date.
- To prevent the closing of jobs into a locked period.
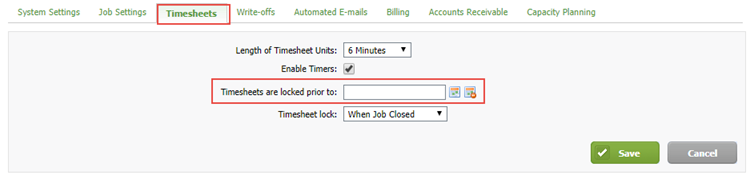
Typically, the lock date should be edited once a month after invoicing is completed. To edit the lock date, proceed as follows:
- Click Settings > Jobs & Billing.
- Click General Settings.
- On the System Settings tab, click the calendar icon to select the date on which the prior WIP will be locked
- On the Timesheets tab, click the calendar icon to select the date before which timesheets will be locked.
- Click Save.

Reports
We suggest that you run the following reports:
- Journals
- Bank Reconciliation
- Bank Deposit Supplement
- Finalized Invoices
- WIP Control
- Aged Work in Progress
- Aged Accounts Receivable
- Billable Time Breakdown by Period