Send Documents to Be Signed
Client Portal - Electronic Signing; Client Portal - Electronic Signing Tags (if you want to assign tags to a document, see step 11 below).
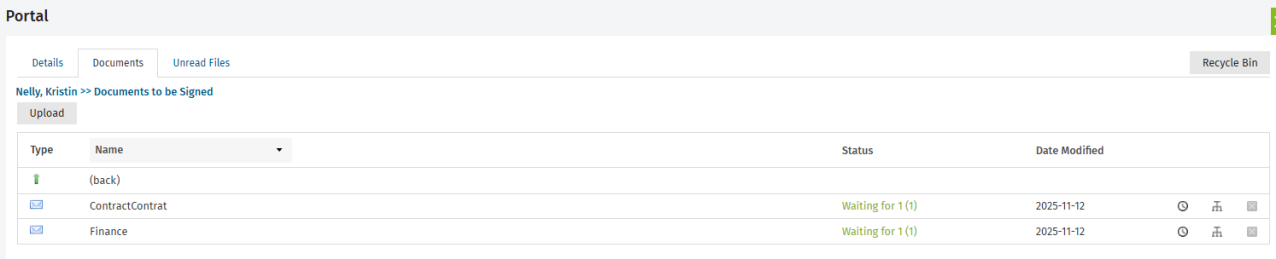
When you set up the digital signature feature, two new folders appear in each of your portals. The Documents to be Signed folder is where you upload the documents that you want to be signed. The documents stay in this folder until they are signed by all signatories. Once signed, they are moved to the Signed Documents folder.

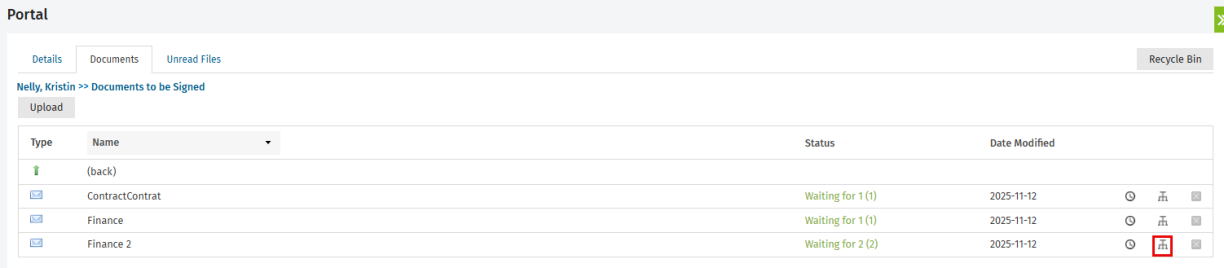
Inside the Documents to be Signed folder, the Status column of each document tells you how many signatures you are waiting for. For example, "Waiting for 1 (2)", indicates that you requested two signatures and you are waiting for one out of the two.
You can upload multiple documents to the envelope. You can then send that envelope to your selected portal subscribers.
To send documents to be signed, proceed as follows:
- Click Portal.
- Under the Active Portals tab, click the required portal.
- Click the Documents tab.
- Click the Documents to be Signed folder.
- Click the
 button.
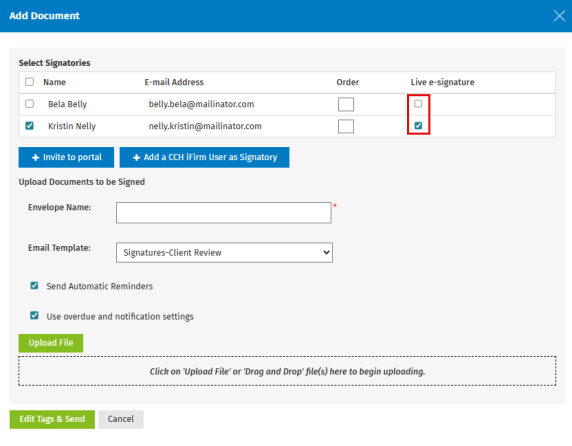
 - In the Add Document dialog box, indicate which signatories should sign the document by selecting them from the list of portal subscribers.
To add additional signatories to the list, click Add a CCH iFirm user as Signatory and select the user from the Select User drop-down menu.
Users appearing on this list depend on the rights defined in the Settings > Contacts > Contact Security section. - Select your preferred options:
- If you want the signatories to sign the document in a particular order, enter the order numbers in the Signing Order boxes. Read about the signing order below.
- If you want the signatory to sign the document in person, select the Live e-signature check box. Read about the Live e-signature feature below.
- Select the Send Automatic Reminders check box to send automatic reminders to the selected signatories if they do not sign the document. This reminder is governed by the Set Reminder settings in the Digital Signatures settings. For more information, see the Send a reminder page for more information.
- Type the envelope name (this is the name for the package of documents and displays as the e-mail subject).
- Select the e-mail template that you want to apply to the envelope, if required.
Note: Your template selection will override the default template in your digital signature settings. - Click the Upload file button, then browse to the file(s) that you want to upload and select the desired file(s). Click Open.
- The combined file size should not exceed 5 MB; the maximum is 25 MB.
- Supported file types are: .pdf, .doc, .docx, .xls and .xlsx.
- Click the Edit Tags & Send button to add tags to the document:
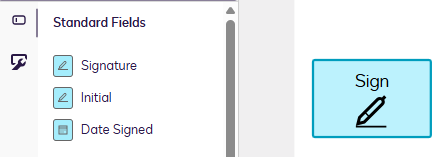
Read about the Sign tags feature below. - In DocuSign, add the tags for each signatory using the Standard Fields menu.
- Click Send.
Notes:
The appropriate signatories will receive a notification e-mail advising them that their signature is required on documents in their portal.
Once logged in, they will see a Sign Now button next to the document to be signed. When the signatories click this button, they are then redirected to the DocuSign Web site, where they can review and sign the document.
Signing order
The Signing Order feature allows you to set the order in which the signatories sign the documents in the envelope. This is useful in the case of multiple signatories.
You must enter a number equal to or greater than 1. The number indicates the order in which the signatory is required to sign the document. For example, you set the order for John to 1 and Julie to 2. John will receive an e-mail requesting his signature. Once John signs the document, Julie will then receive an e-mail requesting her signature.
Signatories can share the same signing order. For example, you set John as 1, Julie as 2 and Mary as 2. Once John signs the document, both Julie and Mary will then receive an e-mail requesting their signatures.
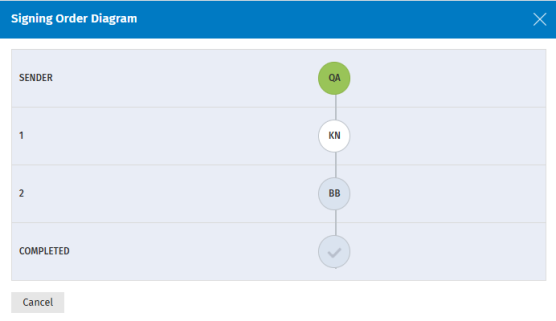
To view the signing progress, go to the Documents to be Signed folder and click the Signing Order button ![]() . You will see a graphical illustration of the signing order. The signatories are identified by their initials. A green colour identifies a signatory who has signed the document. A white colour identifies the signatory who is next to sign the document. You can hover over a signatory to view their full name.
. You will see a graphical illustration of the signing order. The signatories are identified by their initials. A green colour identifies a signatory who has signed the document. A white colour identifies the signatory who is next to sign the document. You can hover over a signatory to view their full name.
Sign tags
The Sign tags feature allows you to add tags to indicate whereabouts in the document you require a signature or other input from the client, such as a date stamp or initials.
When you click the Edit Tags & Send button in the Add Document dialog box, the document opens in DocuSign. You can then add the tags for each signatory using the Fields menu before clicking Send. Each signatory name is colour coded.
When the signatory opens the document in DocuSign, they are automatically directed to your tagged areas when they click Start.

Live e-signature
The Live e-signature feature allows you to get a document digitally signed in person. This is useful in situations where the signatory is in your presence. The client does not receive an e-mail notifying them that a signature is required. Instead, they can follow your direction to add their digital signature to the document using your computer or device.
- In the Add Document dialog box, select the Live e-signature check box for the required signatory and complete the steps to add and edit tags as well as send the document.
- In your portal, click the Live e-signature button
 that appears on the row of the document to be signed.
 - In the Live e-signature dialog box, click the Sign Now link on the row of the required signatory.
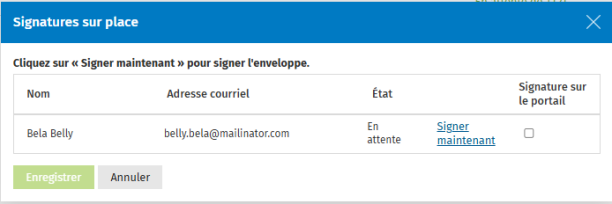
- Lend your computer (or device) to the signatory and prompt them to click the Sign Now button. They will be redirected the DocuSign page, where they can review and sign the document as usual.