Print and send statements
Receivables - View Only or Receivables - View, Add and Edit Transactions
Contents
Learn about printing and sending (e-mailing) statements
You can print (download as PDF) your receivable statements and then send them by mail or you can e-mail them directly to your clients.
You have a choice of statement templates to use. The standard Default Statement template shows overdue and current debt. The Open item - Default Statement Aged template shows only outstanding items and aging debt. The Default Statement Aged template shows 30, 60 and 60+ days aging debt. The Open item- Default Statement Aged template shows only outstanding items and aging debt. You can also customize your own statement templates. Click here to learn more about how to customize statement templates.
| Statement template |
|
|
Statement Aged template |
|

When you e-mail statements, you can view the status of the e-mails in the E-mail Centre.
Print or e-mail an individual statement
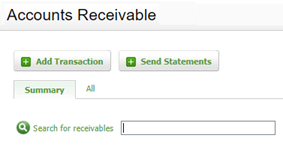
- Click Jobs & Billing > Accounts Receivable.
- Select the billing entity, if required.
- Click the All tab.
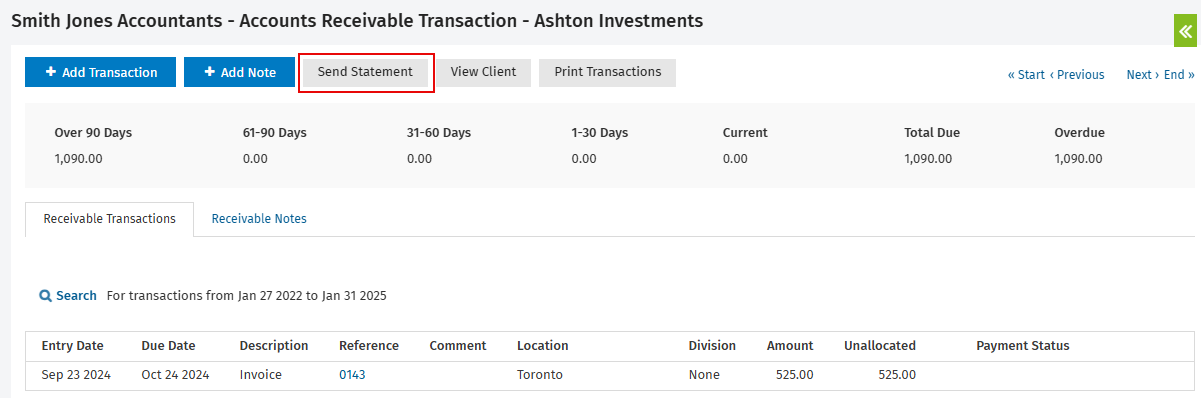
- Locate and click the required receivable to open its Receivable Transactions page.
- Click Send Statement.
- Select a Statement Template from the list.
- Click the Calendarbuttons
 to select the required date range.
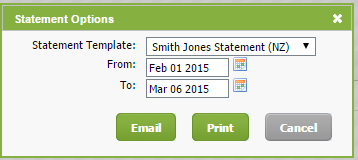
- Choose from one of these options:
- Click Print to download your statement in PDF format.
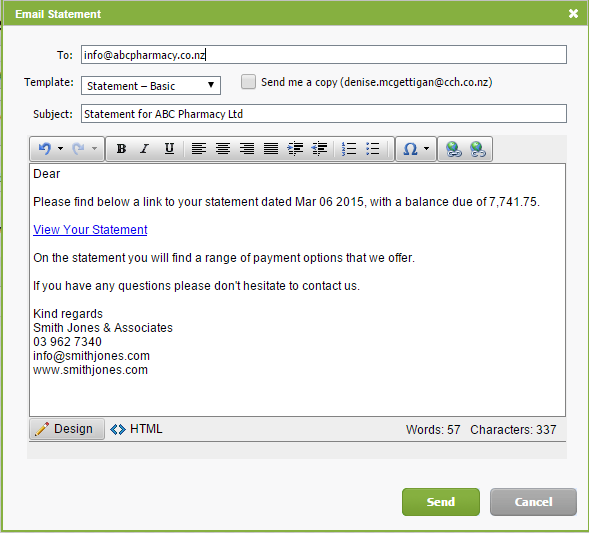
- Click E-mail, then:
- Select the required E-mail Template.
- Select the Send me a copy check box, if you would like to receive a copy of the statement.
- Edit the To address, Subject or e-mail content, if required.
- Click Send.
Print or e-mail a batch of statements
- Click Jobs & Billing > Accounts Receivable.
- Click Send Statements.
- Limit the information shown to a particular Partner and Manager, if required.
- Limit the information shown to a Minimum Amount, if required.
Tip: To include clients showing a $0 balance, select a Minimum Amount of 0 (zero), and clear the Only include receivables with a debit balance check box.
- Filter the clients that you want to include:
- Select the Only include receivables with a debit balance check box to prevent a statement for a receivable with a credit balance from being printed.
- Select the Only include overdue receivables check box to print a statement for a receivable whose debt is overdue.
- Select the Only include receivables with activity check box to prevent a statement that does not contain any transactions from being printed.
- Click the Calendar buttons to select the required date range.
- Select a statement template.
- Order the statement information by Client Code, Client Name, Contact Group or Billing Group.
Tip: If you have contact or billing groups set up, you can order the statements by Contact Group or Billing Group. This allows you to save time and money by putting the statements of the groups with one address in the same envelope.

- Choose from one of these options:
- Click Print to download your statements in PDF format.
- Click E-mail, then:
- Select the required E-mail Template.
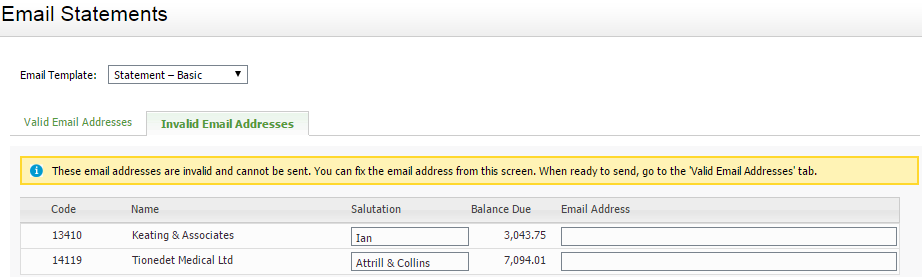
- Update any invalid e-mail details, if required, on the Invalid E-mail Addresses tab.
- Click the Valid E-mail Addresses tab (if it is not already open by default).
- Clear the check boxes of any e-mails that you do not want to send.
- Edit the e-mail addresses, if required.
- Click Send.
- Click Yes to send the e-mails.
- Click OK to acknowledge the confirmation message.