Add a timesheet entry and adjust for time in lieu
- Timesheets - View, Add and Edit My Timesheet (to access the Timesheets area, and to view, add and edit your own timesheet entries);
- Timesheets - View, Add and Edit All Timesheets (to view, add and edit timesheet entries for all staff members)
Contents
Add a timesheet entry
If you are expected to enter timesheets, we recommend that you do this on a daily basis and monitor your incomplete timesheets on the dashboard.
- Access the My Timesheet page.
- Click Change User to enter time on behalf of another user, if applicable.
- Select the user from the list and click Change,
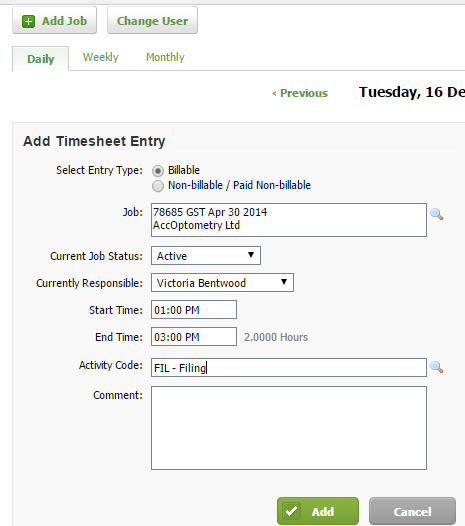
- Select the entry type to specify the type of entry you are making (Billable or Non-billable/Paid Non-billable).
- If entering billable time, type the first few letters of the client name in the Job field, then select the required job from the list or click the search
 icon to locate and select the required job. Then, change the job status and the person currently responsible for the job, if applicable.
- If entering billable time, type the first few letters of the client name in the Job field, then select the required job from the list or click the search
- Enter the time, according to your timesheet entry method:
- Actual: In the Start Time and End Time boxes, enter the hours in the 24-hour format. Jobs & Billing will automatically predict your start and end time based on the first few numbers you enter.
- Units: From the Quantity list, select the quantity of units.
- Decimal: In the Quantity box, enter either:
- the amount of hours in decimal format, up to 2 decimal places, for example, 1.25 means 1 hour and 15 minutes (75 minutes); or
- the hours and minutes, separated by a colon, for example, 1:25 means 1 hours and 25 minutes (85 minutes).
- Specify the activity worked on for the job using either one of these methods:
- Enter the first few letters of the activity code in the field provided, then select the required code from the drop-down list.
- Click the search
 icon beside the Activity Code field to locate and select the required code.
- Enter a note about the work completed in the Comment field, if required.
- Click Add - your entry displays on the right, including the dollar values and chargeout rates (the hourly cost is calculated, but not displayed). Once you have added an entry, you can click the Job ID number to return to the Job Details screen or the client name to open the client profile.
Record time in lieu
Time in lieu is the ability to keep track of time owed to the employee, for example, when a user has worked extra hours so that they can work a shorter day later in the week. Once you have set up the time in lieu feature, you can start recording your time against the time in lieu (LIE) activity code.
You have an allocated number of standard working hours. If you work more or less hours than this, you need to record a time in lieu entry in your timesheet to ensure that your time adds up to your standard daily amount of hours.
Example 1: A long day in the office
Your standard daily working hours are 8 but on Monday you work an extra hour, so you worked 9 hours in total. You need to make your daily timesheet balance to 8 hours.
- Hours worked = 9 hours
- Time in lieu = -1 hour (negative)
- TOTAL time recorded for the day = 8 hours
Recording time when the hours worked are more than the standard hours:
- Add a timesheet entry for the hours you worked billable/non-billable (9 hours in this case).
- Add another timesheet entry to adjust for the time in lieu:
- Select Non-billable/Paid Non-billable as the entry type.
- Select the Quantity of your time in lieu units (-1 hour in this case).
- Select LIE- Time in lieu as the Activity Code.
- Type a comment.
- Click Save.
Example 2: A short day in the office
Your standard daily working hours are 8 but on Tuesday you leave work an hour early to go to the dentist, so you worked 7 hours in total. You need to make your daily timesheet balance to 8 hours.
- Hours worked = 7 hours
- Time in lieu = 1 hour (positive)
- TOTAL time recorded for the day = 8 hours
Recording time when the hours worked are less than the standard hours:
- Add a timesheet entry for the hours you worked billable/non-billable (7 hours in this case).
- Add another timesheet entry to adjust for the time in lieu:
- Select Non-billable/Paid Non-billable as the entry type.
- Select the Quantity of your time in lieu units (+1 hour in this case).
- Select LIE- Time in lieu as the Activity Code.
- Type a comment.
- Click Save.


