Set up user availability
User availability settings are especially important if you are planning to use the workflow management features in Jobs & Billing, such as being able to use employee efficiency reports, job ordering and use the Capacity Planning module.
Specify user budgeted billing percentages
Security - View and Edit Budgets, Rates and Hours for User
Billable percentages indicate how much of a user's time should be billed. These percentages are also used in a number of places in Jobs & Billing, for example:
- Employee efficiency reporting
- Timesheets weekly view (to monitor your weekly efficiency)
- Job ordering (summary line – to calculate how long it will take to complete the selected jobs)
- Capacity planning (if you have enabled the setting for Capacity Planning, then the total available hours are reduced using these percentages)
To specify a user's budgeted billing percentages:
- Click Settings > Users. The User Manager page displays.
- Click a user's row to access his or her account.
- In the Budgeted Billable Percentages panel located at the bottom page, click
 Add Percentage
 - Click the calendar
 icon to select the start date.
- These settings are per month, so you cannot create two entries for the same month as this will create an error message.
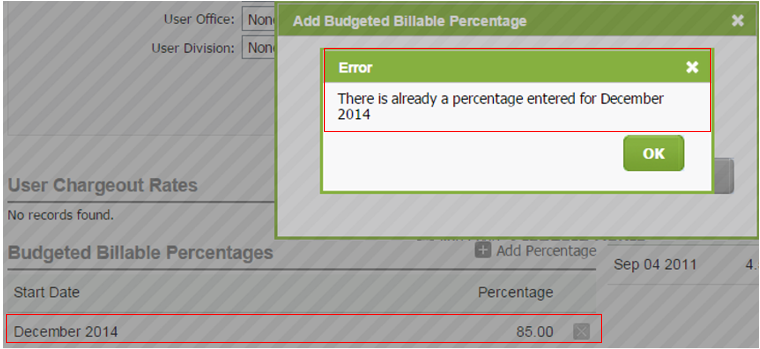
- In the Percentage field, enter the billable percentage .
- Click Save.
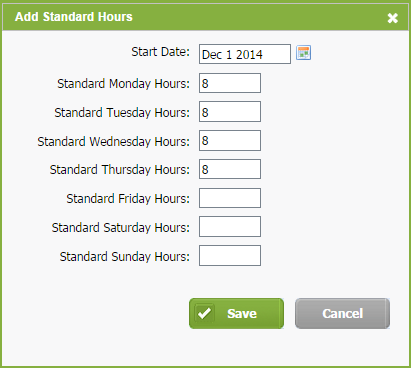
Specify user standard hours
Security - View and Edit Budgets, Rates and Hours for User
- Employee efficiency reports
- Missing and Incomplete Timesheets Report
- Capacity planning (to calculate the total availability of a user)
You can enter as many standard hours as are applicable. For example, if a staff member works shorter hours during school holidays, enter this information with the corresponding start date. Similarly, if an employee does not work in the month of January, but does work throughout the rest of the year, set the standard hours to zero for the weeks in January, then set the standard hours in February to the employee's usual contracted hours. This ensures that your total availability in capacity planning and employee reporting is always accurate.
- Click Settings > Users. The User Manager page displays.
- Click a user's row to access his or her account.
- Navigate to the Standard Hours panel at the bottom.
- Click Add Hours.
- Specify the start date and daily hours in the fields provided.
- Click Save.