Add and edit billing entities
Settings - Jobs & Billing
Firm billing entities are useful for firms with multiple offices that require separate default invoice and statement templates. The default firm billing entity is identical to the firm details. This entity cannot be deleted. However, you can edit various fields, such as the firm's address and phone numbers.
Firms with a single firm billing entity will not see any changes, as the additional billing entity filters and labels are only displayed if there are more than one billing entity set up.
There are two stages to setting up billing in Jobs & Billing, the billing entity and the general global settings. As you will see below, there are a range of billing entity settings available. You can select the ones that apply to you and leave the rest blank. You can enter default invoice text when you customize job types. There are various options for hiding or displaying the time and disbursements that have been added to the job. Once you have set up your default invoice options, you can override these for individual invoices, if required.
Add a billing entity
- Click Settings > Jobs & Billing.
- Click Billing Entities.
- Click Add Billing Entity.
-
The E-mail Address field is used as the reply address in all of the invoice, credit notes and statement e-mails.
-
Select the Default Invoice Template for this entity. You can also use your own custom invoice template.
-
Select the Default Invoice Email template for this entity.
-
In the Time Layout list, select your preferred layout.
-
Summarized - displays all timesheet entries in a summarized format. The total of all timesheet entries will appear on a single timesheet WIP line.
-
Group by Activity Code - displays all timesheets entries - grouped by activity code. Each activity code will appear on a separate WIP line.
-
Detailed - displays all timesheet entries individually. Each timesheet entry will appear on a separate WIP line.
Note: In order to report on activity codes that are invoiced separately, you need to select the Detailed option. The activity codes will then be displayed separately on the Invoice Breakdown by Code report.
-
-
Select your preferred Disbursement Layout from the list.
-
Grouped by Disbursement Code - displays all disbursement entries - grouped by disbursement code. Each disbursement code will appear on a separate WIP line.
-
Detailed - displays all disbursement entries individually. Each disbursement entry appears on a separate WIP line.
-
Do Not Show Separately - the disbursement amount will be automatically added to the timesheet entry WIP line. This option will only appear if the timesheet layout has been set to summarized.
Note: In order to report on disbursements that are invoiced separately, you need to select the Detailed option. The disbursement codes will then be displayed separately on the Invoice Breakdown by Code report.
-
-
Select your preferred Adjustment Layout from the list.
-
Summarized - displays all adjustment entries in a summarized format. The total of all adjustment entries will appear in a single adjustments WIP line.
-
Do Not Show Separately - the adjustment amounts will be automatically added to the timesheet entry WIP line. This option will only appear if the timesheet layout has been set to summarized.
-
- Select the Job Heading check box and select a display mode for grouped detailed invoices by activity code.
- Job ID & Code - displays the job ID and job code.
- Job Type Name - displays the job type name.
- If applicable, enter the Next Invoice Number.
- Select the default invoice due date type and type the required number of days.
- Type a default Invoice Message, for example, "Please pay within 7 days" - you can change the default message for a particular invoice or choose not to display it.
- Select the default Credit Note Template for this entity.
- Select the default Credit Note E-mail template for this entity.
-
Select the Statement Type:
-
Balance Forward
-
Open Item
-
- Select the Statement Template for this entity - the Default Statement Aged template shows 30, 60 and 60+ days ageing for the debt, by chronological order.
- Select the Statement E-mail for this entity.
- Select the Display Watermarks on Draft Invoices check box, if required.
- Select your payment options using the check boxes and type your firm's electronic funds transfer and/or credit card details, if applicable.
- Select the ePay (override) check box, if required. If you only use one ePay merchant, this option is not required.
- Select the category from the Accounts Receivable Notes Category list, if required.
- You can view receivable notes related to a client from the Receivable Notes tab in the client's Accounts Receivable Transaction page.
You can also view the notes via the client’s Contacts record from the Notes & Reminders tab in the client’s Contact Details page.
- The categories in the list come from the Note Categories in the contacts settings.
-
Select your Ageing Method:
-
Due Date - The date the payment is due.
-
Transaction Date - The date the transaction was done.
-
-
Set your Ageing Periods:
-
Enter the number of days that you would like to include in each ageing interval (up to 10 intervals are available) and the table will update accordingly.
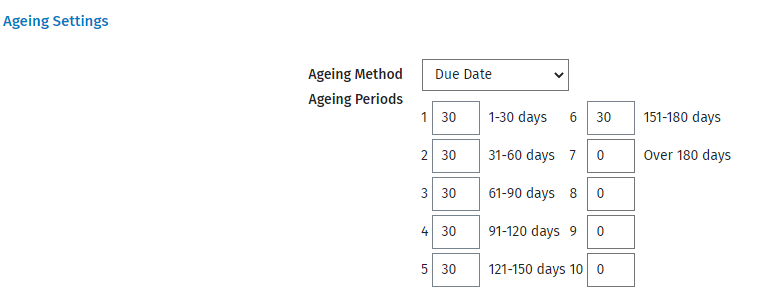 Note: Some pages and reports will only display a total of five periods because of the limited space available.
-
- Click Save.
Note:If you modify the E-mail Address field, it will also be modified in the firm details, and vice versa. If the field is left empty, the reply e-mails will be sent to a cchifirm.ca address and will bounce back to the sender as nonexistent.
Edit a billing entity
- Click Settings > Jobs & Billing.
- Click Billing Entities.
- Click the Manage Billing Entity button for the firm billing entity that you are setting up.
- Edit the details as required.
- Click Save.
