Customize job types
Settings - Jobs & Billing
Job types are templates that define the jobs that you will perform in your firm for your clients. You can have any type of job in Jobs & Billing. This includes annual accounts, tax, monthly, and other jobs. Each job added in Jobs & Billing has a job type with a description that displays as the default text on the invoice for the job. Using job types helps you classify jobs so you can easily search for and report on them.
Contents
Learn about the types of jobs
There are two main types of jobs.
- Annual Accounts (AA) jobs - track the work on a client's annual financial statements and must have AA as their job type short code. When creating an Annual Accounts job, you will need to set the period end date appropriately. Annual Accounts jobs have more status options than other jobs: Not Yet In, On hold, Allocated, Active, In progress, Finalising, Ready to issue, Complete and Filed.
- Other jobs - include all jobs except Annual Accounts jobs. They are used for wages, business advisory work, and other general work. There are no restrictions on the job types you can use for other jobs, provided their job type short codes are not AA.
Learn about the default job types
When Jobs & Billing is activated, it includes the default job types outlined in the table below. Job type codes marked with an * cannot be deleted, although you can modify the description.
|
Short Code |
Name |
Description |
|---|---|---|
|
ADV |
Advisory Services |
Provision of advice in respect of |
|
AA* |
Annual Accounts |
Compilation of financial statements for the year ended {PeriodEnded} |
|
AUD |
Audit |
Auditing financial statements for the year ended {PeriodEnded} |
|
BOOK |
Bookkeeping |
For bookkeeping assistance provided for the year ended {PeriodEnded} |
|
BD |
Business development |
Business development invoice text |
|
GEN* |
General |
General job invoice text |
|
IMPWIP* |
Imported WIP |
Imported WIP invoice text |
|
NTR |
Notice to Reader |
Compilation of financial statements for the year ended {PeriodEnded} |
|
PR |
Payroll |
Attending to administration and calculation of payroll |
|
REV |
Review Engagement |
Review of annual financial statements for the year ended {PeriodEnded} |
|
T1 |
T1 |
Preparation of personal income tax returns including all required scheduled attachments |
|
T2 |
T2 |
Preparation of corporate income tax returns, including relevant attachments for the {PeriodEnded} |
|
T3 |
T3 |
Preparation of T3 Trust income tax and information returns including all required schedules and attachments |
|
T4 |
T4 Slip(s) |
Preparation of T4 summary and T4 slip(s) to report salaries and wages paid during period ended {PeriodEnded} |
|
T5 |
T5 Slip(s) |
Preparation of the T5 summary and T5 slips to report dividends reported during the period ended {PeriodEnded} |
|
T5013 |
Partnership |
Preparation of Form T5013, Partnership Information Return, including relevant attachments for period ended {PeriodEnded} |
Add a job type
You can add your own job types alongside the default job types.
- Click Settings > Jobs & Billing.
- Click Job Types.
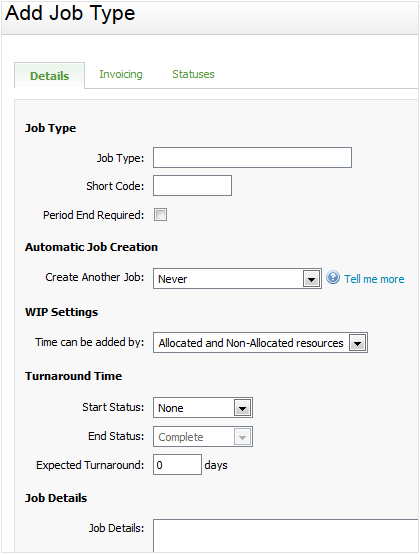
- Click Add Job Type.
- Type a label for the job type in the Job Type field, for example Annual Accounts.
If your firm is also using CCH iFirm in French or if you have to communicate with some French speaking contacts, you have to click the button and then enter the French description of the label.
 - Type a short code for the job type in the field provided, for example AA.
- Select the Period End Required check box, if you want a period end date to be specified when this job type is created (this check box must be selected for Annual Accounts jobs).
- Select a time frame from the Create Another Job drop-down list (if you are not using recurring jobs).
- Specify who can add time to the job from the Time can be added by drop-down list.
- Allocated and Non-Allocated resources - this is the default settings and allows any user to add time to a job.
- Allocated resources only - this option only allows allocated resources to add time to this type of job.
- The Add Time button on a job screen and the Add Time button on the Recently Viewed Jobs screen will be hidden for non-allocated resources.
- The job will not be displayed on the non-allocated resource's timesheet.
Note: This setting prevents unallocated resources adding time to a job. It ensures that time budgets are adhered to and jobs are completed as efficiently as possible. Also, managers will more likely be involved when an adjustment to fees is needed, i.e. when the job scope is changed.
- Select the turnaround time for the job type from the Start Status and End Status drop-down lists and enter the expected turnaround time in the appropriate field.
- Type job details, if required - they will display in the Job Details field when you set up a job.
- Click the Invoicing tab:
- Select invoice text from the list that you want to appear on invoices for this job type (click here to learn how to add invoice text items).
- If you have the setting for interim/progress text selected, then you can also select invoice text to be used when progress billing for this job type.
- Click the Statuses tab and select the statuses to assign to the job type.
- Use either one of these options to save your changes:
- Click Save to save and close the screen.
- Click the arrow on the Save button then select Save & add another to save your changes and add another job type.
Assigning roles to job types
To track tasks by role using Task Management, add users and roles to your job types.
Add roles to job types
-
Click Settings > Jobs & Billing.
-
Click Job Types.
-
Select the job type(s) that you want to add roles to.
-
Click the Statuses tab.
-
For each applicable status, select the appropriate role from the drop-down list.
Note: You can also add roles using Setting > Jobs & Billing > Job Statuses. -
Click Save.
These roles are available when managing resources and when adding tasks in Task Management.
Edit a job type
- Click Settings > Jobs & Billing..
- Click Job Types.
- Click the row of the job type you want to edit.
- Make the required change.
- Click Save.
Delete a job type
If the job type has not been used in the system, you can delete it. If it has been used, you will see an error message if you try to delete it. In this case, you should deactivate (archive) the job type instead.
- Click Settings > Jobs & Billing.
- Click Job Types.
- Click the delete
 icon for the job type you want to delete.
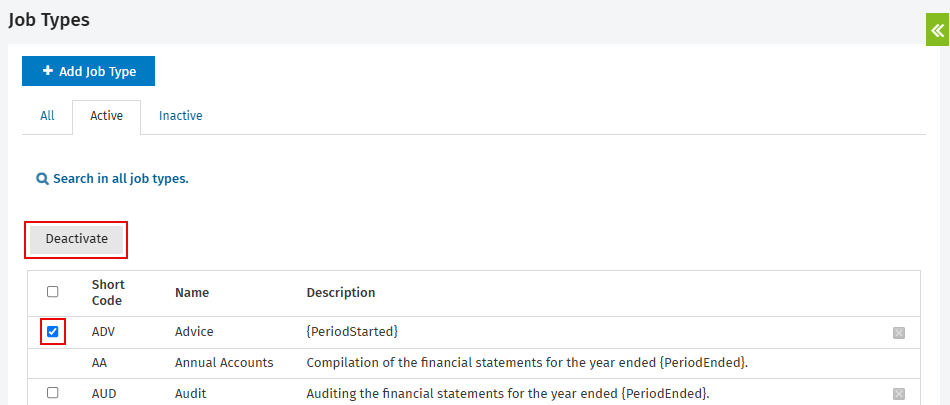
Deactivate a job type
If there are default job types that you will not be using, you can deactivate them. When you deactivate a job type it is moved to the Inactive tab, where it can be reactivated later.
- Click Settings > Jobs & Billing.
- Click Job Types.
- Select the job type(s) you want to deactivate using the check boxes.
- Click Deactivate.