Edit draft invoices
Invoicing - View, Add and Edit Invoices
Contents
View draft invoices
- Click Jobs & Billing > Invoices.
- Click the Draft Invoices tab to display all your draft invoices.
- Click a row to view the draft invoice.
Edit draft invoices
Delete an item
- Click Jobs & Billing > Invoices.
- Click the Draft Invoices tab to display all your draft invoices.
- Click a row to view the draft invoice.
- Click the Delete Job Invoice Entry button
 at the end of the row.
 - Click Yes to confirm.
Change the order of items
- Click Jobs & Billing> Invoices.
- Click the Draft Invoices tab to display all your draft invoices.
- Click a row to view the draft invoice.
- Drag and drop the invoice item rows using the drag indicator.
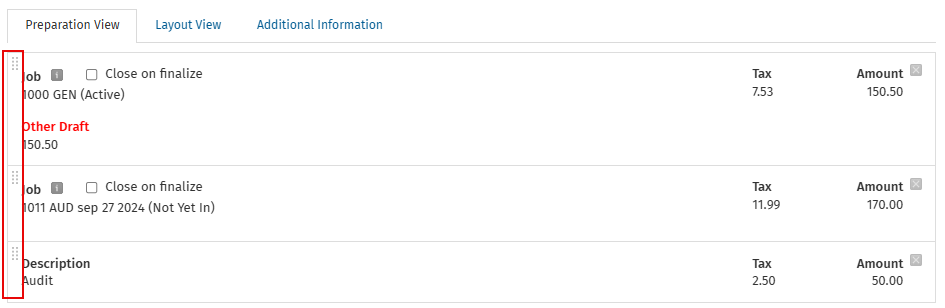
Close a job from WIP Line
- When viewing a WIP line, if the job is currently open, you will see the job status in brackets next to the job information (for example, Active).
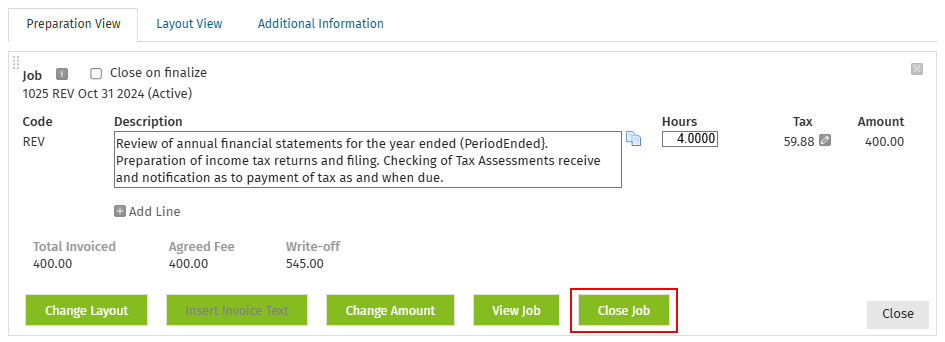
- Click the WIP line to enter the edit mode.
- Click the Close Job button.
- Select the appropriate effective closing date and job status and click Close Job. The WIP line will no longer show a job status and the job information will be shown in grey text.
Change billing entity on invoices
If you have multiple offices that require separate invoicing, use the steps below to change the billing entity on your invoices.
- Click Jobs & Billing > Invoices.
- Click the Draft Invoices tab.
- Click a row to open the invoice.
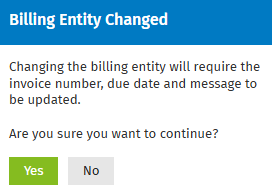
- Select the Billing Entity from the list.

- Click Yes on the notification indicating that the invoicing number will be updated. The invoice number is updated to the next sequential invoice number for that billing entity.
Change the amount
The WIP amount can be changed within the Change Amount dialog box. The Change Amount dialog box will contain a number of different expand/collapse sections. The sections displayed are dependent on how the WIP was created.
When closing a job that has any outstanding WIP on it, you are prompted to apply the write-off or write-on on the amount.
Make a simple amount edit
- Click a WIP line in the draft invoice to expand it into edit mode.
- Click the Change Amount button - the Change Amount dialog box opens and the Simple Amount Edit panel is displayed if no prior edits have been made to the amount.
- Enter the amount to change the WIP line using either one of these methods:
- Enter the amount in the Total line, if you do not mind what WIP items the change is applied to.
- Click the option button next to Timesheets, Disbursements and/or Adjustments (these items only appear as options if you have such entries on the job), then make the relevant changes.
- Select an option for what happens to the extra amount - this depends on whether the amount is more or less than the original.
- If the amount is more than the original amount, you can perform a write-on or invoice in advance.
- If the amount is less than the original amount, you can perform a write-off or send it back to WIP.
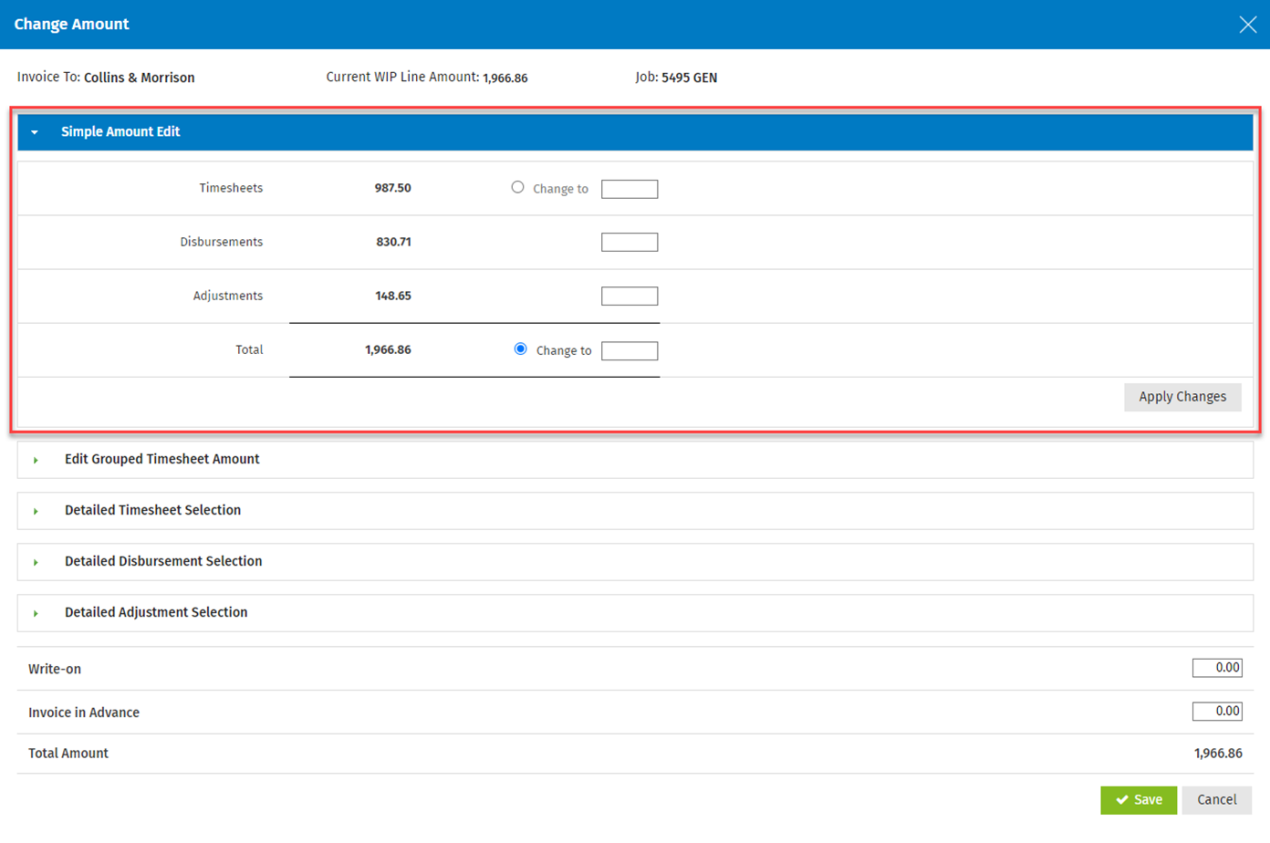
- Click Apply Changes.
- This action automatically allocates the relevant changes to the grids and fields below.
- If you have written-on or written-off an amount, you should review the assignment of that write-off/on in the expand/collapse section that appears at the bottom of the screen.
- Click Save to update the WIP line.
Note: If there are WIP items on the job, then the write-on/write-off will be applied to the relevant items, i.e. newest or oldest.
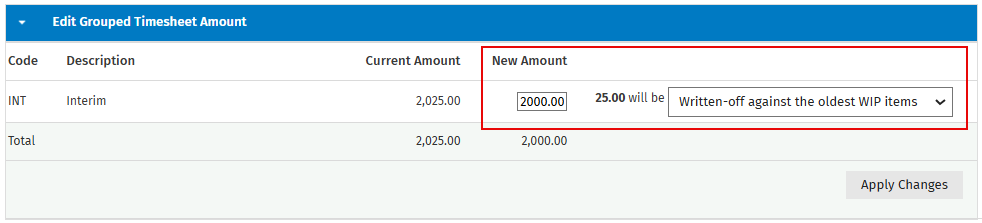
Change the amounts grouped by activity codes on timesheets
The Edit Grouped Timesheet Amount area is displayed only when timesheet entries are paired with a job. It presents grouped activity codes for which you can change the amount. The changes are then applied to the individual timesheet entries.
-
Click on a WIP line in the draft invoice to expand it into edit mode.
-
Click Change Amount; the Change Amount window will open.
-
Click Edit Grouped Timesheet Amount to expand the section into edit mode.
-
Edit the amounts as required.
-
The calculated write-on or write-off will appear in the corresponding column.
-
-
Select an option to indicate how the remaining amount should be handled. This selection will depend on whether the remaining amount is greater or lower than the initial amount.
-
If the amount is greater than the initial amount, you can perform a write-on or invoice in advance.
-
If the amount is lower than the initial amount, you can perform a write-off or send it back to WIP.
-
-
Click Apply Changes.
-
This action automatically allocates the relevant changes to the grids and fields below.
-
If you have written on or off an amount, review the assignment of that write-on/off in the section that appears at the bottom of the screen.
-
-
Click Save.
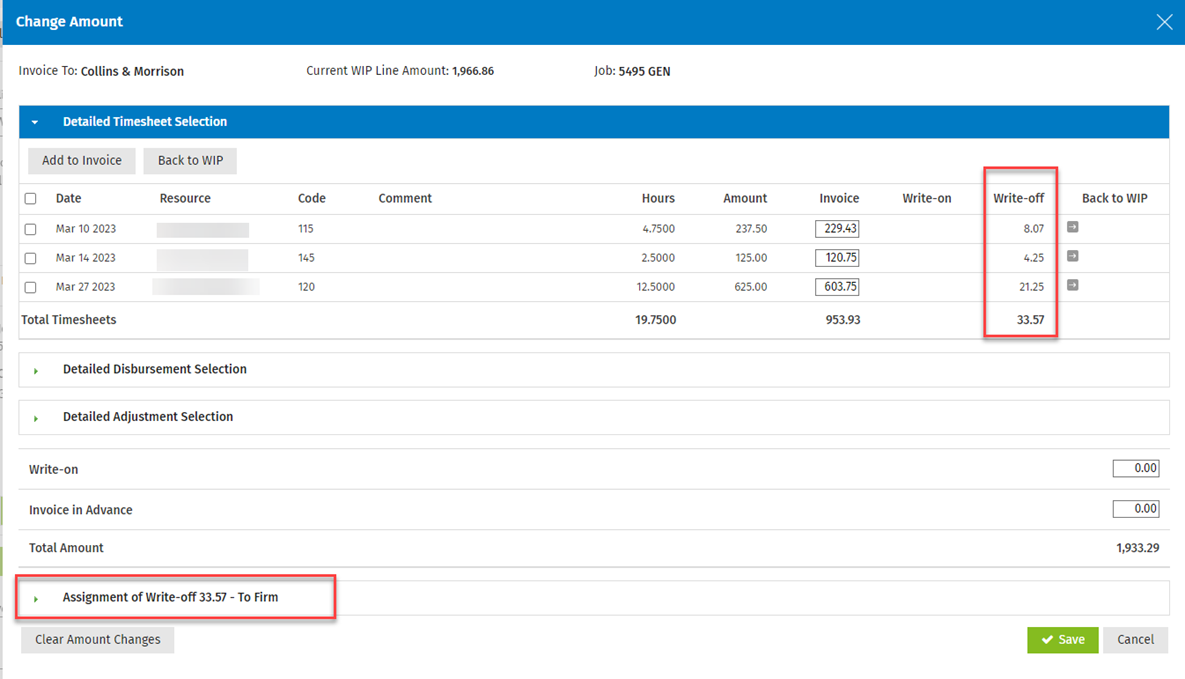
Change the amount on a timesheet
The Detailed Timesheet Selection area only displays if there are timesheets on the job.
- Click a WIP line in the draft invoice to expand it into edit mode.
- Click the Change Amount button - the Change Amount dialog box opens.
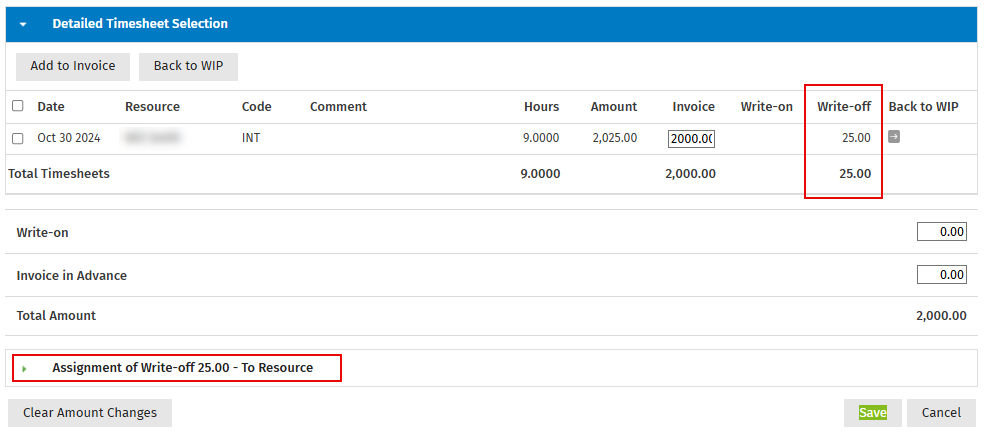
- Click Detailed Timesheet Selection to open the expand/collapse section into edit mode.
- Edit the amount in the Invoice column.
- The calculated write-on or write-off appears in the corresponding column.
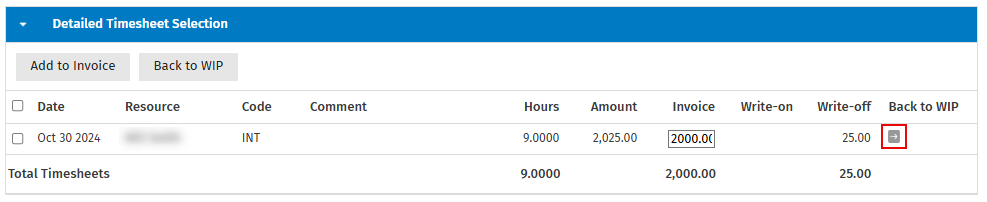
- The write-off amount can alternatively be sent back to WIP by clicking the button
 .
.
-
Process the WIP items, as required:
-
Select the check box at the start of the required row.
-
Click Add to Invoice to add the WIP items (that are on the job but not yet included) to the invoice. They may have been added to the job after the invoice was created.
-
Click Back to WIP to send the WIP items included in the invoice back to WIP and change the amount of the invoice in the process. The WIP can then be billed on a later invoice for that job. The amounts from the Invoice column are removed, thus reducing the totals.
-
- Click Save.
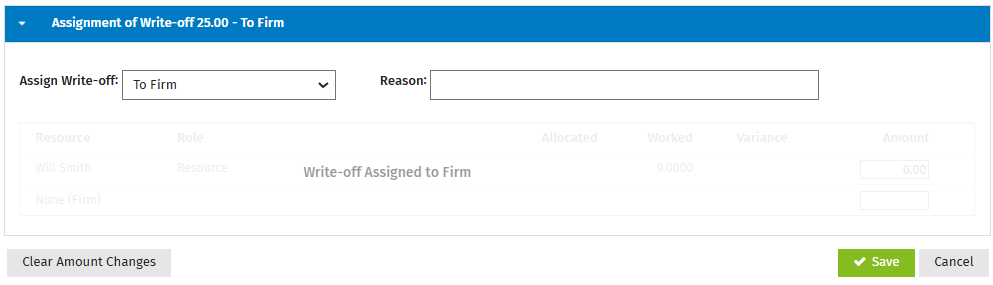
Assign the write-off or write-on
After completing the Simple Amount Edit and/or the Detailed Timesheet Selection areas, you can then assign the write-off or write-on to the firm or to an individual.
- Click Assignment of Write-off to open the expand/collapse section into edit mode.
- Select a write-off option from the Assign Write-off drop-down list.
- Enter a reason in the Reason field.
- Click Save.
Change the amount on a disbursement
The Detailed Disbursement Selection area only displays if disbursements are linked to the job.
- Click a WIP line in the draft invoice to expand it into edit mode.
- Click the Change Amount button - the Change Amount dialog box opens.
- Click Detailed Disbursement Selection to open the expand/collapse section into edit mode.
- Enter the amount to change the WIP line to:
- The calculated write-on or write-off appears in the corresponding column.
- The write-off amount can alternatively be sent back to WIP by clicking the button .
-
Process the WIP items, as required:
-
Select the check box at the start of the required row.
-
Click Add to Invoice to add the WIP items (that are on the job but not yet included) to the invoice. They may have been added to the job after the invoice was created.
-
Click Back to WIP to send the WIP items included in the invoice back to WIP and change the amount of the invoice in the process. The WIP can then be billed on a later invoice for that job. The amounts from the Invoice column are removed, thus reducing the totals.
-
- Click Save.
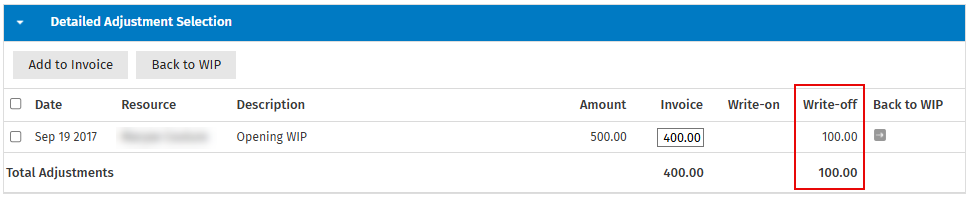
Change the amount on an adjustment
The Detailed Adjustment Selection area only displays if adjustments (write-on, WIP Opening Balance, WIP Transfers) are on the job.
- Click a WIP item in the draft invoice to expand it into edit mode.
- Click the Change Amount button - the Change Amount dialog box opens.
- Click Detailed Adjustment Selection to open the expand/collapse section into edit mode.
- Enter the amount to invoice in the Invoice column - the calculated write-on or write-off appears in the corresponding column.
- Click Save.
Invoice in advance
If required, use the Invoice in Advance field to add an additional amount to the WIP line that will be left as unallocated on the Invoice WIP Credit. Add only positive amounts. The Total Amount field displays the increase from amounts entered into the field. When you click Save, the WIP line amount is changed.

Edit the tax amount
You can change the tax amount that Jobs & Billing automatically calculates, using the default tax type in the Tax Type settings. You can also split the line amount and apply multiple tax types, which will in turn change the total tax amount.
- Click the Edit button
 to edit the tax amount on the invoice.
- The Edit Tax dialog box displays, with the following three columns:
- Amount - this is the line amount for which the tax amount is being edited.
- Tax Type - the available tax types are shown in this drop-down list.
- Tax Amount - this is read-only, and is the tax amount calculated from the amount and tax type columns. It updates as soon as you change the tax type or amount.
- The Edit Tax dialog box displays, with the following three columns:

- Click Add Tax Line.
- A new row appears with an amount of 0.00. The tax type is the default for the province.
- The amount fields only accept positive numbers.
- Enter the new amount and select the required tax type from the drop-down list.
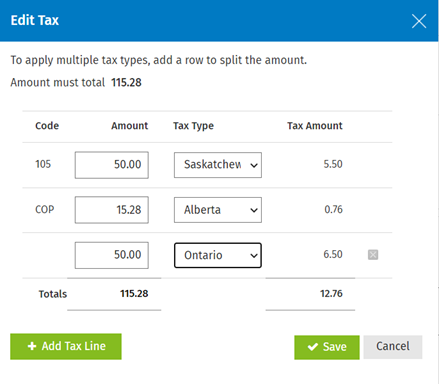
- Repeat steps 2 and 3 to add multiple tax lines and, as a result, split the tax amount.
- Click the Delete tax line button at the end of any rows you add (not the original row) to delete it, if required.
- Click Save - you are taken back to the invoice to see the WIP line updated for tax amount.
Fix a rounding issue
- Click the Edit button to edit the tax amount on the invoice.
- Click Add Tax Line.
- Reduce the original amount by the out of balance amount, for example 0.01.
- Add the rounding amount, for example 0.01.
- Set the Tax Type to No Tax.
- Click Save.
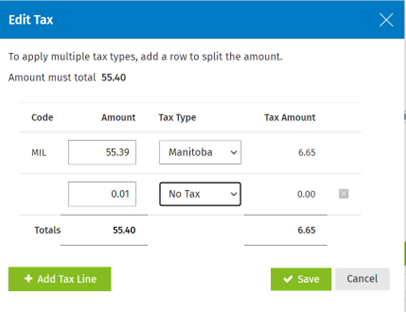
Note: Tax components used in multiple tax types, such as the GST, are grouped on a single line on invoices instead of being displayed on separate lines.
Change the layout
You can change the way the time, disbursement and adjustment information is displayed on the invoice.
- Click the Change Layout button below the WIP or simple lines on the invoice - the Change Layout dialog box displays.

- In the Time Layout list, select your preferred layout.
- Summarized - displays all timesheet entries in a summarized format. The total of all timesheet entries will appear on a single timesheet WIP line.
- Group by Activity Code - displays all timesheets entries - grouped by activity code. Each activity code will appear on a separate WIP line.
- Detailed - displays all timesheet entries individually. Each timesheet entry will appear on a separate WIP line.
Note: In order to report on activity codes that are invoiced separately, you need to select the Detailed option. The activity codes will then be displayed separately on the Invoice Breakdown by Code Report.
- Select your preferred Disbursement Layout from the list.
- Grouped by Disbursement Code - displays all disbursement entries - grouped by disbursement code. Each disbursement code will appear on a separate WIP line.
- Detailed - displays all disbursement entries individually. Each disbursement entry appears on a separate WIP line.
- Do Not Show Separately - the disbursement amount will be automatically added to the timesheet entry WIP line. This option will only appear if the timesheet layout has been set to summarized.
Note: In order to report on disbursements that are invoiced separately, you need to select the Detailed option. The disbursement codes will then be displayed separately on the Invoice Breakdown by Code Report.

-
Select your preferred Adjustment Layout from the list.
-
Summarized - displays all adjustment entries in a summarized format. The total of all adjustment entries will appear in a single adjustments WIP line.
-
Do Not Show Separately - the adjustment amounts will be automatically added to the timesheet entry WIP line. This option will only appear if the timesheet layout has been set to summarized.
-
-
Click Save.
Tip: Learn about billing templates and set your default invoice layout.