Learn about Account Receivables
There are four receivables security roles, click here for details
Contents
Learn about the Accounts Receivable area
You can use the Accounts Receivable area of Jobs & Billing to:
- Access all your receivables.
- View live information about your:
- Aged receivables
- Receivables by partner
- Top 10 Receivables - you can click the row of a top 10 receivable to access their details, add a transaction, and print a statement for them.
- Process transactions - this includes payments, credits, write-offs, discounts, debits, interest transactions, and invoice transactions.
- Print one or more statements to PDF.
Access the Accounts Receivable area in Jobs & Billing
- Click Jobs & Billing > Accounts Receivable.
- Use one of these methods to access details about transactions for all or some of your receivables:
- Use the search field to locate the required receivable. Click the Search for receivables button to display the expanded search filters. When using the expanded search, clients with $0.00 balances are only displayed if the Total Due filter is set to All. You can set the Total Due filter to Debit to only display clients that owe you money.

- Click the row of one of your top receivables.
- Click the All tab and click the row of the required receivables - you can then search for an invoice number or amount.
- Use the search field to locate the required receivable. Click the Search for receivables button to display the expanded search filters. When using the expanded search, clients with $0.00 balances are only displayed if the Total Due filter is set to All. You can set the Total Due filter to Debit to only display clients that owe you money.
- Use the tabs to access the Receivable Transactions and Receivable Notes.
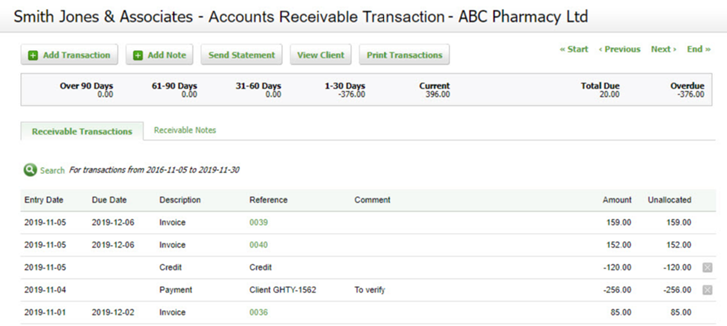
View your receivable notes
If you select an option (other than None) from the Receivable Notes Category box in the billing entities settings, the Receivable Notes tab is activated on the Accounts Receivable Transaction page. This enables you to view receivable related notes from within the Accounts Receivable section, so you have all the information available to you when collecting the debt.
The notes are laid out in the same way as on the client Notes & Reminders tab in Contacts.
- Click View All Notes to go the Notes & Reminders tab of the Contact Details page.
- Click the search link to access the search tools and search the notes for the defined category.
- Click Add Note at the top of the Accounts Receivable Transaction page to open the Add Note page.

Access receivables information from other areas
- There are various billing and receivables reports you can print to view detailed information.
- There are three dashboard widgets you can add to your CCH iFirm dashboard to help you view summarized information and monitor your receivables. They are: Aged Accounts Receivable, Accounts Receivable by Partner and Top 10 Accounts Receivable.
- If you access Jobs & Billing via a mobile phone, you are notified if a client has an overdue amount. This is handy if you want check the status of a client before meeting or contacting them.
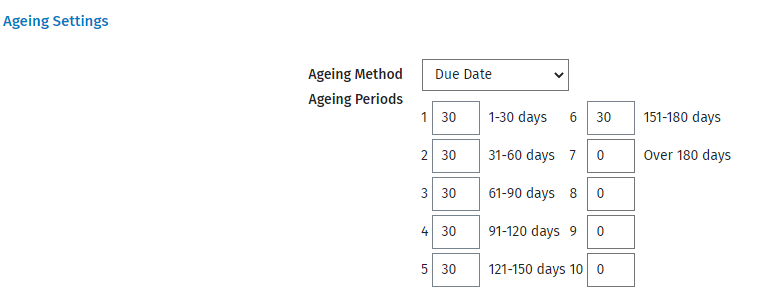
Set Accounts Receivable Ageing Method
Access the Accounts Receivable Ageing Settings
- Click Jobs & Billing if using your Admin login, or
Click Settings > Jobs & Billing if using your User login. - On the Jobs & Billing page, click General Settings.
- Click the Accounts Receivable tab.
- Select your Ageing Method:
- Due Date - The date the payment is due.
- Transaction Date - The date the transaction was done.
- Set your Ageing Periods:
- Enter the number of days that you would like to include in each ageing interval (up to 10 intervals are available) and the table will update accordingly.
 Notes:
- You can edit the periods for each of your Billing Entities by accessing Settings > Jobs & Billing > Billing Entities.
- Some pages and reports will only display a total of five periods because of the limited space available.
Adjusting Statement Templates
Merge fields are available to support these additional periods on statement templates.
The Default Statement Aged and the Open Item - Default Statement Aged statements can be customized to display the ageing periods.
For example, if you use the Due Date method and five Aged Periods plus the Current period (based on 20-day increments), your statement template should be set as follows:
|
Over 80 Days |
61-80 Days |
41-60 Days |
21-40 Days |
1-20 Days |
Current |
|---|---|---|---|---|---|
|
<<Period5AndOver>> |
<<Period4>> |
<<Period3>> |
<<Period2>> |
<<Period1>> |
<<Current>> |