Import Jobs
- Settings - Installation;
- Jobs - View, Add and Edit Jobs
To import your jobs into CCH iFirm, you need to prepare a .csv file using the template provided in CCH iFirm. You can import multiple different job types for the same contact in one .csv file.
Contents
Download the .csv file template
You can prepare a .csv (comma-delimited) file of your jobs to be imported using the template provided in CCH iFirm.
- Click Settings > Installation.
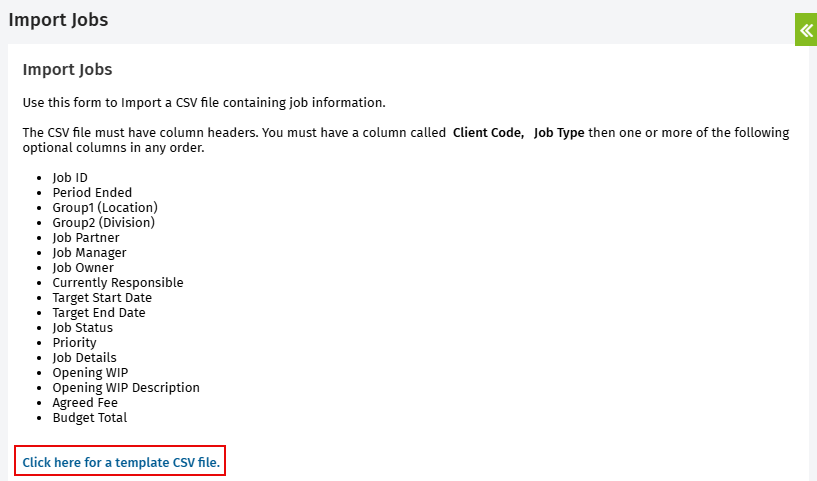
- On the Installation page, click Import Jobs.
- Click the Click here for a template CSV file. link to download the sample .csv file to your computer.
- Save the .csv file to your computer - it will open with Microsoft® Excel®.
Prepare the Jobs Import .csv file
Next, you need to populate the .csv file template with your data.
You can use this table as a guide for preparing the .csv file of your jobs. You do not need data for all the column headings.
If a job type requires a Period Ended, this column must be populated in your .csv file.
|
Column Description |
Data Format |
Information |
|---|---|---|
|
Client Code |
|
This is a required field. The client code must match the code of a contact in the system. |
|
Job Type |
For example: Audit, General or Annual Accounts. |
Enter the name of a valid job type (available under Settings > Jobs & Billing > Job Types). |
|
Job ID |
|
Optional column. Used to update the data of an existing job. |
|
Period Ended |
Use the YYYY-MM-DD date format |
Any job types (for example an AUD or T2 job) that requires a period ended date must have a valid date included on the spreadsheet. |
|
Job Partner |
|
Optional column. Enter the username of the user assigned as job partner. The user must have the partner role. |
| Job Manager |
Optional column. Enter the username of the user assigned as job manager. The user must have the manager role. |
|
| Job Owner |
Optional column. Enter the username of the user assigned as job owner. By default, the user performing the import will be set as the job owner for the jobs. |
|
| Currently Responsible |
Optional column. Enter the username of the user designated as currently responsible. |
|
|
Target Start Date |
Use the YYYY-MM-DD date format |
Optional column. Enter the date to be used in Capacity Planning. Click here to learn more. |
|
Target End Date |
Use the YYYY-MM-DD date format |
Optional column. Enter the date to be used in Capacity Planning. Click here to learn more. |
|
Job Status |
|
Optional column. Enter the name of a valid Job Not Yet Started job status for the job type selected (available under Settings > Jobs & Billing > Job Statuses). |
|
Priority |
Normal, Red, Blue, Green |
Optional column. Only the priority options available in CCH iFirm may be used. If left blank, the default priority (Normal) is assigned. |
|
Job Details |
|
Optional column. Enter up to 100 characters. |
|
Opening WIP |
Use a period for decimal separation. Negative values must be entered with a – (e.g., – 50.00) |
Optional column. You can enter the opening WIP as an alternative to importing it when you first start using Jobs & Billing. |
|
Opening WIP Description |
|
This column is mandatory if you populate the Opening WIP column. Enter up to 100 characters. |
|
Agreed Fee |
Use a period for decimal separation |
Optional column. Enter the amount you have agreed to charge the client. This becomes the default invoice amount and it will show in the Budget field in reports and job lists. This overrides any agreed fees you may have created for the client. |
|
Budget Total |
Use a period for decimal separation |
Optional column. Enter the estimated cost of the job. This amount does not show in the invoice. |
Import the Jobs Import .csv file
When jobs are imported, a new job is created for each row in the .csv file unless a job ID has been specified.
- Click Settings > Installation.
- On the Installation page, click Import Jobs.
- Click Choose File to locate and select the .csv file to be imported.
- Click Import.
- Check the import notification to confirm that your data was imported successfully.
Reimport the Jobs Import .csv file
If you want to update multiple jobs, you can populate the .csv file by following the steps in the Prepare the Jobs Import .csv file section. The Job ID, Client Code and Job Type column headers are mandatory.
Once you have populated the .csv file with the updates to your jobs, you can proceed with the reimport as indicated below.
- Click Settings > Installation.
- On the Installation page, click Import Jobs.
- Click Choose File to locate and select the .csv file to be imported.
- Click Import.
- Check the import notification to confirm that your data was imported successfully.

