Remove a user from Jobs & Billing
If you want to deactivate an CCH iFirm user account, you need to carry out extra steps if the user is a Jobs & Billing resource. If the user has been allocated to jobs, you need to remove all resource allocations before you can deactivate the user account. You may also need to change the job owner of any jobs the user is the owner of, and redirect automatic e-mails if they are set up to be sent to the user. This ensures that all of the user’s jobs are taken care of, as all allocated work is transferred to someone else and jobs are owned by someone else. It also ensures that the user no longer receives any Jobs & Billing e-mails or appears on any Jobs & Billing reports.
Contents
Read a case study - limited CCH iFirm licences
The following case study may apply to your firm, if you have used up the maximum number of user accounts that come with your CCH iFirm licence. The process of changing a user gets complicated when Jobs & Billing resource allocations are involved.
Situation: You want to add Anne as a new user to CCH iFirm to replace Sam, a CCH iFirm user who has recently left your company. However, you do not have enough licenses in CCH iFirm to simply add a new user account for Anne. You need to deactivate another user account first. You cannot deactivate Sam's account yet because he was allocated as a resource to a lot of jobs and therefore, has a lot of hours that you want to reallocate to Anne. You cannot reallocate the hours to Anne because she is not a user in CCH iFirm yet.
Recommendation: Deactivate another user account (Chloe) temporarily, so that you can add Anne as a new user. You can then remove the allocations from Sam and allocate them to Anne. Once this is done you must deactivate Sam's user account (as he has left the company), so that you can reactivate Chloe's user account (current staff member).
Reallocate a user's automatic resource allocations
Workflow and Resource Manager
You first need to search for all of the user's automatic resource allocations, then reallocate them to another user, either individually or in bulk.
- Click Jobs & Billing > Resource Allocations.
- Click Search Auto Resource Allocations. to access the search filters.
- In the Resource list, select the user.
- Click the Searchbutton - the list on the page updates to display only the user's automatic resource allocations.

- Reallocate the user's automatic resource allocations to someone else, using your preferred method (or a combination of both):
Tip: If you use this method, you can make the new resource (user) the job owner at the same time, if required.
Reallocate the user's manual resource allocations
Jobs - View, Add and Edit Jobs
You first need to search for all of the user's resource allocations that were manually added to jobs, then reallocate them to another user, by either setting up automatic resource allocations or manually adding new resources to the jobs.
- Click Jobs & Billing > Jobs.
- Click
 to access the search filters.
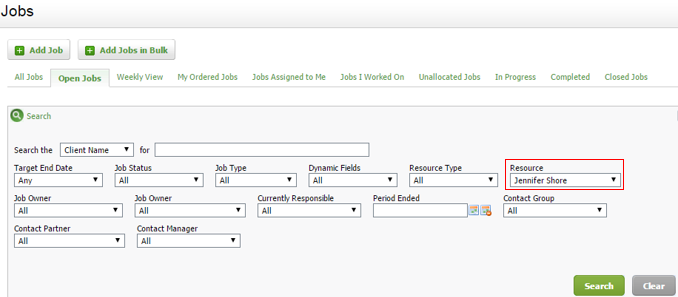
 - In the Resource list, select the user, for example Jennifer Shore.
- Click the Search button - the list on the Jobs page updates to display only jobs in which Jennifer was allocated as a resource.

- Reallocate the user's manual resource allocations to someone else, using one of the following methods:
- Add automatic resource allocations for the clients that appear in the list. This will save you time in the future if you ever need to make changes again.
If access has been provided to you, you can change the resource allocations for users in the Capacity Planning area.
Tip: When you add automatic resources, you can make the new resource (user) the job owner at the same time, if required.
- Manually delete the resource for each job on the list, then add a new resource.
Change the job owner
Jobs - View, Add and Edit Jobs
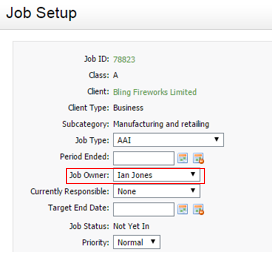
If the user was set as the job owner for one or more jobs, a new owner must be set for each of those jobs. If you do not change the job owner while reallocating resources, you need to identify the jobs of which the user is the owner and then manually edit each one to change the job owner. Please note that the job owner can be edited in bulk.
- Click Jobs & Billing > Jobs.
- Click
 to access the search filters.
 - In the Job Owner list, select the user, for example Jennifer Shore.
- Click the Search button - the list on the Jobs page updates to display only jobs in which the user (Jennifer) was the owner.
- Change the job owner for the all the jobs in the list:
- Open CCH iFirm in another browser tab, so that you can edit jobs in one tab and keep your list of jobs open in the other tab.
- Locate and open the first job and click Edit details to open the Job Setup page.
- Click Save.
- Repeat for all other jobs on the list.
Redirect automatic e-mails
Settings - Jobs & Billing
If the user was set up to receive any automatic e-mails, you need to remove that user's e-mail address so that they do not get any more e-mails from CCH iFirm. You can add another user's e-mail address, if required.
- Click Settings > Jobs & Billing. > General Settings > Automated E-mails tab.
- In the Daily tasks e-mail notifications are sent to box, remove the user's e-mail address..
- Add another user's e-mail address, if required.

