Add information to an invoice
Invoicing - View, Add and Edit Invoices
Once you have created a draft invoice you can add various bits of information to it. This enables you to customize each invoice to contain the exact information that is relevant to each of your clients.
Contents
Add a WIP line
Adding a WIP line enables you to invoice a job's WIP items, such as timesheets, disbursements and adjustments (WIP transfer, write-ups, and so on). You can add as many WIP lines as required for your client.
- Click Add WIP Line.
- The Select Job to Invoice dialog box displays, listing all the jobs assigned to the client, including jobs with 0.00 WIP.
- If the client is part of a billing group, the other group members and their jobs are also listed.
- If the client is part of a contact group, the other group members and their jobs are also listed.
- You can click the blue job link to open the job in another tab and view its details.
- You can click the column headers to sort the list, for example, by Billing Group.
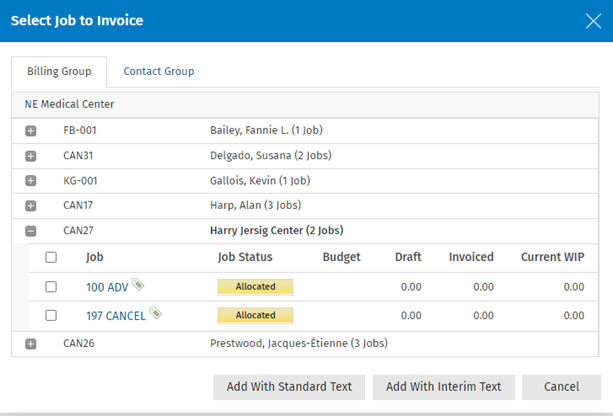
- Select the check boxes of the jobs you want to add as WIP lines to the invoice.
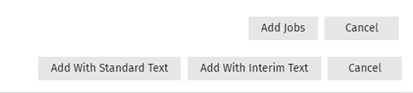
- Click Add Jobs or Add With Standard Text or Add With Interim Text, as required. The Add With Standard Text and Add With Interim Text buttons only display if you have enabled the Use interim/progress text on job types setting.
-
After adding the job, you may see warning messages. For example, if the job has an unallocated WIP Credit, Unallocated WIP credits exist will show. In this case, you should remove the WIP line and allocate the existing WIP credit on the job.

- Edit the WIP line, if required.
- The information that displays:
- Job - the job information showing the job id, job type and relevant period ended date. When clicked, the
 button will show a pop-up with the job information.
 - Code - this is the Job Type code (edit mode).
- Description - this is the description from the job type settings (edit mode).
- Close on finalize - select this check box to close the job when the invoice is finalized. This option is suitable if your billing process involves closing the job after the invoice has been generated. It saves you time as you do not have to manually close the job. If any of the jobs have a WIP balance, the system will write-off/on the amount according to the default action for WIP balances when closing a job setting. The following security role is required: Jobs - Close Jobs.
- Hours - this will show the unbilled hours of the debit WIP items being included on the invoice. They are the debit WIP items with an outstanding WIP amount (unallocated). For example, if a timesheet is added for 5 hours and only half of the amount is invoiced, the invoice will show 2.5 hours. When the timesheet is added to the next invoice, the remaining 2.5 hours are shown.
- Tax - the amount of tax that has been calculated. It will be calculated based on the default tax type selected in settings. Note that you can edit this amount, if required.
- Amount - this is made up of the outstanding amounts on the debit WIP items. The amount can be changed by clicking the Change Amount button.
- Job - the job information showing the job id, job type and relevant period ended date. When clicked, the
- You can drag the row to a new position in the order or delete it.
- Click View Job to open the job in a new tab.
- Click Close or click away from the line, to display the WIP line in summary mode.
- The information that displays:

Note: A draft invoice may include pending transactions. These are a special version of WIP transactions and allocations, that ensure that the WIP debits on the draft invoice cannot be written off or edited in error.
Split a WIP line
You can split the WIP for an individual job. In order to see this option on an invoice, you must set your time layout, at the invoice or billing entity level, to be summarized.
To modify the time layout at the invoice level, see change the layout.
To modify the time layout at the billing entity level, see add and edit billing entities.
To split the WIP for a job into multiple lines:
-
On a draft invoice, click the WIP line to open it for editing.
-
Click the Add Line button.
-
Enter the Description, Hours and Amount for the new line.
-
Edit the existing line amount and hours to ensure that the total of all lines match up with the original amounts (warnings display until the figures add up).
If you need to change the overall amount for the job, click the Change Amount button. Click here to learn more.

Add a group line
Adding a group line allows you to group existing WIP lines on the invoice under the one group line description. The group line description will be shown to the client only and not the individual job descriptions.
- Click Add Group Line.
- Type the group description.
- Click Add WIP Line to Group.
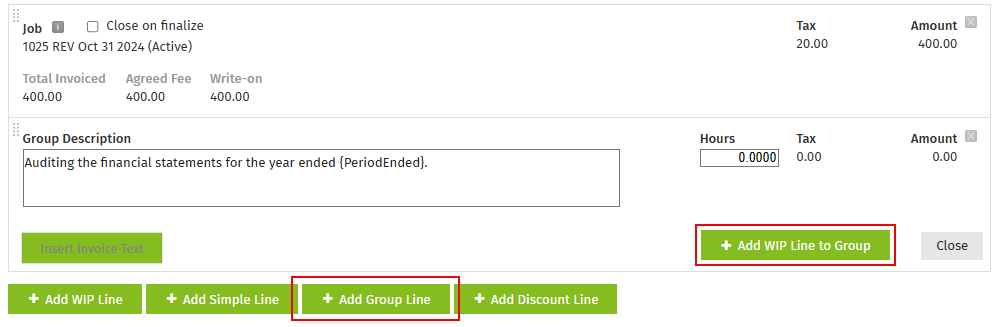
- Select the WIP lines to include with the group line.
- Click Add WIP Lines.

- Click the Layout View tab - this displays the content that will show on the invoice.

Add a simple line
You can add an invoice line that is not related to a job.
- Click Add Simple Line - a row is added to the invoice line item section and opens in edit view.
- Type a description, then press the tab key to move to the next box.
- Enter the hours if applicable.
- Enter the invoice amount.
- Repeat the above steps to add multiple simple line invoice entries.
- Drag and drop the invoice item rows to change the order. The drag indicator on the left hand side is used also.
- Click off the row or click Close - the row will change to the summary view.

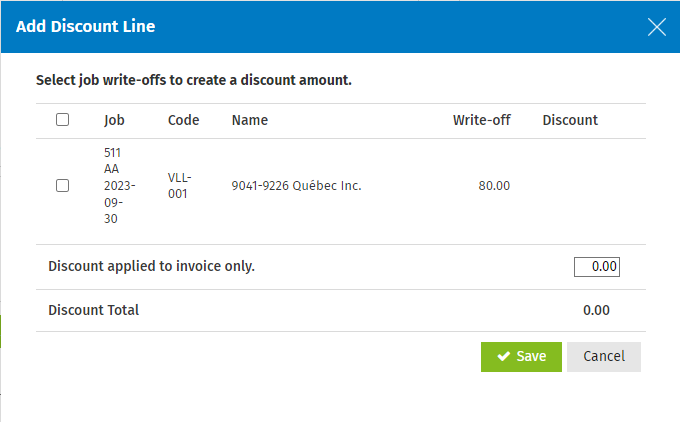
Add a discount line
When applying a write-off to jobs on an invoice, you can add a discount line, which will show those write-offs as a discount to the client. You can also apply a discount to an invoice as a whole, without having it linked to a particular job.
Associate a discount with a job
To associate the discount with a particular job on the invoice, you first need to apply the write-off by using the Change amount button within the invoice line. You can then choose to show that write-off as a discount on the invoice. When the discount is added this way, the tax is handled at the WIP line.
- Click Add Discount Line.
- Select the check box(es) of the job write-offs you want to show as discounts.
- Click Save.
- A discount line is added to the bottom of the invoice.
- The amount of the invoice does not change because this discount has already been accounted for within the job line. However, the jobs (WIP lines) that you selected have their WIP line amounts changed to not include the write-off amount. For example, if the WIP line was previously showing an amount of $250.00 and you applied a $50.00 write-off on a discount line, the WIP line amount will show as $300.00. The $50.00 is shown on the discount line.
- If you later delete a WIP line that was included in a discount line from the invoice, the write-off amount is removed from the discount line.
- You can add multiple discount lines in this way. However, if a job is already included on another discount line, it does not appear in the new discount line.
Apply a discount to the whole invoice
This method adds an amount to a discount line that applies to the whole invoice. This is used to reduce the amount of the invoice total only. This allows you to apply discounts without doing write-offs on WIP lines. It also allows you to apply a discount to an invoice that only contains simple lines. When the discount line is added this way, the HST is displayed at the discount line level.
- Click Add Discount Line.
- Enter the discount amount.
- Click Save.
- The discount appears on the invoice as a separate line and updates the total.
- You can click the line to change the amount or edit the text that appears on the invoice.

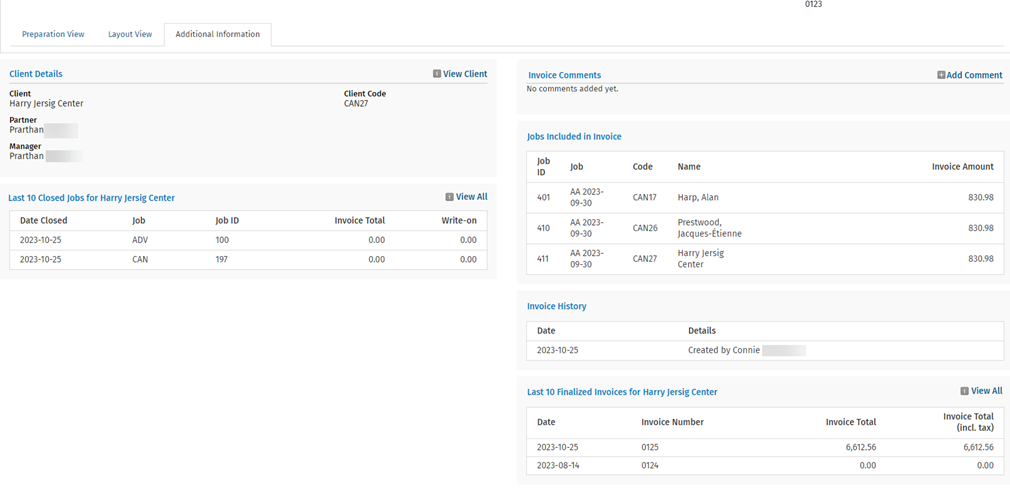
View additional information
Click the Additional Information tab to view information about the jobs included on the invoice, including Client Details, Last 10 Closed Jobs for the client, Invoice Comments, Jobs Included in Invoice, Invoice History and Last 10 Finalized Invoices for the client.
If you make a change to a job, for example adding time to it, the change will not be reflected in the invoice unless you update the invoice using either of the two methods outlined below.
Method 1
This method can be used for any WIP items (time, disbursement and so on).
- Click Change Amount - items that are new and not currently included on the invoice are displayed.
- Select the items you want to add.
- Click Add to invoice.
Method 2
This is a quick method, however, it is not suitable if you have made changes to the invoice text or layout, for example, as it will cause you additional work. In that case method 1 is the best option.
Delete the job line entry in the invoice and use Add a WIP Line to add it again.