Add users
Security - View, Add and Edit Users
The person in your firm responsible for setting up and maintaining user accounts can log in to CCH iFirm as the admin user or general user to manually add other user accounts.
- If you are not running other modules of the CCH iFirm, you will see some fields that do not apply to your firm when you add a user - just ignore them.
- If you want to ensure that certain user information remains confidential, leave the sensitive fields blank.
- Once you have added a Partner/Admin user, it is not possible to change their username, password, or security role.
Contents
Manually add a user
- Click Users - if using your Admin login, or
Click Settings > Users - if using your User login. - On the User Manager page, click Add User.
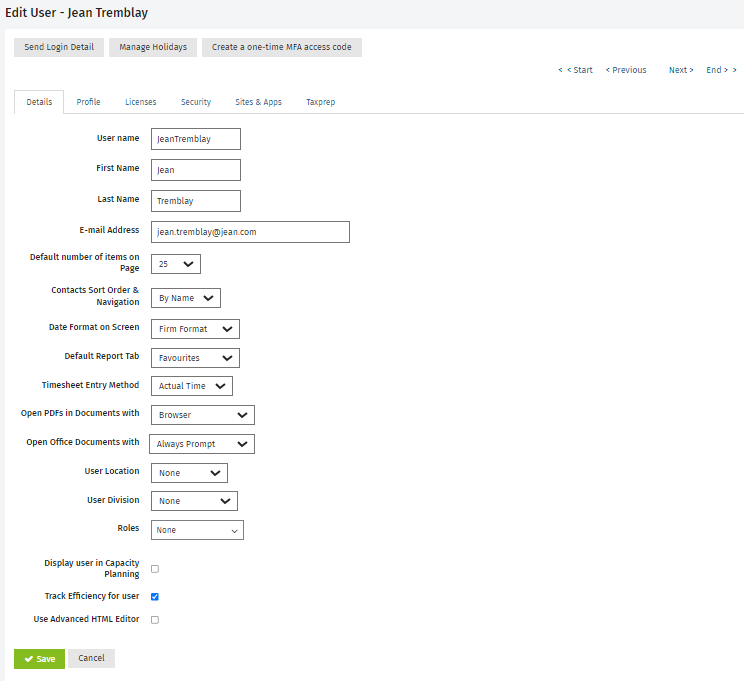
- Enter the mandatory details about the user: User Name (ensure that you do not include an apostrophe), the user's first name and last name and the user's e-mail address.
- Make selections as required (settings are dependent on the CCH iFirm modules you have):
- Select the Default number of items on Page - set how many items (10, 25 (default), 50, 100 or 200) you want displayed on a page before the user has to navigate to the next page.
- Select the Contacts Sort Order & Navigation - set the preferred sort order, either By Name (default) or By Code, for the grids and the navigation links (Start, Previous, Next and End) in the Contacts module.
- Select the Date Format on Screen - this is the way you want dates to be displayed on your pages. The firm format is the default setting. This is set in the firm details area. Even if you select another format, the firm format is still used in the reports, invoices and statements.
- Select the Default Report Tab - set the report tab that displays by default when users click Reports > All Reports. Setting the report section that is most relevant to the users enables them to get to those reports more quickly.
- Set the Timesheet Entry Method - Select Actual Time, Units or Decimal. Click here for more information.
- Select Display name in Partner field - if you want the user to display as a partner in a contact's profile.
- Select Display name in Manager field - if you want the user to display as a manager in a contact's profile.
- Select Display user in Capacity Planning field - if you want the user to appear in the Capacity Planning area of Jobs & Billing.
- Select Track Efficiency for user - if you want the user to be included in efficiency reporting.
- Set the Hourly Chargeout Rate and the Hourly Cost - enter the hourly rate and the hourly cost that apply to this user. For more information on the chargeout rate, click here.
Note: if the hourly cost is entered for an existing user, it will be calculated in this user's timesheets.
- Select Use Advanced HTML Editor - if you want the user to have full access to the content editor toolbar in CCH iFirm Intranet (for advanced users).
- Click the Profile tab to add more details, if required.
- Use the Calendar button
 to select the day the user started work at your firm.
 - Type the user's work, home, and mobile phone numbers.
- Use the Calendar button to select the user's birthday.
- Use the Calendar button
Tip: Users can enter details about themselves by clicking their username in the top menu.
- Click the Licenses tab to associate licenses with a user to allow the user to access the desired CCH iFirm applications.
- Click the Security tab and assign the relevant profiles and security roles.
- We recommend that you assign the Contacts - View Only security role to all users, so that they can access the Contacts application and view the contact records.
- You may want to delegate the tasks of setting up the Contacts application, adding contact records or setting up users to another staff member. In this case, you will need to apply the applicable security roles to that user's account. For example, Settings - Contacts.
- More security roles will become available once your application(s) or module(s) is activated. For example, if you bought Jobs & Billing, you will not be able to assign any Jobs & Billing security roles until the application is activated. You can come back and edit user accounts at any time.
- Click Save.
- Repeat the above steps to add user accounts for all staff members who will be using CCH iFirm.
- Send the login details in bulk when you have finished adding all users.
- Alternatively, you can click Send Login Detail at the top of the Edit User page to notify that individual user of the new account.
Import users in bulk
Settings – Installation
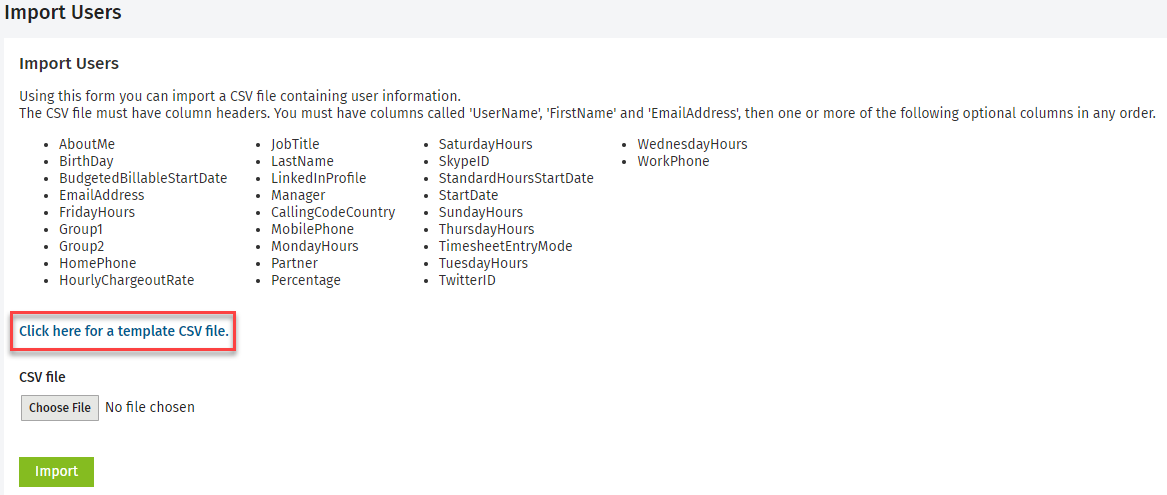
You can import users in bulk into CCH iFirm; this involves creating a comma-delimited text (.csv) file, which is a spreadsheet containing your users’ data.
Step 1: Download the .csv file template from CCH iFirm
Before you import any data into CCH iFirm, we suggest that you download the .csv file provided by CCH iFirm. The .csv file acts as a template for you to use because it contains the field headings that match the CCH iFirm system.
- Click Installation > Import Users if you are using your Admin login; or
Click Settings > Installation > Import Users if you are using your User login. - Click the Click here for a template CSV file link to download the .csv file template to your computer.
Step 2: Prepare the data
You may want to prepare and import a .csv file containing only a few of your users to test that it imports correctly. Once the .csv file imports without error and you are satisfied with the imported data, you can proceed to import all your other users.
- Open the .csv file.
- Populate the columns with your user data.
- Delete any columns that you do not want to use.
- This will ensure you do not get any error messages during the import process that relate to data you do not have nor want to use.
- Save the file.
Important points to consider when preparing to import users:
Ensure you are using the Admin login when importing users.
- Remove carriage returns, commas and spaces.
- Ensure that there are no duplicate records – there should only be one line for each username.
UserName, FirstName, LastName, EmailAddress, CallingCodeCountry and MobilePhone are mandatory fields.
- The date format is Mmm dd yyyy.
- Fields requiring an amount must be populated with numbers only, not letters and not alphanumeric characters. For example, use 21, not twenty-one.
- Columns that have numbers, such as mobile phone numbers, that commence with a 0 need to be formatted as text fields, not numerical fields. This will hold the 0 at the beginning of the number.
- Do not use any special characters (for example %, &, !). You can use Notepad ++ to help you identify any special characters embedded in your .csv file.
Apostrophes and commas are not supported in the UserName, FirstName, LastName, AboutMe and EmailAddress columns of the .csv file.
Additional information:
-
To import SSO identifiers, the .csv file must include the column headers UserName, FirstName, LastName, EmailAddress, SSOUserName and SSOIdentifierId. You will find below an example of the columns and values you will need in your .csv file for this import. Note that the SSOIdentifierId column should be set to 1 in most cases, as it refers to the identifier ID.
UserName
FirstName
LastName
EmailAddress
SSOUserName
SSOIdentifierId
testuser
John
Smith
test.test@wolterskluwer.com
test.test@wolterskluwer.com
1
Important notes:
It is not possible to update the identifier records of users that are already assigned to your identity provider.
The Assign SSO Identifiers security role must be assigned to the user performing the import.
-
To import security profiles, the .csv file must include the column headers UserName, FirstName, LastName, EmailAddress and Profile. You will find below an example of the columns and values you will need in your .csv file for this import.
Note that the accepted value for the Profile column refers to the numerical IDs of the profiles you want to associate. You can get the profile ID by navigating to Settings > Users > Manage Profiles. Click on the desired profile and the ID will be displayed at the end of the URL (e.g., https://yoursite.cchifirm.ca/#/fe/role_security-edit?mode=edit&id=4). You can associate multiple profiles to a user in the same import by separating the IDs using the pipe character as a field separator. You cannot remove profiles using the .csv import; subsequent imports will append the additional profiles to the ones associated with the user. By default, no security profile will be assigned to the user when the cell is left empty.
UserName
FirstName
LastName
EmailAddress
Profile
testuser
John
Smith
test.test@wolterskluwer.com
4|3|5
-
To import roles, the .csv file must include the column headers UserName, FirstName, LastName, EmailAddress and Roles. You will find below an example of the columns and values you will need in your .csv file for this import.
Note that the accepted value for the Roles column refers to the content of the EN field of the roles you want to associate. You can get the EN role title by navigating to Settings > Users > Manage Roles. Click the desired role and the content will be displayed in the EN field (example: Partner). You can associate multiple roles to a user in the same import by separating the roles using the pipe character as a field separator. You cannot remove roles using the .csv import; subsequent imports will append the additional roles to the ones associated with the user. The options All and None can be used. By default, no role will be assigned to the user when the cell is left empty.
UserName
FirstName
LastName
EmailAddress
Roles
testuser
John
Smith
test.test@wolterskluwer.com
Partner|Preparer
Active | SendLoginEmail | Outcome |
0 | 0 | Imports the user as inactive. No login credentials will be sent by email. |
0 | 1 | Warning generated: Cannot send login details for an inactive user. Please activate the user or disable the Send Login option. |
1 | 0 | Imports the user as active. No login credentials will be sent by email. Note: These are the default values used if none are provided in the .csv file. |
1 | 1 | Imports the user as active. Login credentials will be sent by email. |
Step 3: Import the .csv file into CCH iFirm
- Click Installation > Import Users if you are using your Admin login; or
Click Settings > Installation > Import Users if you are using your User login. - Click Choose File or Browse (the button label may be different depending on the browser you use) to locate your .csv file.
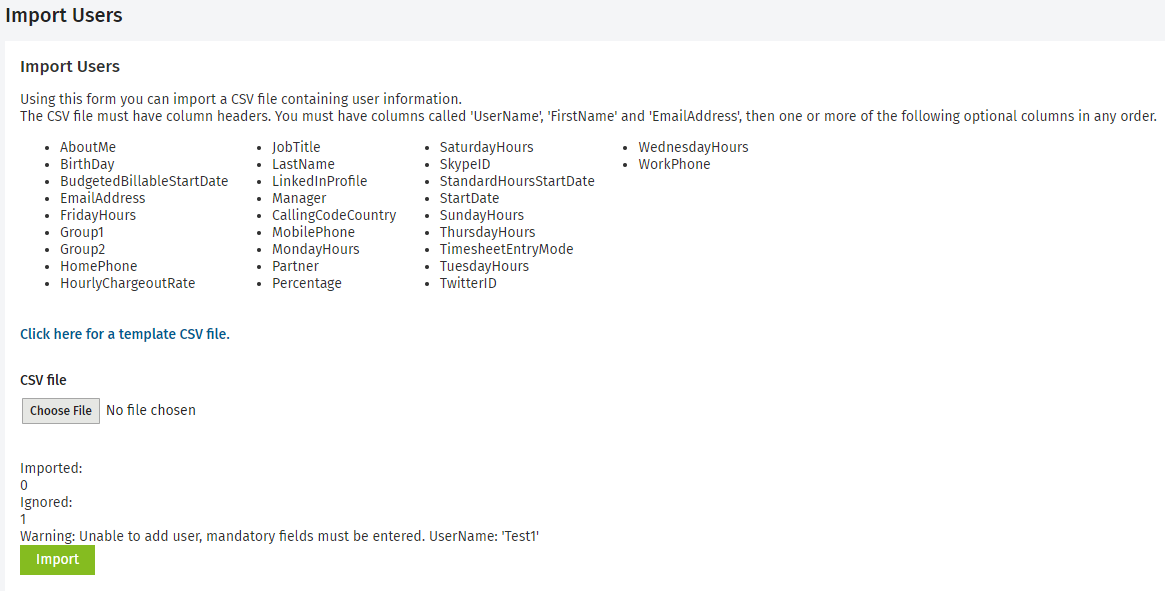
- Click Import.
- Resolve any errors.
- If there are any errors, they will be displayed on the bottom left-hand side of the screen.
- Use the Guide for preparing a .csv file for users for help.
- Go back to your .csv file, make the necessary amendments, save and close the file. Then reimport the .csv file.
- If there are any errors, they will be displayed on the bottom left-hand side of the screen.
- Look at your imported users and check that they have imported correctly.
Step 4: Assign security roles to your users
If security profiles were not included in the import process, you will need to assign security roles or profiles to your users after they have been imported. You can learn more about user security profiles and roles here.
Step 5: Assign roles to your users
If roles were not included in the import process, you will need to assign roles to your users after they have been imported. You can learn more about user role management here.
Step 6: Activate your users
Users imported via a .csv file will be inactive and appear under the Inactive tab. Once your users are imported and ready to be used, you can activate them in bulk. Learn more about this process here. They will automatically receive a “Reset password” e-mail containing a link to your CCH iFirm site, their username and a temporary password.
Step 7: Assign licenses to your users
After you import your users, you will need to assign licenses. You can do so via License Management.