CCH iFirm Release Notes
Reintroducing Telephone Support
As announced on February 18, 2026, you can now contact our support teams directly by phone Monday to Friday, from 10:00 a.m. to 5:00 p.m. (ET), when a live conversation is preferred.
Reintroducing phone support adds another way for you to engage with us, ensuring flexibility while maintaining the high level of service you expect.
To help you navigate the phone menu, we invite you to read the following article, which details all the available options: What are the phone menu options for 1-800-268-4522?
Digital support remains available
Our Knowledge Base, Support Platform, Virtual Agent, and Live Chat continue to provide convenient, efficient, and prioritized ways to get help.
Register for our Support Platform and log in to our virtual agent to find answers, submit a support ticket or chat with a live agent.
For more details about the web ticketing system and best practices, watch the following “How to” videos:
Contents
Enhancements – July 17, 2026
Core & Contacts
-
Centralized Taxprep and Jobs & Billing statuses
The statuses used by CCH iFirm Taxprep and CCH iFirm Jobs & Billing have been centralized and are now managed from a single location in Firm Settings. Users with the required security role can access and manage statuses by navigating to Settings > Firm Settings > Statuses.
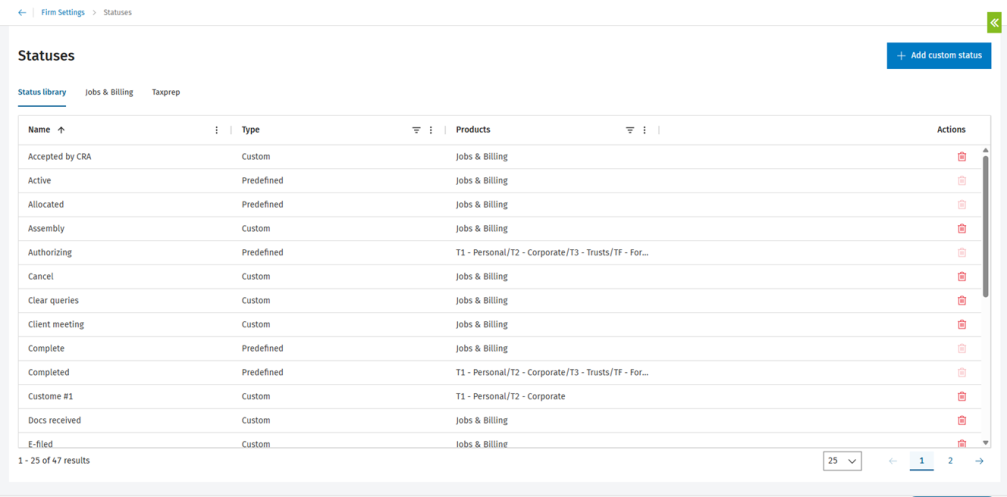
The following security roles have been introduced:
-
Settings – Statuses – View, Add and Edit: Allows users to add custom statuses and edit existing statuses.
-
Settings – Statuses – View, Delete: Allows users to delete custom statuses.
Note that a user can only edit or delete statuses related to a product for which he or she has a licence. Statuses that were used in a job cannot be deleted or unlinked from the Jobs & Billing module.
Tabs
The Jobs & Billing tab allows users to modify the order in which the statuses will appear in the module.
The Taxprep tab allows users to modify the order in which the statuses will appear in the module and to set these statuses as Active or Inactive.
Migration impact
Existing statuses have not been affected by this centralization. They are now simply accessible from a single location. Statuses from both products have not been merged as part of the centralization. As a result of this update, users and security profiles that had the existing CCH iFirm Taxprep security roles related to custom statuses, Tax – Settings – Custom return statuses – Add, Edit and Tax – Settings – Custom return statuses – Delete, will have their CCH iFirm Taxprep roles replaced by the new roles. These new roles will also be assigned to users and security profiles that had the Settings – Jobs & Billings security role.
-
Jobs and Billing
- Job statuses and tax return statuses integration
We are pleased to announce that it is now possible to synchronize job statuses with tax return statuses. This feature helps ensure consistency and saves time by keeping related records up to date automatically.
To enable status synchronization, first ensure that your job and tax return statuses are appropriately mapped within the new centralized status page at Settings > Firm Settings > Statuses.
Once shared statuses have been mapped, any updates made to a linked job or tax return will automatically be reflected in both records. For instance, if a tax return status is set to Preparation and the associated job is linked and mapped to that status, the job status will automatically update to Preparation as well.
Notes:
-
It is not necessary to map every job status to a corresponding tax return status; however, only matched statuses will be synchronized. For example, if a job status is set to Billing but this status is not mapped for the tax return, updating the job to Billing will not affect the tax return status.
-
You must first link a job to a tax return for the statuses to be synchronized automatically.
-
-
Other changes
-
The issue where Job IDs were being truncated when there were more than five characters in the following reports has been resolved:
-
Jobs Due
-
Jobs Budget
-
Work in Progress Client Breakdown
-
Work in Progress Job Breakdown
-
Billable Time
-
Timesheet
-
Variance
-
-
The issue where the Currently Responsible History time-date stamp was inconsistent in the job history has been fixed.
-
The issue where discounts could not be added to some invoices has been fixed.
-
The issue where duplicate hours were showing for some staff in Capacity Planning has been fixed.
-
Capacity Planning
Customers who are currently using the older version of Capacity Planning will be automatically migrated to the new Capacity Planning module.
For more information, please register for one of our upcoming webinars on July 20 and July 29, 2026; we will walk you through the new features and answer your questions. Not able to attend? Please register anyway to receive a recording of the session:
Register for an upcoming NEW CCH iFirm Capacity Planning Overview webinar
-
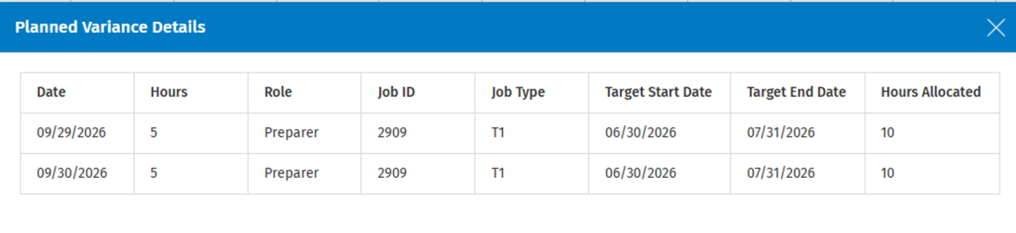
Planned Variance
The new Planned Variance feature shows if a job is projected to miss its start or end date, with a line indicating the hours needed to finish on time.

You can click the information icon to view which specific jobs are delayed.
Note: Planned Variance indicates each day that is behind for a job.
Portal
-
Editing subscriber details
You are now able to choose if only users within your firm can edit subscriber email addresses or if your portal customers can also edit email addresses.
Go to Settings > Portal > Portal Settings > General Settings > Edit subscriber’s details and choose your selection.
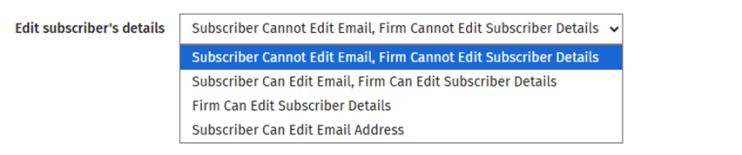
Note: If this feature is not currently enabled, it will remain disabled by default. If the feature is already enabled, the Subscriber Can Edit Email Address option will be automatically enabled.
-
Other changes
-
The issue where the Signed Electronic Documents report was showing the incorrect time zone for timestamps has been fixed.
-
-
Digital Signature
-
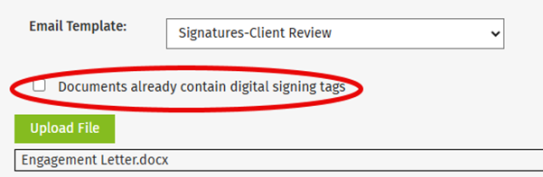
The Apply Embedded Tags button is now conveniently available as a checkbox when submitting documents. If your documents already have digital signature tags, simply select the checkbox to use those digital signature tags.
-
The issue where the Documents signés folder was duplicated in French has been fixed.
-
Documents
-
Lock and review folders
-
You can now lock and review Documents folders and files. When you choose to lock or review a folder, the process will run asynchronously, and you will be notified in CCH iFirm when it finishes.
Note: You cannot lock or review system folders.
-
-
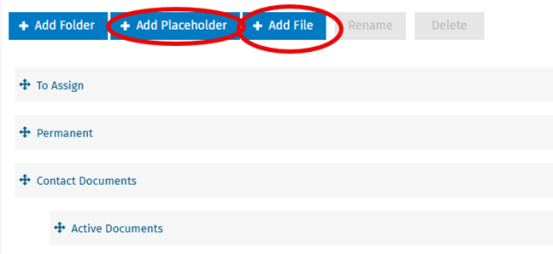
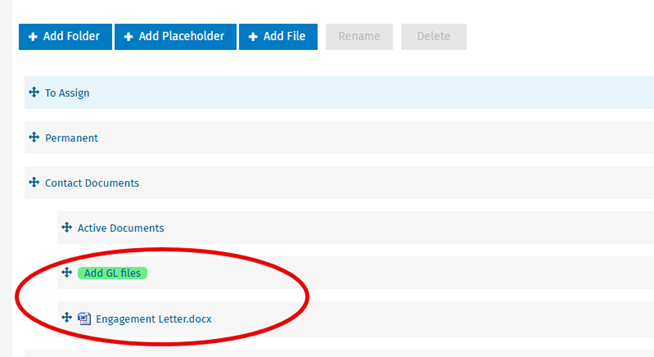
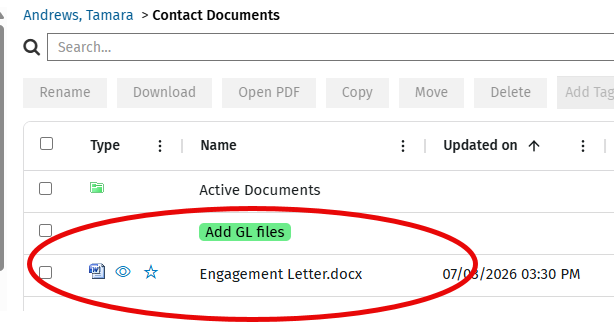
Document template placeholders
-
Placeholder text and placeholder files can now be added to document templates. You can either add text as a placeholder for a file to be added later or an actual file.
To add placeholder text or files
-
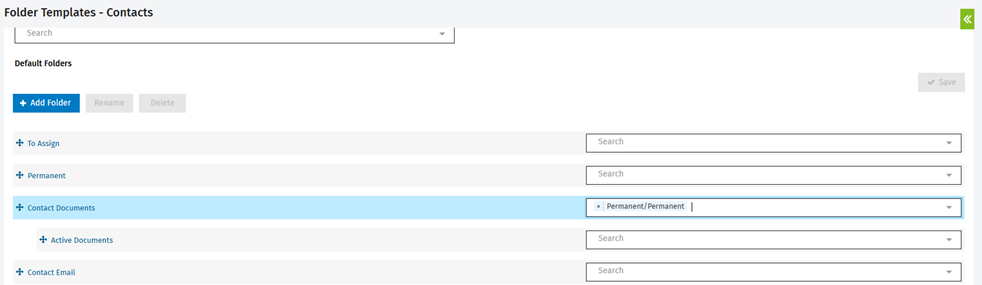
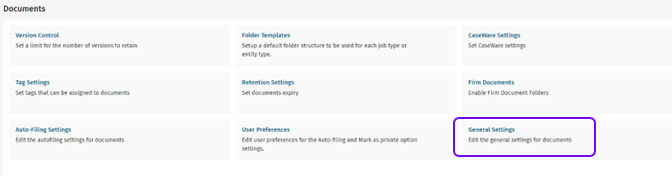
Go to Settings > Documents > Folder Templates.
-
Select the template where you want to add the placeholder.
-
Click the section where you want the text to appear followed by Add Placeholder or Add File.
-
Type your placeholder text or browse to the placeholder file.
Notes:
-
The placeholder file should be present in CCH iFirm Documents, and it will appear as having been added by the person who updated the template.
-
Placeholder text will appear in green in the template and in the file.
-
-
The text and/or file will appear in all contacts associated with that template.
To delete placeholder text or files
-
Go to Settings > Documents > Folder Templates.
-
Select the template where you want to delete the placeholder.
-
Select the file or placeholder you want to delete and click Delete.
Note: With regard to the placeholder files, if someone has edited the placeholder files within a contact, the placeholder file will be added to that contact as a new version rather than as a replacement of the existing file.
-
-
Enhancements – June 5, 2026
Jobs & Billing
-
Task Management
You are now able to plan and track tasks within a job with Task Management.
Task Management helps you break work down into clear steps, understand who is responsible for each step and see progress at a glance.
Please refer to the Learn about Task Management help topic for more information.
Other updates
-
The issue where filters could not be applied to the Resource WIP & Billing report has been fixed.
Enhancements – May 15, 2026
Core & Contacts
-
Contacts
-
The following security roles have been added to the Contacts module:
-
Contacts – Edit Assignee: Controls whether a user can update the partner and the manager associated with a contact from the Contacts module, from CCH iFirm Taxprep or from CCH iFirm Tracking.
-
Contacts – Edit Contacts in Bulk: Controls whether the Change in Bulk button is displayed on the Contacts page. Additional security roles could be considered depending on which field the user is trying to update.
-
-
A new setting allows you to control whether the Client From field of a contact is automatically prefilled with the date when the contact is created. You can configure this option by navigating to Settings > Contacts > General Settings.
Note: Existing contacts won’t be affected by this new setting.
-
It is possible to delete default Delivery Method options.
-
-
Users
-
The following user information can now be imported through a .csv file:
-
Hourly chargeout rate(s)
-
Code chargeout rate(s)
-
In addition, you can choose whether the imported user should be set as Active and whether their login credentials should be sent. Refer to the Add users help topic for more details on how to use these new options.
-
Jobs & Billing
The issue where multiple interest lines were generated for some months was fixed.
Documents
You can now automatically add tags to documents in folders.
To add tags automatically to documents:
-
Open Settings > Documents > Folder Templates.
-
Select the template that you want to add tags to.
-
Next to the folder that you want to add tags to, click Search and type the name of the tag that you want to be automatically applied to documents in that folder.
-
The tag(s) will be automatically added to any document added to that folder.
Note: Changes will only apply to newly added documents.
Portal
-
Digital signing dashboard
You can now filter pending signatures by firm group, client type and client entity in the Digital signing dashboard.
-
Apply Smart Tags button
The Apply Smart Tags button has been renamed Apply Embedded Tags.
Enhancements – February 13, 2026
Jobs & Billing
You are now able to create automated disbursements for 2026 and 2027.
Enhancements – January 23, 2026
Portal
Digital signature
-
You are now able to edit your initials in the signing room. To edit your initials, click the Edit button and type your initials.
-
Note: This will change the initials in the entire envelope.
-
-
You can now copy and paste digital signature tags across documents in the composition room. To do so, select the tag, press Ctrl + C, navigate to where you want the tag to appear and press Ctrl + V.
-
GUIDs for individual signatures have been added to the audit trail to assist with tracking.
Enhancements – December 19, 2025
Portal
Digital signature
You can now track your envelopes from the new Digital signing dashboard.
To access the dashboard, select Portal > Digital signing.
The dashboard shows you all signatures that are in progress. The new and waiting envelopes will be displayed by default.
![]()
-
From the dashboard, you can search for envelopes for a specific client name, client code and envelope name.

-
You can filter the list using the Saved, New and Waiting, Open and Waiting, Overdue and Rejected statuses.

-
You can also filter the list using the Client Name, Sender, Contact Manager, Contact Partner and Contact Group fields as well as a date range.

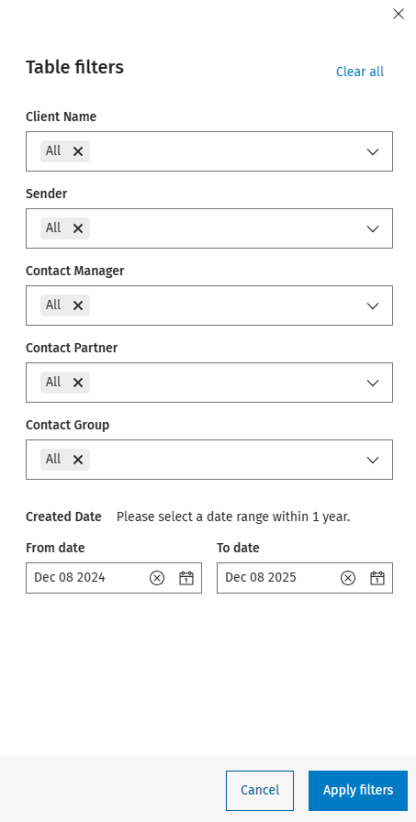
-
You can export a .csv file of the envelopes.

-
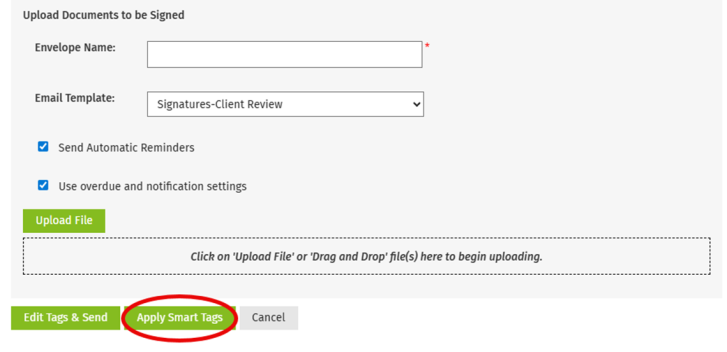
You can also upload a document and send it for signature.
-
Click the Upload button.

-
Scroll the Select Portal drop-down list or search for the portal to which you want to send the document.

-
Complete the other fields and click Edit Tags & Send.
-
Notes:
-
Signed envelopes are not viewable.
-
You need to have our new in-house signing feature to use the dashboard.
Smart tags
You can now activate signing tags in PDF files that are uploaded through the portal by clicking the Apply Smart Tags button before you send the envelope for signing.
Note: There is no need to click the button if you are sending documents through the Taxprep or CCH iFirm Taxprep integrations.
Enhancements – December 5, 2025
Core & Contacts
-
The global audit trail has been expanded to allow the rollback of Contact Updated and User Updated events. Users will need the new Rollback – Contact Audit Trail or Rollback – User Audit Trail security roles to have access to this new action.
Additionally, these new events are now tracked in the global audit trail:
-
Rollback – Contact Updated
-
Rollback – User Updated
-
User Security Role Updated
-
User Licence Updated
-
-
The Contacts – Merge Contacts security role has been added. With this security role, users will have access to the Merge Contact button that is visible while consulting a contact. Previously, the Contacts – View, Add and Edit Contacts security role was required for this functionality.
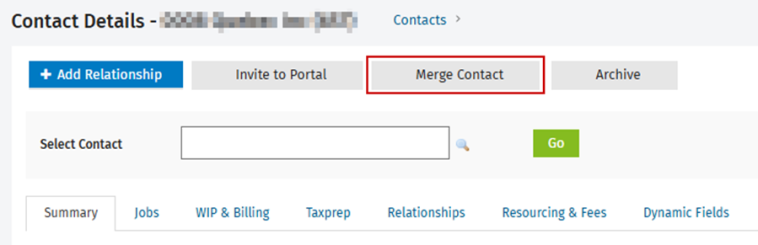
Note that every user that had the Contacts – View, Add and Edit Contacts security role before the release will now have the new security role.
-
It is possible to customize the order of the Delivery Method options. To change the order of the delivery method, navigate to Settings > Contacts > Delivery Method and drag and drop the options in the desired order.
-
The E-mail 2 and Invoice e-mail contact fields are now available in the .csv import file, in the contact reports and in Power BI.
Jobs & Billing
You are now able to choose different options for the target start/end date when searching for jobs. The available options include:
-
All (default option) – Returns all target start/end dates and jobs with no date.
-
None – Returns jobs with no target start/end date selected.
-
Due on – Allows you to select a specific target start/end date.
-
Select Date Range – Allows you to select a date range for the target start/end date.
Documents
You are now able to control the Documents user settings from the new Documents tab in the user settings.
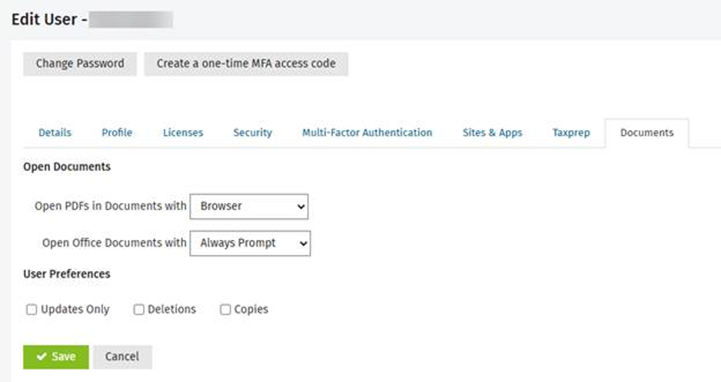
Watch notifications
Users can now select their own notification types for files they are watching in Settings > Users > Documents. These settings can still be set in the Documents > Settings > User Preferences area, but the selection in the user settings will override the firm settings.
Favourites
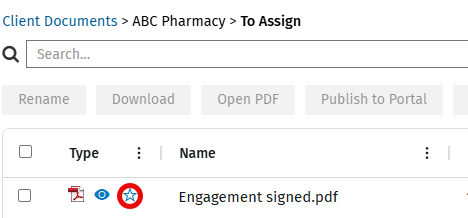
You can now mark files as favourites for easy access. These files will show up in Documents > Favourites.
-
To add a document to the favourites, click the star icon.
-
You can easily access these files from the Documents > Favourites menu.

Portal
Subscriber email addresses
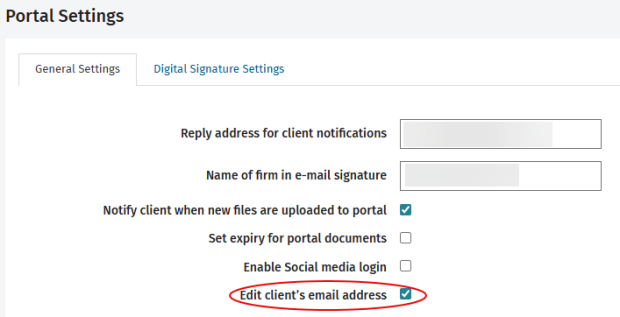
You can now update the email address of a portal subscriber in CCH iFirm, and your clients can also update their email address from their client portal.
To allow clients to update their email address, you need to select the Edit client’s email address checkbox in Settings > Portal > Portal Settings.
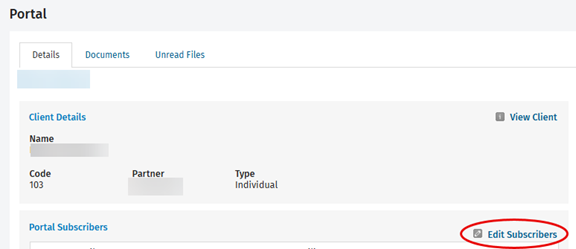
Editing an email address in CCH iFirm
You can change an email address from the Edit Contact and Portal Details pages.
-
Click Edit Subscribers.
-
Select the email address that you want to change.
-
Click Change email address.
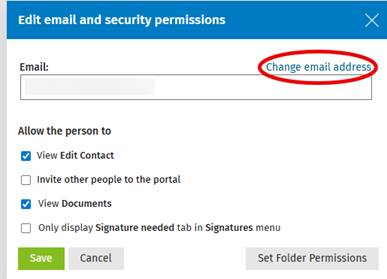
-
Enter the new email address.
-
Click Save.
-
Your customer can now log into the portal with the new email address and the existing password. If the customer was logged in during the change, he or she will be logged out and will need to log back in.
Editing an email address from the client portal
Your customers can edit their email address from the client portal.
-
Click the Edit icon (
 ) next to the portal name.
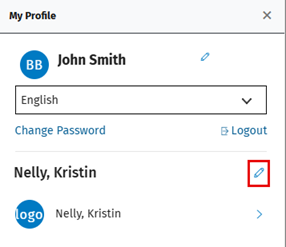
-
Enter a new email address.
-
Click Save.
-
When the customer clicks Save, a notification will be sent to you.
-
Navigate to Portals > Portal Subscribers > Client updates.
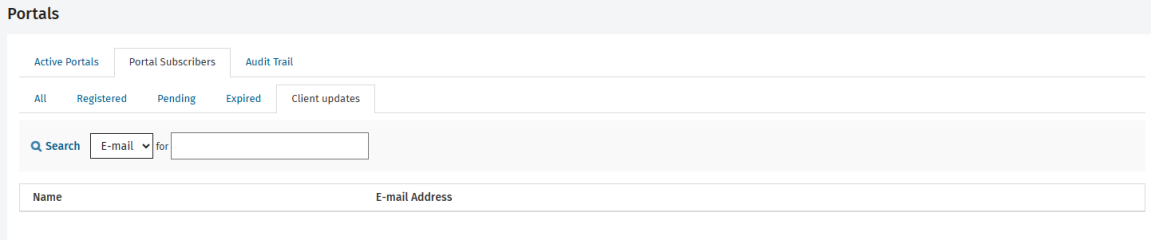
-
A list of updated email addresses will appear.
-
To reject the change, click the
 icon.
icon. -
To accept the change, click the email address.
-
A list of affected portals will appear.
-
Click Approve to accept the change.
Notes:
-
All portals associated with that email address will be changed.
-
You can only change the email address for clients who have successfully completed the portal registration.
-
If you have our Digital signature feature, any envelopes that were sent for signing must be finalized before you can change the email address.
-
You will need to approve any email addresses submitted by your clients.
-
A new email address must be used. If the email address to modify already exists in CCH iFirm, the user will not be able to change it.
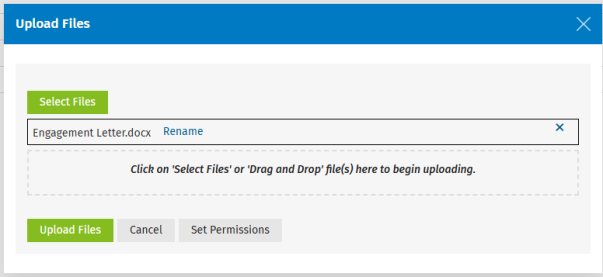
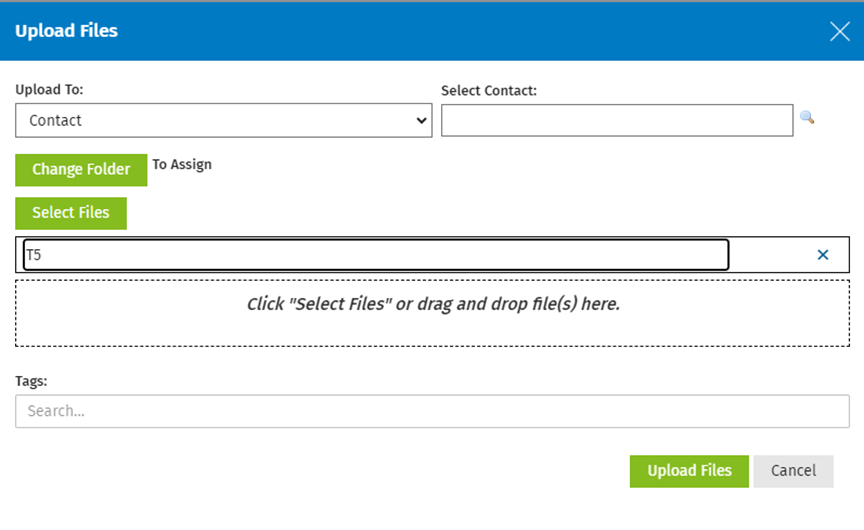
Renaming files
You will now be able to rename a file when you’re uploading it to the portal.
Note: The Client Portal – Rename on Upload security role is required.
-
Click Rename to rename the file.
Digital signature
Your customers are now able to sign documents using the Previous and Next buttons, which will guide them through the fields in the envelope.
Merging documents for signing
You now have the option to merge multiple PDF documents into one for the purpose of digital signing.
To enable this feature, go to Settings > Portal > Portal Settings > Digital Signature Settings and select the Merge documents to a single PDF checkbox.
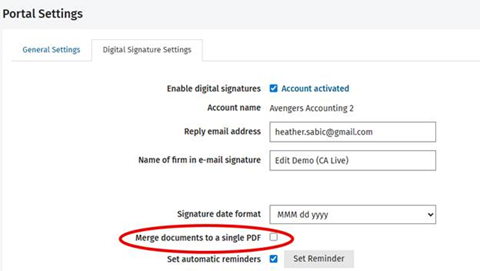
Notes:
-
The file name will change to the envelope name.
-
The PDF documents will be merged in the order they appear in the envelope signing window.
Enhancements – September 12, 2025
Core & Contacts
-
The global audit trail has been expanded to log these new events:
-
User Added
-
User Updated (excluding licence and security role updates)
-
User Activated
-
User Deactivated
-
Import User
-
Login Details Sent
-
Contact Created
-
Contact Updated
-
Contact Archived
-
Contact Restored
-
Contact Deleted
-
Contact Change in Bulk
-
Import Contact
-
-
It is possible to customize the delivery method options. To add or delete a custom delivery method, navigate to Settings > Contacts > Delivery Method. Note that the default options cannot be deleted.
-
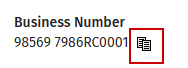
A button has been added to quickly copy the SIN, the business number or the account number when viewing a contact.
-
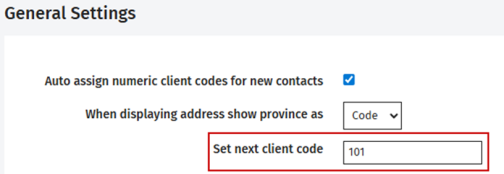
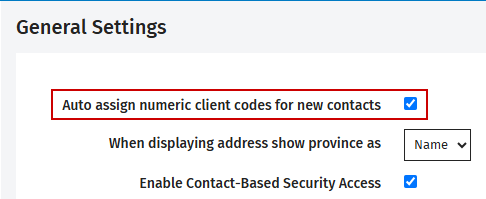
A setting option has been added to allow you to set the next client code used when creating a new contact. To configure this option, navigate to Settings > Contacts > General Settings. Note that this option is available only when the Auto assign numeric client codes for new contacts checkbox is selected.
Jobs & Billing
Timesheets API
-
API endpoints have been added to retrieve, create and update timesheets:
-
POST /global/1.0/gettimesheets: Returns timesheets based on user and date filters.
-
POST /global/1.0/timesheet: Allows you to add a timesheet.
-
PUT /global/1.0/timesheet/{id}: Allows you to update an existing timesheet.
-
New security roles
The following security roles have been added to Jobs & Billing:
-
Jobs – Add Individual Jobs: Controls whether the Add Job button is displayed on the Jobs page, in the Contacts > Jobs tab and in My Timesheet.
-
Jobs – Add Jobs in Bulk: Controls whether the Add Jobs in Bulk button displays on the Jobs page.
-
Jobs – Add Recurring Jobs: Controls whether the Add Recurring Jobs in Bulk button or the Add Recurring Job button displays on the Recurring Jobs page and in the Contacts > Jobs tab.
-
Jobs – View and Edit All Job Resources: Controls whether users can edit job resources, including dynamic fields and checklists.
-
Jobs – View and Edit My Job Resources: Controls whether users can edit their job resources, including dynamic fields and checklists.
-
Jobs – Change Status: Controls whether users can move the job status forward and backwards.
Note: Ensure the selected security profile is updated to match the user’s job requirement.
Documents
Review, lock and watch files
You can now mark files as reviewed (with reviewer information) and lock them to restrict editing, unless users have the appropriate security role.
Two security roles manage these features:
-
Documents – View and Unlock: Allows unlocking of locked files.
-
Documents – Workflow – Copy Locked File: Allows copying of locked files or folders.
To set up reviewing, go to Settings > Documents > Column settings
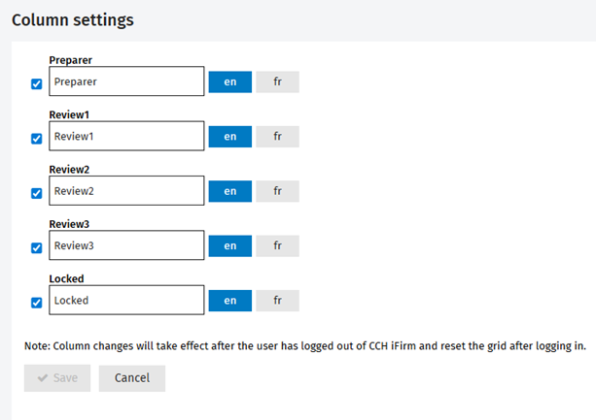
-
You can choose which columns should be displayed in CCH iFirm. Deselect the columns that you don’t want to use.
-
Columns can also be renamed.
Note: Any changes to these settings will apply only after users have logged out and back into CCH iFirm.
Review columns
The Review and Locked options now appear in the Documents grids.
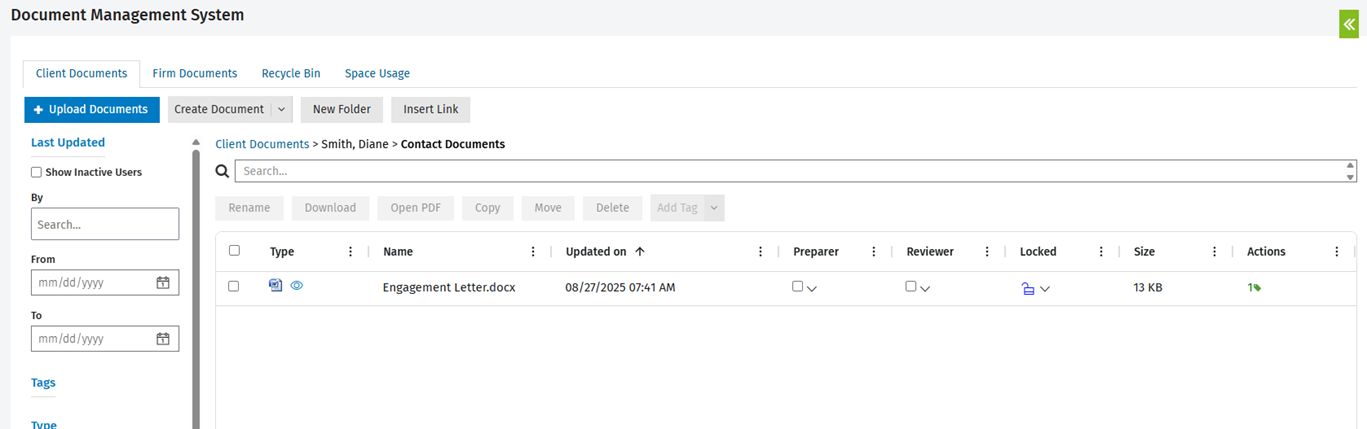
-
To indicate that you have reviewed or prepared a file, select the associated check box.
-
To view the audit trail, hover over the
 arrow.
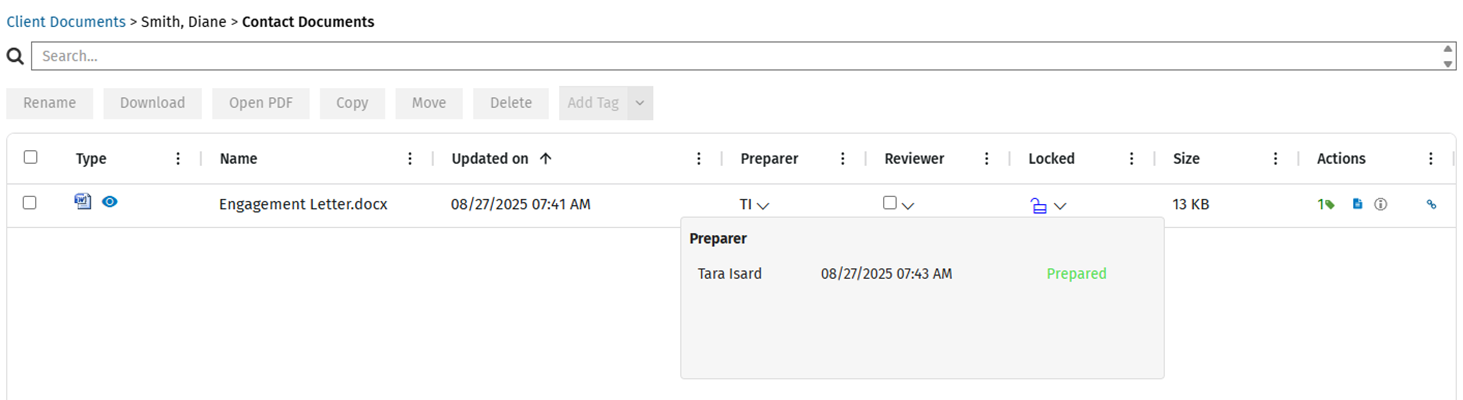
Note: You can deselect a Review column selection if it was selected by mistake. All actions are logged in the audit trail.
Locking files
Locking a file lets others view it but prevents edits. Locked files cannot be sent to the portal.

Watching files
Once you are a reviewer, you automatically become a watcher of the file(s).
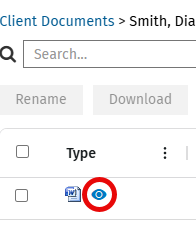
You will receive email notifications when changes such as deletions, copies or updates are made to the file that you are watching.
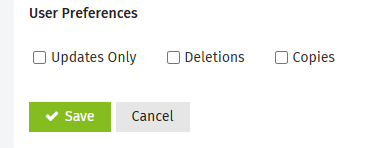
The types of notifications that you receive can be controlled in Settings > Documents > User Preferences.

Note: Watch notifications are not enabled by default.
You can also choose to watch other files in the system that you have not reviewed by clicking the  icon.
icon.
Copied files
You can review and lock copied files. In that case, the parent file will be locked. If you choose to watch a copied file, you will receive notifications when changes are made to the parent file.
Portal
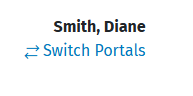
Switching portals
Your clients can now easily see a list of portals they have access to from the Switch Portals menu.
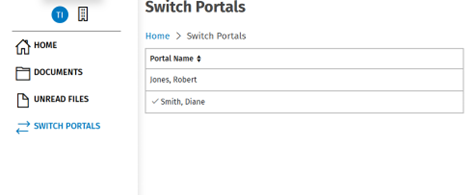
The option to switch portals from the right-hand side of the portal is also available.
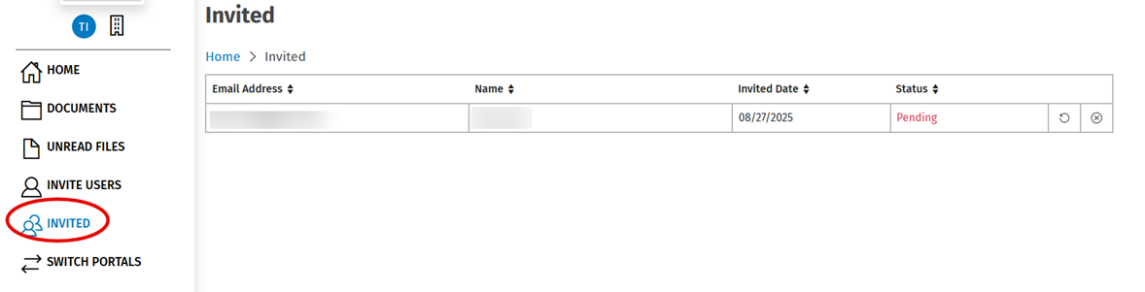
Inviting users to the portal
If you have enabled the option to allow your customers to invite others to the portal, they can now see a list of pending invitees from the Invited menu.
Reordering files for digital signature
You are now able to reorder digital signature files when uploading from the portal.
Enhancements – July 18, 2025
Jobs & Billing
Dashboards
-
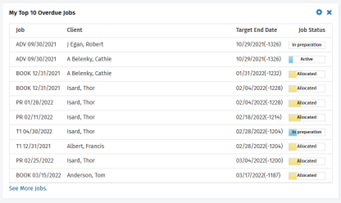
The new My Top 10 Overdue Jobs dashboard is now available to view your overdue jobs.
-
Note: To access this dashboard, you need the Dashboard > View My Top 10 Overdue Jobs security role.
-
In addition, the Dashboard > View Top 10 Overdue Jobs security role has been created to provide access to the existing Top 10 Overdue Jobs dashboard.
-
Note: Customers with the Workflow and Resource Manager security role will need the new Dashboard > View Top 10 Overdue Jobs security role to view the Top 10 Overdue Jobs dashboard.
Jobs API
-
API endpoints have been added to update job statuses:
-
GET /global/1.0/jobs/statuses: Returns a list of all job statuses and their associated job types
-
/global/1.0/jobs/{jobId}/status: Allows you to update the job status of a job
-
-
Other changes
-
Users will now be notified when a job owner has been changed.
-
Documents
Sending documents as email attachments
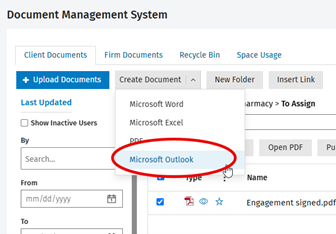
You can now send documents as email attachments from within the Documents module.
-
To send a document from Outlook, select the document that you want to send.
-
Click the Create Document button.
-
From the list of options, choose Microsoft Outlook.
-
A draft email will open from within Microsoft Outlook.
-
Click the Edit button (pencil icon) to continue.
-
If the contact has an email address, the email will be automatically addressed to that email address.
Notes:
-
You must select a document before the Microsoft Outlook option is visible.
-
You must use a web-based version of Microsoft Outlook to send an attachment.
Portal
In the list view of the client portal, customers will now see folders in lines with files.
-
The Unread files section of the client portal is now available from the left-sided menu.

-
When searching for documents, the file location appears in the suggested results.
-
When uploading documents to the portal, a breadcrumb shows the folder in which the document is being uploaded.
Core & Contacts
-
It is no longer possible to manually modify a contact code when the Auto assign numeric client codes for new contacts feature is activated. This will help maintain consistency of the code sequence for your contacts.
-
Two emails fields have been added to the Internet section of a contact.
-
The Email 2 field allows you to enter a second email address.
-
The Invoice Mail field allows you to indicate an email address that can be used specifically when producing invoices and statements in Jobs & Billings. Filling in this field means that all invoices and statements will be sent to that email address only.

-
-
The issue related to the endpoint PUT /global/1.0/contacts/{contactId} where specifying a custom entity was making the call fail has been fixed.
CCH iFirm APIs
Common API
API endpoints have been added. Please consult the Swagger for more details on the following endpoints:
-
Contacts
-
PATCH /global/1.0/contacts/{contactId}: Allows you to modify and partially update a contact
-
-
Contact security
-
GET /global/1.0/contact-security-filters: Allows you to retrieve the Contact Security filters defined at the firm level based on the contact groups, partner and manager.
-
GET /global/1.0/users/{userGUID}/contact-security-filters: Allows you to retrieve the user’s contact security configuration
-
PUT /global/1.0/users/{userGUID}/contact-security-filters: Allows you to modify the user’s contact security configuration
-
-
Global Audit Trail
-
GET /global/1.0/audit-trail: Allows you to retrieve all or a filtered subset of the events logged in the global Audit Trail
-
Note: User GUIDs can be retrieved with the endpoint POST /global/1.0/getuserdetails.
Enhancements – May 16, 2025
Jobs & Billing
-
The Import Jobs spreadsheet is now accessible to admin users.
-
You can now export the following reports without formatting:
-
Accounts Receivable Control Report
-
Accounts Receivable Transaction Report
-
Bank Reconciliation Report
-
Bank Deposit Supplement Report
-
Grouped Aged Accounts Receivable Report
-
Grouped Work in Progress Report
-
Invoice Breakdown by Code Report
-
Journals Report
-
WIP Control Report
-
WIP Control by Group Report
-
Work in Progress Client Breakdown Report
-
-
The Code Description field has been added to the following reports:
-
Grouped Work in Progress Report
-
Work in Progress Client Breakdown Report
-
Invoice Breakdown by Code Report
-
Capacity Planning
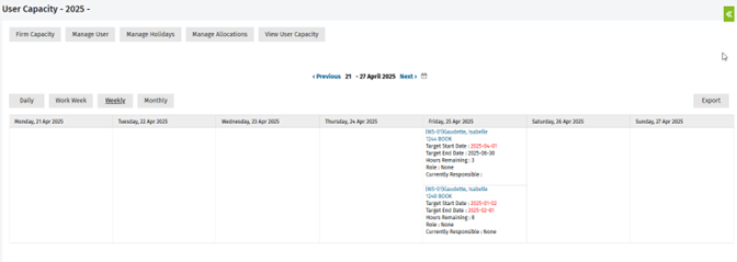
You can now view individual users' schedules in a calendar format from the User Capacity screen.
-
To open the calendar view, select a user from the Firm Capacity view. Then, click the View Schedule button.

Note: This feature is only available in the newest version of the Capacity Planning functionality. Contact your sales representative for more information on the new version of the Capacity Planning functionality.
Documents
The issue where attachments could not be saved in Documents when using the Documents add-in for Microsoft Outlook has been fixed. You will need to log out and log back into the Documents add-in for Microsoft Outlook for the attachments to be saved
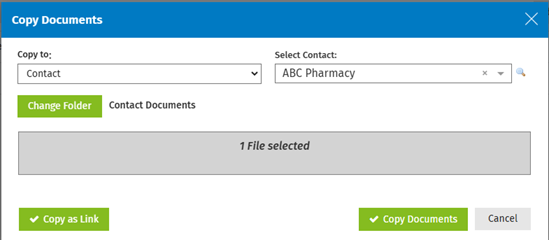
Document copies
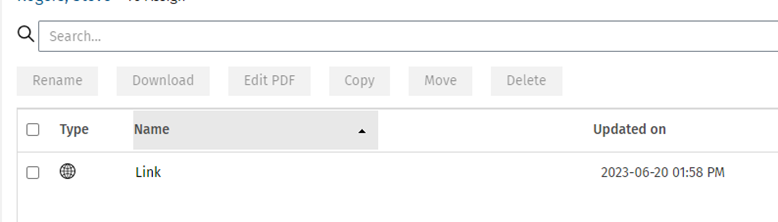
A single file can now appear in multiple folders in Documents using the Copy function. Copying a file will create a link to the original (parent) file.
To copy a file:
-
Select the file that you want to copy and click the Copy button.
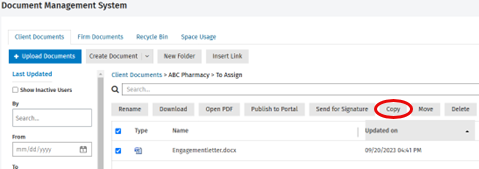
-
Choose where you would like to copy the file and click Copy as Link.
-
The file will be copied to the selected location. All copied documents can be identified by the link icon (
 ).
).
Notes:
If you open a copied file, it will always reflect the original file.
-
You can copy multiple files at once as long as they are copied to the same location.
-
Copied files do not have versions.
-
You cannot copy CaseWare or email files.
-
You can delete a copy, but if the parent document is deleted manually or through retention rules, all copies will also be deleted.
-
If you restore a parent file, the copies will not be restored.
-
You can upload and rename a file to have the same name as a copied file.
Portal
-
The Portal – Admin security role no longer provides access to Settings > Portal. To access Settings > Portal, the Settings – Portal security role is now required.
-
The None option can be selected in the Partner and Manager drop-down lists of the Unsigned Electronic Documents and Envelopes Created reports.
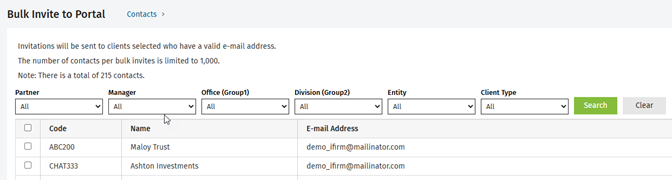
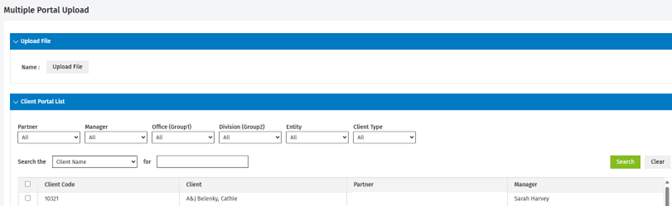
Filters
Filters have been added to the Bulk Invite to Portal and Multiple Portal Upload screens. It is now possible to filter the data by Partner, Manager, Office, Division, Entity and Client Type.
Copy, cut and paste
Portal subscribers can now copy, cut, and paste documents in their client portal(s).
-
To copy or cut documents, select the document(s) that you want to copy or cut and click the
 button. Select Copy or Cut.
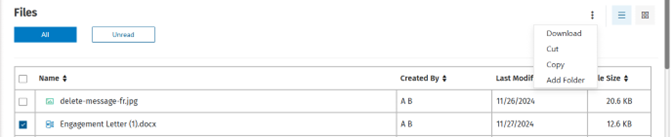
-
Navigate where you want to paste the document(s), click the
 button and select Paste.
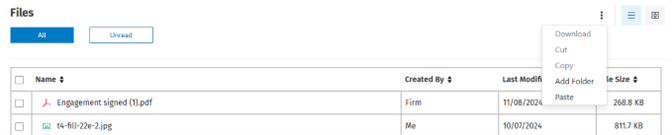
Enhancements - February 14, 2025
Portal
-
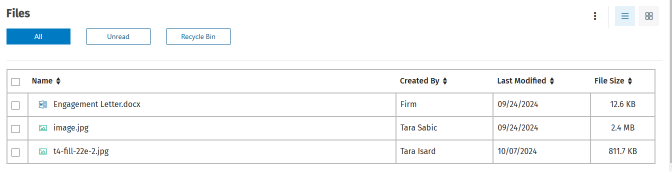
The client portal interface has been updated to resolve display issues, including overlapping text and missing scroll bars.
-
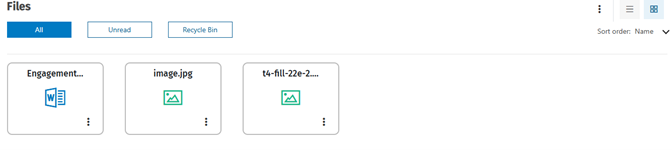
The list view is now the default view for files, with the option to switch to the tile view if preferred.
-
The Unread files folder is now collapsible and will be collapsed by default.
-
The home page content view has been adjusted to use a smaller font so that more text is displayed on the home page.
-
The issue with some signed documents not appearing in the portal has been resolved.
Jobs & Billing
-
The problem with the sales tax rate for a contact being set automatically to Alberta has been fixed.
Enhancements - January 24, 2025
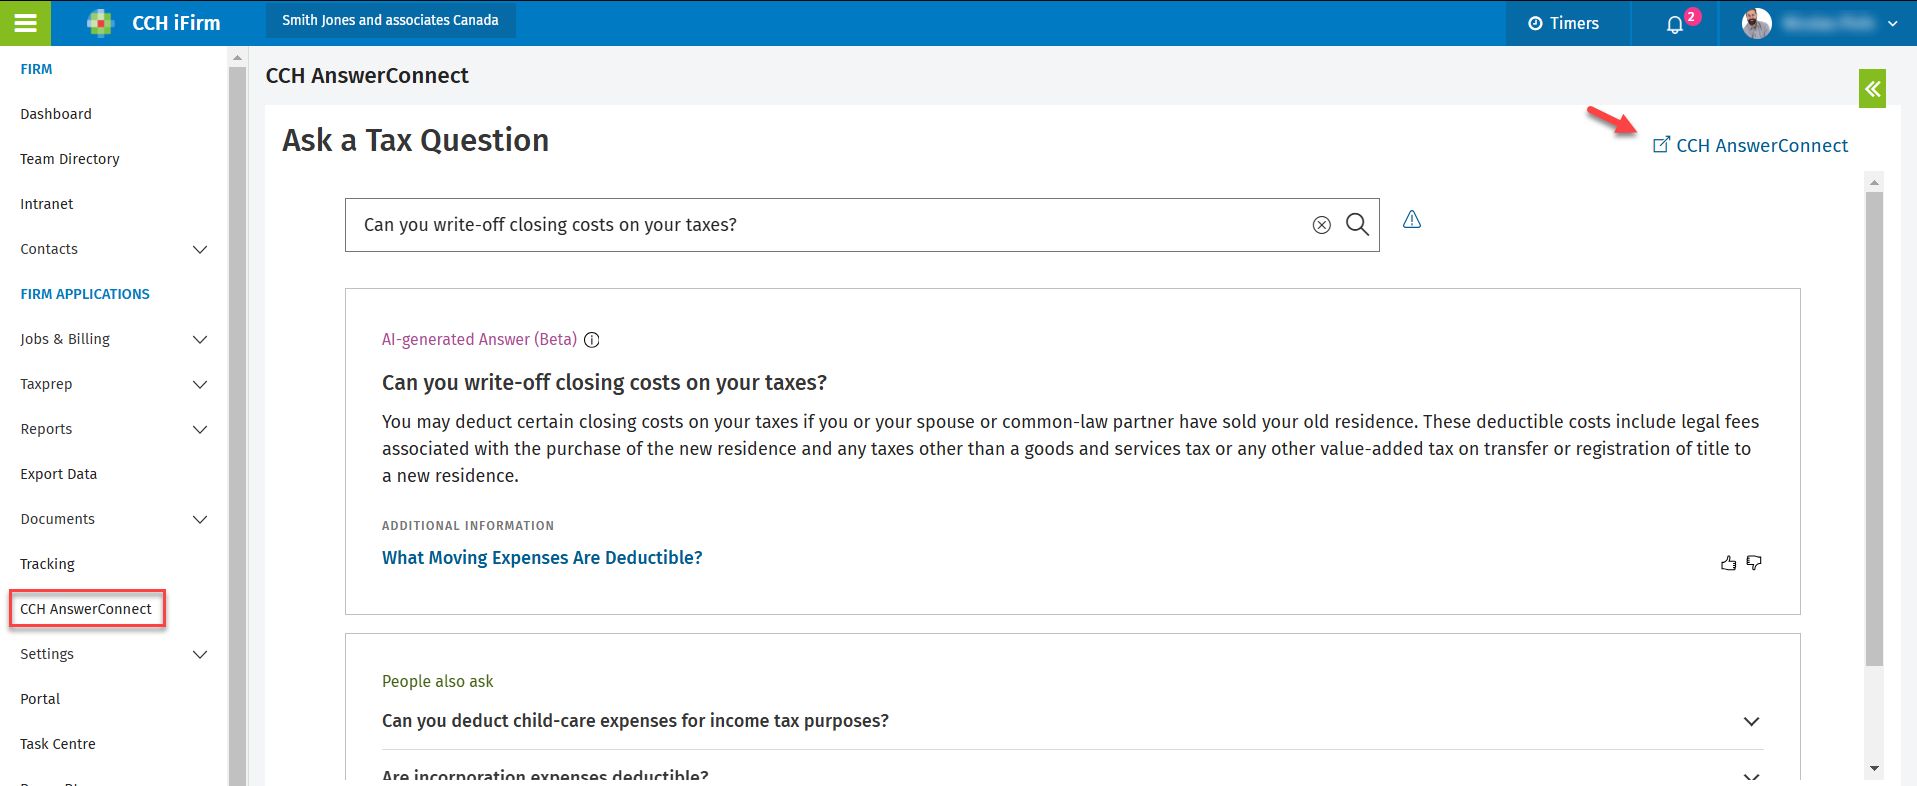
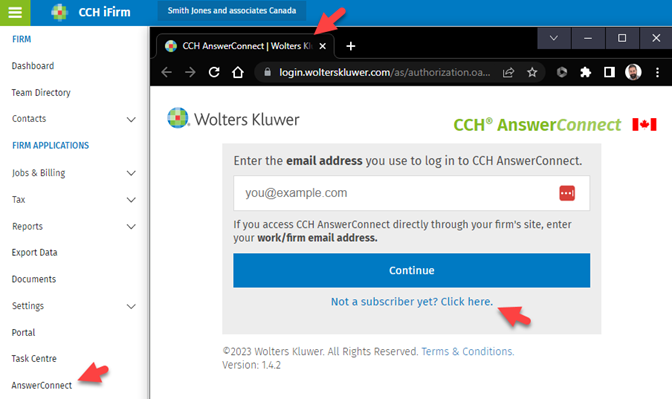
The Ask a Tax Question search functionality from CCH AnswerConnect is now integrated in CCH iFirm
-
When you open the CCH AnswerConnect menu, the Ask a Tax Question search bar is now displayed. As a result, you can benefit from our groundbreaking search functionality driven by cutting-edge technology and generative AI (GenAI) directly in CCH iFirm. For more information on this functionality, see the CCH AnswerConnect New Feature – October 2024 article (Tax Research, Transformed).
Note that you can launch the full CCH AnswerConnect product by clicking the button in the top right corner of the screen. A subscription to CCH AnswerConnect is required to access this product.
Note: You must have the CCH AnswerConnect – Access security role to access the CCH AnswerConnect menu.
Jobs & Billing
-
The problem preventing reports from being opened in version 2409 of Microsoft Excel has been resolved.
Documents
-
The problem with some closed jobs not appearing in the Documents folder has been fixed.
Enhancements - December 20, 2024
CCH iFirm Analytics
-
A new version of the CCH iFirm Analytics Report is now available. This version includes the following changes:
-
Filters have been moved to a new menu to allow more data to display in the dashboard for most dashboards. To open the filters, click the
 icon.
icon.
-
Timesheet dashboard: The Billable Hours widget has been redesigned
-
Year End Planning dashboard: The format of the table has been redesigned
-
The following dashboards have been added:
-
WIP Revenue: Shows the revenue associated with current WIP
-
Monthly Billable Time: Shows total billable hour by month per user
-
New Client Revenue: Shows revenue by client partner for new clients
-
Lost Client Revenue: Shows lost revenue by client partner for lost clients
-
-
-
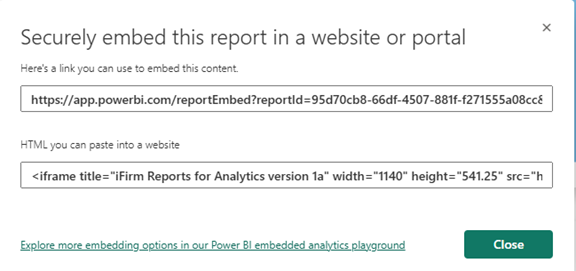
Your CCH iFirm Analytics dashboard now opens in the CCH iFirm frame.
-
To set up your dashboard to open in CCH iFirm:
-
Click Power BI in the left menu.
-
Enter your Power BI Analytics URL.
-
To enter your Power BI Analytics URL, select File > Embed report > Website or portal.
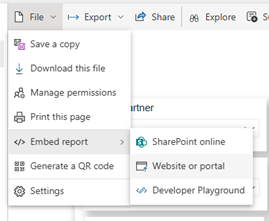
-
Copy the first URL into CCH iFirm.
-
-
Once you have entered your Power BI URL, you will be able to download the newest CCH iFirm Analytics file from Download Power BI Analytics Template.
Notes:
-
For information on updating your Power BI Report and finding your URL, please consult the Analytics Guide.
-
You must have a CCH iFirm Analytics license to access the dashboards.
-
-
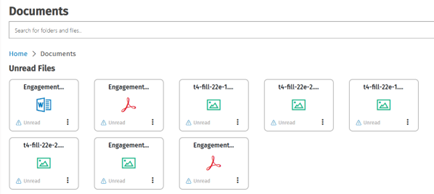
Portal - New mobile-friendly interface
-
We are pleased to announce a new look for our client portal! The new client portal has been redesigned so your customers can easily find unread files, upload documents and complete document signing.
The new design will be automatically available for your customers; no changes to settings or security roles are required. Any emails sent to customers when documents are uploaded or when they are invited to the portal will link to the new portal.
-
With the new design, your customers will be able to see unread files and documents that need to be signed at a glance from the home screen.

-
The Unread Files section at the top of the Documents screen allows customers to access those documents quickly. A search bar is also available at the top of the Documents screen.
-
Your customers can choose whether they want to view their documents in a tile view or in a list view.
-
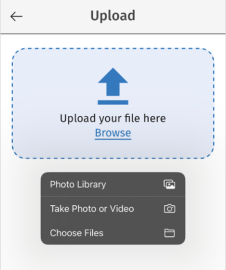
The new design was created to work with mobile phones and tablets. As a result, the display will resize automatically to work with your client’s device. If the client is using a mobile phone, he or she can upload pictures from that device.
-
We have added shortcuts to the top of the portal so that your clients can quickly access frequently used features such as uploading a document.

-
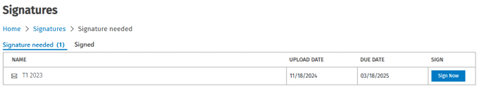
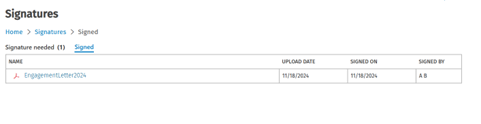
Customers can quickly access any documents to be signed from the left-sided menu and see documents that have been signed from the Signatures menu.
-
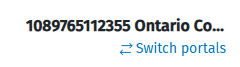
Customers can easily switch between multiple portals by clicking the Switch portals link at the top of the portal.
-
CCH iFirm Documents is now integrated with CCH AnswerConnect
We continue to strengthen integration between CCH iFirm and our expert research content within CCH AnswerConnect. You can now save tax research within CCH iFirm Documents and organize it for quick retrieval, to plan and relay information back to clients. For more information on this new functionality and how to enable it, see the CCH AnswerConnect New integration with CCH iFirm Documents What's New article.
Enhancements - December 6, 2024
Jobs & Billing
-
CCH iFirm Jobs & Billing is now integrated with CCH iFirm Taxprep
We are pleased to announce that you can now link a job to a tax return in CCH iFirm Taxprep.
A new section called CCH iFirm Taxprep is displayed in the Job Details page. From this section, you can link, unlink and open CCH iFirm Taxprep returns.

Linking Jobs to Tax Returns
To link a job to a tax return, click Link Tax Return.

Select the tax product that includes the return that you want to link.
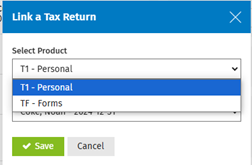
Note: The list of available tax products is based on the entity type in Contacts. See the table below for more information on which tax products can be linked to which entity types.
Entity Type
T1 - Personal
T2 - Corporate
T3 - Trust
TF - Forms
Individual
X
X
Company
X
X
Non-Profit Organization
X
Partnership
X
Trust
X
X
Other
X
A list of tax returns will be displayed in the drop-down menu. Select the Return ID that you would like to link.
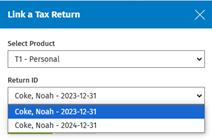
Notes:
You can only link one tax return to one job.
The list of tax returns includes tax returns from all years.
If your job has a period end date, the tax return that matches that date will be listed first.
The Return ID list includes tax returns for that client and tax products, including tax returns that are already linked to another job. You can choose to link the return to the current job, but doing so will remove the link from the other job.
Click Save to save the link.
The tax return is now linked to the job.

You can quickly access the tax return in a new window by clicking the link. You can also access the job from the tax return by clicking the link in CCH iFirm Taxprep.
Unlinking a Tax Return
To unlink a tax return, click Unlink.

Changing an Existing Link
To change an existing link, click Change Linked Tax Return.
Select the tax product and the tax return that you want to link.
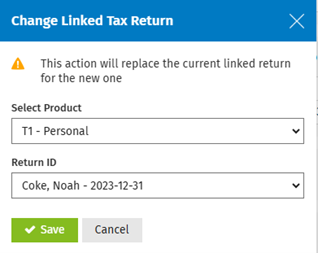
Click Save to change the link.
Note: This action will remove the existing link and add the new one.
Documents
-
Documents Grid
You are now able to resize the grids in the Documents module by hovering on the
 icon until your cursor changes to two arrows. You can then resize the column.
-
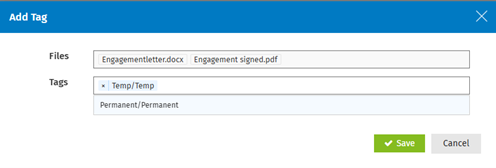
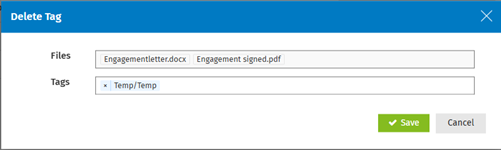
Adding and Deleting Tags in Bulk
You can now add or delete tags from files in bulk.
Adding Tags
-
To add tags in bulk, select the files that you want to add tags to and click Add Tag.

-
Select the tags that you want to add and click the Save button.
Deleting Tags
-
To delete tags in bulk, select the files that you want to delete tags from and click Delete Tag.

-
Select the tags that you want to delete and click the Save button.
-
-
Recycle Bin
We have introduced a new security role for Documents administrators. The security role Documents – Recycle Bin Admin allows you to delete all documents in the recycle bin. Users with the existing security roles will only be able to delete files that they deleted from the recycle bin.
Core & Contacts
-
The new Audit Trail available under Settings > Firm Settings allows you to track the following login events:
-
Login
-
Logout
-
Password Reset
-
Forget Password
The data shown in the table can be filtered by user, action, source and date. The Global Audit Trail security role has been added to allow you to manage which user can have access to the Audit Trail feature.
Note: For existing CCH iFirm sites, the Audit Trail will only include the data and the actions performed starting on December 6, 2024 (i.e., the date on which the Audit Trail functionality was made available). Audit records are retained for a period of three months.
-
-
CCH iFirm Contacts is now integrated with CCH iFirm Taxprep. Tax returns associated with a contact are now displayed in the Taxprep tab available in the Contact Details page. By clicking the name of the taxpayer, the return will open in a separate tab. The Info column displays the label associated with the returns.
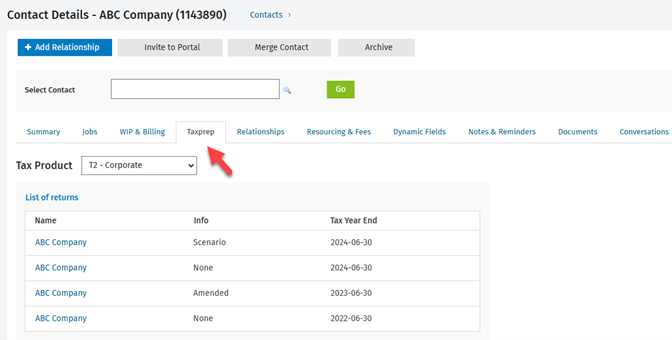
Note: The list of available tax products is based on the entity type in Contacts. See the table below for more information on which tax product is applicable for each entity type.
Entity Type
T1 - Personal
T2 - Corporate
T3 - Trust
TF - Forms
Individual
X
X
Company
X
X
Non-Profit Organization
X
Partnership
X
Trust
X
X
Other
X
-
You can now select the default values (Settings > Contacts > General Settings) that will be set when creating a contact for the following fields:
-
Entity
-
Province
-
Country
-
Communication language
-
Title
-
-
Import Users: You can now update the users’ SSO identifiers by importing a .csv file (Settings > Installation > Import Users). Please consult the Add users help topic for more details on importing users into CCH iFirm.
-
Other changes
-
Import Users: Diacritic characters are now supported for roles.
-
An eye icon has been added to the Password field to allow you to view the password you entered on the login screen.
-
Firm group filters have been added to the Manage Firm Subscription page.
-
Manage Firm Subscription: You can now use the Group 1, Group 2 or Profile filters to narrow the list and search users that display in the list of Available users and Associated users.
-
Export Data – Users Data: The Partner and Manager columns have been removed as they are now considered under the Roles column.
-
CCH iFirm APIs
Common API
API endpoints have been added. Please consult the Swagger for more details on the following endpoints:
GET /global/1.0/contacts/{contactId}
PUT /global/1.0/contacts/{contactId}
POST /global/1.0/contacts
POST /global/1.0/updatessologindetailsforuser
Jobs API
A Jobs API has been created. The following Jobs API endpoints are available. Please consult the Swagger for more details:
POST /global/1.0/jobs/create
GET /global/1.0/jobs/details
PUT /global/1.0/jobs/update
GET /global/1.0/job/dynamicfields
PUT /global/1.0/jobs/dynamicfields
Enhancements - September 13, 2024
Core & Contacts
-
A security role has been added to allow users to update the mobile phone number and e-mail address of other users without having to log in as an admin user. This option is available to users assigned with the Update User Details security role.
-
Firm administrators can now unlock a user account that has been locked due to too many failed password attempts by clicking the Remove Temporary Lockout button in the Edit User screen. This option is available to users assigned with the Security – Clear Temporary User Lockout security role and will only display for users who have been temporarily locked out of their account.
-
Users’ accounts configured with SSO (Single Sign-on) now automatically log into CCH iFirm when a valid authentication token is detected in the user’s browser session (e.g., the user has already logged into another application using the same identity provider). This removes the need to click the Single Sign-On option on the login page when accessing CCH iFirm.
Jobs & Billing
-
ePay
You can now send ePay payments to QuickBooks Online. To send a payment:
The invoice must have been sent to QuickBooks Online;
The invoice must have been paid using ePay; and
You must be logged into your QuickBooks Online site.
To send an ePay payment, search for the receivable that you would like to send and open it. Click the Send to QBO button.
-
Currently Responsible Search
You can conduct searches from the Currently Responsible field in the Job Details and Change Jobs in Bulk screens.
-
Accounts Receivable Transactions
You can now specify contact groups when adding accounts receivable transactions from the Add Transaction page.
The contact groups now appear on the Bank Reconciliation and the Bank Deposit Supplement reports.
Documents
-
The Documents Import tool will be unavailable until the next major CCH iFirm release. If you need access to the tool, please create a ticket for our support team through support.cch.com/oss/canada.
CCH iFirm Common API
-
API endpoints have been added. Please consult the Swagger for more details on the endpoints.
POST /global/1.0/contacts/{contactId}/archive
-
The endpoint below has been modified to include the User ID, Email and UserGUID in the response body.
POST /global/1.0/createusers
Enhancements - July 23, 2024
Core & Contacts
-
Import Users: You can now associate roles to users by importing a .csv file. Note that the Partner and Manager options have been removed as they are now considered under the roles. Please consult the Add users help topic for more details on importing users into CCH iFirm.
-
Update your bookmarks! The following URLs have been updated:
Login:
Old: https://yoursite.cchifirm.ca/2/login#/fe/dashboard
New: https://yoursite.cchifirm.ca/2/login/#/
Dashboard:
Old: https://yoursite.cchifirm.ca/#/fe/dashboard
New: https://yoursite.cchifirm.ca/#/
-
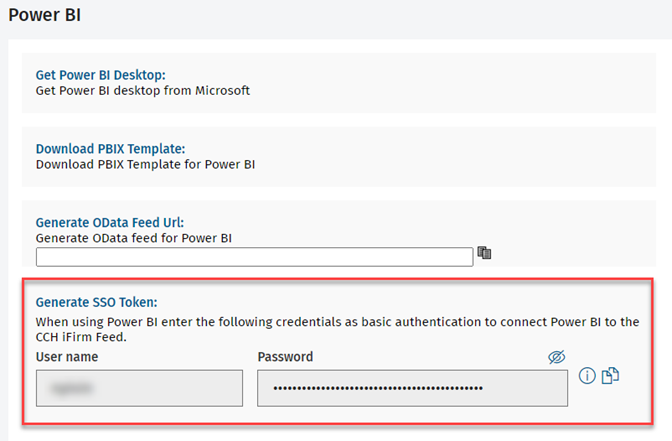
Firms for which Single Sign-on (SSO) and Power BI (OData feed) have been configured can now generate a user name and a password that can be used for basic authentication to connect to a OData feed data source in Power BI from Power BI > Generate SSO Token. Please note that this feature will only display for CCH iFirm sites that are preconfigured with SSO. Additional charges may apply for SSO.
Jobs & Billing
-
ePay Pre-Authorized Debit
The workflow for ePay pre-authorized debit transactions has been improved. When a payment is processed using pre-authorized debit, the status of the Accounts Receivable and Invoices lists will be Pending. Once the payment is processed and confirmed by Stripe, the status will change to Succeeded. If the payment fails, the status will change to Failed.
-
ePay Payment Status
A report and a Power BI feed to view ePay payment statuses have been added.
You can access the report under Reports > All Reports > Jobs & Billing.

The report will show the ePay payment statuses from the last six months. You can filter the statuses by client, date range, contact partner, contact manager, firm group, billing entity, contact group and payment status.
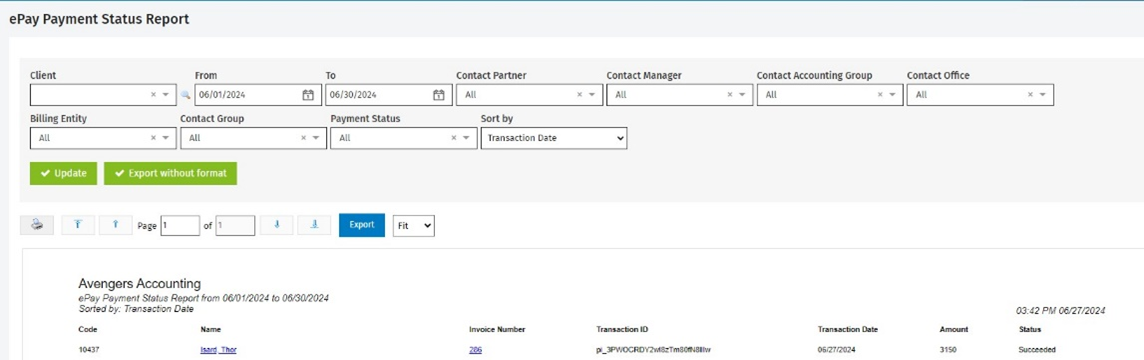
The Power BI feed ePayPaymentStatus will show the invoice amount, client code, client ID, client name, invoice number, payment status and transaction date. The report and feed provide data from the last six months only.
-
Bank Deposit Supplemental Report
The Bank Deposit Supplemental report now displays all payment types, including custom payment types. You can also filter the report by payment type.
-
Work in Progress Client Breakdown Report
The Work in Progress Client Breakdown report, available from the Quick Links menu of the invoice, has been improved and now includes all jobs on an invoice, including the ones that are closed.
Documents
-
Default Folder
You can now choose a default folder when new files are uploaded. Only permanent folders can be selected.
To select the default folder, go to Settings > Documents > General Settings.
Select the folder that you want to use as your default folder and click Save.

-
Create New Documents
You can now create new Microsoft Word, Microsoft Excel or PDF documents directly from CCH iFirm Documents.
To create a new document, click the Create Document button and select the type of document that you want to create.
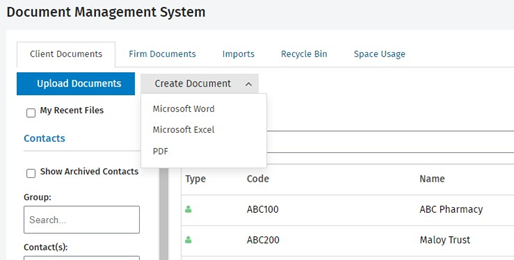
Select the location where you want to save the new document and enter a file name for that document.
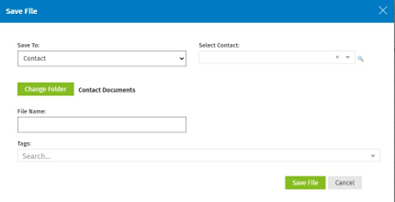
The new document will open in the appropriate application.
Closing the file in Microsoft Word, Microsoft Excel or the PDF Editor will save the document in CCH iFirm Documents.
CCH iFirm Common API
-
API endpoints have been added. Please consult the Swagger for more details on the endpoints.
GET /global/1.0/customroles
GET /global/1.0/customroleusers/{customRoleId}
GET /global/1.0/usercustomroles/{userId}
GET /global/1.0/users/{userId}
We now support roles for the following API endpoints: createusers, updateusers, getuserdetails and fetchusers.
-
Common API endpoints now validate all the different levels of CCH iFirm security against the given access of a user: API access, security roles and contact security.
Enhancements - May 17, 2024
Jobs & Billing
-
Importing Jobs
-
You can now create jobs and update existing jobs in bulk using a comma-delimited (.csv) file.
-
Notes:
Once a job has been created, it can only be closed, not deleted.
For existing jobs, we recommend that you use the Change Jobs in Bulk functionality available from Jobs > Change Jobs in Bulk.
You must have the following security roles to use the Import Jobs spreadsheet:
Settings – Installation
Jobs – View, Add and Edit Jobs
To import jobs, click Settings > Installation > Import Jobs.
The columns Client Code and Job Type are mandatory.
For more information on how to use the Job Import functionality, consult the Import Jobs Help topic.
-
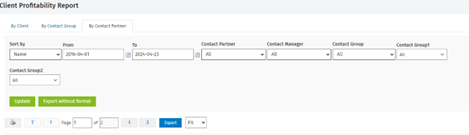
Client Profitability Report
-
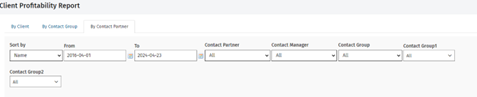
You can now view the Client Profitability Report by Contact Partner.
-
You can now export the Client Profitability Report without formatting by clicking the Export without format button. This allows you to view the report data and manipulate it in Excel.
-
Job Order
-
You can now filter the Ordered Jobs tab in the Job Order page by Client Name, Client Code and Job ID.
-

-
Recurring Jobs
-
When creating recurring jobs, if None is selected in the Job Partner or Job Manager fields, the Contact Partner or Contact Manager will be used for the job, if applicable.
-
-
Other Corrections
-
Custom payment types now display on the Bank Reconciliation Report.
-
The issue where the Payment Overdue label wasn’t appearing for clients with overdue invoices and two billing entities has been fixed.
-
Core & Contacts
-
In response to customer feedback and to enhance CCH iFirm security, the Login As User functionality available under Settings > Users > Edit User has been removed from the application.
Enhancements - December 8, 2023
Jobs & Billing
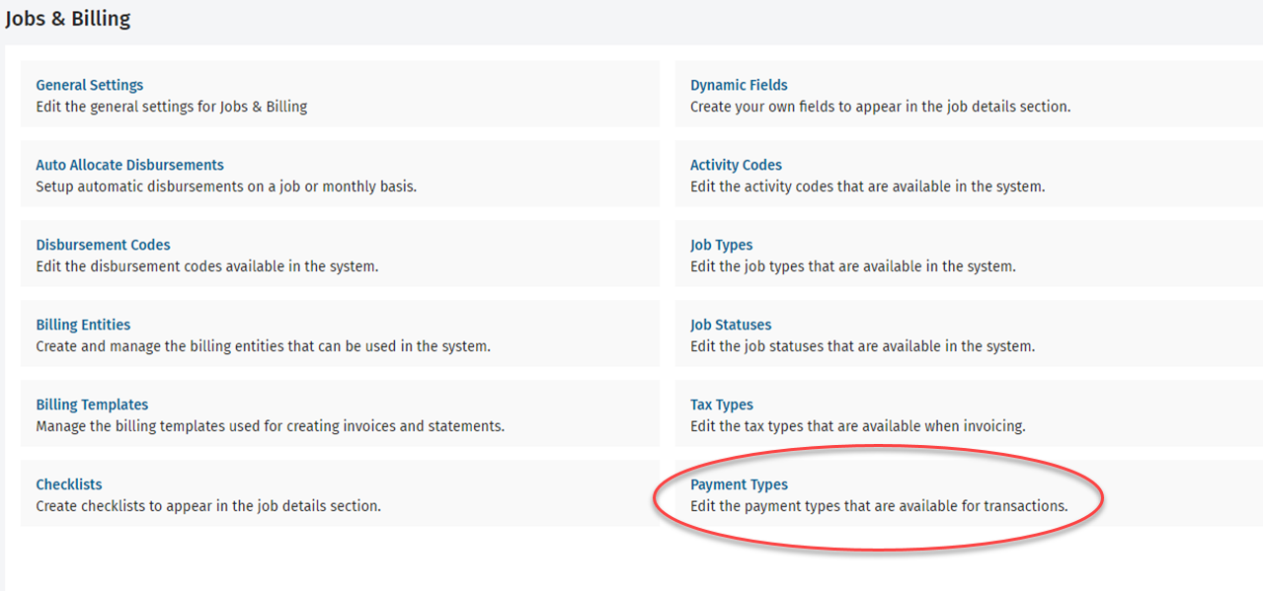
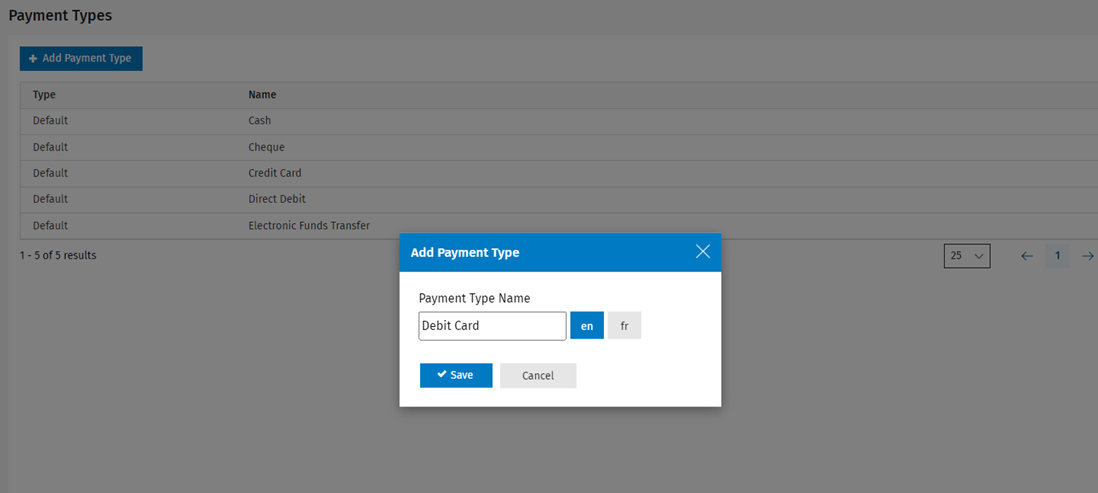
-
Payment Types
-
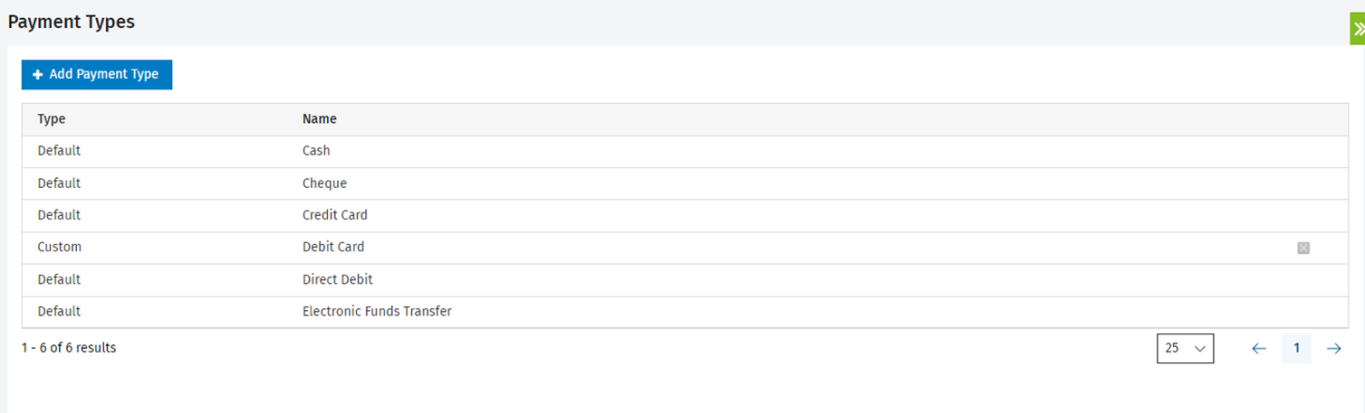
You are now able to add your own payment types to the Accounts Receivable settings from Settings > Jobs & Billing > Payment Types.
-
To add a payment type, click Add Payment Type.
-
The new payment type will display in the Payment Types list as a Custom payment type.
-
New payment types will display in the Accounts Receivable > Add Transaction screen, under Payment Type.
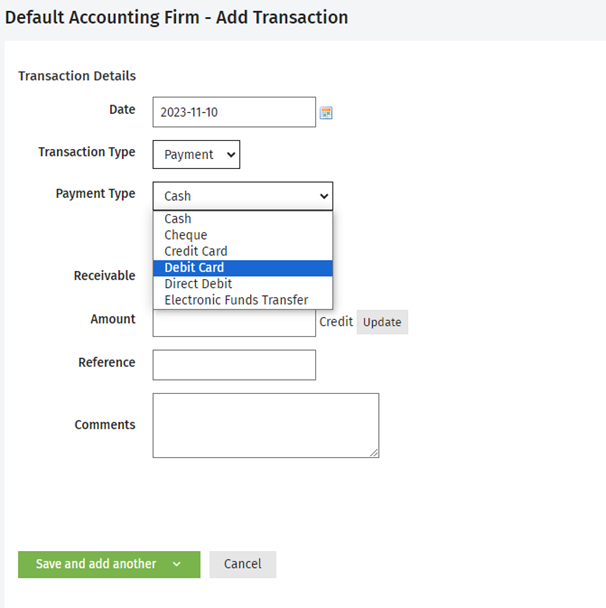
Notes:
-
Default payment types cannot be edited or deleted.
-
Custom payment types cannot be deleted if there is an accounts receivable transaction associated with them.
-
-
Portal
-
We’re happy to announce that customers of the Client Portal will now be offered the option to log in with their Facebook or Google accounts. To enable social media account logins, go to Settings > Portal > Portal Settings and select Enable Social media login.
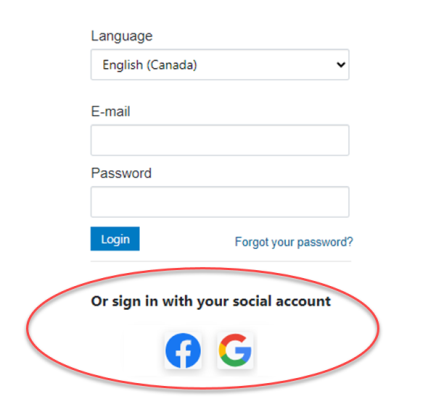
Notes:
The first time a client logs in with their Google or Facebook account, they will receive a message indicating that Wolters Kluwer has used his or her social media login to authenticate them.
Documents
-
You can now collapse the Documents filter view.
-
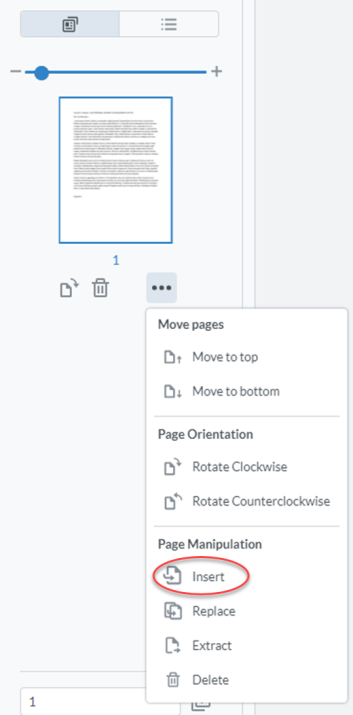
PDF Editor
-
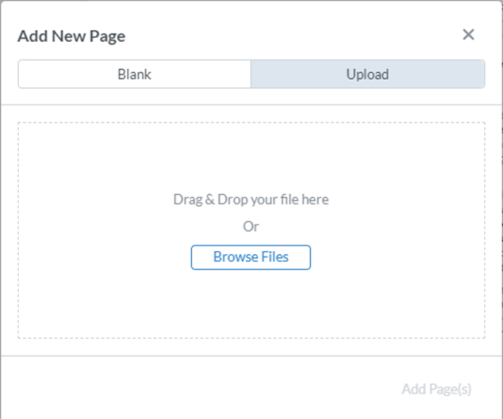
You can now upload Microsoft Office documents and image files into the PDF Editor in the Thumbnails view.
-
Click … and select Insert.
-
You will have the option to insert a blank page or upload a file.
-
-
You are now able to open and merge Microsoft Office documents and image files in the PDF Editor.
-
To create a PDF document from those files, you can open the files in the PDF Editor and then save the new PDF to CCH iFirm Documents.
-
-
-
Renaming Files
-
You are now able to rename documents when uploading them to CCH iFirm Documents.
-
When you choose a file to upload, you will be offered the option to rename the file.
-
-
Clicking Rename will give you the option to change the file name.
-
Core & Contacts
-
You are now able to configure and assign roles to your users. Four default roles are defined in CCH iFirm: Manager, Partner, Preparer and Reviewer. You can also choose to add a customized role by clicking Manage Roles under Settings > Users.
-
This September, we launched our Web support platform. This platform centralizes your requests in a single location and allows you to view the status of your requests, add comments and submit any questions concerning our software products.
Not only does the new platform provide a fast streamlined support system, it also features a robust chat function powered by our virtual assistant, with access to over 40,000 articles from our Knowledge Base. We know your time is valuable, and our goal is to ensure your inquiries are addressed promptly and comprehensively.
We are excited to announce that our virtual assistant will be accessible directly from CCH iFirm starting December 11. Register to our support platform to submit, modify and track all your support requests in a single location.
CCH iFirm Common API
-
API endpoints have been added. Please consult the Swagger for more details on the endpoints:
-
POST /global/1.0/CreateRelationshipByID
-
POST /global/1.0/CreateRelationshipByGUID
-
POST /global/1.0/DeleteContactRelationships
-
GET /global/1.0/FetchContactRelationById
-
GET /global/1.0/FetchContactRelationByIdentifier
-
POST /global/1.0/GetUserRolesByIdentifier
-
-
The business number can now be updated via API (/global/1.0/CreateOrUpdateContacts), and validation has been included for the SIN, BusinessNumber and AccountNumber fields.
Enhancements - October 6, 2023
Jobs & Billing
-
Credit Notes
You will now be able to apply credit notes directly to an invoice. You can still apply a partial credit, which will write the credit against the client’s receivables directly.
-
Full Amount Credit Note: The new full amount credit note reverses existing allocations against the WIP entries in the invoice, once it is finalized, to allow the WIP to be re-invoiced. The Select Invoice to Credit method is a full amount allocation of the credit note towards a specific invoice.
-
Note: Credit notes created using the Select Invoice to Credit method and the associated invoices cannot be unfinalized or deleted.
-
-
Partial Amount Credit Note: Partial or simple line credit notes do not reverse the WIP transactions and write the credit against the client’s receivables directly, lowering the total amount due. To add a partial credit, you will now need to select Add Simple Line from the Add Credit Note button.
-
-
Power BI
A new feed called TimesheetApprovalData has been added to Power BI. The feed will include:
-
Activity (Description), Activity Code, Approval Status, Approval Name, Billable Time, Client Code, Client Name, Date of Timesheet Entry, Job, Job Description, Job Group 1, Job Group 2, Job ID, Job Manager, Job Partner, Job Type, Non-Billable Time, Paid Non-Billable Time, Time, Timesheet Comment, User Group 1, User Group 2 and User(Who had added the timesheet)
-
-
Export Data
Timesheet Approval Data
-
The following fields have been added to the Timesheet Approval Data:
-
Client Code
-
Timesheet
-
Billable Time
-
Non-billable Time
-
Paid Non-billable Time
-
-
-
You’ll also now be able to filter the data by Client and Timesheet type: Billable Time, Non-Billable Time and Paid Non-billable Time.
-
Portal
-
We’re pleased to announce that branding can now be applied to your client portals. You can add a logo that will display when the user logs in; it will also display in the client portal. As well, you can add a background image that will display when your client logs in.
Adding a logo and background:
-
Click Settings > Portal > Portal logo and background.
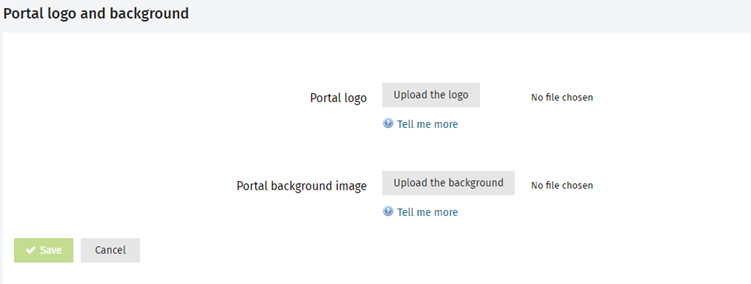
-
Click the Upload the logo button to upload a logo.
-
Recommended dimensions: 100 x 50 pixels (larger images will be resized)
-
-
Click the Upload the background button to upload a new background image.
-
Recommended dimensions: 1920 x 1080 pixels (larger images will be resized)
Image Requirements
-
Supported formats: JPEG, JPG and PNG
-
The changes may take some time to reflect in the client portal.
-
Maximum file size: 2 MB
-
Notes:
-
The existing Portal Themes will no longer be available.
-
If you don’t set your background image or logo, the background image will be grey, the logo space will be blank, and your firm’s name will not display.
-
Documents
Opening Locked Files
Users will now be able to access locked files in read-only mode even if the file is being used by another user.
-
Users with the Documents – View and Unlock security role will see the following message when they click the lock (
 ) icon. Clicking the Open as Read-Only button will open the file in the PDF editor in read-only mode.
-
If the user clicks the file and not the lock icon, the file will open in read-only mode.
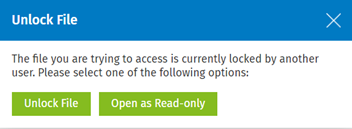
-
-
For users without the Documents – View and Unlock security role, the file will open in read-only mode.
Note: All editing functions in the PDF editor will be disabled.
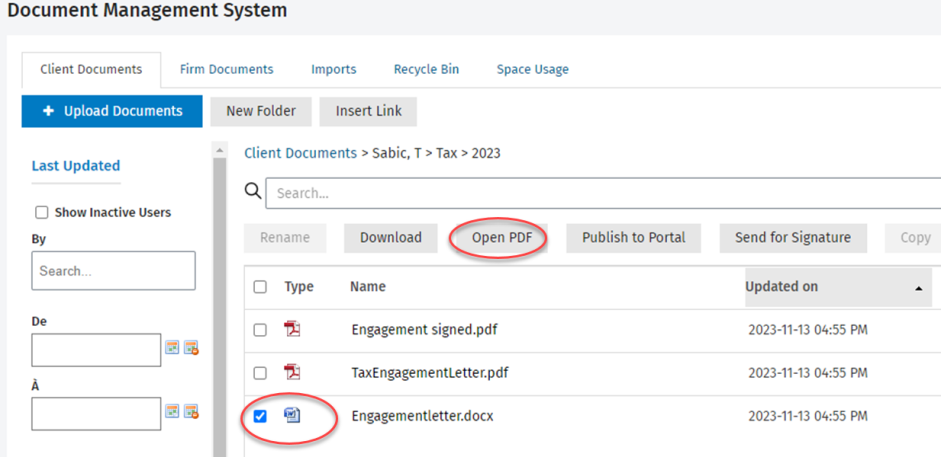
Opening PDFs
-
The Edit PDF button has been renamed Open PDF.
Core & Contacts
-
Firm administrators can now see a more detailed message when their site is disabled for administrative reasons. The Manage – Login suspension security role allows users to consult this message at the time of login.
CCH iFirm Common API
-
OAuth 2.0 Client Credentials Grant Type is now supported by CCH iFirm Common API. For more information, consult the Common API help topic.
Enhancements - July 14, 2023
Jobs & Billing
-
The issue where the drawer information was not appearing in the Bank Deposit Supplement report has been resolved.
-
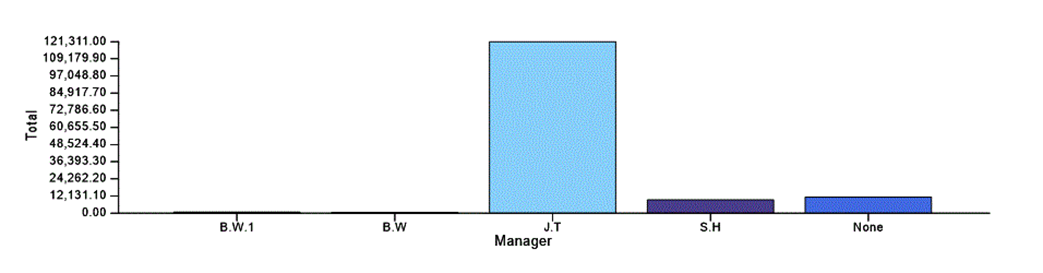
The issue where users with the same initials were grouped together in some report graphs has been fixed. A number will be added to these users’ initials to differentiate them in graphs. For example, users with the initials B.W. will now be displayed as B.W.1 and B.W.
-
The following reports are affected by this change:
-
Work in Progress by Partner Report
-
Work in Progress by Manager Report
-
Cashflow Analysis by Partner Report
-
Cashflow Analysis by Manager Report
-
Revenue Analysis by Partner Report
-
Revenue Analysis by Manager Report
-
Portal
-
The issue where documents with two periods in the file name (for example, Excel..xls) could not be downloaded from the client portal has been resolved.
Documents
-
You will need to update your Documents Sync tool and Documents add-in for Microsoft Outlook for this release.
-
The issue where the formatting of an email was lost when saving it has been resolved.
-
You are now able to add a link within a Documents folder.
-
Within the folder, click the Insert Link button.

-
Enter the information for your new link:
-
Display text (required): This is the text that will display in your Documents folder.
-
Enter Link (required): Enter the link that you want to save.
-
Tags (optional): Add the tags that you want to associate to the link.
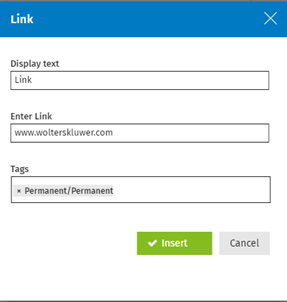
-
-
The link will display in your Documents folder.
-
Links display with a
 icon next to them.
-
-
You can open the link by clicking on the display name. The link will open in a new browser tab.
-
Core & Contacts
-
You can now export user data through Export Data. The Export Data – View, Add and Edit security role allows users to access the Export Data menu and the Export Data page. You can consult the Export data help topic for more information.
-
You can now launch CCH AnswerConnect directly from the CCH iFirm menu. CCH AnswerConnect is the most innovative research service for professionals who want accessible answers to Canadian tax questions all in one place. Please note that you will need a subscription to CCH AnswerConnect to access this product. If you are not a subscriber yet, you can click the link displayed on the login page to try it for free!
-
The Partner, Manager and Entity field values will now be retained in contacts you archive.
Enhancements - June 2, 2023
Jobs & Billing
-
The following fields have been added to the Bank Deposit Supplement report:
-
Payment Type
-
Reference
-
Comments
-
-
The issue regarding the language selection, namely “English” or “French”, when sending statements has been resolved.
-
The issue in reference to a 404 error received when printing or e-mailing hundreds of statements has been resolved.
-
The issue relative to the lack of display of the firm filters in the Work in Progress by Partner and by Manager reports has been resolved.
-
You can now filter inactive users out of the Billable Time Breakdown by Period report.
Documents
-
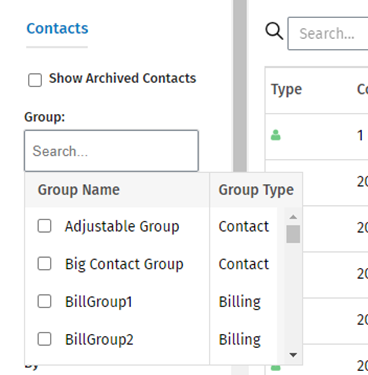
The Contact Group filter has been renamed to Group and now include two columns (Group Name & Group Type).
-
While saving merged PDF files from the same contact, the contact name field will now be pre-populated at the time of saving.
-
You can now copy a link to a specific document in Documents and paste it into documents that support embedded links. You can copy the link by clicking on the new linking icon.
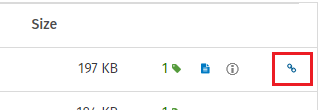
-
Clicking on the link in another document will open the associated document on your workstation using Documents Sync.
-
Core & Contacts
-
The Business Number field is now available for contacts with an entity type set to “sole proprietor”.
-
When searching for contacts using the Client Name option in the main contacts grid, the result output will now include matching results from the Client Name and Mailing Name fields. Note that the Mailing Name column is not yet available in the grid, but will be added in a future version.
-
Import Users: You can now associate security profiles and add SSO identifiers to users via .csv import. Please consult the Help topic Add users for more details on how to import users into CCH iFirm.
-
A column has been added in the User Manager grid to display the Profiles associated to the users. From the user advanced search, you can now filter on Profiles.
Enhancements - December 16, 2022
Jobs & Billing
-
ePay
The Pre-Authorized debit payment option in Stripe will only be available for invoices under $3,000 to be compatible with the Stripe limit. Credit card payment options are available for invoices over $3,000.
Enhancements - December 2, 2022
Documents
-
CCH iFirm Documents now includes a complete cloud-based PDF editing solution.
-
To enable the PDF editing solution, go to your CCH iFirm user profile and select Open in browser as your preferred PDF solution.
-
To launch the editing solution, simply open a PDF file. To open multiple PDFs, select the relevant PDF files and click the new Edit PDF button from the top menu.
-
The PDF editing solution offers a complete range of features:
-
Merge and split documents
-
Delete, add and rearrange pages
-
Annotate documents: highlight, bold, strike, underline, free text and free hand, shapes
-
Comments with statuses
-
Insert: images, attachments, callouts, stamps (premade and custom)
-
Edit: existing text, image and text placement
-
Forms: create and/or fill forms
-
Search through documents
-
Audit trail with users, modifications and timestamps
-
Print from the cloud
-
Save directly to CCH iFirm Documents versioning or as a new file
-
-
-
CCH iFirm Documents is now supporting the cloud-based applications of Microsoft Office 365.
-
When opening a Microsoft Office file, the user will now have the choice to download it with the Documents Sync Tool or to open it in the browser.
-
If it is the first time a file is opened in the browser, the user will need to log into his Microsoft Office 365 account.
-
Files can only be opened by a single user at any time from CCH iFirm Documents, and they can be edited using all the available options from Microsoft Office. The modifications will be saved when the user closes the tab.
-
The file will then be uploaded back into CCH iFirm Documents, and a new version will be created in the version history of the file.
-
If the user wishes to save the document as a new version or to a new location, using the Microsoft Office 365 add-in will be necessary.
-
Opening a file in the cloud-based version of Microsoft Office 365 will still lock the file in CCH iFirm Documents, making it available to a single user only.
-
-
CCH iFirm Documents and CCH iFirm Taxprep now let users access tax-related documents stored in CCH iFirm Documents directly from the CCH iFirm Taxprep interface.
-
A new Tax folder will be visible under each contact in CCH iFirm Documents.
-
In the Tax folder, a yearly folder will be created automatically.
-
Any document placed in the proper year folder will now be visible and accessible from a tax return.
-
Please refer to the CCH iFirm Taxprep Release Notes for further details.
-
-
CCH iFirm Documents and CCH iFirm Portal now offer an improved Tag feature. When moving a file from CCH iFirm Portal to CCH iFirm Documents, users will now have the option to add tags to the files when choosing their destination.
Portal
-
All digital signature reports now include the option to filter by Partner or Manager.
Jobs & Billing
-
The following OData feed has been added:
EmployeeRealization_Last365days – This new feed provides data pertaining to the last 365 days for the Employee Realization report. The available columns are WipID, UserID, ClientID, EntityID, Billing Entity, Billing Entity, Contact Partner, Contact Manager, Job Partner, Job Manager, Job Group1, Job Group2, Contact Group, Billing Group, Invoice Date, Invoice Number, ClientId, Client Code, Client Name, UserId, Resource, JobId, Job Type, Period Ended, WipItem, Activity Code, Activity Description, Hours, Wip Amount, Total WriteOnOff, Allocated WriteOnOff, Invoice Amount, IsPaid, Effective Rate and Realization %.
Contacts
-
The Recalculate Contact Security button has been removed from the user interface. The use of this button will not be required anymore; all Add Contact scenarios will now automatically recalculate the Contact Security rules as needed.
CCH iFirm Common API
-
Rate limiting for the Common API has been adjusted. For more information, consult the Common API help topic.
Enhancements - October 7, 2022
Jobs & Billing
- Contact Security
Contact Security has been extended to some reports, export data feeds, and to the Work in Progress area. These areas will now only show data for clients that you have permission to view.- Work in Progress Area
- When you access the Work in Progress area you will only see the Work in Progress for the clients that you have permission to view.
- Reports
- Client Profitability
- Job Profitability
- Work in Progress
- Aged Work in Progress
- Work in Progress Client Breakdown
- Work in Progress by Manager and by Partner
- Grouped Work in Progress
- Grouped Work in Progress Summary
- Write-on Breakdown
- Write-on Summary
- Export Data
- Accounts Receivable Aged Data
- Accounts Receivable Control Data
- Disbursement Data
- Employee Realization Data
- Timesheet Approval Data
- WIP Aged Data
- WIP Control Data
- Work in Progress Area
-
Billing Entities & Invoice Templates
-
Billing Entities and Invoice Templates can now be set at the Contact level. The Billing Entity and Invoice Template selected at the Contact level will be used as the default Billing Entity and Invoice Template during invoicing.
-
If there is no Invoice Template selected at the Contact level, then the Invoice Template set in the Billing Entity will be used as a default.
When you invoice the client, the selected Billing Entity and Invoice Template will be used to create the invoice.
You can still change the Billing Entity or the Invoice Template at the invoice level, if needed.Importing Contacts
You can also now specify the Billing Entity when you import clients. If no Billing Entity is specified, then the default Billing Entity will be used during import.
You will now be able to edit individual recurring jobs from the Recurring Jobs screen, by clicking the edit button.
-
- Recurring Jobs
You will now be able to edit individual recurring jobs from the Recurring Jobs screen, by clicking the edit button.
-
Job Dynamic Fields
-
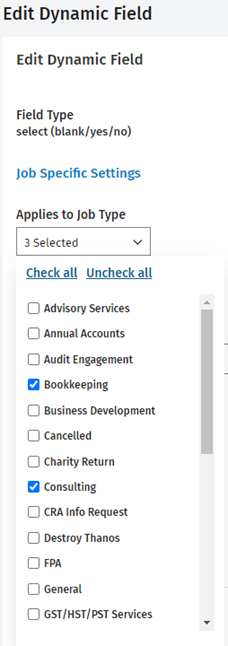
Assigning Job Types
You will now be able to assign multiple job types to a single dynamic field.
-
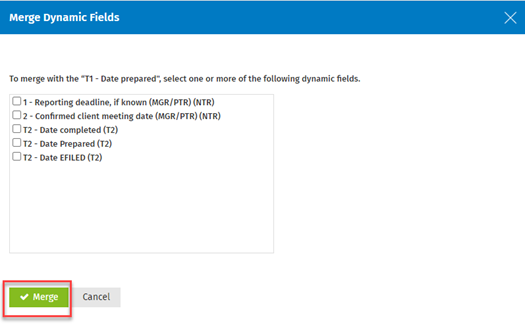
Merging Dynamic Fields
The Admin user will now be able to merge multiple similar dynamic fields in Settings > Jobs & Billing > Dynamic Fields by clicking the plus
 sign next to the primary dynamic field, that is the dynamic field you wish to merge other dynamic fields into.
Important: Only the Admin user can merge dynamic fields.
-
- Job Search Filters
You can now save Search Filters to quickly access them for future searches. From the Jobs page, click the Search tab and choose the desired filters for your search. Once you have created your search filter, you can assign a name to your filter and click the Save Filter button.
You can see your saved filters on the Jobs page by clicking the blue arrow located on the far right.
Saved filters can be renamed, moved, or deleted.
Note: Saved filters are unique to each user and cannot be shared between users.
Documents
- When using the CCH iFirm Document import tool, documents can now be mapped and imported into the Internal Documents folder. For Firm Documents, users can only import to the folder if they have the Documents - Internal Documents View and Edit role. When a user has the Documents - Internal Documents View and Edit role, they will be able to see and import to the Firm HR Documents folder but not to individual users HR Documents Folders.
- To improve searching by the Last Updated field, the user search made with the “By” filter now displays active users only. You can select to see inactive users by selecting the checkbox in the Last Updated section.
Contacts
- A new firm setting allows firms to hide users Mobile Phone number in the team directory. Deactivate the setting under Settings > Firm Settings > Firm Details > Show the phone numbers in the team directory to make this change effective on your site.
- The Administrator user can now have a Mobile Phone number set in the Profile tab of the Edit User screen. This enables the use of SMS for Multi-factor authentication for this user.
- Firms configured with Single Sign-on (SSO) can now enable or disable SSO from Settings > Firm Settings > Enable Single Sign-on. Please note this feature will only display for sites with SSO preconfigured on their CCH iFirm site. Additional charges can apply.
CCH iFirm Common API:
- Enhance your current workflow by leveraging the new Common API of the CCH iFirm platform. This API will allow you to automate the management of your Contacts, Users and Contact security-related functions. For more information, consult the Common API help topic. Please note this is sold as a separate module; contact your solution consultant for more information.
Enhancements - July 15, 2022
Jobs & Billing
- ePay
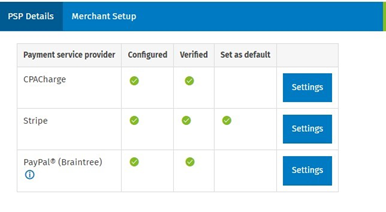
We are pleased to announce that two new ePay service providers have been added to CCH iFirm:As with Braintree, once your merchant account is set up with a provider, you can integrate your account with CCH iFirm in Firm Settings > ePay. Once you click Configure, you will be provided with the option to set up your CPACharge or Stripe accounts.
We recommend, when switching payment service providers, that you do not remove your previous payment service provider until all invoices issued under that provider are paid.
- Holiday Manager
The Holiday Manager now hides by default any users that you have marked as Inactive.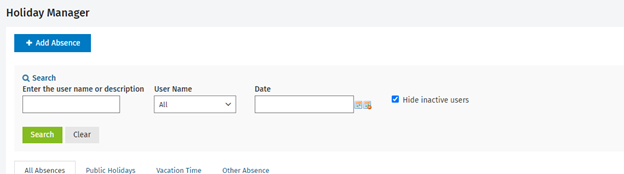
- Deselecting Hide inactive users shows inactive users in the Holiday Manager; however, their entries cannot be edited or deleted.
- You can now also select users to filter the Holiday Manager view. You can select all users, one user or multiple users. Only users that have unique holiday entries will be displayed in the list. For example, if a user only has public holidays off like all other users, they will not display in the list.
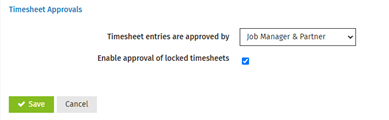
- Timesheet Approvals
The Timesheet Approvals feature, which allows your firm to add an approval level for billable time, has been released to all users. You can turn this functionality on from Settings > Jobs & Billing > General Settings > Timesheets and, under the new Timesheet Approvals section, by selecting who will approve the timesheets. You can also allow the approval of locked timesheets by selecting Enable approval of locked timesheets.With the addition of this approval level, billable timesheets must be approved by a user with the appropriate security role before they are added to WIP.
- Reports and Export Data
- Billable Time Export: We have added a new Revenue Generated column to the Billable Time Data export. This field will show the total revenue per job and per client for each employee.
- Sales Tax Data Export: We have added a new export data feed that breaks down sales tax by employee per job, client, activity code, disbursements and other items.
- Timesheet Approval Data: We have added a new export data feed that shows which timesheets have been approved and which have not.
Portal
- By default, Documents to be Signed will now only be visible in CCH iFirm Portal for the person required to sign documents. Through portal settings, it is possible to show the content of the Signed Documents folder only to the person intended to sign or to everyone that has access to the portal.
- When inviting existing subscribers to additional portals, it is now possible to edit the First Name, Last Name and Mobile No. fields.
Contacts
- Contact Security rules are now recalculated for an inactive user when they have been made active.
Enhancements - May 27, 2022
Core & Contacts
- A notification message recommending that users configure two or more multi-factor authentication methods is now displayed on the dashboard. Please note that users can disable this notification message, if desired, by selecting the Hide notification to set up multiple MFA credentials checkbox near the bottom of the page > My Profile > Multi-Factor Authentication tab.
- Client Status is now included in the list of Available Fields in the Contact Details report. This filter will allow you to determine if a contact is active or inactive in the CSV export.
- The one-time access code generated from Settings > Users > Edit User > Create a one-time MFA access code is now valid for four hours.
Jobs & Billing
- The following OData feed has been added:
- ActualVsAllocatedHours – This new feed will provide data for the Actual/Allocated Hours Report. The available columns are UserName, UserID, Allocated, Worked, Difference, Variance Reason, Contact Group, Client, Job, Job ID, Status, Invoiced, Write-off, WIP and Budget.
- The issue where the timesheet entry method selected by a user was not considered when the Change User option was selected has been fixed.
- The issue where the English date format appeared for French contacts when an invoice description included the period ending text date merged field ({PeriodEndedText}) and the layout had been changed to not show the disbursements and/or adjustments separately has been fixed.
- Diacritical characters are now displaying correctly in ePay invoices.
Portal
- It is now possible to apply a global file retention policy to the CCH iFirm Portal module. From the Settings > Portal section, input the desired retention period in number of days. Once the number of days is reached for a file, it will automatically be purged from the portal.
- From their portal, your clients can now update their personal information. This change request is available in CCH iFirm, under the new Portal Updates tab. Once reviewed, you will be able to approve or cancel the changes.
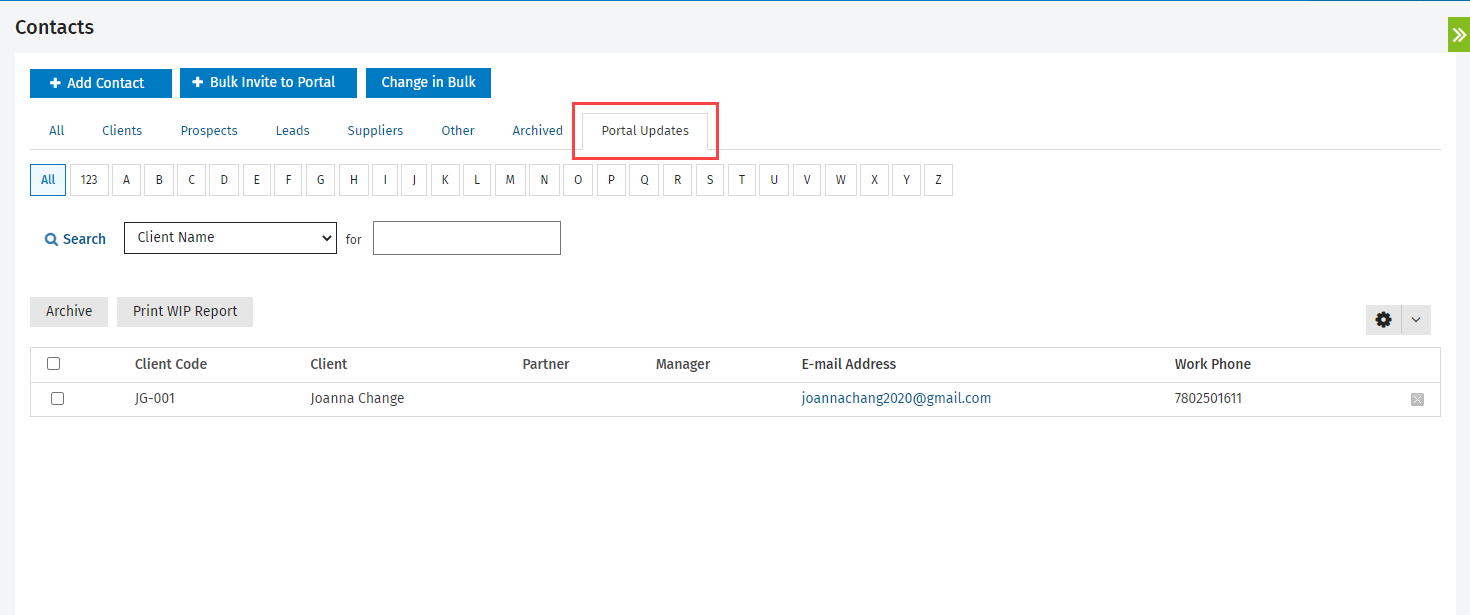
Documents
- We improved the sorting behaviour of folders and files in the different display grids according to these priorities:
Scenario #1: Groups of files and folders that will always be displayed, sorted by Name (or any other column), in individual groups.
Type | Name
Folder | A
Folder | B
Folder | C
File | A.txt
File | B.txt
File | C.txt
Scenario #2: If the Type column is clicked, the files group will appear first, sorted by Name (or any other column), in individual groups.
Type | Name
File | A.txt
File | B.txt
File | C.txt
Folder | A
Folder | B
Folder | C
Scenario #3: If the Name column (or any other column) is clicked, items from the Name column will be sorted by descending order, in individual groups. Here, Type sorting will persist.
Type | Name
File | C.txt
File | B.txt
File | A.txt
Folder | C
Folder | B
Folder | A
Enhancements - December 17, 2021
Core & Contacts
- Temporary passwords will now expire 24 hours after you send new users their login details.
- The issue affecting some users where Associated licenses were not retained when saving the latter in the Edit user screen has been fixed.
- To ensure consistent performance for everyone, email content and metadata stored in the e-mail centre will now be permanently deleted after 365 days.
Jobs & Billing
- The issue where an amount was added automatically to the Invoice in advance field when applying write-offs from the Change Amount dialog box in the Draft Invoice page has been fixed for all newly created invoices. Please note that previously created invoices affected by this issue have not been automatically corrected. You can now manually do the correction from the Change Amount dialog box.
- The issue where jobs appeared as duplicates in the My Ordered jobs tab when multiple people were assigned as resource and the job order had been set for each person has been fixed.
- The job types’ full name now displays instead of the job code when adding a job status in Settings > Jobs & Billing>Job Statuses and when adding automatic fees or a resource allocation in Contact Details > Resourcing & Fees.
- A security role has been added to allow you to further restrict the ability for your users to view, add and edit their own disbursement entries. This security role is called Disbursements - View, Add and Edit My Disbursements.
Documents
- The issue where sending a folder from CCH iFirm Document to CCH iFirm Portal, which could lead to missing files in the folder has been fixed.
Portal & Digital Signature
- The Firm Name and Client name merge fields contained in e-mail templates should now return to the proper value.
Enhancements - December 3, 2021
Core & Contacts
- You can now search for a user from the Contact Security page.
-
Up to 100 characters can now be entered in the User Name field.
-
Sortable columns are now visually identifiable in the Contacts, Client Notes, Contact Security and E-mail Centre screens.
-
The Import Clients functionality is now restricted to 3,000 contacts per batch.
-
Contacts will no longer be duplicated when they are added to a Billing Group or Contact Group, which can now be accessed without errors.
-
By default, imported QBO contacts will not be visible to users added to Contacts until a firm administrator refreshes the contact security by clicking the Recalculate Contact Security button from Settings > Contacts > Contact Security.
-
The E-mail Centre Date Sent column will display information based on the time zone configured for your CCH iFirm site.
-
The Contact Details report now correctly displays diacritic characters in the CSV export.
-
The Current WIP section, under the WIP & Billing tab (Contact Details page), will now list the top 10 items based on the WIP amount.
- Dashboard
- The Dashboard will now display eight widgets on the initial load of the screen. You can use the Show More button to display four additional widgets per click.
- The Team Efficiency widget will now show updated information when a filter is selected.
- Clicking a timesheet in the Missing and Incomplete Timesheets widget will take you to the correct timesheet.
Jobs & Billing
- My Timesheet
- You can now search for jobs that have an “&” in the contact name in My Timesheet.
- You can now enter a single character in the Job and the Activity Code drop-down fields and results will be displayed.
- A copy button is now available next to the Activity Code field in My Timesheet. Clicking the button will copy the text in the Activity Code field into the Comments section.
- In the Monthly tab of the My Timesheet view, if you click the Next button in a 31-day month, you will now be taken to the next month.
- The Search box will now resize to the size of your window.
- Activity Codes will display when adding time to a Timesheet from a timer.
- When editing a time entry, the Current Job Status will now display.
- Job Order
- Gridlines have been added to the Job Order page to facilitate review. The page has also been resized and the columns width improved.
- WIP
- The issue with the Add Allocation button in the Edit WIP Item screen has been fixed.
- The issue with the transferring WIP to a new job in the French interface has been fixed.
- Reports
- The issue with loading reports has been fixed and all reports should now load correctly.
- In the Job Profitability report, you can now select more than one job type and see the results for all selected job types in the report.
- Recurring Jobs
- The selections made when creating bulk recurring jobs in Jobs & Billing > Recurring Jobs will now be used.
- Accounts Receivable
- Accounts Receivable transactions for a client will now be listed from newest to oldest.
Capacity Planning
- You can now see all users in the Capacity Planning view.
Documents
- The import mapping feature has been enhanced to enable bulk approval. When the mapping is done through a mapping file, all mapped items will be approved.
- One or more folders can be selected as permanent folders during the import process. This will prompt CCH iFirm Documents to place all folders and files contained in the selected folders in the contact's permanent folder.
- The behaviour of the search filters has been modified. Search will now work across all entries even if the drop-down menu only presents a limited number of entries. The Load more button can be used to display more entries.
Portal & Digital Signature
- The Signed Documents report will now include drop-down lists from which to select Partner and Manager as filters.
- An option to invite additional portal users to CCH iFirm Portal during the envelope creation process has been added. Once invited, the user will be a potential signatory for the envelope.
- When inviting a new user to CCH iFirm Portal, a new security option has been added to only display the Documents to be Signed folder to them.
- CCH iFirm Users can now see the size of a folder within CCH iFirm Portal by clicking the new Properties icon next to the folder.
Enhancements - September 24, 2021
Core & Contacts
- We are excited to announce the release of the new CCH iFirm User Interface (UI) to all users. This is the first step in the ongoing development of UI/UX (User Interface/User Experience) enhancements of the application.
What’s new in this version:
- A modern user interface for enhanced productivity.
- Responsive screen designs improving user productivity and workflow efficiency.
- Faster response times, which further boost productivity and user experience.
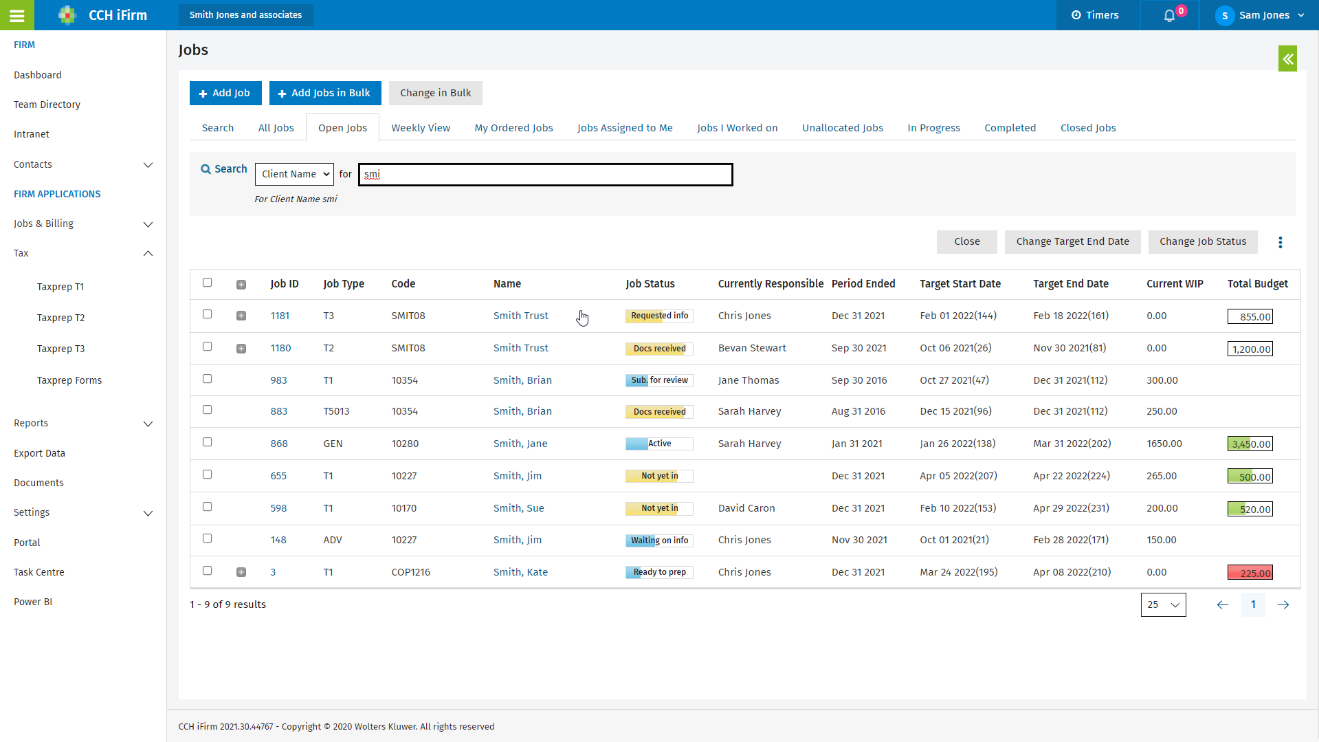
To ensure a smooth transition, no features have been removed as part of these enhancements and a limited number of features have been redesigned or moved. Please also note that the following links have been moved to the drop-down menu at the top of the page: My Timesheet, Recently viewed jobs, My Favourites, Demo Firm, Help, Customize Dashboard. You can use the CCH iFirm Feedback Form to let us know what you think of the new UI interface.
- We have modified our password requirements. The new requirements are the following:
- Password strength validation:
- Minimum password length is eight characters.
- Your password must contain any three of the following:
- one uppercase letter (A-Z)
- one lowercase letter (a-z)
- one numeric character (0-9)
- one special character (!, $, #, %)
- Your password must not contain three consecutive characters that appear in your username, first or last name.
- Your password cannot be the same as your previous five passwords.
- Your password will expire after 90 days and temporary passwords (i.e., those created when passwords are reset) are valid for one day.
- Users’ accounts configured with SSO (Single Sign-on) login will now be directed to the appropriate page instead of the Dashboard when using a direct link (bookmarks or copied and pasted URLs).
- Import Users: The decimal timesheet entry method can now be selected as a Timesheet Entry Method via .csv import. The value for the TimesheetEntryMode column must be either “b” (Units), “e” (Actual Time) or “d” (Decimal).
Jobs & Billing
- Duplicate Timer Names. We have enhanced our Timer feature. As a result, you can now duplicate timer names. This will enable you to use the same timer name for a customer or job even if another timer with the same name has been added to a timesheet or is currently active.
- The following OData feeds have been updated to include a UserID column:
- BillableTime
- CurrentlyResponsible
- ResourceWIPAnd Billing
- MissingTimesheets
The UserID is a unique numerical identifier for each user and will display in front of the UserName column. This will simplify the creation of relationships between tables in Power BI.
Documents
- A limit of 3,000 contacts/contact groups will now be displayed in the selection drop-down menu.
- We removed the File Type Count from the CCH iFirm Documents home search filters. All File Types will now be displayed.
- All tags will now be displayed on the CCH iFirm Documents drop-down menu instead of showing only used Tags.
- A User Preferences section is now available so that users can apply default settings for the Mark as private and Auto add contacts features of the CCH iFirm Outlook Add-On.
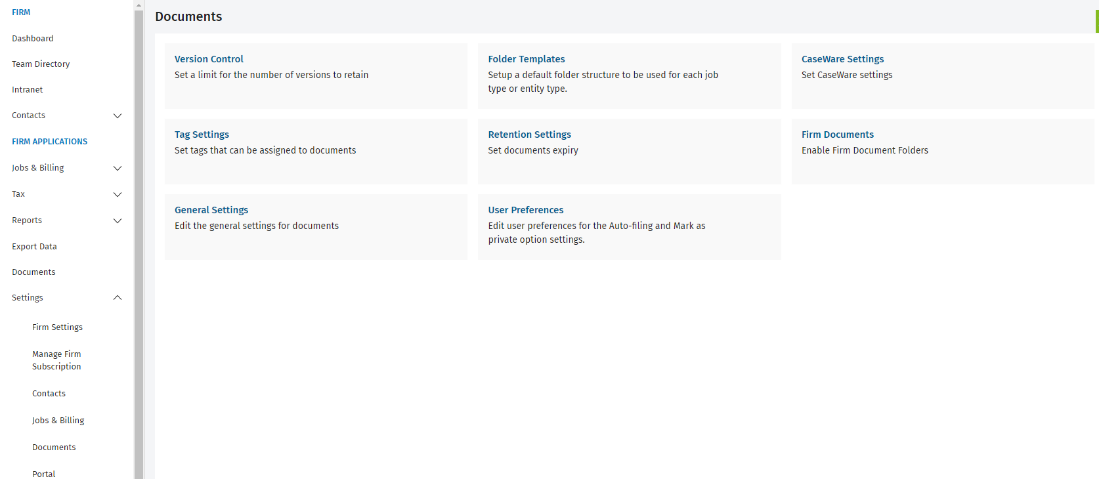
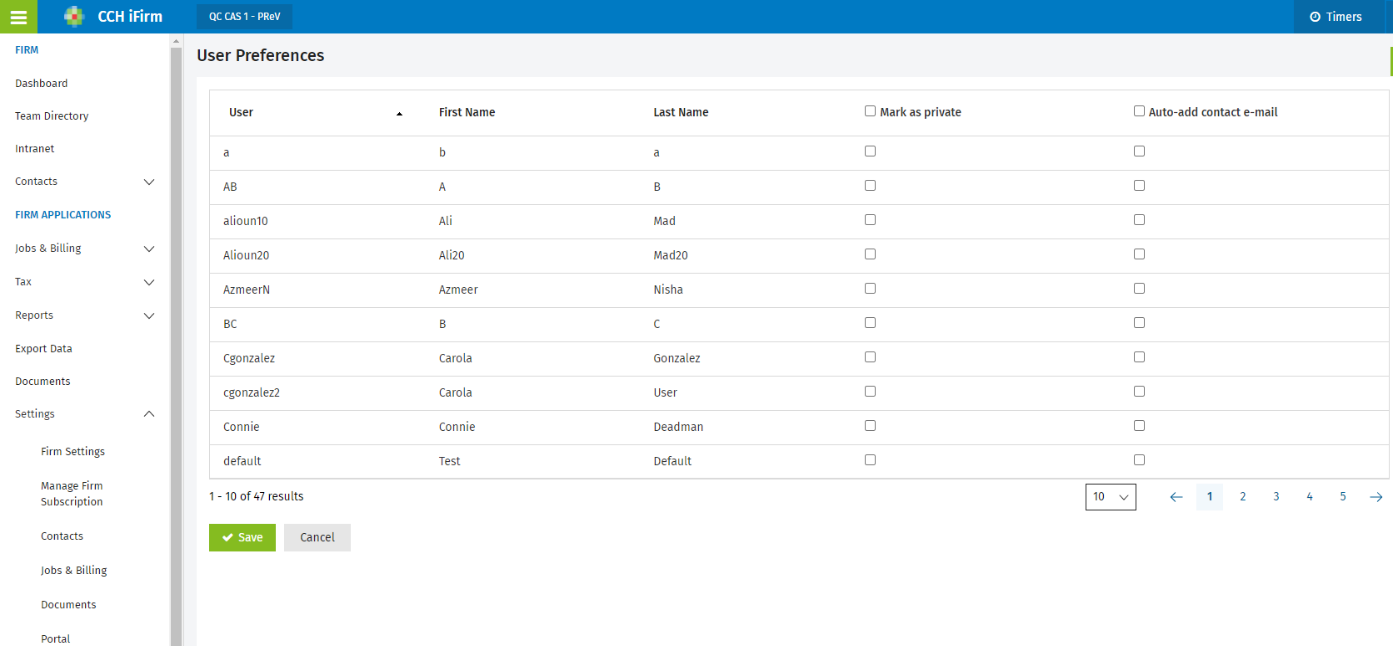
Portal & Digital Signature
- A limit of 3,000 files and folders will now be displayed in the following CCH iFirm Portal sections: Documents, Search and Unread.
- The folder size will no longer be visible in the CCH iFirm Portal Documents section.
- All CCH iFirm Portal users, regardless of their status, will be displayed in the Subscribers tab and can be deleted.
- The previous behaviour for empty folders when downloading in bulk has been changed. Empty folders will no longer be downloaded.
- We have changed the current restrictions on allowed file types. File types, like accounting software proprietary files, will once more be allowed when uploading to CCH iFirm Portal.
Enhancements - July 23, 2021
Core & Contacts
- With recent rises in tax-related identity theft and phishing attacks, we would like to inform you that we take your information security seriously. Therefore, we have made a change to our multi-factor authentication (MFA) process for firm users who need to reset their lost password by clicking the Forgot your password link. During the recovery process, when prompted for MFA, users will not be able to use the MFA E-mail to option. They will need to use the Google Authenticator or Text Message to options. We recommend that users proactively configure one of those two options if not already done.
Firm administrators who have the MFA Generate One-Time MFA Code security role, will be able to generate a one-time access code, which will be valid for 10 minutes, for users who are not able to complete the MFA process using one of the other two available options. To create a one-time MFA access code, open the Edit User page by clicking Settings/Users and selecting the user. Then, click Create a one-time MFA access code to get the code, which will be valid for 10 minutes.
Jobs & Billing
- You can now click Add Tax Line in the Edit Tax dialog box to adjust tax amounts on draft invoices. Once a new tax line is added, the Amount field will become editable, which allows you to make adjustments. Please note that the tax calculation will be reset if you edit a WIP line by clicking Change Amount under the Preparation View tab on the invoice.
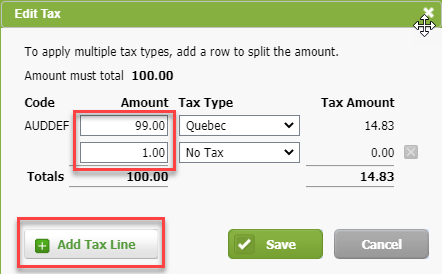
- Tax components used in multiple tax types, for example GST, will now be grouped on a single line on newly created invoices instead of being displayed on separate lines.
- The tabs By Resource & Activity, By Resource, Job & Activity and By RICJA (By Resource, Invoice, Client, Job & Activity) of the Employee Realization report have been added. You can now export employee realization data from the Export Data application. Please consult this help topic for more information about the Employee Realization report.
- The following OData feeds have been updated:
- Jobs – Now includes the Date Changed column. Note that this data feed is now limited to the last five years.
- AccountsReceivableTransaction – Now includes the Billing entity column.
- The following OData feeds have been added:
- WIPClientBreakdownBilled – This new feed is a complement to the existing WIPClientBreakdown feed. It includes any WIP items for closed jobs where the amount outstanding is equal to $0. To ensure reliable performance, this data feed is limited to the last five years.
- JobHistory – This new feed will provide data of the Job History tab on the Job Details page. The available columns are: JobID, StatusId, UserID & JobStatus.
- JobComments – New feed that displays job comments. The available columns are: JobID, ClientCode, ClientName, Comment, CommentedDate & CommentedBy.
- MissingTimesheets – New feed that provides data available in the Missing and Incomplete Timesheet report. The available columns are: User, Day, Date, Missing, Standard, Total, Billable & Non-Billable.
- BudgetedBillablePercentages – New feed that includes the following columns: UserID, FirstName, LastName, StartDate, Percentage & Status.
Documents
- When using the Outlook Add-in for CCH iFirm Documents, you will now be able to save new attachments to the Firm Folders section. Instead of selecting a contact from the list, you can simply select Firm Documents and the correct folder from the drop-down list.
- A new section is now available in the General Settings page. This new section currently contains a single setting allowing you to determine the default behaviour of the Outlook Add-in when handling attachments. When the setting is enabled, the Outlook Add-in will save attachment(s) as separate copies by default.

- To improve version control of attachments imported through the Outlook Add-in, the default file name will now include a timestamp appended to the existing name.
- The Outlook Add-in now supports special characters in the subject field when saving to CCH iFirm Documents.
- When using the Office 365 Add-in from the cloud version of Word/Excel/PowerPoint, you are no longer required to save a local file when creating a new or existing document.
If editing an existing file from CCH iFirm Documents, you will need to click the Save button from the Add-in panel to update the existing file. Clicking Save from Word/Excel/PowerPoint will not update the document in CCH iFirm Documents. Please note that a new version of the file is created in the versioning tool each time you save.
If creating a new file, you will need to click /the Save button from the Add-in panel to send the file to the selected folder in CCH iFirm Documents. Clicking Save from Word/Excel/PowerPoint will not send the document to CCH iFirm Documents. Please note that a new version of the file is created in the versioning tool each time you save.
- To improve performance, the column sorting feature has been disabled at the main document folder level. Column sorting is still available at the contact level and lower levels.
- Following tests and feedback, the Settings section has been removed from the Document Sync Application to be replaced by default settings based on best performance. The Document Sync Application has also been enhanced to reduce failures.
- New features have been added to improve the Import Tool. You will now be able to Skip Folders as well as indicate Mark as Permanent folders.
- To ensure system performance and stability, the following bulk operations that are performed on files and folders have been limited to 2,000 files at once: Copy, Move, Delete, Move To Recycle Bin, Restore and Permanent Delete.
Portal
- The portal registration has been simplified. Previously, users receiving a registration request would have to input all the requested data to create their account. The new registration process uses the information already available in the Contacts section of CCH iFirm to populate those fields for the registrant. With this new process, registrants only need to enter the password they would like to use.
- To simplify the invite process, the Invite to portal prompt has been improved in CCH iFirm.
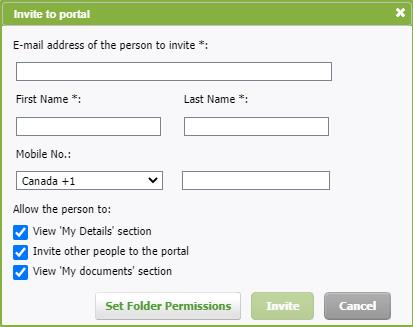
Digital Signature
- You can now change the e-mail address linked to your DocuSign account from the Digital Signature settings under Portal Settings. You will also need to log in to your DocuSign account to make the e-mail change and keep a valid connection.
- The Add a CCH iFirm User as Signatory feature has been enhanced to verify the user role when adding to a document.
Corrections:
- The link available in the Allocations section of the User Capacity for a specific month and job type no longer returns a 500 error in the French interface.
- The Currently Responsible widget on the dashboard will now also include jobs in which the target end date is not specified.
- Invoices that have been paid via ePay cannot be unfinalized to prevent allocation issues.
- Users without the Jobs – View, Add and Edit Jobs and Jobs - Close Jobs security roles can now use the Select Columns feature in the Jobs grid to customize which columns to display.
- You can now sort by the Invoiced column in the Jobs to Invoice page.
- Invoices and credit notes can be finalized when the total amount is $0.00.
- In the Client Profitability report, the calculation in the Hours column is no longer adjusted by write-offs and negative opening WIPs allocated to a time entry.
- WIP items are now properly transferred to QBO when using the Add Line option to split WIP items on the invoice.
- Import Users: The option to indicate if a user is a Manager or a Partner has been enabled. Simply set the answer to Yes or No in the appropriate column.
Enhancements - December 4, 2020
Core & Contacts
- You can now use the Contacts Security functionality to restrict user access to your contacts in CCH iFirm applications including CCH iFirm Taxprep, Jobs & Billing, Contacts, Intranet, Portal and Documents. User access can be removed from contact records associated with specific Managers, Partners, Contact Groups, filters and groups related to the Firm (i.e. Office and Divisions) and by defining Override Access for Specific Client(s). To review and update contact security you must have the Settings – Contacts security role.
The following Contact Security video will provide you an overview of this new functionality:
https://go2.wolterskluwer.ca/training-vid-en-ifirm-contact-settings
To enable Contact Security for your firm, go to Settings > Contacts > General Settings, select the box Enable Contact-Based Security Access and click Save. The default setting for each user is full access to all contacts records. To review the access of your users, go to Settings > Contacts > Contact Security. All current system users are listed on this screen. From that screen, you can select a user to review their access. For example, if a user should not have access to contacts records associated with a specific Office (e.g. Sherbrooke) you can, from the Edit Contact Security screen for this user, remove the Sherbrooke office from the Associated Office(s). Then, this user will no longer be able to find contact records associated with the Sherbrooke Office when they browse and search records in CCH iFirm and from the CCH iFirm Taxprep module. Therefore, the user will not see the tax returns associated with those contacts. To learn how to create groups such as Office and Division in contact records, please watch the CCH iFirm video Firm Filtering & Group Settings.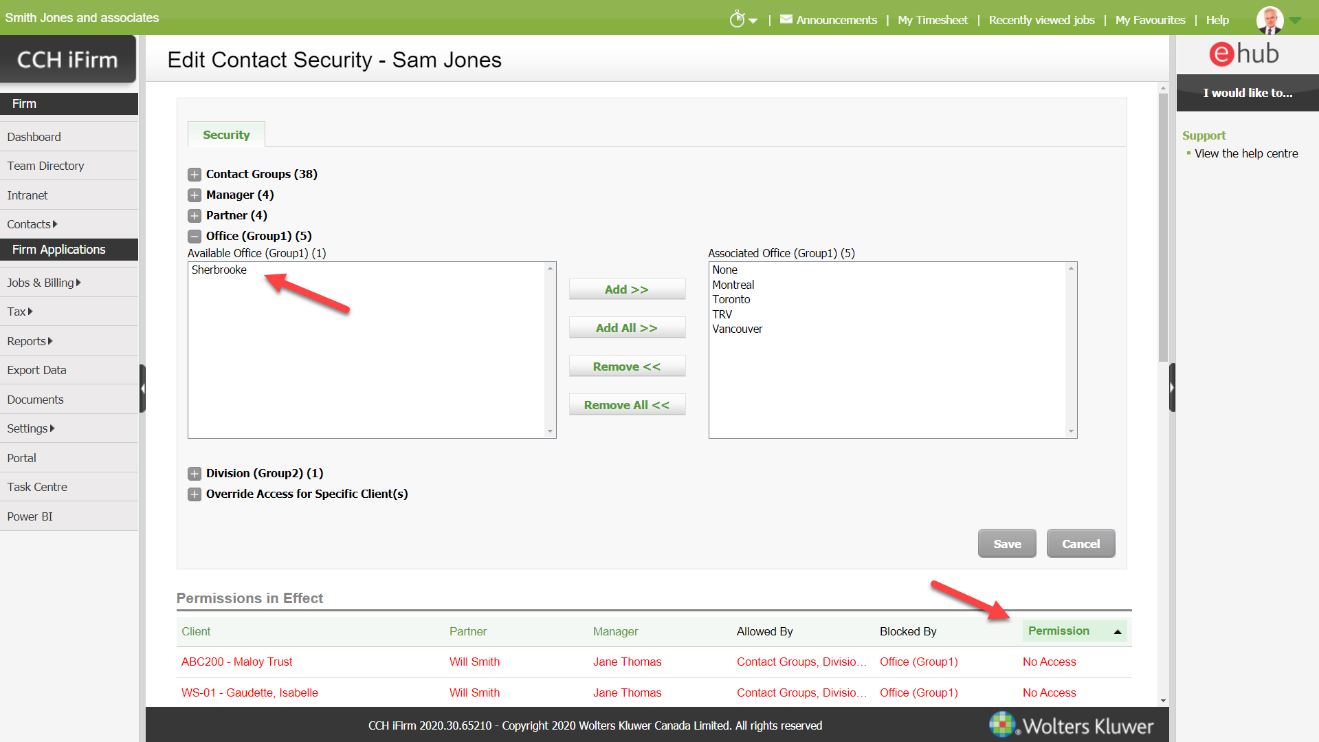
*Please note that the following list of screens and areas are not yet integrated to the Contact Security feature: Power BI OData feed, Imports, Export Data, Capacity Planning, Invoices (Jobs to Invoice, Draft Invoices, Finalized Invoices), Accounts Receivables, Work In Progress, Correct WIP, All Jobs & Billing reports and dashboard widgets, API calls (i.e. Taxprep and QBO integration), E-mail Centre and Task Centre.
Jobs & Billing
- We are excited about a new feature that allows your clients to securely pay their invoices online. When you have ePay configured in CCH iFirm Jobs & Billing and send an invoice to your client via e-mail, the latter will now see a Pay Now button in the PDF invoice that allows them to pay online. After your client submits the payment, it is posted to Accounts receivable and automatically allocated to the invoice. Transactions will show in Accounts receivable which Payment Type is ePay and refer to the ePay transaction ID in the transaction comments.
Our first supported payment service provider is Braintree, a PayPal service (https://www.braintreepayments.com). Once your merchant account is set up with this provider, you can set up ePay in Settings > Firm Settings > ePay.
Refer to ePay Help for details about setting up and using ePay. Note that ePay transactions are recorded automatically in accounts receivable and, therefore, cannot be edited. Invoices that are associated with an ePay transaction cannot be unfinalized or deleted. The ePay transactions recorded in accounts receivable cannot be sent from CCH iFirm to QBO at this time. However, we are currently looking into this possibility. - The Job ID and Name columns in the Jobs screen are now hyperlinks. The default behaviour of those hyperlinks is to open in the same tab. You can use your preferred browser keyboard shortcuts (e.g. Ctrl + left click) or right mouse click to open the link(s) in a new tab or window.
- You can now edit unallocated WIP entries that are locked from the Correct WIP screen. Editable locked entries will now display a green lock icon. To review and update those entries you must have the Correct WIP - Edit Locked WIP Entries security role.
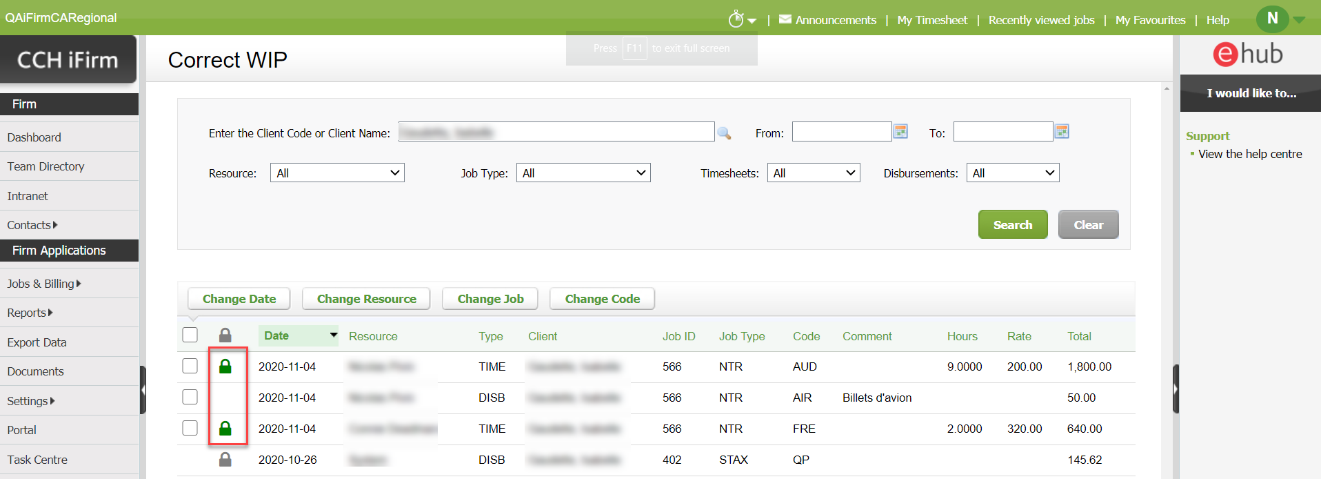
- You can now access the Edit WIP Item screen of allocated timesheet entries from My Timesheet using the new View Allocation button that displays on the error message warning you that the entry is allocated to the WIP credit. This new option is available to users that have the WIP Centre - View, Add and Edit Transactions security role.
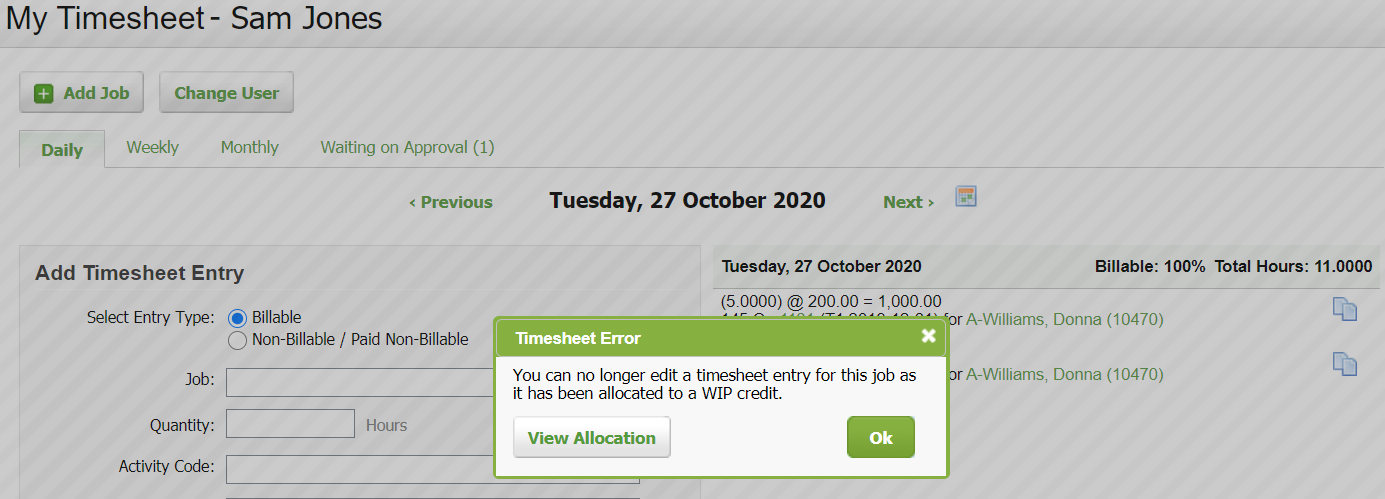
Portal
- You can now send forms for signatures to CCH iFirm Portal directly from Taxprep with CCH iFirm Digital Signature. To streamline your signature process, a built-in tag was integrated into more than 300 forms to indicate where the digital signature must be affixed. This will increase your efficiency in sending documents for signature and in receiving signatures from your clients. Keep an eye on the Taxprep Release Notes for additional information.
- You can now add a CCH Firm user as a live e-signature signatory on envelopes you send from CCH iFirm. To do so, proceed as follows:
- Click Upload from the Documents to be signed folder.
- Click Add a CCH iFirm User as Signatory from the Add Document window.
- Select the desired user from the drop-down list and define the order of signatures if required.
- Follow the same procedure as you would normally do to send a document for signature to any other portal signatory.
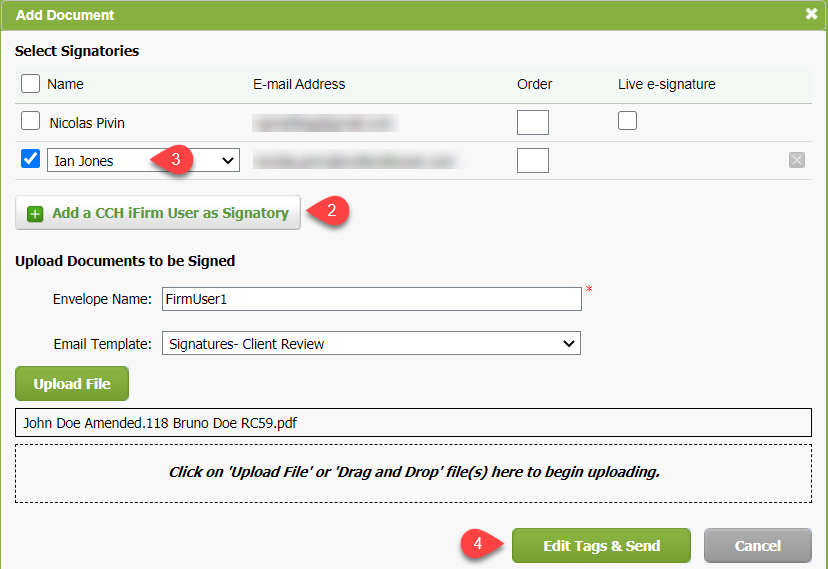
The user will then receive an e-mail notification from CCH iFirm requesting their signature on the document. To sign the document, users must proceed as follows:
- Click the link in the e-mail notification they received from CCH iFirm.
- Go to the Documents to be Signed folder of the selected portal.
- Click the Live e-signature icon.
- Click Sign Now.

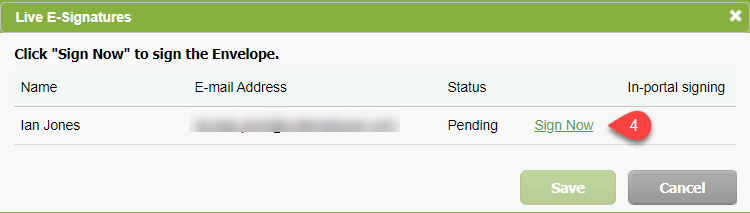
- You now have the option to change an envelope sent to be signed in person to an envelope to be signed in the portal. To change to signing method, proceed as follows:
- Go to the Documents to be Signed folder of the selected portal.
- Click the Live e-signature icon.
- Select the In-Portal signing check box.
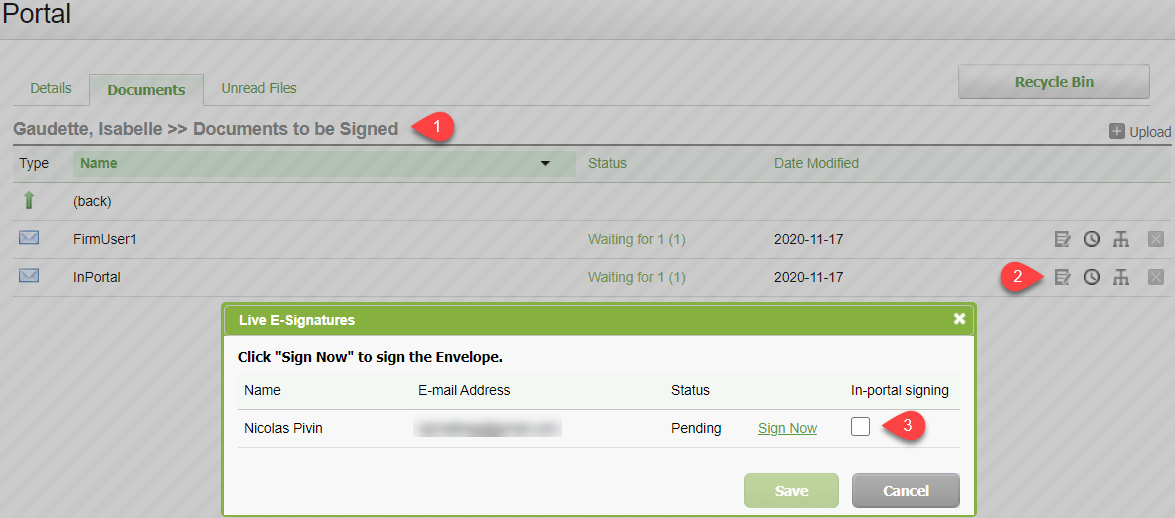
Once the option is selected the signatory will receive an e-mail notification advising them that their signature is required on documents in their portal.
- Notifications can now be e-mailed to the user in your firm who is sending a document to be signed when a signatory signs or declines to sign documents. You can select this option from Settings > Portal > Portal Settings > Digital Signature Settings and select the check box Notify the sender when a signatory signs or declines to sign documents.
- Notifications can now be e-mailed to the person who is the Job Owner for the client jobs when the clients have uploaded files to their portal. You can select this option from Settings > Portal > Portal Settings > General Settings and select the check box Notify the job owner when client files are received or when they are modified by the clients.
- Notifications will now be sent to all Portal Subscribers, whether their status is Registered, Pending or Expired when new files are uploaded to their portal. This will ensure that subscribers who may not have yet registered get upload notifications.
- The Unopened Documents report has been added to the Portal section. This report enables you to review a list of all documents in your portals that have not been opened by your clients. You can access this report from Reports > All Reports >, then click the Portal tab > and Unopened Documents Report. You can select the Select all portals check box, then click Update to view a list of all unopened documents in your portals or clear the Select all portals check box to search and view the unopened documents in a specific portal.
- An option to upload a single file to multiple (or all) portals at the same time is now available. This new option is now available from Portal > Multiple Portal Upload. From the Multiple Portal Upload screen, you will be guided through the following three simple steps:
- Upload File.
- Click the Client Portal List section to view a list of all client portals associated with your firm and select the check box at the top of the list to select all subscribers or scroll through the list to select the check boxes of specific portals to which you want to upload the document.
- Click the Select Default Folder section to view a list of all your default folders and click Select of the folders to which you want to upload the file.
- You now have the option to edit the font style and size from the HTML toolbar of the Edit E-mail Template screen.
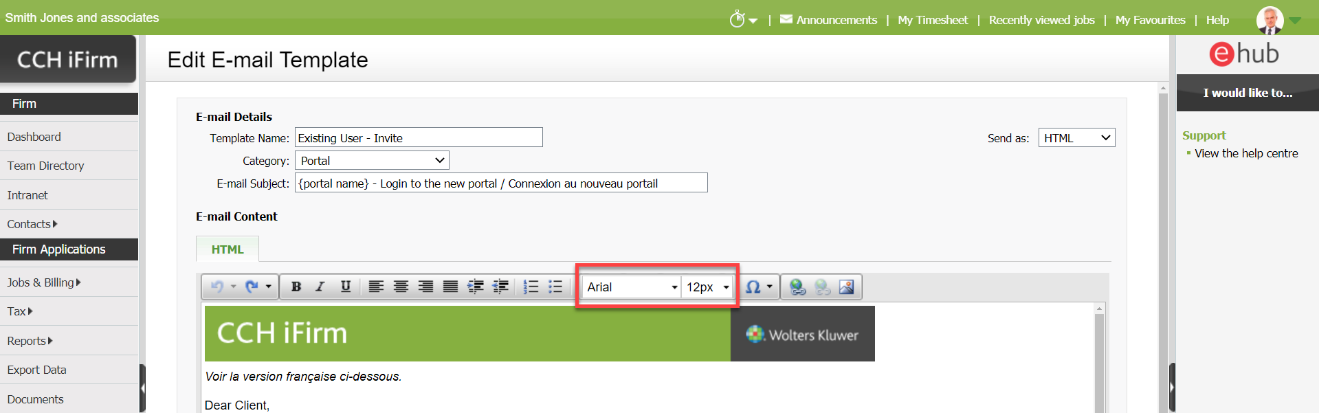
Documents
- With the Documents Add-in for Microsoft 365 you can now save Word documents directly to CCH iFirm Documents from Microsoft Word Desktop or from Word Online applications. Please refer to the Install the Documents add-in for Microsoft Outlook help topic for instructions on how to install the add-in. Please note that the manifest file that you need to use to install the Word add-in is available in Settings > Installation > Documents Add-In for Microsoft 365. To save a Word document using the CCH iFirm add-in once it is installed and authenticated, proceed as follows:
- Go to the References tab of Word.
- Click the CCH iFirm add-in.
- Search for the desired CCH iFirm Contact.
- Select the folder to which you want to save the document.
- Click Save.
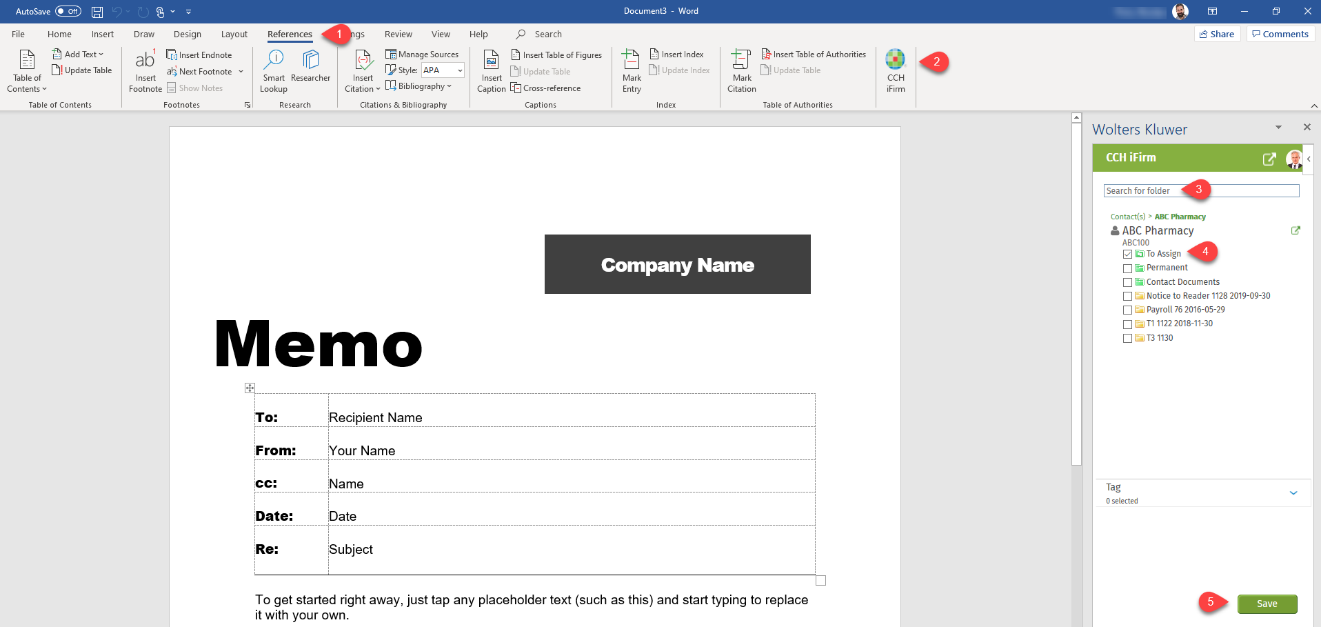
*Files must be saved locally or to OneDrive before they can be saved to CCH iFirm Documents with the CCH iFirm add-in.
Corrections
- Assignment of write-on and write-off to resource is now correctly allocated to appropriate WIP entries when performed from the draft invoice.
- The None option is now available in the Resource, Job Partner, Job Manager, Currently Responsible, Contact Partner, Contact Manager filters of the Jobs screen.
- The Tax Reference No. column in the Contacts screen now displays the Social Insurance Number, Business Number or Account Number as applicable.
- The Invoice breakdown by Job type report now displays the correct total.
- The Invoice Summary Data export now shows the correct amount in the Tax and Invoice Total (Incl. Tax) columns for invoices on which you used the Add Line option.
Enhancements - September 4, 2020
Core and Contacts
- You can now use the Import Users functionality (Settings > Installation) to create your users in CCH iFirm. Once imported, their account will default to inactive. Note that, once you activate their account, users will automatically receive an e-mail prompting them to reset their password. This e-mail will include their username as well as a temporary password.
Jobs & Billing
- The Invoice Summary Data export feature, available from the Export Data application in the left menu, has been updated to include the following columns: Billing Entity Business Number, Invoice Description, Invoice Message, Job Type Description, Job Owner, Currently Responsible, Tax Components, Pending Amount, and Payment Received.
- The tabs By Resource & Activity and By Resource, Invoice, Client, Job & Activity of the Employee Realization report have been temporarily removed to investigate an issue.
- A new dashboard widget, i.e., Currently Responsible, is now available. This widget displays the Top 10 Jobs for which the logged in user is currently responsible in addition to the following data: Job, Client, Target End Date & Job Status. You can click the See More Jobs link at the bottom of this widget to go to the Jobs page in which displays the filters applied based on the current selection in the dashboard’s widget. The jobs are ordered by target end dates, and the widget can be filtered by:
- Currently Responsible;
- Resource;
- Firm Filters (i.e., Group1, Group 2);
- Job Manager, Job Partner, Job Owner; and
- Contact Manager, Contact Partner.
- The following OData feeds have been updated to match latest enhancements done in related reports or data exports: WIPControl & WIPClientBreakdown. The AccountReceivableAged feed has also been updated to take into account the optional customized Ageing Periods, and Ageing Method. Data will now display as periods in the feed (“Current,” “Period1,” “Period2” to “Period10”). Therefore, make sure to update your Power BI query to correctly name those columns as required after the update.
- The Target Start Date column of the Jobs Grid now displays, between parenthesis, the number of days to or preceding the date.
- The default values in the Invoice Reminder section and the Charge interest field under the Accounts Receivable tab (Settings > Jobs and Billing > General Settings) will be set for QuickBooks Online contacts added to CCH iFirm.
- The Contact Details report now allows you to include the value in the Send Invoice Reminder field in the report.
- The new Timesheet approval feature allows your firm to have an approval level for billable time. With the addition of this approval level, billable timesheets must be approved by a user with the appropriate security role before they are added to WIP. For this release, the feature can be enabled on demand on your CCH iFirm site. This will be available to all firms with our fourth-quarter version. To get this feature enabled, submit a support ticket at http://support.cch.com/oss/canada.
Documents
- From the Imports tab of the Documents page you now have the option to load a mapping file to speed up the mapping process of your imported files. The mapping file needs to be in .csv format and includes the following two columns headers:
- Code – Which represents the CCH iFirm client code;
- Directory – Which represents the directory or folder name that should be associated with the CCH iFirm contact.
- The Documents add-in for Microsoft Outlook now uses a responsive design. The drill down to subfolders is now supported and you can also add tags to the e-mail saved in CCH iFirm Documents directly from the add-in.
Enhancements - June 22, 2020
Jobs & Billing
- You can now edit unallocated WIP entries in a more streamlined way with the new Correct WIP functionality accessible from Jobs & Billing > Correct WIP. From the Correct WIP screen, you will be able to change the date, resource, job code as well as the activity code for unallocated WIP entries. This will allow firms to drastically reduce the number of WIP transfers they have to make to move WIP from one job to the other. To view the new Correct WIP screen, you must have one of the following security roles: Correct WIP – View and Edit All WIP Entries or Correct WIP – View and Edit My WIP Entries.

- The management of sales tax on your invoices just got easier. We have introduced some changes that allow you to specify a hierarchy of sales tax settings that flows to your client invoices. With those changes you will be able to set sales tax at the following levels:
- Default Tax Type at the firm level (existing feature);
- Contact;
- Activity and Disbursement codes.
The following rules will apply to assign the correct tax type to disbursements, activities, simple lines, opening WIP and transferred WIP, when generating invoices:
- If the WIP entry is a disbursement or timesheet (activity), the system checks the disbursement or activity code to verify if a tax type is set.
- If a tax type is set, that tax will be applied to the disbursement or timesheet (activity) entry.
- If no tax type is set for the activity or disbursement code, the tax rate set in the Billing tab for the contact will apply.
- If there is no tax rate specified for the contact, the default firm tax type will apply.
To assign a tax rate to a contact, navigate to the Billing tab of the Edit Contact screen. To do so, go to Contacts > All Contacts. In the page that displays, click the contact row to open its record then click Edit details > Billing where a new section called Tax rate displays two options. You can use a custom tax rate for a specific contact by selecting the applicable tax type from the drop-down menu.
Alternatively, you can specify a tax type to use for your contacts from the Tax Types settings according to their provincial mailing address (Settings > Jobs & Billing > Tax Types > Province). For example, in the settings, you could specify that the Québec tax type should apply to all clients whose postal address is in Québec.
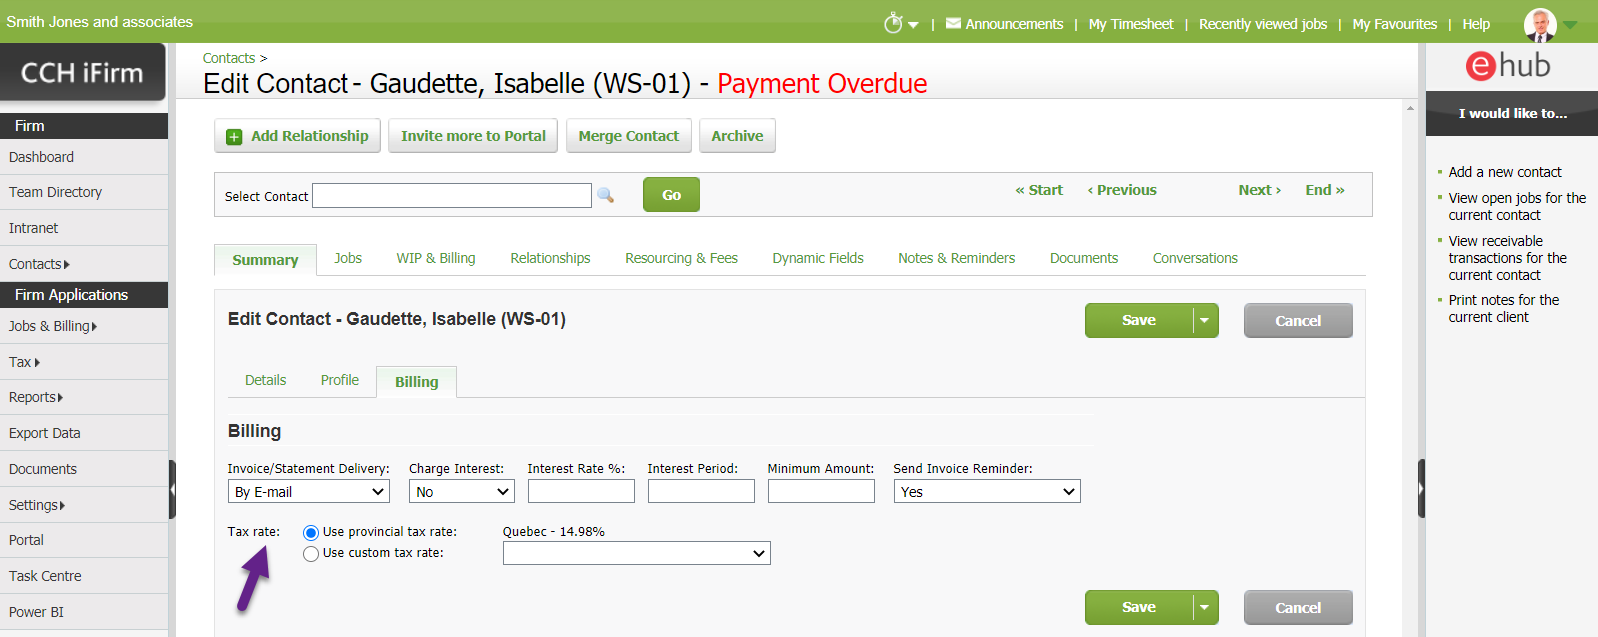
To assign a specific tax type to any of your activity or disbursements codes, navigate to Settings > Jobs & Billing > Activity Codes or Disbursement Codes, select the desired code and, in the Edit Disbursement Code or Edit Activity Codes page, select a tax type from the Tax Type drop-down menu. Save the changes.
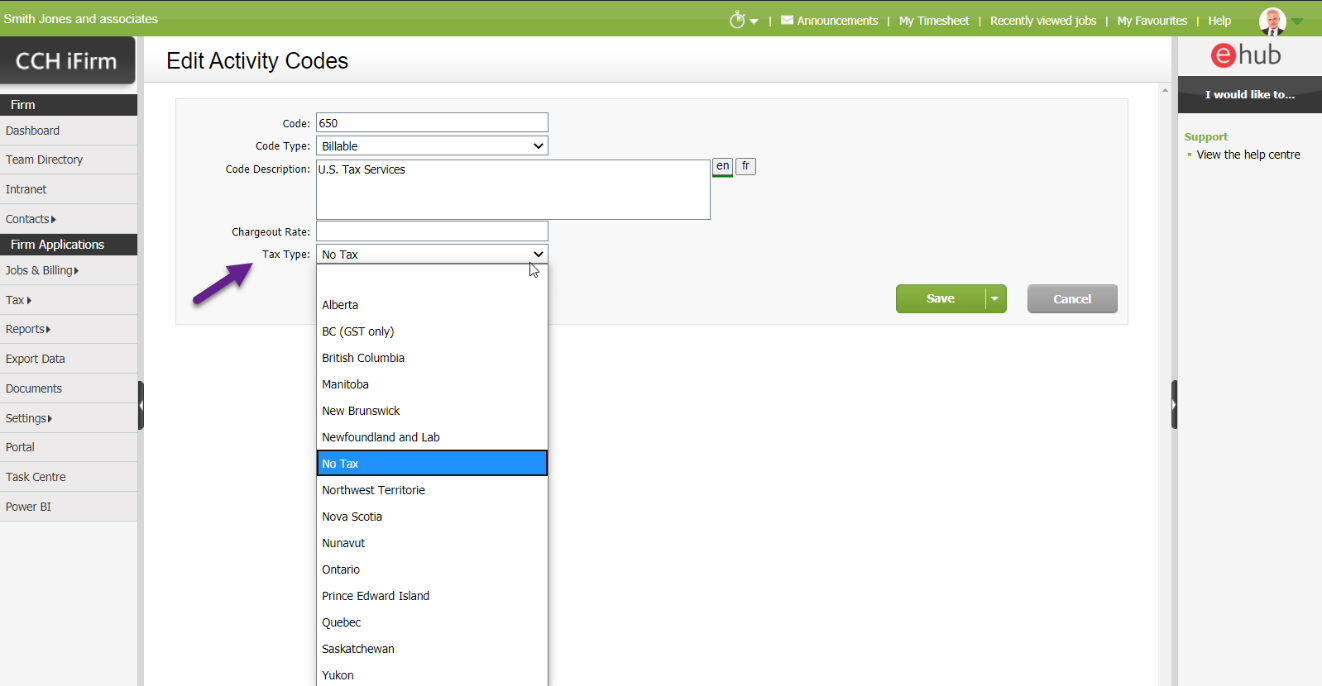
If specified, either the default tax type set at the firm level or the tax type set at the contact level will be used for simple lines, credit notes, opening WIP and transferred WIP.
Please note that existing invoices (draft and finalized) will not be impacted by this new feature. This new functionality will only be used for new invoices created after the 2020.20 version release.
- The Employee Realization Report has been added to the Employee Reports section. This report can be used to determine the Realization % and Effective Rates of users for the selected period. Users must have the Reports - Employee Realization security role to view the report. Five tabs are available in this report to display the data grouped at different levels:
- By Resource: Displays one line per user for the selected period.
- By Resource & Job Type: Displays one line per user per job type for the selected period.
- By Resource & Activity: Displays one line per user per activity (Time & Disbursement) for the selected period.
- By Resource & Job: Displays one line per user per job for the selected period.
- By Resource, Invoice, Client, Job & Activity: Displays one line per user per invoice broken-down at the activity level for the selected period.
The following columns are displayed in the report:
- Resource: Users for whom data is displayed for the selected period. The None resource refers to any transaction not allocated to a specific user.
- Hours: Total number of hours that relate to the WIP item.
- WIP Amount: WIP transaction amount.
- Write-on/off: Total amount adjusted as a write-on or write-off.
- Allocated Write-On/Off: Amount adjusted as a write-on or write-off and allocated to the user.
- Invoiced: Amount billed.
- Effective Rate: Invoiced + Allocated Write-On/Off - Write-On/Off) / Hours.
- Realization %: Invoiced / (Invoiced - Allocated Write-On/Off).
- Code: Depending on the tab you are in, this column will display the Activity Code, Job Code or Client Code.
- Job type.
- WIP Item: Will display if the WIP item is a Timesheet, a Disbursement, an Opening WIP or a WIP Transfer.
- Activity: Timesheet or Disbursement activity description.
- Job: Job ID including a hyperlink that will open the Job Details page in a new tab in your browser when clicked.
- Period Ended: Period ended date for the job.
- Name: Client name.
- Invoice Number: Invoice number including a hyperlink that will open the Invoice Details page in a new tab in your browser when clicked.
- Date: Invoice Date.
- Client: Client Code and Client Name concatenated in one string.
- The Client Profitability Report now displays the Hours column as the first column in the report and will display the total hours that relate to the WIP amount.
- Multi-select filters have been added to the advanced search filters of the Jobs grid (Jobs & Billing > Jobs). The following filters now allow you to select more than one item at a time in the list: Jobs Status, Job Type, Dynamic Fields, Resource, Job Partner, Job Manager, Job Owner, Currently Responsible, Group 1, Group 2, Contact Partner and Contact Manager.
- The Select Columns feature can now be used to customize which columns to display in the Jobs grid and the Contacts grid. Columns can also be reordered from the Select Columns screen by dragging each line in the order of your choice.
- The optional columns for the Jobs grid are: Job ID, Code, Hrs Worked, Current WIP, Disbursements, Total Budget, Total Invoice, Hrs Allocated, Hrs to Go, Target Start Date, Target End Date, Write On, Currently Responsible, Job Owner, Date Changed, Group 1 filter, Group 2 filter, Job Status, Job Create Date.
- The optional columns for the Contacts grid are: Client Code, Entity, Partner, Manager, Group 1 filter, Group 2 filter, Tax Reference No., E-mail Address, Work Phone, Mobile.
- To ensure consistent availability and performance for everyone, limits are now applied on frequency and hours for OData feed calls (Power BI). The frequency is now limited to one call per hour per feed and all calls will be blocked during peak day hours from 10:00 a.m. EST to 6:00 p.m. EST. Note that an error 429 will display in Power BI should a call be blocked because of one of the above reasons.
- You now have the option to send invoice reminders to your client when an invoice payment is due or overdue.
- If your firm would like to use invoice reminders, enable the functionality in Settings > Jobs & Billing > General Settings > Accounts Receivable. In the Invoice Reminder section, set the Send Invoice Reminder option to Yes. Set the frequency of the reminders and define the number of days that an invoice must be overdue before reminders are sent.
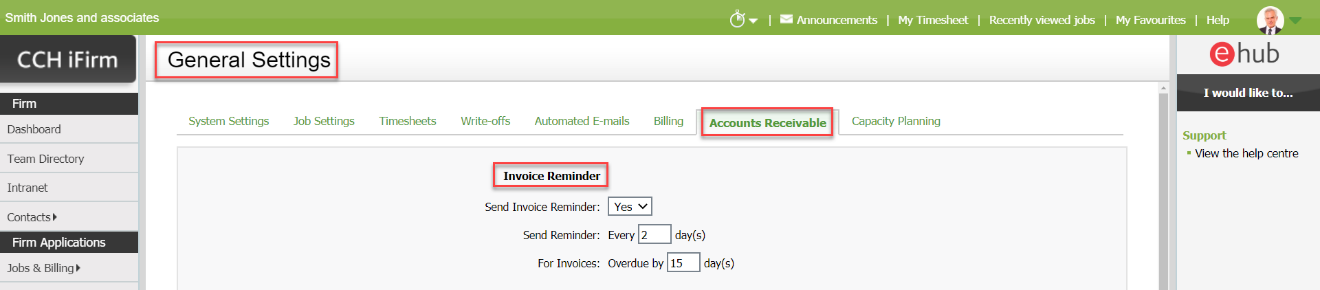
- Update your e-mail template to match your preferences. Some suggested e-mail templates and steps to update the e-mail template are available in this Knowledge Base article.
- Set the Send Invoice Reminder option to Yes for existing contacts for whom you want to send invoice reminders. It can also be done in bulk by updating the SendInvoiceReminder field via the Import Clients functionality.
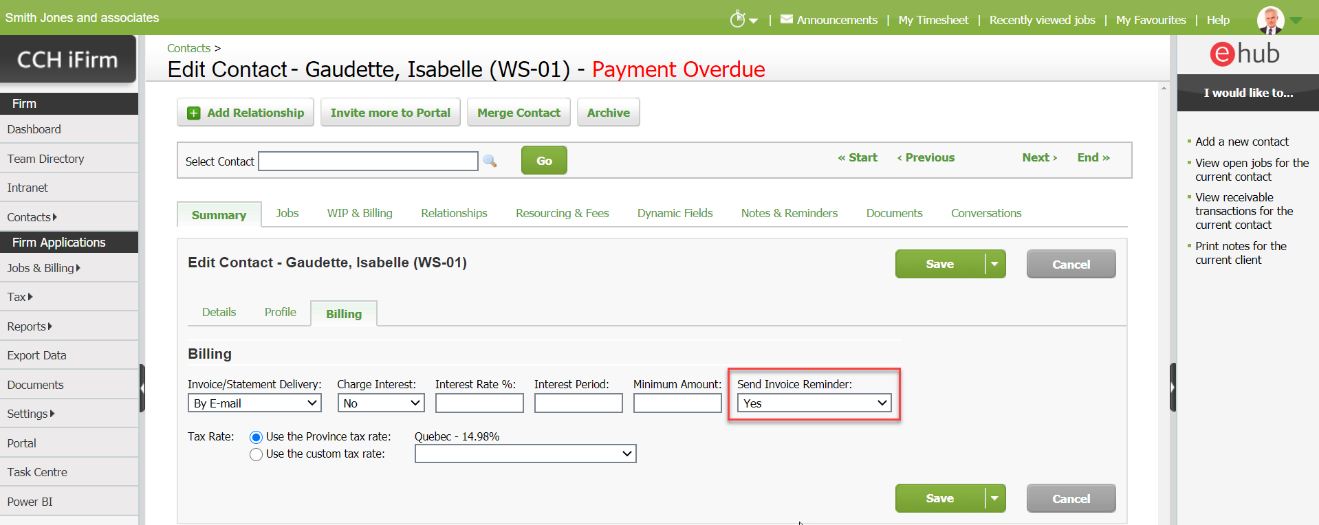
Important notes:
- The billing template used to generate invoices when a client clicks the link in the overdue invoices e-mail is the Default Invoice template set for the Billing Entity associated with the invoice. If you use an invoice template for a client other than the default template for the Billing Entity, you might want to disable invoice reminders for this specific client.
- All overdue invoices for a client will be consolidated in one single e-mail (even if from multiple billing entities).
- Users start date for the Hourly Chargeout Rates will now show the full date instead of only the month. However, the start date for existing entries will be the first day of the month.
Documents
- Notes can now be added to documents. When the note is created, it can be assigned to a user and the Open or Resolved status as well as the Due date can be set. History of the notes added to a document will display in reverse chronological order. The status can be updated for existing notes by clicking the status hyperlink of the note you want to update. You can also filter documents with notes-related filters. When a document contains a note, a visual indicator (blue icon) will permanently display in the documents grid for this document.
- Additional filter options have been added to the Client Documents tab (Documents > Client Documents). You can now filter on My Recent Files, Hide Archived Contacts, Contact Group, Contact(s), Open & Closed Jobs & Notes related filters.
- The Firm Documents tab (Documents > Firm Documents) underwent various small enhancements.
Portal
- You can now use the new Audit Trail tab of the Client Portal to view the following events by clicking the Filter button: Created, Downloaded, Restored from Recycle Bin, Sent from Documents, Renamed, Deleted, Copy, Uploaded, Moved to Recycle Bin, Cut and Paste.
- The Portal Usage Report is now filtered by default to exclude empty portals. The Include Empty Portals option can now be used to display empty portals if required.
- The Invite to portal dialog box now provides options to restrict access to view the My Details section, invite other people to the portal and view the My documents section while you are sending invitations. Check boxes will be selected by default. Also note that you can edit security permissions of existing subscribers from Contacts > Contact Details > Portal Subscribers > Edit Subscribers and by clicking the name of a subscriber (or from the Portal Details tab).
- The Clients can invite others to portal option can be used to prevent portal subscribers from sending invitations to others from Settings > Portal > Portal Settings. The new setting is not selected by default for existing sites. Note that a new e-mail template called Portal User Invitation will be sent to firm users when a subscriber invites another subscriber to the portal. Some suggested e-mail templates and steps to update the e-mail template are available in this Knowledge Base article.
- A registration notification e-mail will be sent to firm users when a subscriber accepts an invitation to the portal. You can customize the Portal Registration e-mail template from Settings > Firm Settings > E-mail Templates. Some suggested e-mail templates and steps to update the e-mail template are available in this Knowledge Base article.
Corrections:
The following problems have been corrected in this release:
- The Invoiced and WIP Amount columns in the Job Profitability Report will now display the correct value for customers that exclude their disbursements in their invoices (Settings > Jobs & Billing > General Settings > Billing, then clear the Include disbursements in agreed fee check box).
- Disbursements are now imported for contacts who have an apostrophe in their name.
- The Grouped Aged Accounts Receivable Report now displays contacts in the By Contact Group and Billing Group tabs, as expected.
Enhancements - March 9, 2020
Jobs & Billing
- You now have the option to proportionally allocate write-ons and write-offs based on the amounts from the Add Write-off and Add Write-on dialog boxes accessible from the Jobs Details page. Note that this option is now selected by default. The option was already available from the Simple Amount Edit panel in the Change Amount dialog box available from the Draft Invoice page.
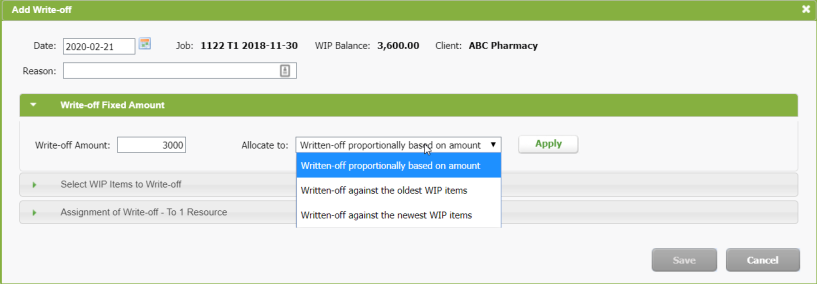
- To help you save time when editing recurring jobs, a Change in bulk button has been added to the list of recurring jobs. This button allows you to edit certain fields in bulk. The following fields can be edited: Job Manager, Job Owner, Job Partner, and Firm Filters (Group 1 & Group 2).
- You can now send payments linked to multiple contacts (Contacts>Groups) to QuickBooks Online in a single operation.
Documents
- You can now search across all documents related to your contacts and their jobs in CCH iFirm from the new Client Documents tab (Documents > Client Documents). The default view of this screen will provide you with a list of all your CCH iFirm contacts. Clicking a contact from this screen will allow you to navigate to this contact’s folders and files. You can use the breadcrumb above the search bar to navigate back as you drill-down in the structure of folders back up to the Client Documents view. You can use the search bar to locate all files and folders related to your contacts and their jobs that contain a specific word in their name. Like in the other areas, you can still use the available filters and tags to narrow your search.
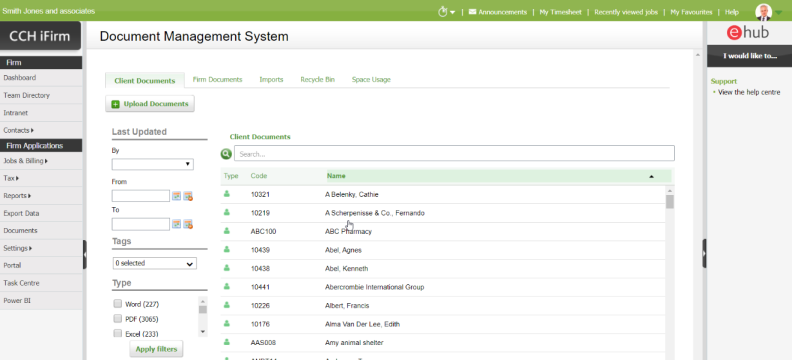
- You can now store internal firm documents that do not relate to any Contacts or Jobs in the new Firm Documents tab (Documents > Firm Documents). The Documents - Firm Documents security role is required to view this tab. The default view includes the following folders based on the security roles assigned to your user: Internal Documents, HR Documents, User Documents. You can use the search bar to locate all files and folders stored in firm documents that contain a specific word in their name. Like in the other areas, you can still use the available filters and tags to narrow your search results.
- The Internal Documents folder can be used to create your own folder structure for your firm documents. Users need to have the Documents - Internal Documents View security role to view documents stored in this folder and contributors need to have the Documents - Internal Documents View and Edit security role.
- HR Documents can be used to store HR documents related to your staff. A folder is automatically created for each of your users and will be accessible only to users that have the Documents - HR Manager security role.
- Each user of your firm can now have a private space in the Firm Documents area. Users are the only ones that can view the content of their own folders with the exception of users that have the Documents - User Folders Admin security role assigned to their profile.
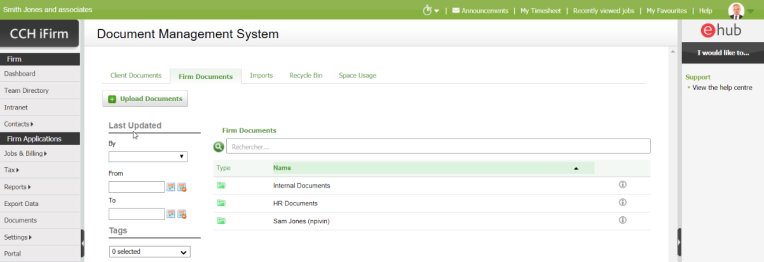
Reminder: To edit the user security roles, on the Firm Applications menu, click Settings > Users, and select a user account to edit.
Note that the User Documents and HR Documents folders are optional and can be enabled by clicking Settings > Documents > Firm Documents.
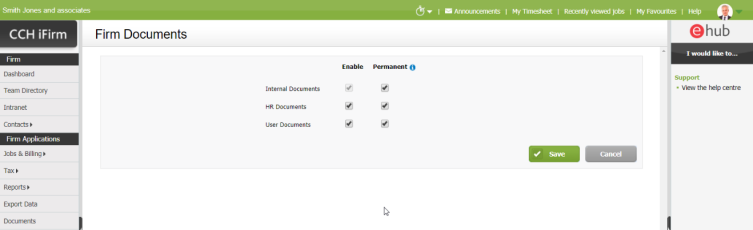
- The Documents Sync application has been modified not to open files with elevated privileges. As a result, this will reduce the User Account Control (UAC) prompts and improve the current workflow. This means that you can now drag-and-drop files from your workstation to CaseWare. Note that users installing CaseWare in a location different from the default installation path (C:\Program Files (x86)\CaseWare) will need to update the CaseWare Exe Location path by following the steps described in the Open CaseWare files from CCH iFirm Documents Article.
Portal
- You can now perform searches using the title of a document to find files uploaded into a client portal with the Portal File Search feature available in the right-side panel of the screen. This search feature is currently only available in the firm interface.
- You can now resend invitations to pending subscribers. If a client accidentally deleted the invitation, you can now resend it while the status is Pending, instead of waiting until the invitation has expired.
- You can now easily rename any folders created within a portal. On the Documents tab, click the Rename button (depicted by a pencil) located on the row of the folder that you want to rename. Highlight the existing text, type the new folder name and press Enter. Note that the Rename button is not present for folders that are part of the default folder structure nor is it available for folders related to digital signature. As for folders that are part of the default structure, they may be renamed in the Portal settings.
- The Portal Space Usage section, located on the Details tab of an opened client portal, now displays a graph showing how the portal space is distributed. The segments in the graph represent the folders that are created for that client.
Corrections
The following problems have been corrected in this release:
- Columns were not correctly aligned in the Detailed Timesheet Selection from the Change Amount dialog box of the Draft Invoice screen in the French interface.
- The red Payment Overdue warning was not displayed when opening Contact Details until you navigated from the Summary tab to another tab.
- Invoices containing only simple lines were generating an error when sending the invoice to QuickBooks Online. Reminder: when sending to QuickBooks Online, lines from invoices created using the Add Simple Line option will be automatically assigned to the default QuickBooks Online product or service.
- Invoice in advance amounts were not included in the WIP Control Data export report when using the Job with Detailed Resource level of detail. Invoice in advance amounts will now be assigned to the None resource in the report.
- The Job Status could not be updated immediately after reopening a closed job from the Job Details screen.
- The Save button in the WIP Transfer dialog box was unresponsive in the French interface in specific scenarios.
Enhancements - December 3, 2019
Core and contacts
- We are happy to introduce the new Manage Firm Subscription feature. This new feature allows you to control which user in your firm has access to which applications at a more granular level. Because of this change, your firm must ensure that the number of users on each application is aligned with the number of licenses indicated on your product subscription.
For example, for a firm with a subscription to the Jobs & Billing (10 users) and Portal (8 users) applications it would mean that the firm can have 10 active users in CCH iFirm, 10 of which can be associated with a Jobs & Billing license but only 8 of which can be associated with a Portal license.
If you encounter a situation like the above example i.e., where you have a different number of users for two or more applications after the product release, you have until Wednesday, December 4 at 10:00 p.m. EST to make any required adjustments. After that period, access to the applications will be denied for the ones that have more users than the number of licenses indicated on your subscription.
To add to or remove from an application user licenses, access the new Manage Firm Subscription page (Settings > Manage Firm Subscription). To add to or remove from applications user accounts, access the Edit User page (Settings > Users). For more information about this functionality, consult the Learn about License Management topic. If you need assistance, or if you need to purchase additional licenses, contact your Sales Consultant.
Jobs & Billing
- The client code has been added to the contact name between parenthesis in the list of timesheet entries of the My Timesheet page.
- The Client Profitability report has been updated to include the WIP Amount, Realization % and Total due columns.
- The Job Profitability report has been updated to include the WIP Amount and Realization %. columns. The By Individual Job tab of this report will now group jobs by client.
- You can now export Invoice in Advance data from the Export Data application. This will allow you to reconcile the Invoice in Advance value under the Revenue Generated column of the Resource WIP & Billing report.
- Accounts Receivable enhancements: you can now select the ageing period based on the transaction date. To change your preferred Ageing Method, select Due Date or Transaction Date from Settings > Jobs & Billing > General Settings > Accounts Receivables. Note that you can also edit the preferred method for each of your Billing Entities by accessing Settings > Jobs & Billing > Billing Entities.
- You can now customize your ageing periods for Accounts Receivable. To change your Ageing Periods, enter the number of days that you would like to include in each aging interval, with up to 10 intervals available from Settings > Jobs & Billing > General Settings > Accounts Receivables. Note that you can also edit the periods for each of your Billing Entities by accessing Settings > Jobs & Billing > Billing Entities. Some pages and reports will only show up to five periods because of the limited space available. Note that new merge fields are available to support those additional periods on Statement Templates. The available merge fields are the following:
- The templates Default Statement Aged have been updated to support the new ageing periods. If you display the age of accounts receivable on your statements and plan on customizing your Ageing Periods and/or use the Transaction Date ageing method, you need to review your statement with the new above-mentioned merge fields. For example, if you use the Due Date method and five Aged Periods plus the Current period (based on 20-day increments), your statement template should be set as follows:
- A new statement-type option has been added, it allows you to create statement of accounts showing only outstanding items (Open items – Default Statement Aged), as opposed to the Balance Forward method currently available. You can edit the default option for the Statement Type per billing entity from Settings > Jobs & Billing > Billing Entities. You have the option to override this setting when sending statements from the Statement Options window.
Before you start using the new Open item option, we strongly recommend that you review your Statement Template. This requires a new merge field called <<reference>>, which pulls the data entered under the Reference field in the Accounts Receivable application (e.g. the invoice number, payment reference, etc.) and displays data on the statement templates where applicable.
To update your existing custom Statement Templates, if applicable, we recommend that you copy the body of the new Open Item - Default Statement Aged template and paste it over the body of your existing custom template. - The interest settings (Settings > Jobs & Billing > General Settings > Accounts Receivable) have been updated to allow for more flexibility. You can now manually set the Default Interest Period by entering the number of days from due date that should be used for calculating interest. You can also specify the Minimum Amount (balance) for the interest to apply. For example, if you enter 100, clients must carry balances of at least $100 past a certain time before interest is calculated.
The Charge Interest and Don’t Charge Interest buttons have been replaced by a new setting that allows you to define the default option (Yes or No) to use for new clients. This new option prevents you from having to manually update this value for new contacts. As a result of this change, the Default Interest Rate and Default Interest Period fields will be updated to reflect your current settings. This also applies at the contact level.
The Billing tab in the Contacts page has been updated to allow for more flexibility. You can now choose the periods from which interest is calculated for contacts and the Minimum Amount for the interest. - You can now add your contacts to a billing group. Billing groups are used in situations where a contact in a group owns the debt of other contacts (for Jobs & Billing), i.e., an entity that owns the debt of other entities. Select the main contact to invoice from a billing group. When completing jobs for multiple contacts that are members of a billing group, those jobs are combined on a single invoice and sent to the main client.
A billing group is different from a contact group. In a billing group, the main client is your debtor. That contact owns the debt of all contacts in the billing group. A contact group is a list of clients who are related in some way, such as family members. Note that if you currently use contact groups to assist with billing multiple contacts on the same invoice, you can continue to do so. For more information consult the Add or edit a billing group topic.
|
Current |
Period7 |
Period5AndOver |
|
Period1 |
Period8 |
Period6AndOver |
|
Period2 |
Period9 |
Period7AndOver |
|
Period3 |
Period2AndOver |
Period8AndOver |
|
Period4 |
Period3AndOver |
Period9AndOver |
|
Period5 |
Period4AndOver |
Period10AndOver |
|
Over 80 Days |
61-80 Days |
41-60 Days |
21-40 Days |
1-20 Days |
Current |
|
<<Period5And Over>> |
<<Period4>> |
<<Period3>> |
<<Period2>> |
<<Period1>> |
<<Current>> |
.
Documents
- You can now add tags (labels) to files stored in CCH iFirmDocuments. These tags can be used to keep your documents organized. They are like folders, however, unlike folders, you can apply more than one tag to a single document. To help you keep a standard tag structure, not all users can create them. The list of tags is managed at the firm level from Settings>Documents>Tags settings
.
To streamline the use of tags, some tags assignments were automated in the system. Documents stored within jobs are automatically tagged with the Job Type and documents stored in the To assign, Permanent & Contact Documents folders will also get tags of the same name.
Tags can be added, edited and viewed from the Documents grid. Use the Tag: filter in our redesigned search bar to search those tags and apply a tag filter to help you search documents.
You can now configure retention periods for files stored within CCH iFirm Documents. There are multiple layers where you can set the retention period in the system from Settings > Documents > Retention settings. The four standard levels are Permanent, Default Settings, Job Type and Tags. Any file associated with the Permanent tag either from automatic assignment in the Permanent folder or by manually adding it to the file will not expire. The retention date can also be manually overridden in the properties window of each files.
Files are automatically moved to the Recycle Bin once the expired date is reached. Those files remain in the recycle bin where you can restore or delete them permanently. A scheduled task will remove files stored in the recycle bin based on the retention period defined for the default Purge Recycle Bin settings (Settings > Documents > Retention settings).