CCH iFirm Taxprep Release Notes
Reintroducing Telephone Support
As announced on February 18, 2026, you can now contact our support teams directly by phone Monday to Friday, from 10:00 a.m. to 5:00 p.m. (ET), when a live conversation is preferred.
Reintroducing phone support adds another way for you to engage with us, ensuring flexibility while maintaining the high level of service you expect.
To help you navigate the phone menu, we invite you to read the following article, which details all the available options: What are the phone menu options for 1-800-268-4522?
Digital support remains available
Our Knowledge Base, Support Platform, Virtual Agent, and Live Chat continue to provide convenient, efficient, and prioritized ways to get help.
Register for our Support Platform and log in to our virtual agent to find answers, submit a support ticket or chat with a live agent.
For more details about the web ticketing system and best practices, watch the following “How to” videos:
CCH iFirm Taxprep packages
Three CCH iFirm Taxprep packages are available. To find out which package you have, consult this article: CCH iFirm Taxprep packages.
Contents
-
Taxprep Home – A new landing page created to streamline how users locate, view and open tax returns
-
The date and user associated with the last Auto-fill my return download are displayed
-
The second review mark displays in a different colour than the first review mark
-
The Rolled Forward column is displaying new behaviour in the return manager
-
The Automatically synchronize contact information option is kept during roll forward
-
Decommission of the T1 Notice of assessment Download service
-
Decommission of the CRA’s authorization service in EFILE software for individuals
-
The metadata of the cell is now presented in the enhanced right pane
-
Ability to add hyperlinks in the return’s notes and cell comments
-
The name of multiple copy forms now remains visible at the top of the screen
-
The Notice of assessment (NOA) syntax to customize PDF naming conventions was renamed
-
Support of metadata when importing a Taxprep on-premise file
-
Automatic synchronization of the tax return between two browser windows
-
CCH iFirm Jobs & Billing is now integrated with CCH iFirm Taxprep
-
ESC key now closes the form and brings you to the form that was last opened
-
CCH iFirm Taxprep T3 and CCH iFirm Taxprep Forms support EFILE in bulk
-
Integration with CCH AnswerConnect now allows access to topics from a cell or a form
-
Support of additional metadata when importing a Taxprep on-premise file
-
Warning message advising you that a tax return has already been rolled forward
-
Ability to apply assignees and return statuses to all family members simultaneously
-
The header in the Auto-fill-my return reconciliations modal is always visible
-
The digital signature can be published even when the state of the portal invitation is Pending
July 17, 2026 Release
CCH iFirm Taxprep Essentials, Advanced and Pro
Job statuses and tax return statuses integration
We are pleased to announce that it is now possible to synchronize job statuses with tax return statuses. This feature helps ensure consistency and saves time by keeping related records up to date automatically.
For more information, click here.
CCH iFirm centralized statuses
CCH iFirm Taxprep return statuses are now displayed in the centralized CCH iFirm status management section. When accessing Settings > Taxprep > Return statuses, you are redirected to the CCH iFirm Statuses settings page under Settings > Firm Settings > Statuses.
For more information, click here.
May 15, 2026 Release
CCH iFirm Taxprep Essentials, Advanced and Pro
Navigate between fields using arrow keys
In addition to the Tab and Enter keys, you can now move between fields using the keyboard arrow keys, allowing precise navigation from one cell to another.
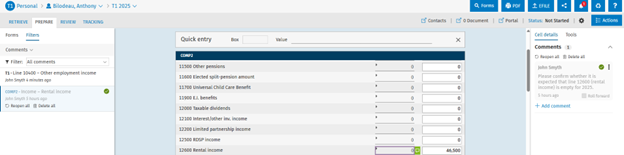
Ability to resolve comments
Comments can now be marked as resolved, allowing you to focus only on active comments.
To resolve a comment, select a comment or a cell containing a comment, then click Resolve all from Prepare > Filters > Comments or from the right pane in the Prepare or Review tabs.
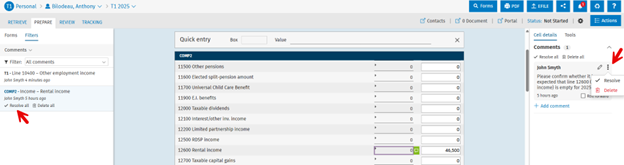
Resolved comments are displayed in a lighter style, and a green checkmark is added to indicate that they have been resolved.
From the Prepare or Review tabs, you can filter which comments are displayed:
-
All comments
-
Opened comments
-
Resolved comments
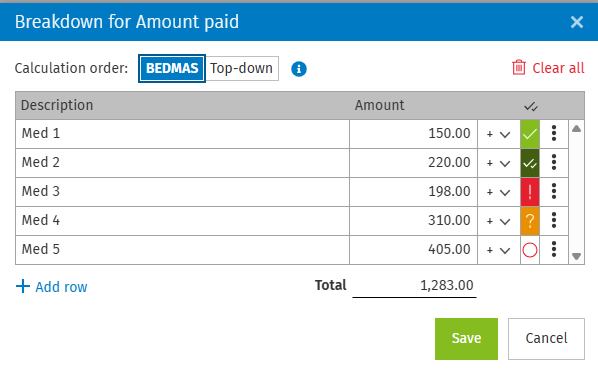
Ability to add all existing review marks to a cell breakdown
The following review marks can be applied to review data entered in a cell breakdown:
-
First review (Ctrl + 1)
-
Second review (Ctrl + 2)
-
Problem (Ctrl + 3)
-
Question (Ctrl + 4)
-
Other (Ctrl + 5)
The review marks can be added or removed by:
-
Using the shortcuts, or
-
Clicking the vertical ellipsis and Review mark beside each line, then choosing the desired review mark.
Return notes improvements
Add a return note in bulk
You can now add the same note to multiple returns at once. Select the returns, then click the Actions menu, followed by Notes.
Edit an existing return note
A return note can now be edited, allowing the note text to be modified.
Redo previous changes using a keyboard shortcut (Ctrl + Y)
In addition to undoing changes (Ctrl + Z), you can now redo changes using the keyboard shortcut Ctrl + Y.
Bulk EFILE for additional forms
Form MR‑69, Schedule 89 and Form T2054 can now be EFILED in bulk.
The birth date is now optional when creating a return
When creating a return for a new contact, the Birth date field is no longer mandatory.
Additional T3 and Forms syntax available to customize PDF naming conventions
Account number syntax for T3 and Identification number syntax for Forms have been added to customize the PDF naming conventions.
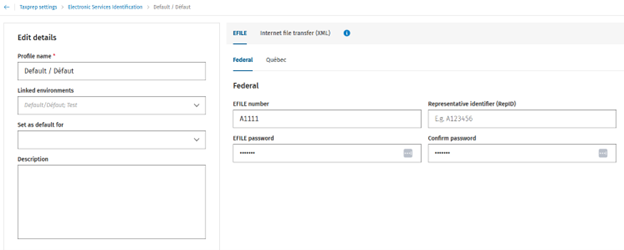
Improved Electronic Services Identification user interface
The Electronic Services Identification section in the Taxprep settings has been redesigned to provide a clearer and more structured configuration experience. EFILE profile details are now presented in the left pane, while electronic filing credentials are organized in a streamlined layout with a clear separation between Federal and Québec information. A new tab based interface distinguishes EFILE and Internet file transfer (XML) settings, making it easier to find, review and maintain electronic filing credentials across environments.
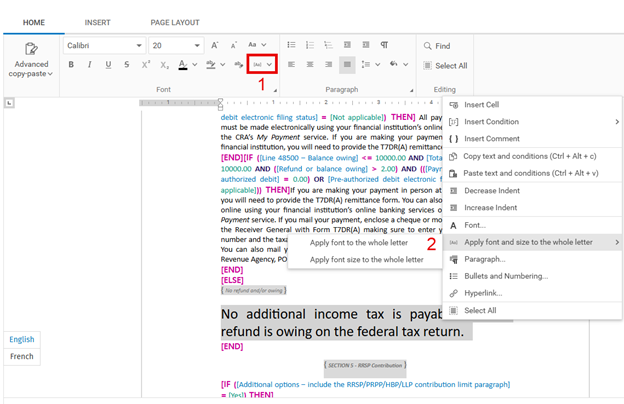
Apply a font and a font size to the whole letter
You can apply a font and a font size to the entire letter by selecting text that already uses the desired font or font size, then choosing one of the following options:
-
Click the toolbar button Apply the font and font size of the selected text to the whole letter, or
-
Right click to open the contextual menu and select Apply font and size to the whole letter.
CCH iFirm Taxprep Essentials and Advanced Only
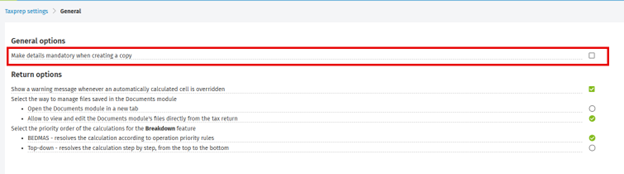
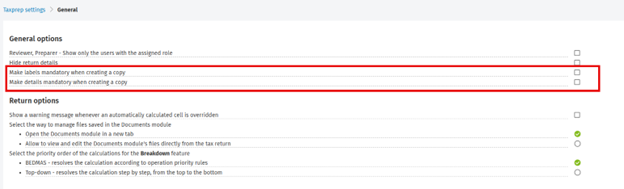
Make details mandatory when creating a copy of a return
You can now require details when creating a copy of a return. This option is configured from Settings > Taxprep > General and ensures copied returns can be clearly distinguished from other returns for the same taxpayer.
CCH iFirm Taxprep Advanced and Pro Only
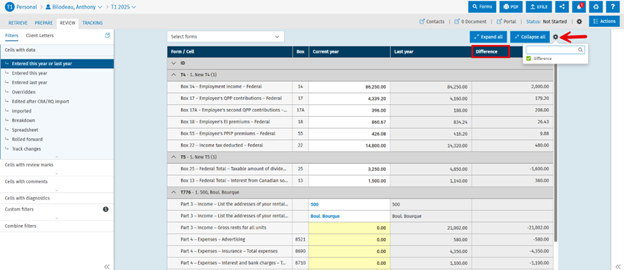
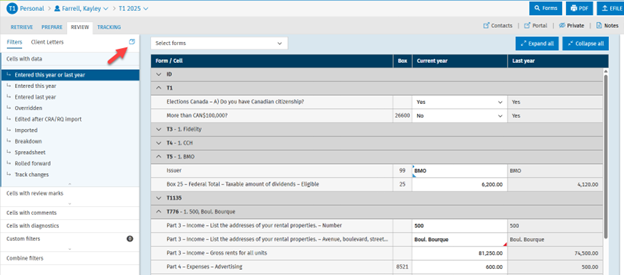
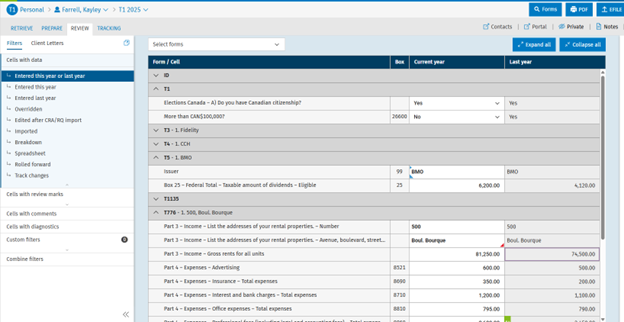
Difference column added to the Review tab
The Difference column is now available in the Review tab, allowing you to compare the current year values in numeric fields with the prior year values. This column can be shown or hidden using the gear icon.
Import data from a T1 Planner return
Data entered in a Planner return can now be imported into the taxpayer’s production return.
To import data from a Planner return:
-
Go to the Retrieve tab and select Import planner return.
-
Click Select a return. All Planner returns for the taxpayer will be displayed.
-
Select the Planner return from which you want to import data.
-
Click Import.
Only data entered in the Planner return will be imported during this process.

Lock or unlock multiple tax returns
Tax returns can now be locked or unlocked in bulk. Select multiple returns, then use the Actions menu to lock or unlock them.
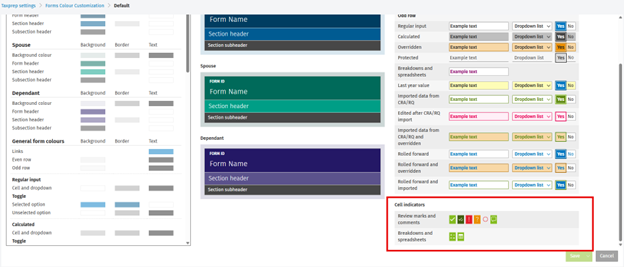
Customize the colour of review marks, comments, cell breakdowns and spreadsheets
You can now customize the colours used for review marks, comments, cell breakdowns and spreadsheets.
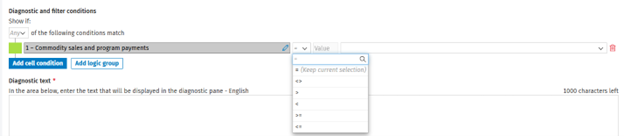
Support for additional operators when creating custom diagnostics and filters or letters
When a drop down field is used to create a condition within a custom diagnostic and filter or a letter, additional operators, the same as for numeric fields, are now supported:
-
= Equal to
-
<> Not equal to
-
> Greater than
-
< Less than
-
≥ Greater than or equal to
-
≤ Less than or equal to
CCH iFirm Taxprep Pro Only
Make labels and details mandatory when creating a copy of a return
You can now require a label and/or details when creating a copy of a return. These options are configured from Settings > Taxprep > General and help ensure copied returns can be clearly distinguished from other returns for the same taxpayer.
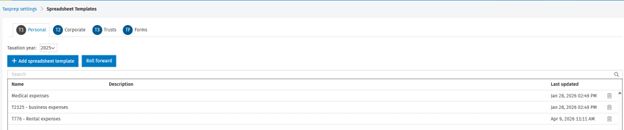
Ability to create a spreadsheet template with premapped fields
You can create spreadsheet templates that allow you to map tax fields once and reuse the templates across multiple tax returns, saving time by eliminating the need to remap fields for each return.
To create a spreadsheet template, go to Settings > Taxprep > Spreadsheet Templates.
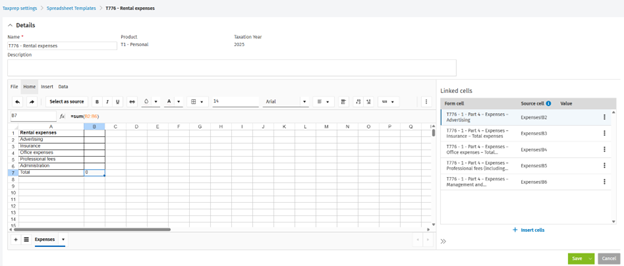
Within a template, add any required information and map each spreadsheet field to the corresponding tax field to which the data will be linked. To select the tax fields, click Insert cells and select the desired form and tax field. If the form is a repeatable form, use the Copy index field to indicate which repeat the values will be linked to.
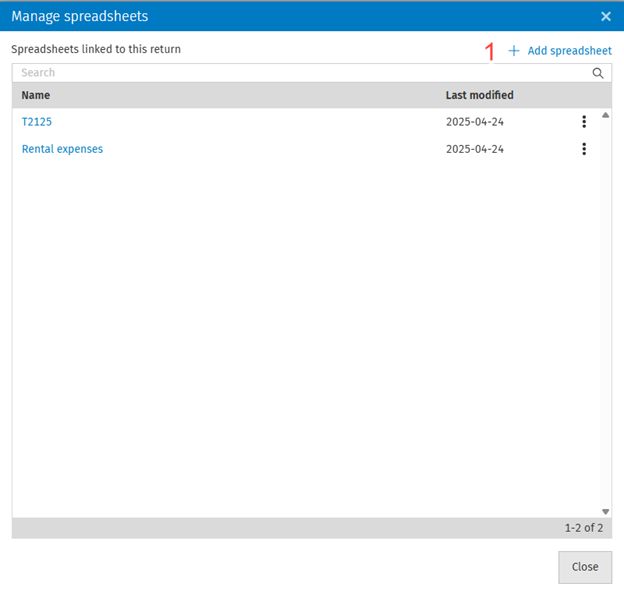
From the tax return, add a spreadsheet by using one of the following methods:
-
Click Actions, followed by Manage spreadsheets and Add spreadsheet. You can also right-click any numeric field, then select Spreadsheet, followed by Link/Edit and Add spreadsheet.
-
Select the desired template from the Create from drop-down list and click the Add button.
-
Enter the content in the spreadsheet either manually or by importing data from an external spreadsheet by clicking File, then Import.
-
Click Add spreadsheet.
The following security roles have been added to allow you to manage spreadsheet template rights:
-
Tax – Settings – Spreadsheet templates – Add, Edit
-
Tax – Settings – Spreadsheet templates – Delete
-
Tax – Settings – Spreadsheet templates – Roll Forward
Export the return manager more than once per day
If the number of returns to export does not exceed the limit, the data will be available in CSV format from the Notifications centre within a few minutes. If the number of documents to export exceeds the limit, the CSV file will be generated overnight.
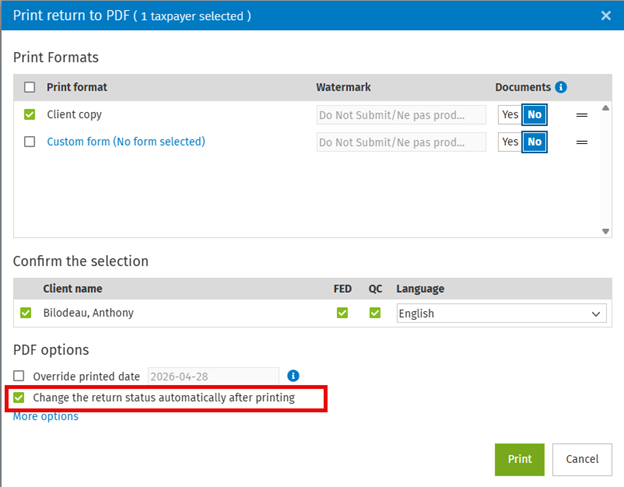
Override automatic return status updates when printing
When automatic return status updates during printing are enabled from Settings > Taxprep > Return statuses, you can temporarily disable this automation when printing by clearing the Change the return status automatically after printing checkbox.
Tax security roles changes
Security role to manage print options
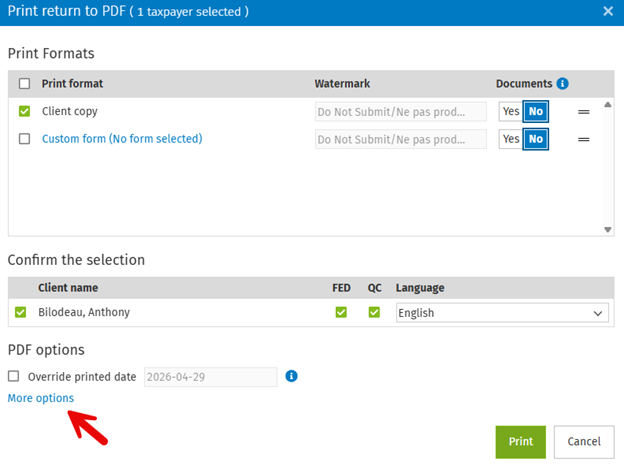
The Tax – Returns – Print options security role has been added to control who can modify print options from More options when printing a return, a form or a slip.
Security role to manage who can print without an enforced watermark
The Tax – Returns – Print/Publish without Enforced Watermark security role has been added to control who can print without an enforced Do not submit watermark.
Renamed security roles
The following security roles have been renamed for clarity and consistency:
-
Tax – Print to PDF was renamed Tax – Returns – Print to PDF.
-
Tax – Publish to Portal was renamed Tax – Returns – Publish to Portal.
-
Tax – Recycle Bin – Access was renamed Tax – Returns – Recycle Bin – Access.
API – Get data using custom filters from the Review tab
A new endpoint is available to get the list of custom filters from the Review tab. In addition, custom filters can now be used to get data through the existing cells/getdata/reviewfilter endpoint.
December 5, 2025 Release
CCH iFirm Taxprep Essentials, Advanced and Pro
Taxprep Home – A new landing page created to streamline how users locate, view and open tax returns
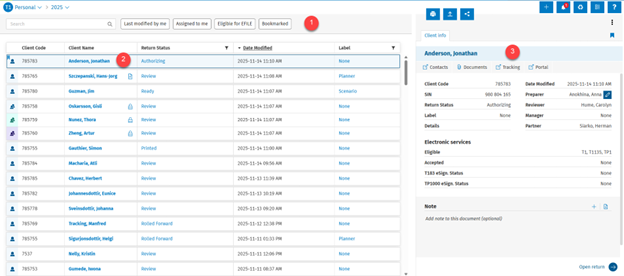
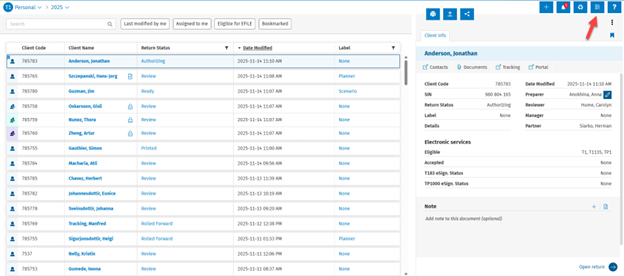
The Taxprep Home functionality provides a streamlined interface that displays pertinent information required for preparing tax returns, allowing users to efficiently access and manage available tax returns.
-
Create the view based on your needs or search for a specific taxpayer.
-
To access a tax return, click the taxpayer's name or any blank area to display the right panel containing the taxpayer’s metadata.
-
The right panel shows the taxpayer’s metadata, which can be viewed or edited, and provides options for actions such as printing, publishing or EFILING. Also, a return can be bookmarked, allowing you to filter based on that metadata.
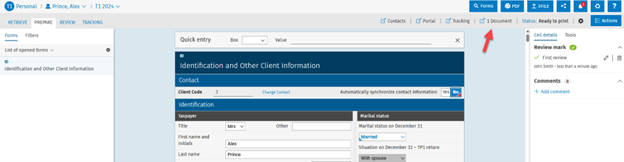
Upon accessing CCH iFirm Taxprep, the user is directed to the return manager by default. To access Taxprep Home, click the Taxprep Home icon from the return manager (see the following image). The next time you open CCH iFirm Taxprep, the application will remember whether your last access was to Taxprep Home or to the return manager.
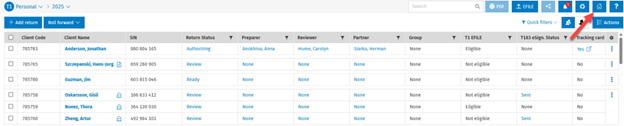
To go back to the return manager, click the Return manager icon from Taxprep Home.
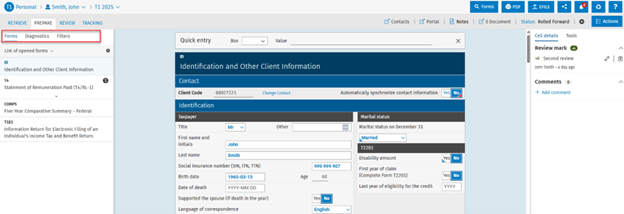
The navigation within the Prepare tab has been updated
Forms, diagnostics and filters from the Prepare tab are now displayed as tabs for easier access between sections.
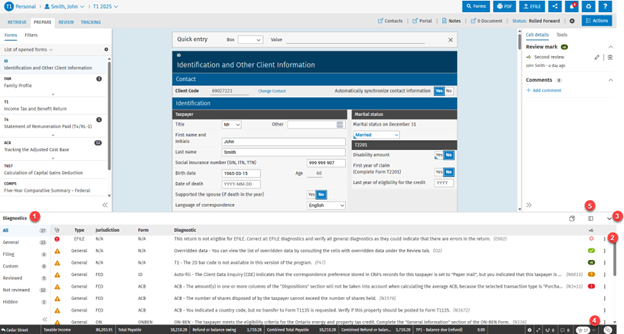
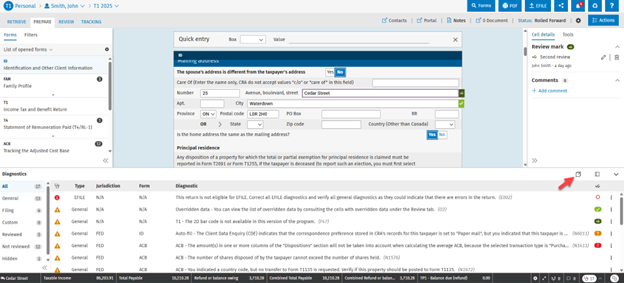
The diagnostics can be opened at the bottom of the screen, in a separate window or from the left pane
Diagnostics can be displayed using the three methods below:
At the bottom of the screen
Diagnostics are now displayed this way by default.
-
Click a filter to display a type of diagnostic.
-
Click the vertical ellipsis to:
Hide diagnostics
Add review marks
-
Click the downward chevron to minimize the Diagnostics pane.
-
Click the upward chevron to open diagnostics.
-
Click the Show diagnostics in the left panel icon to display the diagnostics in the left pane of the Prepare tab.
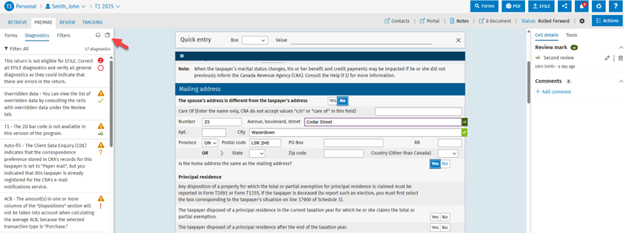
In the left pane of the Prepare tab
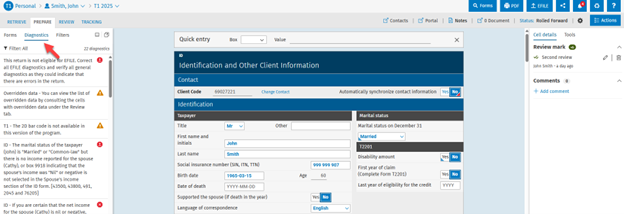
In a separate window
The Diagnostics tab can be opened in a separate window, enabling users to view the Diagnostics tab on one screen and tax forms on another. The values remain synchronized between the Diagnostics tab and the forms, and the cursor moves accordingly between both windows. To open the Diagnostics tab in a separate window, click the Open diagnostics in a new tab icon from the Diagnostics bottom pane.
This can also be done from the Prepare > Diagnostics tabs.
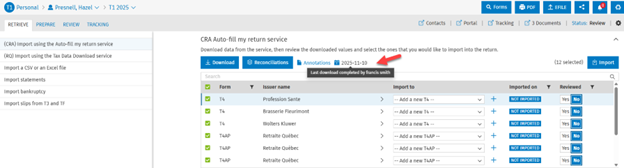
The date and user associated with the last Auto-fill my return download are displayed
When a user downloads data from the T1 or T2 Auto-fill my return service, the download date is shown. In addition, hovering over the date displays the name of the user who performed the most recent download.
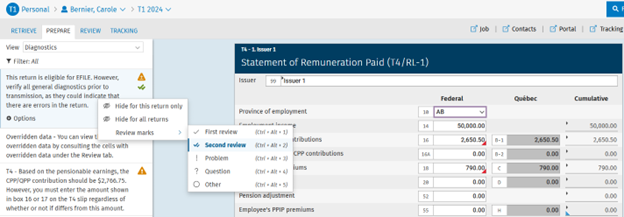
The second review mark displays in a different colour than the first review mark
The colour of the second review mark has been changed to visually distinguish it from the first review mark.
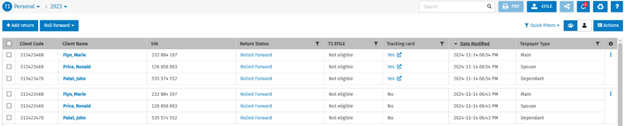
The Rolled Forward column is displaying new behaviour in the return manager
When a return is rolled forward, the Rolled Forward column now shows Yes even if the return was not actually rolled forward to the next year due to tax conditions (e.g., deceased taxpayer). With this enhancement, users can confirm that the file has already been processed for roll forward and no further action is required.
The Automatically synchronize contact information option is kept during roll forward
The Automatically synchronize contact selection option in the ID form is now retained when the file is rolled forward.
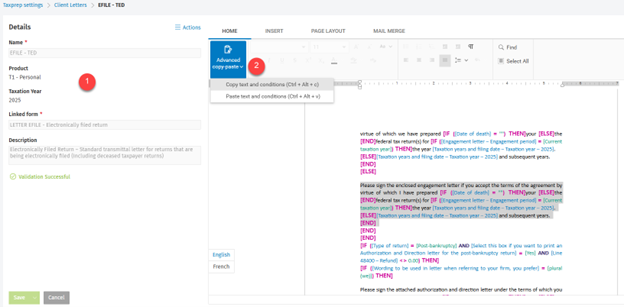
Client letter improvements
-
The Details section is now on the left, creating more space for editing the letter.
-
It is now possible to copy and paste the text and conditions of the letter.
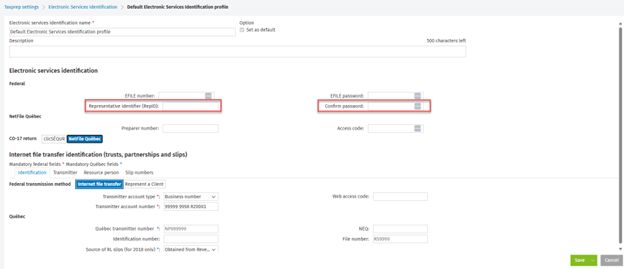
Electronic services identification changes
Electronic services identification
-
When entering an EFILE password, a confirmation is required, and that password must be re-entered. This is a CRA requirement.
-
The Representative identifier (RepID) field has been added, enabling users to enter the RepID once and the value to be automatically populated in Part C of the T1 and T3 T183 forms and on line 925 of the T2 form. Please note that these values are populated starting with the taxation years below:
T1: 2025 returns
T2: 2023 and subsequent taxation years
T3: 2025 and subsequent taxation years
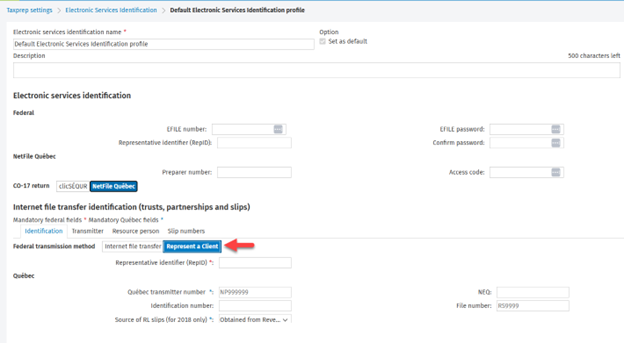
Internet file transfer identification
The Represent a Client tab has been added, enabling users to input a Representative identifier (RepID) in the settings. This identifier is then used to generate slips (XML) and upload them to the Represent a Client service (RAC).
PDF password improvements
The PDF password protection feature is now available for each product individually, enabling the user to select which products (T1, T2, T3 or TF) should have password-protected files.
Additionally, for T2 and TF, you can set the PDF password to the first nine digits of the business or account number. This option is available in Settings > Taxprep > Customize PDF File.
Documents module integration improvements
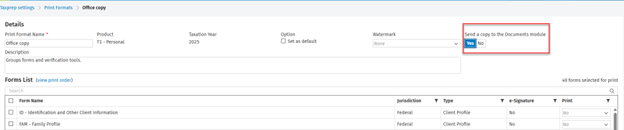
Select print formats when sending returns to the Documents module
When printing or publishing the tax return, the copy can be sent to the Document Management System within the same dialog box. It is now possible to select which print formats, among the ones used for printing or publishing, will be sent to the Documents module.
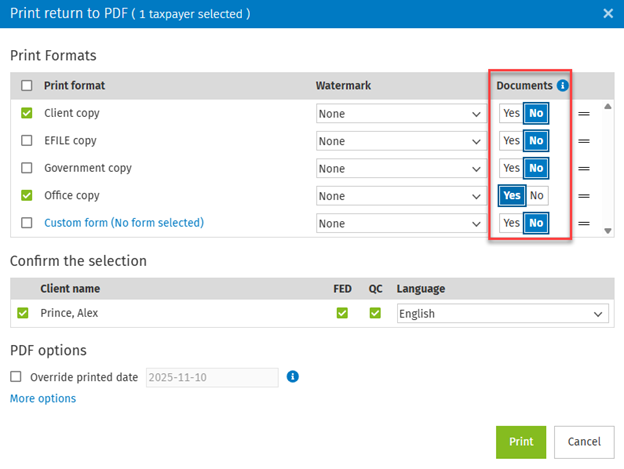
The Send a copy to the Documents Module option has been added to the print formats, allowing a default value for each print format.
Access the taxpayer’s Documents folder with one click
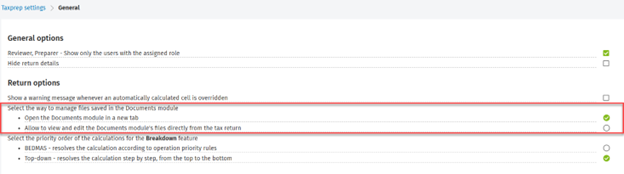
Supported documents from the Documents module can now be accessed from the breadcrumb of an open tax return in two ways:
-
Opening the Documents folder in a new tab.
-
Opening files from the Documents module directly from the tax return.
These options have been added under Settings > Taxprep > General and can be selected as needed. The taxpayer's Documents folder opens in a new tab by default.
Support of additional metadata when exporting CCH iFirm Taxprep returns to the Taxprep on-premise format
When exporting a CCH iFirm Taxprep return to the Taxprep on-premise format, the following additional metadata is retained:
-
Document notes
-
Return status
-
EFILE status
-
Lock of the return
Decommission of the T1 Notice of assessment Download service
The CRA has decided to decommission the T1 Notice of assessment Download service in tax software for all prior and future tax years, effective February 2026. Therefore, this feature has been removed from the Retrieve tab for 2025 tax returns. For the previous years, the Notice of Assessment feature will continue to exist in order to view notices of assessment that have been already downloaded. However, you will not be able to download them.
In the ID form, the section Notice of assessment or reassessment delivery options for a taxpayer not registered for the CRA’s e-mail notifications has been removed, as it no longer applies.
The CRA has also removed the option to download a notice of assessment in Part E of the T183 form.
Please note that the notices of assessment and reassessment will continue to be available through the My Account or Represent a Client services (for authorized representatives) immediately after the CRA receives and processes a return.
Decommission of the CRA’s authorization service in EFILE software for individuals
On July 15, 2025, the CRA has decommissioned its service used to submit authorization requests for individuals (T1) through EFILE software. Therefore, this feature has been removed. From now on, if you wish to obtain online access for a client, you will need to use the Represent a Client service. Note that we have kept the carried forward data with regard to prior-year authorizations in the program. This information is now visible at the end of the Other information section in the Identification and Other Client Information form.
CCH iFirm Taxprep Advanced and Pro Only
The Review tab can be displayed in a separate window
The Review tab can be opened in a separate window, enabling users to view the Review tab on one screen and tax forms on another. The values remain synchronized between the Review tab and the forms, and the cursor moves accordingly between both windows. To open the Review tab in a separate window, go to the Review tab and click the icon next to the Client Letters tab.
The Review tab retains previous user settings
Your expanded or collapsed sections are now saved in the Review tab. As a result, whenever you return to the Review tab, your preferences are automatically retained.
The Preparer Profile column is available in the return manager
The Preparer Profile column can be displayed in the return manager, providing information on which preparer profile is associated with a return.
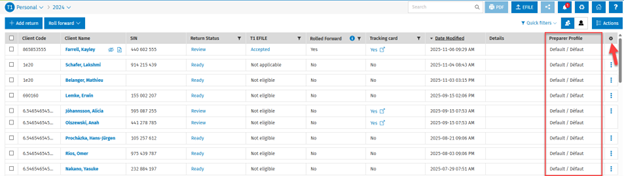
Note: This column can be added by clicking the gear icon in the top right corner of the return manager and selecting the Preparer Profile column.
CCH iFirm Taxprep Pro Only
Security roles changes
Change the contact in the ID form
The new Tax – Returns – Change contact security role now controls who can change the contact from the ID form. This was previously managed by the Tax – Returns – Edit all cells of the contact security role.
Note: The users to whom the Tax – Returns – Edit all cells of the contact security role had been assigned will be assigned the Tax – Returns – Change contact security role by default.
Create Tracking cards
The new Tax – Returns – Create Tracking card security role now controls who can create Tracking cards from CCH iFirm Taxprep.
Note: The users to whom the Tracking – Access to Tracking security role had been assigned will be assigned the Tax – Returns – Create Tracking card security role by default.
Change the partner and/or manager assignee
The new Contacts – Edit Assignee security role now controls who can modify the assigned partner or manager from the Contacts module and from CCH iFirm Taxprep. Previously, the Tax – Returns – Edit all cells of the contact security role managed who had the rights to modify the assigned partner and manager from CCH iFirm Taxprep.
Note: The users to whom the Tax – Returns – Edit all cells of the contact security role had been assigned will be assigned the Contacts – Edit Assignee security role by default.
Security roles name changes
Tax – Returns – Review – Custom Filters – Add, Edit has been renamed Tax – Returns – Review – Custom Filters – Add, Edit, Delete.
Tax – Import and Roll Forward Password-Protected Taxprep Files has been renamed Tax – Import and Roll Forward Password-Protected Taxprep and Cantax Files.
Export return manager functionality improvements
The custom columns shown when a custom filter is applied in the return manager can now be exported. To export, click Actions, followed by Export return manager, and select Export the return manager based on the applied filters.
Web API improvements
Get list of applicable forms
This endpoint returns a list of applicable forms for printing. For more information, see the applicableForms section of the Print Endpoints help topic.
Webhook-based notifications for return status
The Change Return Status event is sent when the return status of a return is changed following a manual or automatic modification.
July 18, 2025 Release
CCH iFirm Taxprep Pro Only
Adjustments related to identification numbers in the Forms product
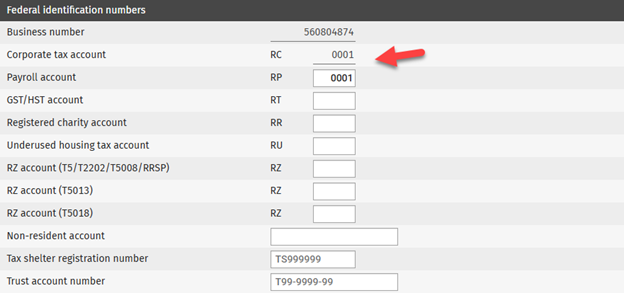
Users who do not have the Tax – Returns – Edit all cells of the contact security role can now edit identification numbers in the ID form of the Forms product as long as those numbers are not synchronized with the contact. For example, in a corporate entity’s return, only the RC identification number will sync with the contact. As a result, users without this security role will not be able to edit the RC value, but they will be able to modify any other identification number that is not synchronized.
The type of entity associated with the contact determines which identification numbers can be modified.
May 16, 2025 Release
CCH iFirm Taxprep Essentials, Advanced and Pro
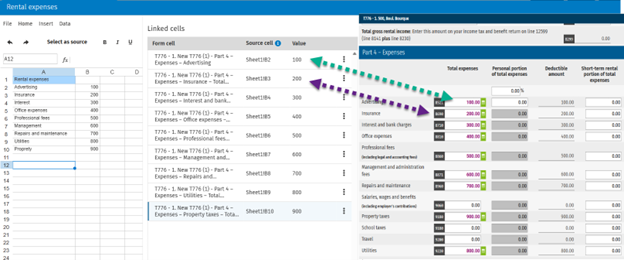
Ability to link multiple cells to a single spreadsheet
A single spreadsheet can now be linked to multiple cells. To do so, proceed as follows:
-
Add a spreadsheet by using one of the following methods:
Click Actions, followed by Manage spreadsheets and Add spreadsheet, or
Right-click any numeric field, then select Spreadsheet, followed by Link/Edit and Add spreadsheet.
-
Enter the content in the spreadsheet either manually or by importing data from an external spreadsheet by clicking File, then Import.
-
Insert the cells that will be linked to the spreadsheet by clicking Insert cells.
-
Choose the form(s) from which you want to insert cells, then select and insert the desired cells.
-
Map the inserted cells to the spreadsheet values by:
Selecting the inserted cell
Selecting the spreadsheet value
Clicking Select as source
After mapping, the Source cell column in the right pane of the spreadsheet will display the corresponding mapped cell, while the Value column will show the mapped value.
-
Click Add spreadsheet and enter a name. Note that the spreadsheet must be linked to at least one return cell before it can be saved.

The values from the linked spreadsheet will be displayed in the respective fields of the form.
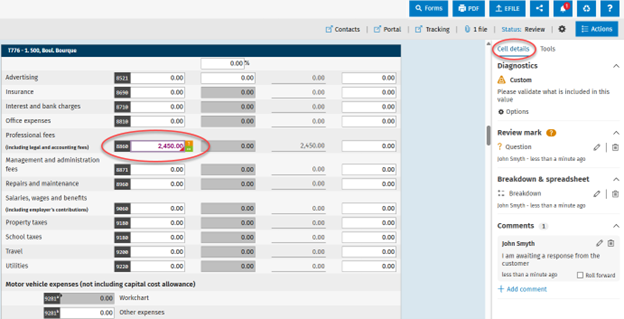
The metadata of the cell is now presented in the enhanced right pane
The right pane in an open tax return has been enhanced. It now includes two tabs:
-
Cell details
-
Tools
Cell details
Upon selecting a cell, this tab will display all its associated metadata. The following metadata can be appended to a cell:
-
Diagnostics
-
Review marks
-
Breakdown
-
Spreadsheet
-
Comments
-
AnswerConnect Help preview
From the right pane, it is possible to apply any available action to given metadata (i.e., add, edit, delete, etc.).
Metadata information will no longer be displayed when hovering on a cell, with the exception of diagnostic text, which will still appear when the cell is hovered over.
Tools
This tab will display all actions that can be applied to:
-
Forms
-
Cells
-
Tools

Ability to add all existing review marks to diagnostics
The following review marks can be applied to any diagnostic.
-
First review (Ctrl + Alt + 1)
-
Second review (Ctrl + Alt + 2)
-
Problem (Ctrl + Alt + 3)
-
Question (Ctrl + Alt + 4)
-
Other (Ctrl + Alt + 5)
The review marks can be added to a diagnostic by:
-
Using the shortcuts
-
Right-clicking a diagnostic, clicking Review marks and choosing the desired review mark, or
-
Clicking Options and Review marks in the relevant diagnostic, then choosing the desired review mark
The filters Reviewed and Not Reviewed are available from Diagnostics > Filter to facilitate the reviewing of diagnostics.
Undo previous changes by using a key shortcut (Ctrl + Z)
The Undo feature (Ctrl + Z) lets you roll back recent data input changes made to a tax return.
Ability to add hyperlinks in the return’s notes and cell comments
The return’s notes and cell comments can now include a hyperlink, allowing users to click the link and directly access the corresponding Web page.
Note: The hyperlink will be activated once the note is saved.

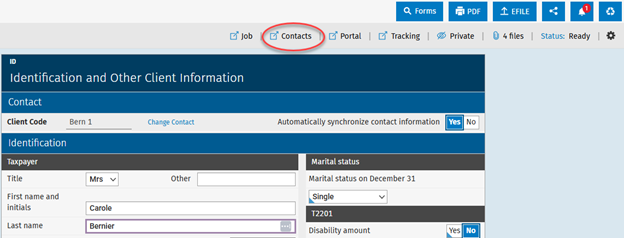
Open the contact directly from a tax return
From an open tax return, the Contacts icon displays in the toolbar. By clicking it, the taxpayer’s corresponding contact will open in a separate tab.
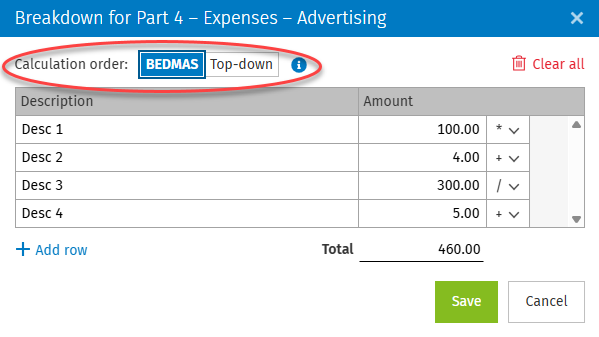
Ability to choose the BEDMAS or top-down calculation order
The Breakdown functionality allows you to choose a calculation order:
-
BEDMAS (resolves the calculation according to operation priority rules (brackets, exponents, divisions, multiplications, additions, subtractions)), or
-
Top-down (resolves the calculation step by step, from the top to the bottom)
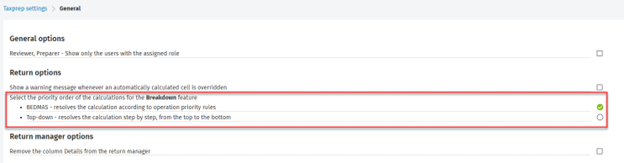
The option Select the priority order of the calculations for the Breakdown feature has been added to Settings > Taxprep > General, allowing you to select the default value for any newly added cell breakdown.
The name of multiple copy forms now remains visible at the top of the screen
As you scroll through a multiple copy form, the copy's name stays visible at the top of the screen, helping users easily identify which copy of the form they are working on.

The Notice of assessment (NOA) syntax to customize PDF naming conventions was renamed
Express NOA and Express NOA download date syntaxes have been renamed to the following:
-
NOA
-
NOA download date
Select the information to be displayed in the toolbar
From the gear icon located next to the Actions button, select the direct links and features that you wish to include in the toolbar.
Note that the content displayed when clicking this icon depends on your subscription and purchased modules.

Support of metadata when importing a Taxprep on-premise file
When importing a Taxprep on-premise file into CCH iFirm Taxprep, the following additional metadata is retained:
-
EFILE status (new)
-
Attached schedule (new)
-
Return’s notes (F11)
-
Cells’ comments (attached notes)
-
Predefined return statuses. Please see the Import Taxprep Files help topic to view the list of supported return statuses.
-
Lock of the return
Support of metadata when exporting CCH iFirm Taxprep file
When exporting a CCH iFirm Taxprep file in the Taxprep on-premise format, the following additional metadata is retained:
-
Cells’ comments
Note: You can choose not to export comments by clearing the Export comments option during the export process.

The Other Settings section is now named General
The Other Settings section under Settings > Taxprep has been renamed General.
Note that the Tax – Settings – Other settings – Access security role has been renamed Tax – Settings – General – Access.
Automatic synchronization of the tax return between two browser windows
The data entered is now automatically synchronized when two browser windows or tabs are opened by the same user for the same tax return. For instance, you may open a form on one screen and another form on a second screen, and the information will remain synchronized. Synchronization will also occur between a form and the Review tab.
CCH iFirm Taxprep Advanced and Pro Only
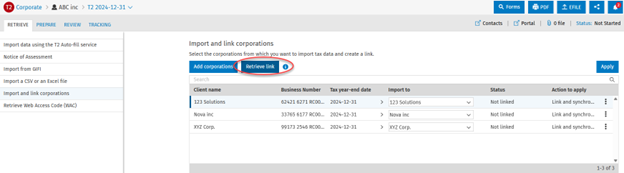
Import and link corporations – The Retrieve link functionality enables the identification of returns to be linked
The Import and link corporations functionality allows you to identify corporate returns that were linked in the previous year. When the T2 return is rolled forward in the current taxation year, click the Retrieve link button to identify all linked returns in the previous taxation year.
Note: All linked returns should be rolled forward in the current taxation year in order to retrieve the links of associated or related corporations.
CCH iFirm Taxprep Pro Only
The Manager role can now be assigned to any tax return
The Manager role is now available in the Taxprep module and can be assigned to any tax return, alongside the existing roles of Preparer, Reviewer and Partner.
The following security role is required to assign the Manager role to a tax return: Tax – Returns – Edit all cells of the contact.

New security role to manage roll forward options from Settings
The Tax – Settings – Roll forward security role has been added to allow you to manage the rights to modify roll forward options from Settings > Taxprep > Roll Forward.
The Tax – Returns – Roll Forward iFirm Taxprep security role now allows you to manage the rights to roll forward CCH iFirm Taxprep returns only.
Web API additional endpoint
Set details
This endpoint allows you to add or update the details of one or a batch of documents. For more information, see the Details Endpoint help topic.
March 11, 2025 Release
CCH iFirm Taxprep Essentials, Advanced and Pro
Ability for trusts to electronically transmit Form T1135, Foreign Income Verification Statement
The electronic transmission of Form T1135 for trusts is now available from CCH iFirm Taxprep T3.
December 20, 2024 Release
CCH iFirm Taxprep Essentials, Advanced and Pro
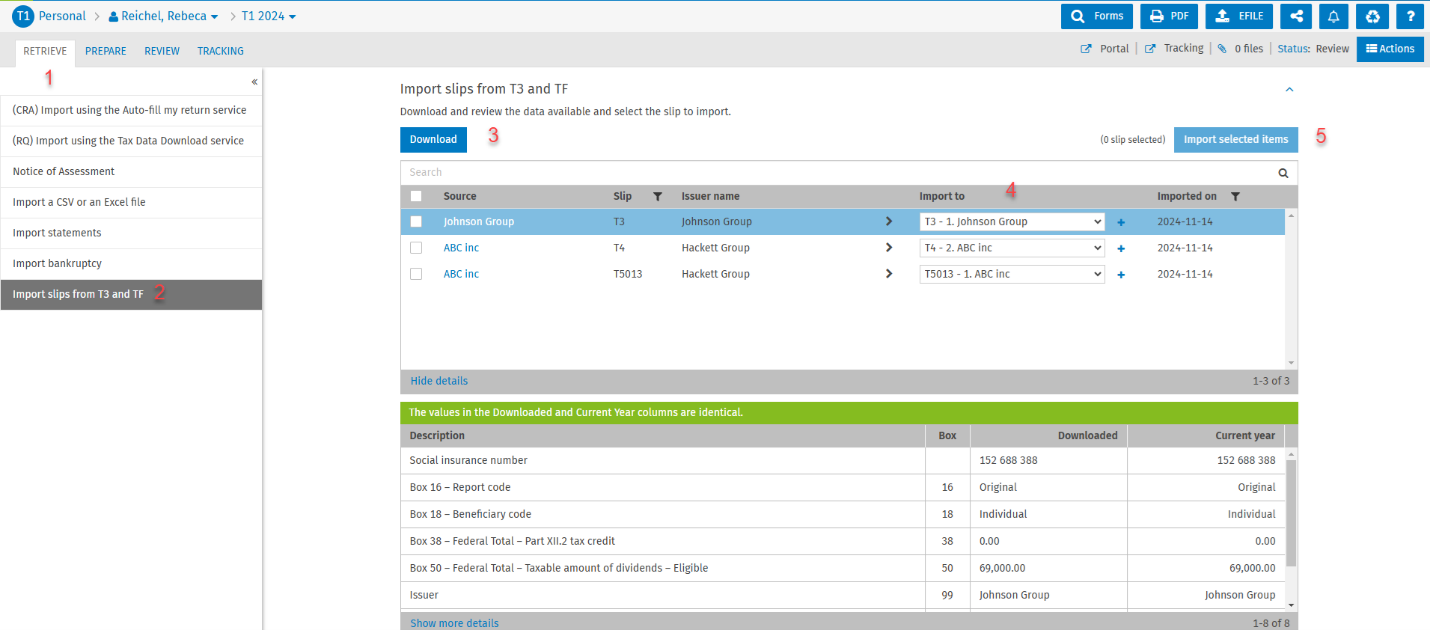
Ability to import slips from T3 and Forms into a T1 return
The Import slips from T3 and TF feature allows you to import slips generated in CCH iFirm Taxprep T3 and/or in CCH iFirm Taxprep Forms directly into the T1 return, saving preparation time.
When the slip is produced (either printed or transmitted electronically) in CCH iFirm Taxprep T3 or in CCH iFirm Taxprep Forms, it automatically becomes available for download and import in the T1 return for the corresponding taxpayer.
-
In the T1 return, open the Retrieve tab.
-
Click Import slips from T3 and TF.
-
Click Download; all available slips for that taxpayer will be listed.
-
Select the copy of the slip for which data should be imported in the return.
-
Click Import selected items.
The following slips and RL slips are supported for import:
Import from CCH iFirm Taxprep T3 to CCH iFirm Taxprep T1
-
T3/RL-16
Import from CCH iFirm Taxprep Forms to CCH iFirm Taxprep T1
-
T4/RL-1
-
T4A/RL-1/RL-2
-
T5/RL-3
-
T5013/RL-15
-
T2200
CCH iFirm Taxprep T3 and CCH iFirm Taxprep Forms support EFILE in bulk
CCH iFirm Taxprep T3 and CCH iFirm Taxprep Forms now allow returns, forms and slips to be EFILED in bulk from the return manager.
The contact group information is displayed in the return manager
The Contact Group column can be displayed in the CCH iFirm Taxprep return manager, allowing you to view the contact group of the tax documents. It is possible to filter on that column and identify any returns linked with a contact group.

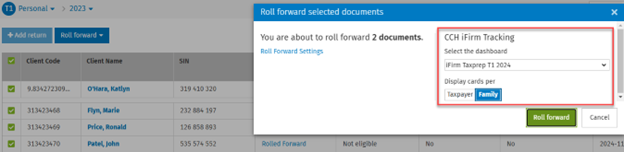
Ability to create CCH iFirm Tracking cards when rolling forward a tax return
CCH iFirm Tracking cards can now be created when rolling forward a tax return.
Note: The CCH iFirm Tracking section will be available in the Roll forward selected documents modal only if you have a CCH iFirm Tracking license and the Tracking – Access to Tracking security role.
December 6, 2024 Release
CCH iFirm Taxprep Essentials, Advanced and Pro
Open a tax return directly from the contact
The Taxprep tab has been added to the Contact Details page, allowing you to open a taxpayer’s tax returns. By clicking the name of the taxpayer, the return will open in a separate tab.
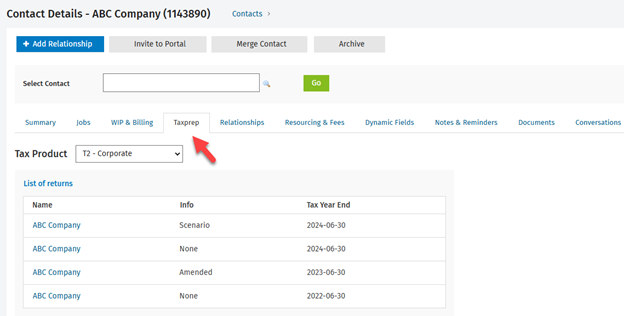
For more information about this integration, see the Core & Contacts section of the December 6, 2024 CCH iFirm release notes.
Access to the taxpayer’s portal in one click
From an open tax return, the Portal icon will display in the breadcrumb. By clicking it, the taxpayer’s portal will open in a separate tab.
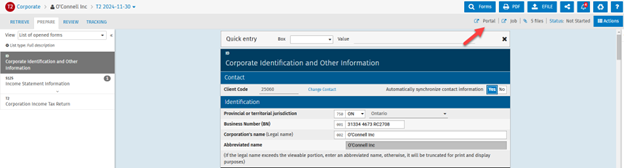
CCH iFirm Jobs & Billing is now integrated with CCH iFirm Taxprep
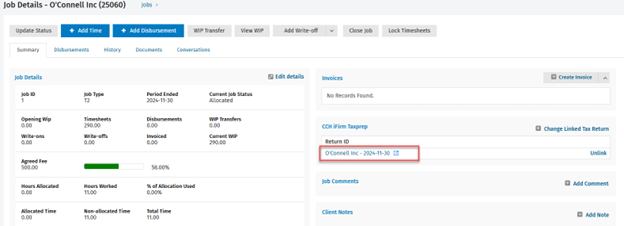
From an open tax return, the Job icon will display in the breadcrumb. By clicking it, the taxpayer’s job will open in a separate tab. Similarly, from a job, a CCH iFirm Taxprep return can also be opened by clicking the tax return link. For more information on how to create the link from a job to a tax return, see the Jobs & Billing section of the December 6, 2024 CCH iFirm release notes.

ESC key now closes the form and brings you to the form that was last opened
The ESC key behaviour has been improved. When closing a form by using the ESC key, the active form will close, and you will be taken to the form that was last accessed.
CCH iFirm Taxprep T3 and CCH iFirm Taxprep Forms support EFILE in bulk
CCH iFirm Taxprep T3 and CCH iFirm Taxprep Forms now allow returns, forms and slips to be EFILED in bulk from the return manager.
Return manager improvements
Ability to resize columns
All columns in the return manager can now be resized by placing the cursor on the right side of the column name and then dragging the cursor to adjust the width of the column.
New column used to identify the taxpayer type
The Taxpayer Type column has been added to the T1 return manager, allowing you to identify the taxpayer type: Main, Spouse or Dependant. It is also now possible to filter on this column.
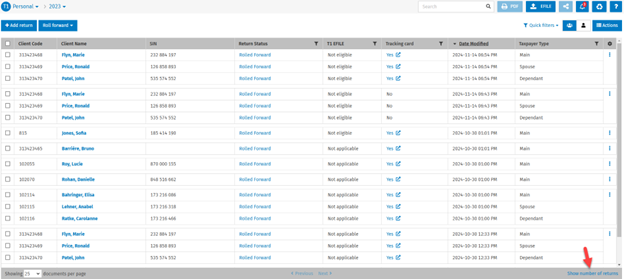
Return count
The return count is now displayed at the bottom-right side of the screen in the return manager. To display the number of returns in the return manager, click Show number of returns.
PDF naming convention improvements
Additional syntax available to customize PDF naming conventions:
-
Label (Pro only)
-
Details

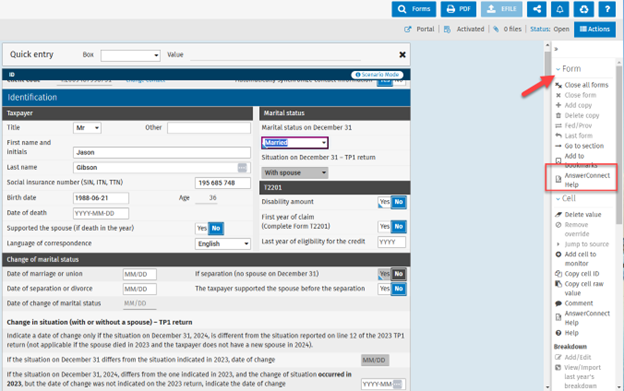
Integration with CCH AnswerConnect now allows access to topics from a cell or a form
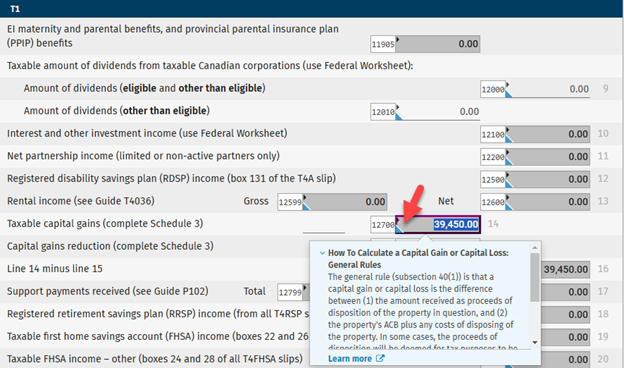
In addition to accessing a CCH AnswerConnect topic from a cell, it is now possible to open a relevant CCH AnswerConnect topic related to a tax form. To do that, open the right pane and click the AnswerConnect Help option under the Form section.
The behaviour to view or open a CCH AnswerConnect topic from a cell has not changed. All cells with a blue triangle icon are integrated with CCH AnswerConnect.
You can quickly identify these links to CCH AnswerConnect by looking for the blue triangle icon located in the left corner of the form field. A preview of the content will appear when you hover over the link:
If you want to see the entire topic in CCH AnswerConnect, you can use one of the following methods:
-
Click Learn more from the preview;
-
Use the Shift + F1 shortcut from the field;
-
Use the contextual menu (right-click) from the field;
-
Use the right pane link.

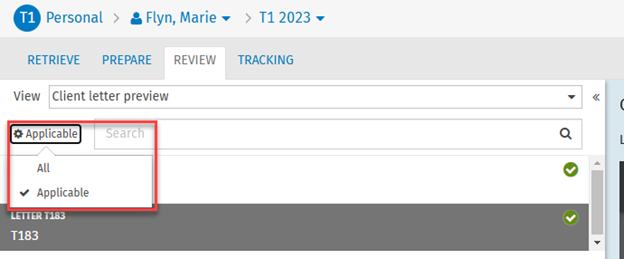
Ability to display only applicable letters inside a return
From the Review tab > Client letter preview, it is now possible to display only the applicable letters by clicking the gear icon and selecting Applicable:
Ability to roll forward from an open tax return
In addition to rolling forward a tax return from the return manager, it is now possible to roll forward a tax return directly from an open tax return. To do this, click Actions > Roll forward. Once the tax return is rolled forward, a notification will be displayed.
Support of additional metadata when importing a Taxprep on-premise file
When importing a Taxprep on-premise file into CCH iFirm Taxprep, the following additional metadata is retained:
-
Return’s notes (F11)
-
Cells’ comments (attached notes)
-
Predefined return statuses. Please see the Import Taxprep Files help topic to view the list of supported return statuses.
-
Lock of the return
CCH iFirm Taxprep Advanced and Pro Only
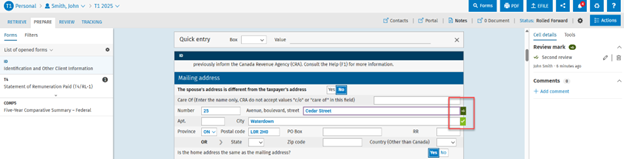
Last year’s input fields are highlighted in yellow, including in the Review tab
When a tax return is rolled forward to a subsequent tax year, all fields that had a value in the previous year and are empty in the current year are highlighted in yellow. The Review tab now behaves the same way as a form, and these fields are also highlighted in yellow:


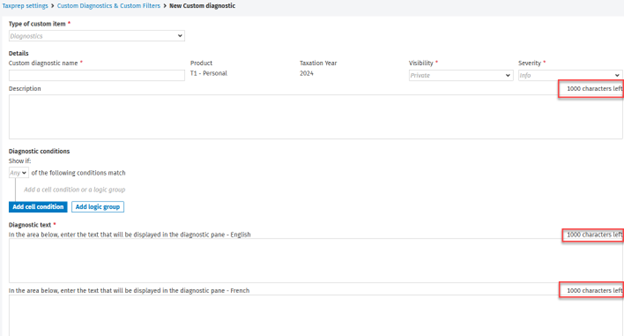
Custom diagnostic and custom filter descriptions
Description fields for custom diagnostics and custom filters now support up to 1,000 characters.
CCH iFirm Taxprep Pro Only
Ability to filter the list of preparers and reviewers when selecting assignees for a tax return
The option Display the list of users with the corresponding user role for the reviewer and preparer assignees has been added to Settings > Taxprep > Other Settings. This option allows you to display the list of users that only have the preparer or reviewer role when you select assignees for a tax return.
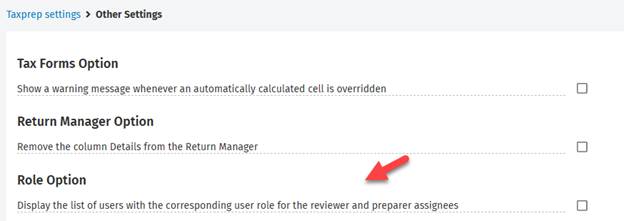
Note: To configure roles and assign them to your users, click Settings > Users > Manage Roles.
Manage visibility feature improvements
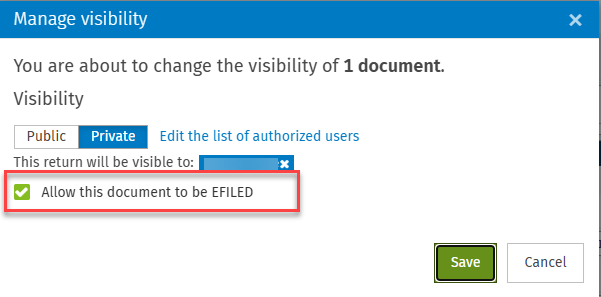
When the Manage visibility feature is used to produce a personal or a private return, another user can EFILE the return without having access to its content. This new option is helpful when a user is preparing a personal return but doesn’t have the rights to EFILE the return.
The Manage visibility modal now includes the option Allow this document to be EFILED. When selected, any user in your firm with the Tax – Returns – Manage visibility – EFILE security role can EFILE private returns from the return manager without being able to open them or view their content.
The following security roles are required to EFILE private returns:
-
Tax – T1 – Returns – EFILE
-
Tax – T2 – Returns – EFILE
-
Tax – Returns – Manage visibility – EFILE
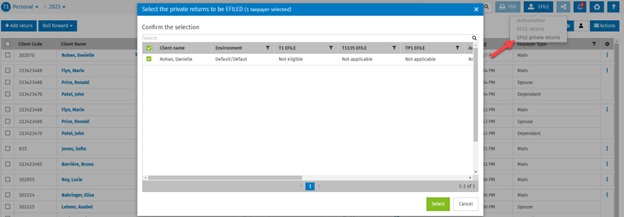
Users with the required security roles are now able to EFILE private returns from EFILE > EFILE private returns:
Changes to the partner assignee are now restricted under a specific security role
The following security role is required to modify a partner assignee inside an existing CCH iFirm Taxprep return: Tax – Returns – Edit all cells of the contact.
Web API additional endpoints
-
Get list of return manager customer filters
This endpoint retrieves the list of all return manager custom filters and custom diagnostics that are available for a given product and year.
-
Publish to Portal
These endpoints publish a batch of documents or slips by printing them to PDF, then publishing them to the corresponding portal. For more details, see the Publish Endpoints help topic.
-
Set label
This endpoint assigns a label to a document or a batch of documents for the product specified in the URL of the endpoint. For more details, see the Labels Endpoint help topic.
Webhook-based notifications for main electronic transmissions
Webhook-based notifications for status changes (acceptance or rejection) of the following main electronic transmissions are now included in the existing CCH iFirm Taxprep Web API offering: T1 (federal), TP1 (Québec), T2 (federal), AT1 (Alberta), CO-17 (Québec) and T3 RET (federal).
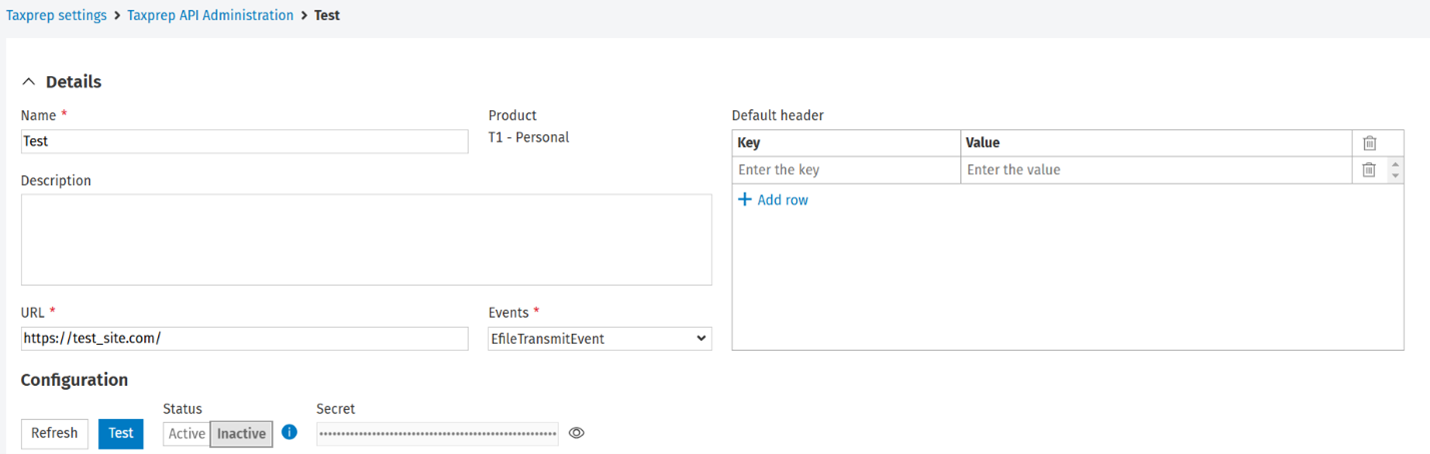
In order to enable webhook-based notifications from Settings > Taxprep > Taxprep API Administration, a new subscription should be created:
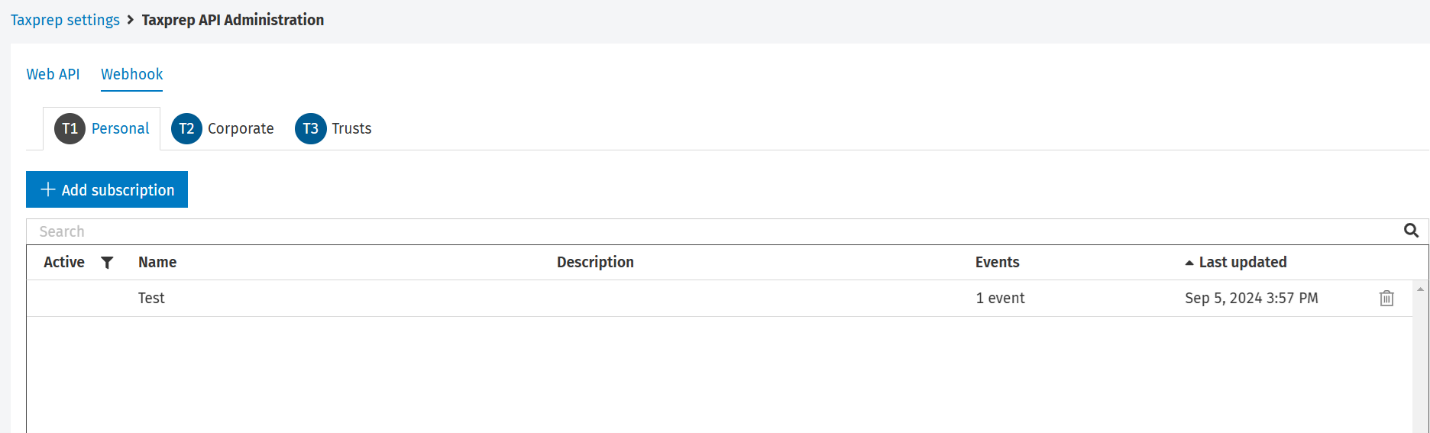
Within a subscription, a destination URL linked to a web application to be notified of EFILE status changes should be provided. The authentication is based on a secret key generated by a CCH iFirm administrator per subscription and can be used to validate webhook notifications at the destination URL.
Note that in order to activate a subscription, a successful webhook event should be sent to the configured destination web application.
A recently sent webhook notification event and its corresponding status are available in the Logs section for every active subscription:

For more information, including the properties received when an event is triggered, see the About CCH iFirm Taxprep Webhook help topic.
July 23, 2024 Release
CCH iFirm Taxprep Essentials, Advanced and Pro
T2, T3 and TF most recent returns are grouped into a single return manager entry
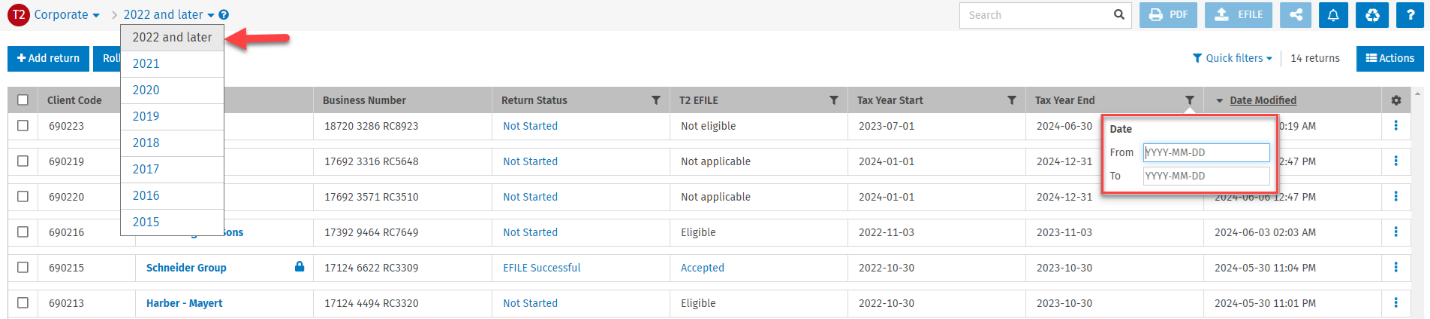
T2 return manager:
The return manager groups the 2022 and following tax years into a single entry. The returns are displayed based on the tax year start date.
The years included in the most recent return manager will be updated once per year.
In addition, the Tax Year column has been separated in two columns:
-
Tax Year Start
-
Tax Year End
These two columns allow you to view the tax year start and end dates of a return and filter returns based on that information.
T3 and TF (Forms) return manager:
The return manager groups the 2023 and following tax years into a single entry. The returns are displayed based on the tax year end date.
The years included in the most recent return manager will be updated once per year.
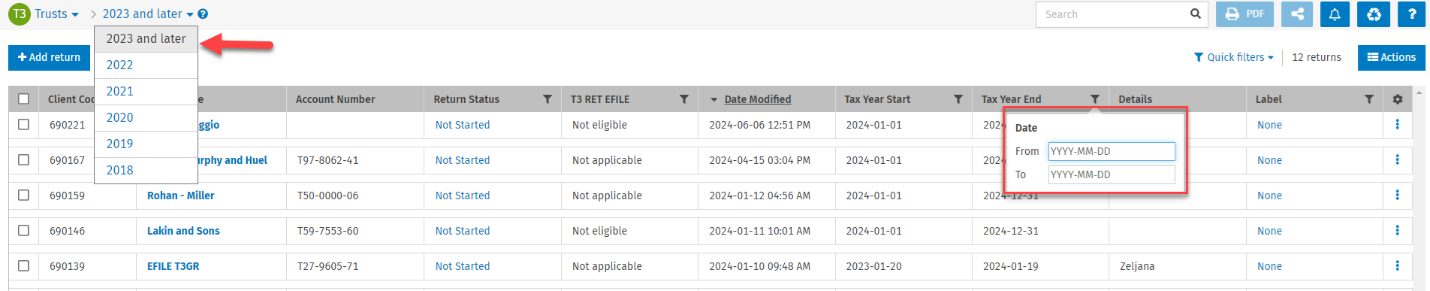
In addition, the Tax Year column has been separated in two columns:
-
Tax Year Start
-
Tax Year End
These two columns allow you to view the tax year start and end dates of a return and filter returns based on that information.
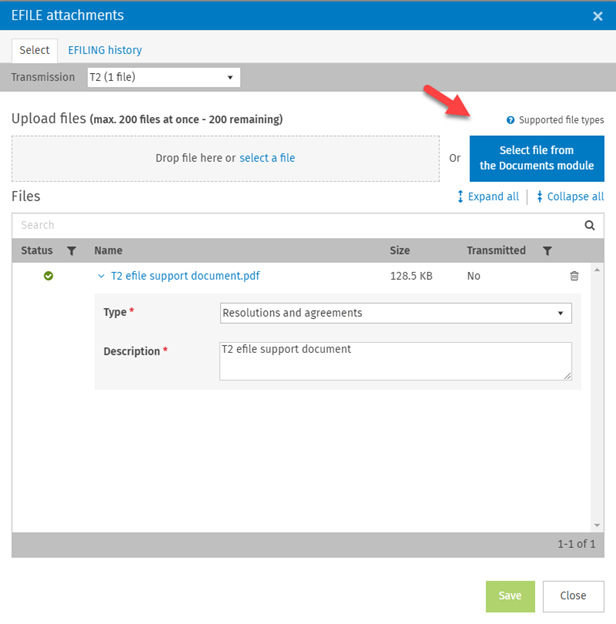
Ability to attach EFILE support documents from the CCH iFirm Documents module
EFILE support documents can be attached directly from the CCH iFirm Documents module.
June 7, 2024 Release
CCH iFirm Taxprep Essentials, Advanced and Pro
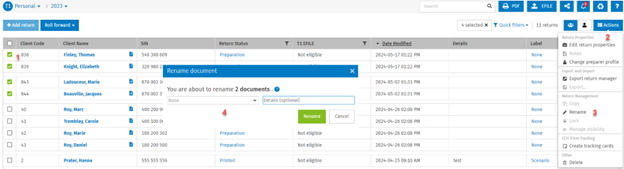
Ability to apply labels and details in bulk
Label and details can be applied or modified in bulk:
-
Select the returns for which the label and/or the details should be applied or modified.
-
Click the Actions button.
-
Click Rename.
-
Select the label and/or add details.
May 17, 2024 Release
CCH iFirm Taxprep Essentials, Advanced and Pro
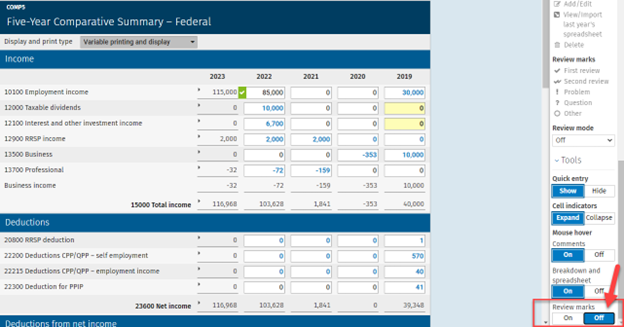
Hide information displaying on mouse hover
The cell metadata on mouse hover can now be enabled or disabled based on user preferences.
The section Mouse hover has been added to the right pane, allowing you to enable or disable the mouse hover for the following cell metadata:
-
Comments
-
Breakdowns and spreadsheet
-
Review marks
By default, the mouse hover will be enabled, and when hovering over a cell, information related to the added metadata will be displayed.
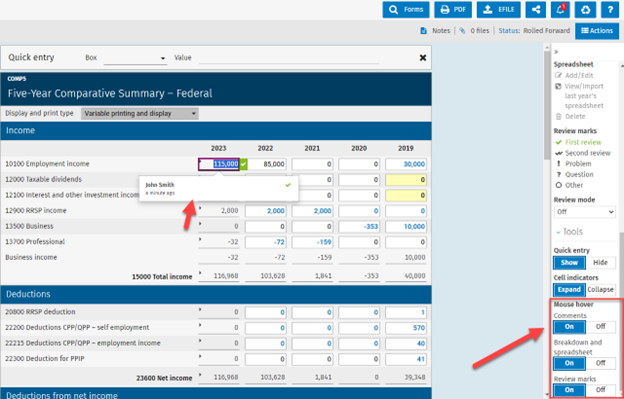
To disable the mouse hover, select Off for the metadata for which you do not want to see information on mouse hover:
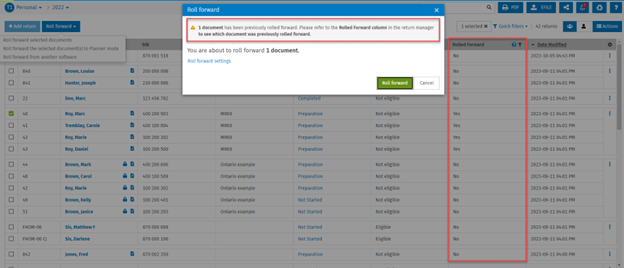
Warning message advising you that a tax return has already been rolled forward
In addition to the existing Rolled forward column that indicates if the tax return has been rolled forward to the subsequent year, a warning message has been added to advise you that the selected tax return(s) have already been rolled forward:
1 document has been previously rolled forward. Please refer to the Rolled Forward column in the return manager to see which document was previously rolled forward.
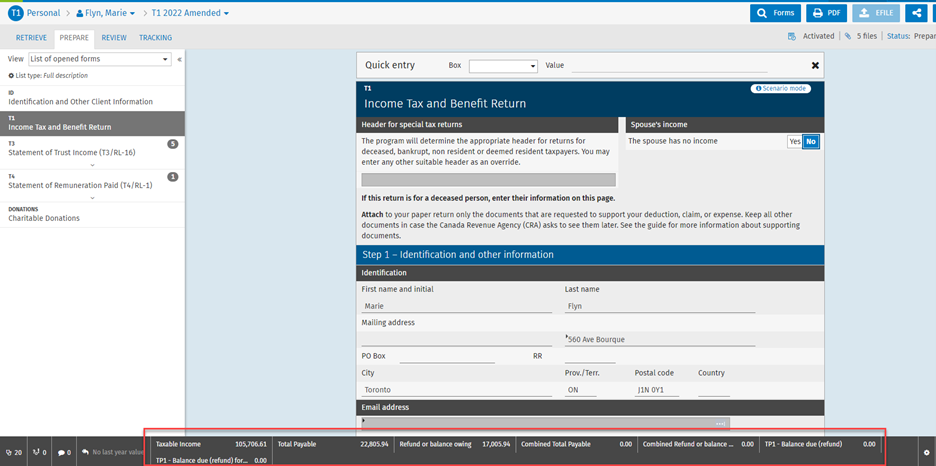
Customize the name of cells in the monitor
You can now customize the name of cells present in the monitor’s status bar.
To change the name of a cell in the monitor, right-click the cell that you want to modify and click Rename. Enter the new desired name and confirm the change.

Reset default value allows you to revert to the default description of the cell.
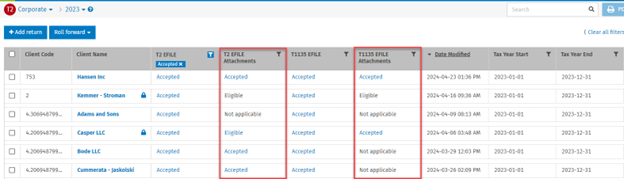
EFILE attachments status is presented in distinct columns
In the return manager and the Tracking tab of an open tax return, the EFILE attachments status is presented separately from the main electronic transmission. For example, in the return manager, the T2 EFILE and T2 EFILE Attachments columns show the EFILE status of both transmissions separately. By having separate columns, it is now possible to filter the returns based on the EFILE attachments status and access from the return manager the EFILE attachment transmission history by clicking the linked EFILE status.
In the Tracking tab of an open tax document, all supported EFILE attachments are presented in the different columns, allowing you to see their EFILE statuses.

PDF customization improvements
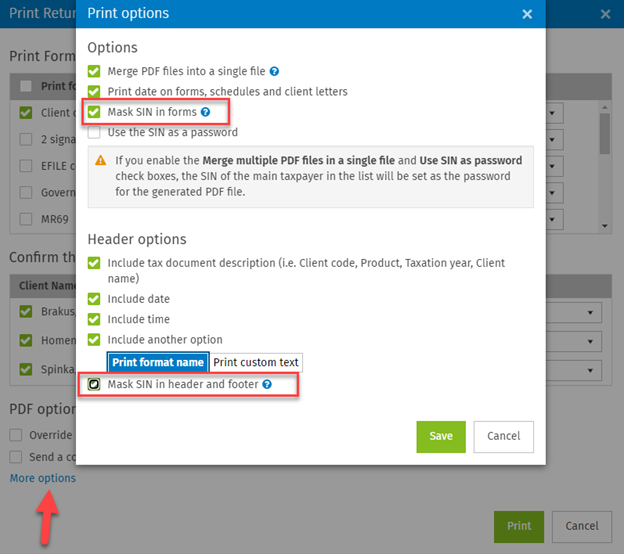
Ability to partially mask the social insurance number when printing T1 forms
In Settings > Taxprep > Customize PDF File > T1 – Personal, two options have been added, allowing you to mask the first five digits of the social insurance number (SIN) when printing a T1 return or a T1 form:
-
Mask SIN in forms
-
Mask SIN in header and footer

Note that these options are not selected by default.
The options can be modified when printing or publishing a return or a form by clicking the More options link.
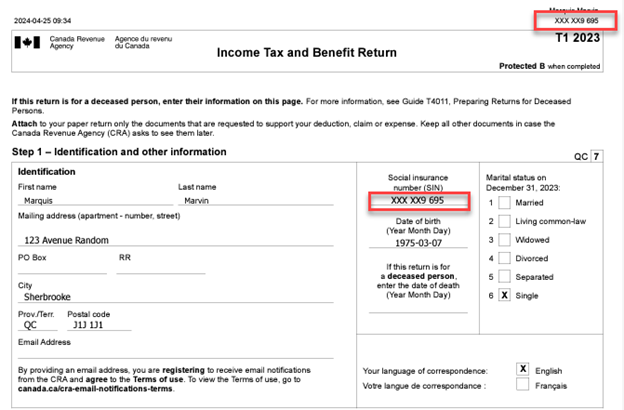
Note that due to CRA and Revenu Québec restrictions, the SIN cannot be masked on all forms. Please click here for more information.
Customizing PDF naming conventions for notices of assessment
In addition to customizing PDF names when printing a return or a form, it is now possible to customize PDF names when printing T1 or T2 notices of assessment from Settings > Taxprep > Customize PDF File > T1 – Personal or T2 – Corporate.
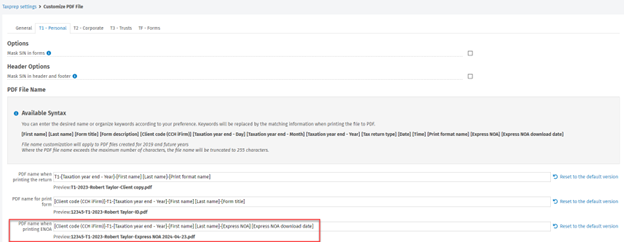
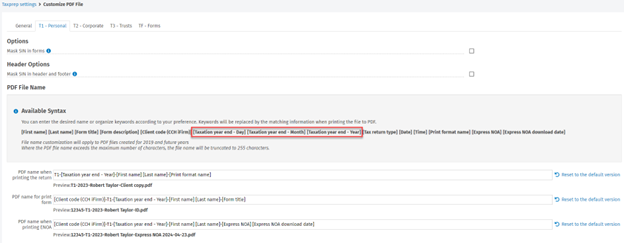
Additional syntax available to customize PDF naming conventions
The Taxation year syntax has been divided in three different parameters, providing more flexibility for the customization of PDF naming conventions:
-
Taxation year end – Day
-
Taxation year end – Month
-
Taxation year end – Year
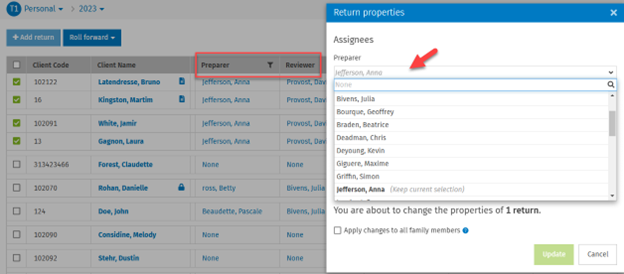
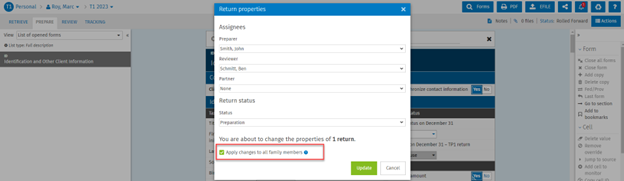
Ability to apply assignees and return statuses to all family members simultaneously
Note: The ability to apply assignees to all family members simultaneously is only available with the Pro package.
When working in a return, a user can modify the assignees and the return status for all family members simultaneously. The option Apply changes to all family members has been added to the Return properties modal, allowing to apply the changes for assignees and the return status for all family members simultaneously.
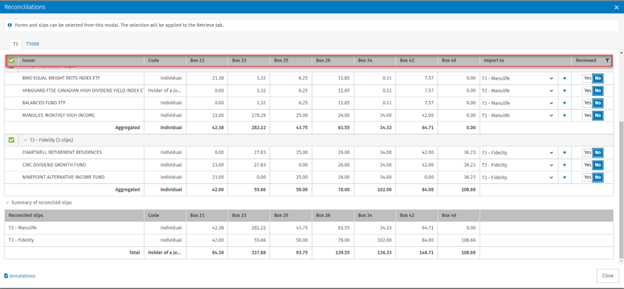
The header in the Auto-fill-my return reconciliations modal is always visible
The header in the Auto-fill my return reconciliations modal is now always visible when you scroll down in the dialog box, allowing you to see the name of each column:
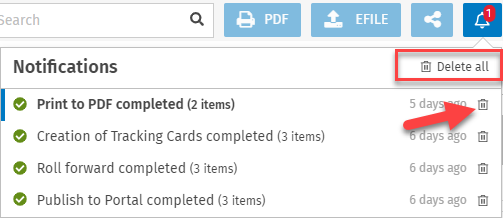
Ability to delete notifications
The notifications that appear in the notification centre can now be deleted. You can choose to delete all notifications by clicking Delete all or individual notifications by clicking the Delete icon at the top right of each notification.
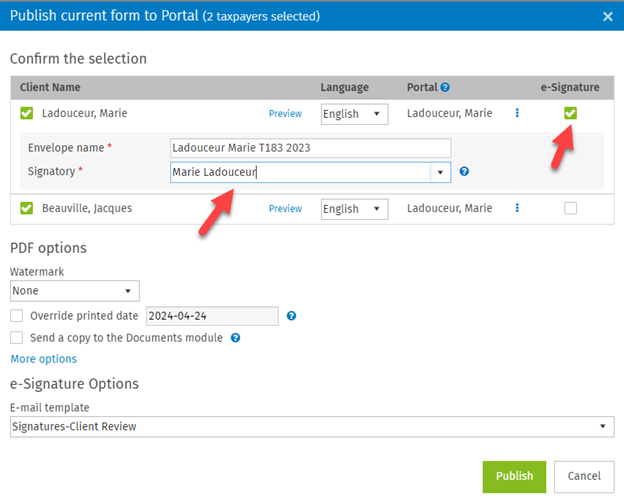
The digital signature can be published even when the state of the portal invitation is Pending
The forms can be published for digital signature even when your client has not accepted the CCH iFirm Portal invitation yet.

CCH iFirm Taxprep Advanced and Pro Only
Ability to bookmark forms for all products
You can now bookmark forms for all products. These forms will open automatically when creating or opening a return and will always be displayed on top of the list of forms.
To add a form to your bookmarks, click Add to bookmarks in the right panel of the return.
A ribbon will be added to the top left corner of the bookmarked forms’ names.
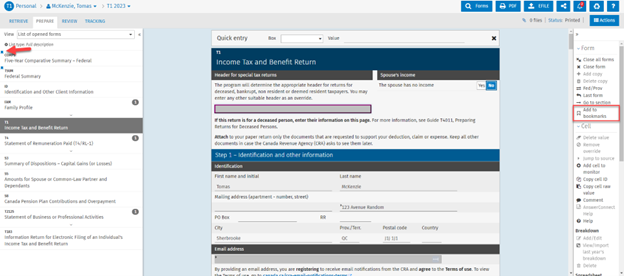
When a form is added to the bookmarks, the button in the right panel will change to Remove from bookmarks.
You can remove forms from the bookmarks by clicking Remove from bookmarks.
CCH iFirm Taxprep Pro Only
Label feature improvements and modifications
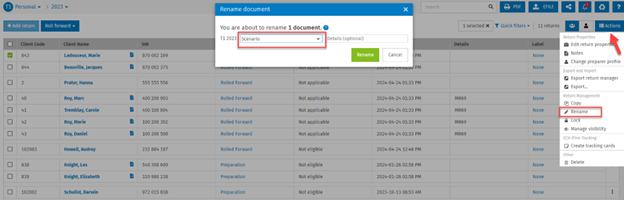
Label moved to Rename document dialog box
The label has been moved from the Return properties modal to the Rename document dialog box in order to be identical to the Details feature. The label can be applied to a tax document from the Actions > Rename dialog box.
Labels available when creating a copy of a return:
When creating a copy of a return, the label can be applied from the Copy document modal.

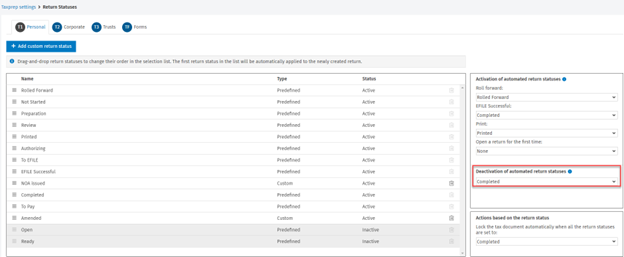
Ability to deactivate automated return statuses when the return reaches a specific preparation step
The Activation of automated return statuses feature allows you to automate the change of the tax return statuses based on four different tax return actions.
The new Deactivation of automated return statuses option provides you with more flexibility by allowing you to deactivate automated return statuses when the return reaches a certain preparation step.
For example, if the automation of the return statuses is set in the following manner:
-
When the return is rolled forward, the return status will change to Rolled Forward.
-
When the return is printed, the return status will change to Printed.
-
When the return is successfully transmitted (EFILE), the return status will change to Completed.
-
The deactivation of automated return statuses is set to Completed.
In the example above, if a user decides to print a return when the return status is Completed, the return status will remain to Completed.
New tax security roles
The following security roles have been added or modified to manage user rights:
EFILE
The Tax – Product – Returns – EFILE, Access transmission history security role has been split in different security roles.
Tax – T1 – Returns – EFILE
Tax – T2 – Returns – EFILE
Tax – T3 – Returns – EFILE
Tax – TF – Returns – EFILE
With these security roles, users can EFILE returns.
Tax – T1 – Returns – Access transmission history
Tax – T2 – Returns – Access transmission history
Tax – T3 – Returns – Access transmission history
Tax – TF – Returns – Access transmission history
With these security roles, users can consult the transmission history specific to each product.
Note: The user to whom the Tax – Product – Returns – EFILE, Access transmission history security role had been assigned will be assigned these two security roles by default.
Add and copy a return
The Tax – Returns – Add and copy security role has been split in two different security roles:
Tax – Returns – Add
With this security role, users can create a tax return.
Tax – Returns – Copy
With this security role, users can copy a tax return.
Note: The user to whom the Tax – Returns – Add and copy security role had been assigned will be assigned these two security roles by default.
Import data using T1/T2 Auto-fill service
Two tax security roles have been added to the Import data using T1/T2 Auto-fill service feature:
Tax – T1 – Returns – Import CRA/RQ Data
Tax – T2 – Returns – Import CRA Data
With these security roles, users can import into a T1 or T2 tax return the data that was downloaded using the CRA’s Auto-fill my return service and Revenu Québec’s Tax Data Download service.
Note that the Tax – T1 – Returns – Import CRA/RQ Data and Tax – T2 – Returns – Import CRA Data security roles will not be assigned by default to any users’ specific security profiles but will be assigned to predefined and custom security profiles.
Web API additional endpoints
-
Delete documents endpoint (POST)
The Delete documents endpoint is now available, allowing you to delete documents and move them to the recycle bin. See the list of endpoints in our Help Centre. -
Couple and Uncouple endpoints (POST)
The Couple and Uncouple endpoints are now available, allowing you to add a spouse or a dependent to a tax return or to uncouple a spouse or a dependent from a tax return. See the list of endpoints in our Hep Centre Centre. -
Get data by using predefined filters from the Review tab (POST)
This endpoint retrieves the value of one or more cells from the document according to the chosen review filter. The filter categories that are supported are Cells with data, Cells with review marks and Cells with comments. See the list of endpoints in our Help Centre.
December 15, 2023 Release
CCH iFirm Taxprep Essentials, Advanced and Pro
CCH iFirm Tracking now integrated with CCH iFirm Taxprep T1
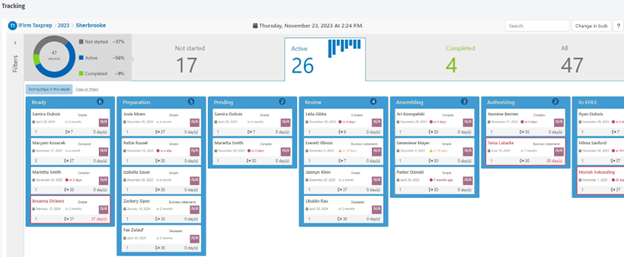
CCH iFirm Tracking is now integrated with CCH iFirm Taxprep T1 and allows you to analyze your T1 tax season in real time, from anywhere and anytime, and manage your workload more efficiently by creating cards for any T1 tax return.
-
Know in real time if you are on track to complete outstanding returns by their due dates.
-
See visual alerts that let you know when returns remain in a given stage for longer than a set number of days.
-
View the history of all changes made to the Tracking card for any return.
-
Identify over-assigned and under-assigned employees and make changes to balance workloads and reduce bottlenecks.
-
Determine return categories for each return and set complexity levels for each of these categories.
-
Customize CCH iFirm Tracking based on your own workflow by creating every step of your tax preparation process.
For more information about CCH iFirm Tracking, please click here.
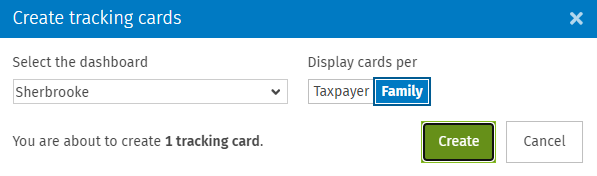
Here are the steps to create a CCH iFirm Tracking card and link it to a tax return:
-
Click the Actions button, followed by Create tracking cards.
-
If you have more than one dashboard, select the dashboard into which the card will be created. Select whether to create a card per taxpayer or per family. If the Family option is chosen, all family members will be included on a single card.
-
Click Create.
When the card(s) have been created, you will be advised from the notification centre.
Note: When a new tax document is created, CCH iFirm Tracking cards can be created at the same time or can be created in bulk from the return manager (up to 100 cards at a time).
Once the tax document is linked with a CCH iFirm Tracking card, the applicable content in the CCH iFirm Tracking card will always be synced with the tax document. For example, if the return status is changed in the card, the tax document in CCH iFirm Taxprep will be updated automatically. Similarly, if the return status is changed in the tax document, the CCH iFirm Tracking card will be updated with the same status.
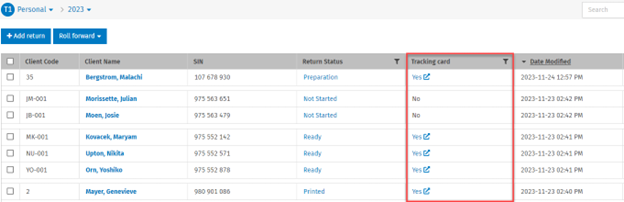
In the return manager, the new Tracking card column will display Yes if the tax document has a CCH iFirm Tracking card created for it. Click Yes to open the CCH iFirm Tracking card in a separate tab.
From an open tax document, the Tracking icon will display in the breadcrumb, and by clicking it, the CCH iFirm Tracking card for the taxpayer will open in a separate tab.
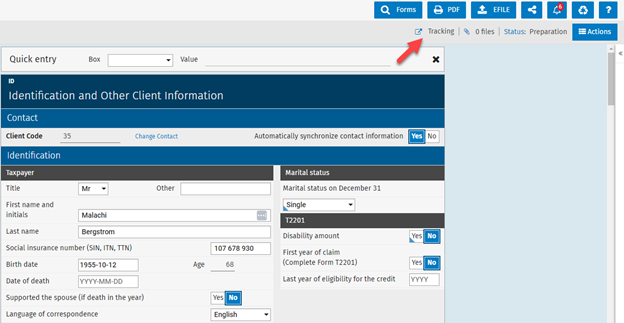
Similarly, a user can open the taxpayer’s tax document by clicking the iFirm Taxprep button on the CCH iFirm Tracking card.
T4FHSA and RL-32 slips (first home savings account) – Internet file transfer (XML) service transmission
T4FHSA and RL-32 slips (first home savings account) can be electronically uploaded on the federal and provincial websites by using the Filing by Internet file transfer (XML) service. For more information, consult the CCH iFirm Taxprep Forms release note.
December 8, 2023 Release
CCH iFirm Taxprep Essentials, Advanced and Pro
Automatic numbering of slips
Each slip is automatically numbered to better differentiate each slip copy.
Cells added to the monitor are used for subsequent tax years
Any cell added to the monitor will be in effect for subsequent years. As a result, there will be no need to manually add custom fields when the new tax year’s version is released.
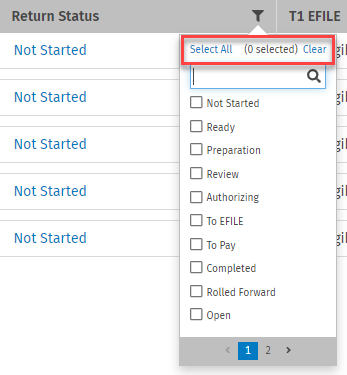
Ability to Select All or Clear a return manager filter
The Filters modal in the return manager contains a new option to Select all or Clear selections in the filters.
Note: This option is not available for the Preparer, Reviewer and Partner roles.
CCH iFirm Taxprep Advanced and Pro Only
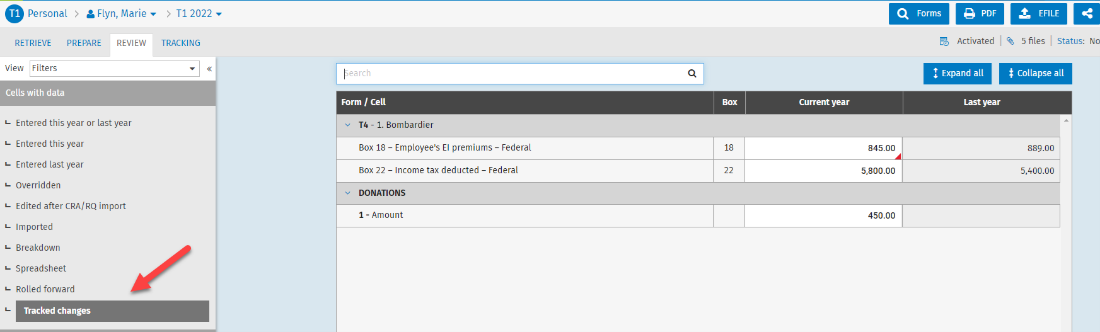
Activate the Track changes feature and identify modified tax data
The Track changes feature allows you to identify a tax value that was modified since Track changes was activated.
To activate Track changes, click the Actions button, followed by Activate Track changes. Once the Track changes feature is activated, any value that is modified in a tax field will be listed in the Tracked changes filter, which is available from the Prepare and Review tabs.
Prepare tab:
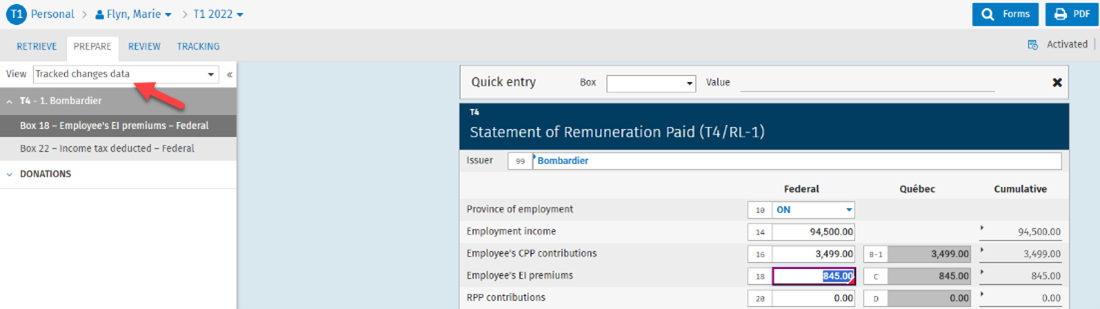
Review tab:
Once Track changes is activated, the icon will appear in the breadcrumb.
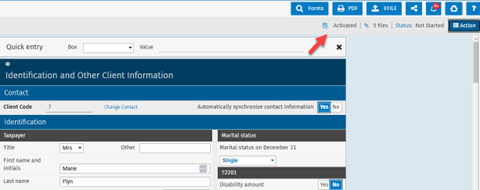
To stop tracking changes, click the icon in the breadcrumb and deactivate it. Alternatively, from the Actions button, click Deactivate Track changes.
When the Track changes feature is deactivated, the list of modified data will be deleted from the Tracked changes filter.
The following security role is required to activate or deactivate the Track changes feature: Tax – Returns - Activate and Deactivate track changes.
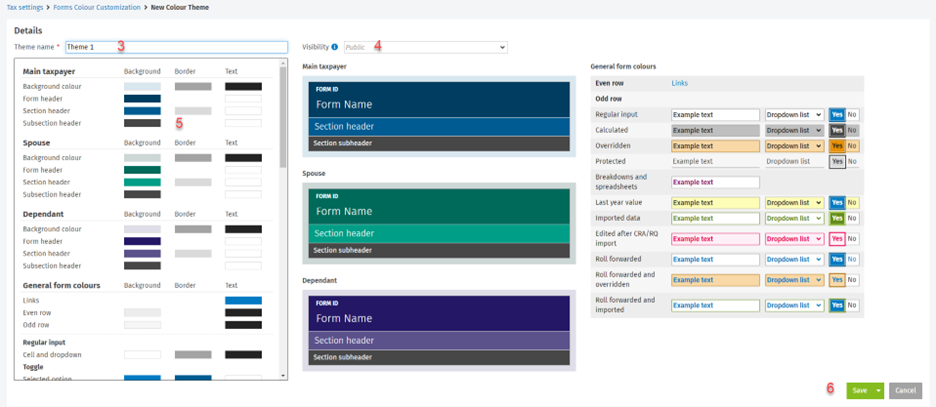
Customize the colours of the tax forms’ components
Customize your tax forms’ colours by creating custom colour themes. Each user can select a preferred theme.
Here are the steps to create custom colour themes:
-
From Settings/Taxprep/Forms Colour Customization, click Add a custom theme.
-
Create the theme from a blank template or from an existing template (predefined or custom).
-
Specify the theme name.
-
Specify the visibility type: Public (visible to all users) or Private (visible to the user who creates it).
-
Change the colours of any of the available components.
-
Click Save.
-
From Settings/Users/Name of the user/Taxprep/Colour Customization, select the desired colour theme and save it.
Two predefined colour templates exist: Default and Dark.

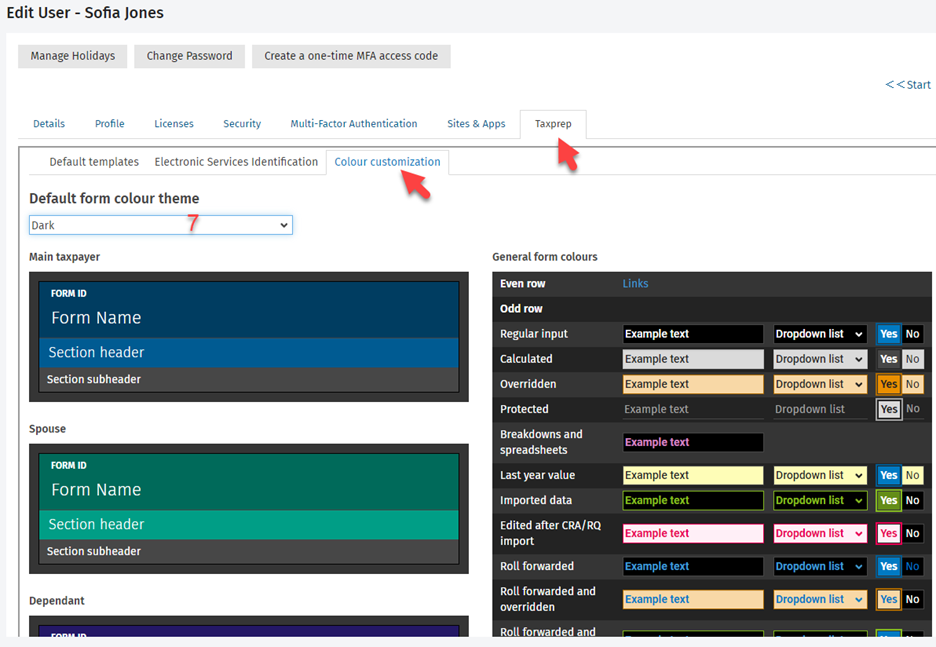
When the user opens a tax document, the selected theme will be applied to the tax forms’ colours.
The following security role is required to create custom themes: Tax – Settings - Forms colour customization.
T2 linked return can be opened even if a user doesn’t have access to all linked returns
When a T2 return is linked to other associated returns (as part of the Import and link corporations feature), a user will be able to open a T2 return even if he or she doesn’t have contact access to all linked returns.
CCH iFirm Taxprep Pro Only
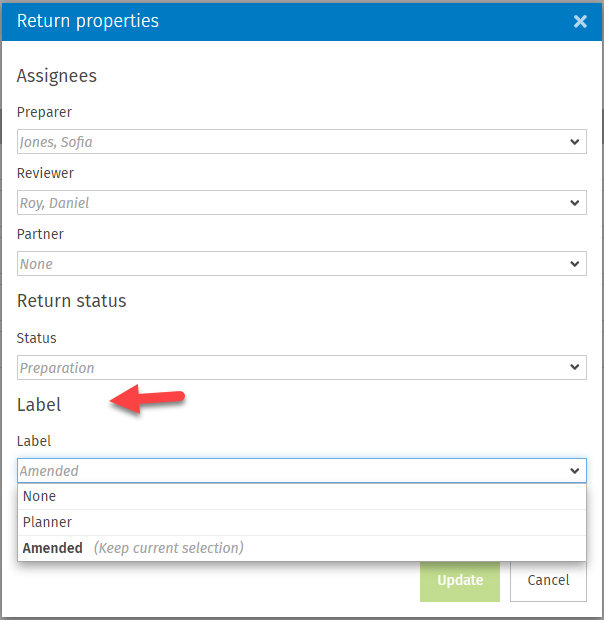
Custom labels allow standardization of the additional details added to a tax document
In addition to the Details column that allows you to add additional information to a tax document, the new Label column facilitates the standardization of the list of categories that can be added to a tax document. Here are the steps to create custom labels:
-
From Settings/Taxprep/Labels, create the labels per product by clicking Add custom label.
-
Enter the name of the label.
-
Indicate the status. If the status is Inactive, it will not be possible to apply the label to the tax document.
-
Select the mode. Please see the next note for more details about the mode.
-
Click Save.

Two predefined labels exist for each product, and these predefined labels can be renamed but cannot be made inactive. For T1, the None and Planner predefined labels are provided, while for the other tax products (T2, T3 and Forms), the predefined labels are None and Scenario.
By default, the None predefined label is applied to all tax documents except T1 planner files, where the Planner label will be applied.
The labels created from the Settings view can be applied to a tax document from the Actions/Edit Return properties modal:
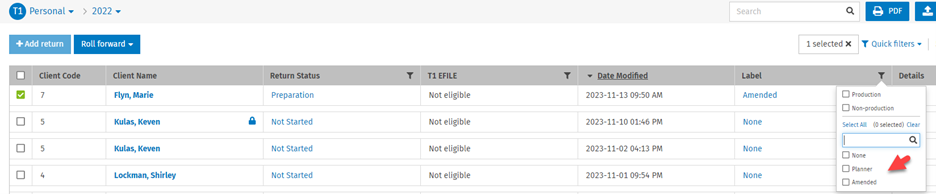
The Label column in the return manager indicates which labels are applied to a return and allows you to filter the returns based on these labels:
The Remove the column Details from the return manager option has been added in Settings/Taxprep/Other Settings, allowing you to hide the Details column for all users. This will force users to use the standardized labels to identify the type of tax document.
Note that even if the Details column is hidden, users will still be able to add a note to any tax document to provide additional information when needed.
The following security roles are required to add, edit or delete labels:
Tax – Settings – Labels – Add, Edit
Tax – Settings – Labels – Delete
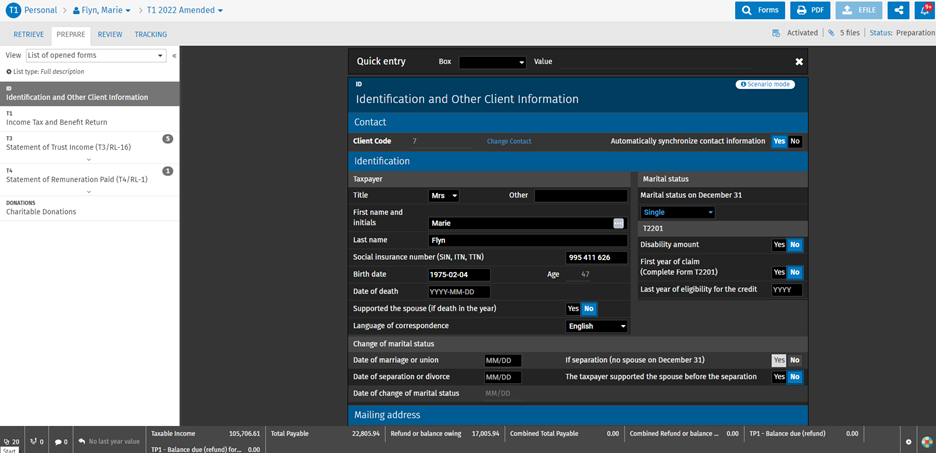
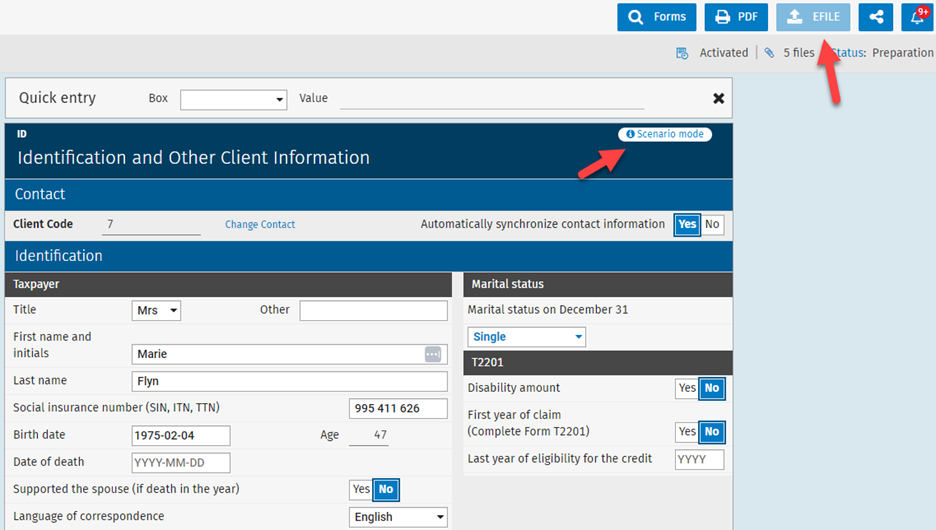
Scenario mode blocks users from production actions in a tax document
Scenario mode can be applied to any tax document created for scenario/planning purposes and will prevent accidentally filing the wrong return to government authorities. Scenario mode can be applied by using labels.
Predefined or custom labels have two modes:
-
Production
-
Non-production

For any custom label, you can decide which mode should be selected.
If a label applied to a tax document has a Non-production mode, the tax document will be in Scenario mode and the following will apply:
-
The Scenario mode tag will appear on screen, in the header of any form.
-
The EFILE button will be disabled for that tax document.
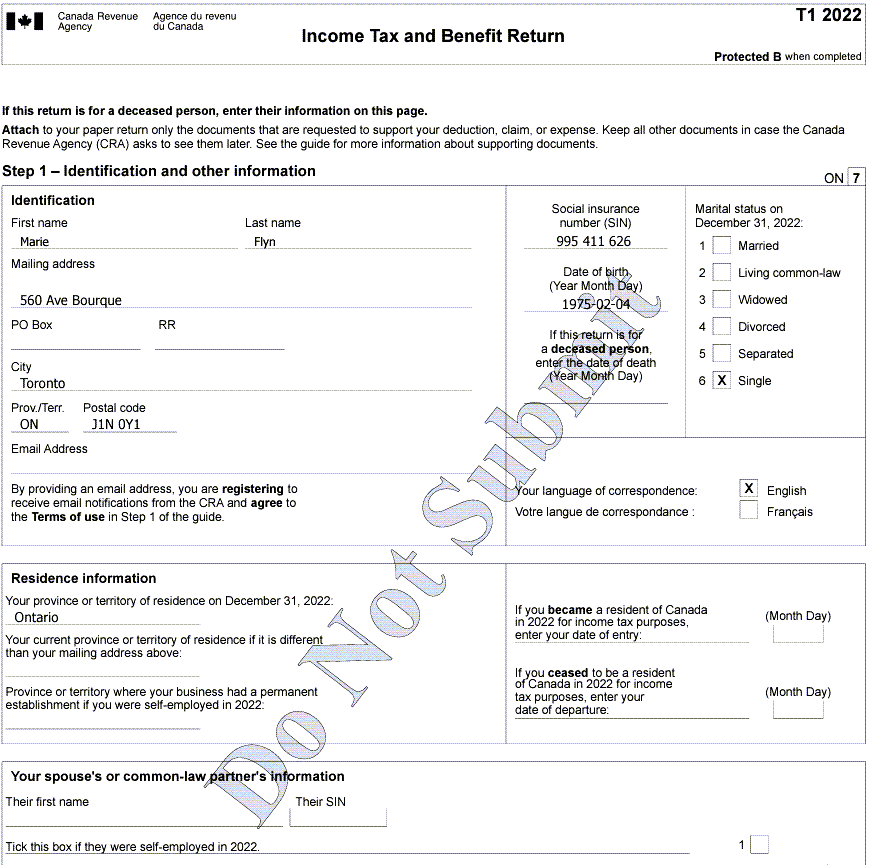
-
Any print output will have a Do not submit watermark.
From the return manager, you can filter the tax returns based on the labels or the production type:

Note: The Planner label will be added and the EFILE button will be disabled by default on a T1 tax document that is rolled forward to Planner mode, while the printout will contain the Planner watermark.
New security roles to manage visibility of SIN or Account Number columns in the return manager
The following security roles were added to allow you to manage the rights to view the SIN column in T1 or the Account Number column in Forms:
Tax – T1 – Return Manager – View SIN column
Tax – TF – Return Manager – View Account Number Column
Without these two security roles, the user will not be able to view the SIN column in T1 or the Account Number column in Forms in the following sections of the application:
-
T1 and/or Forms return manager
-
Existing Contact tab in the Add return modal
-
Roll Forward report from the notification centre
-
Import report from the notification centre
-
The Select a return modal is accessible in the Import bankruptcy or the Import Statements options from the Retrieve tab (T1 only)
October 6, 2023 Release
CCH iFirm Taxprep Essentials, Advanced and Pro
New label for the Tax module
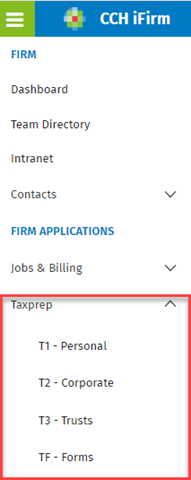
To standardize with other module names, we have changed the label of the Tax module. The left pane in CCH iFirm now displays Taxprep at the first level and under Taxprep, the following products are listed:
T1 - Personal
T2 - Corporate
T3 - Trust
TF - Forms
June 2, 2023 Release
CCH iFirm Taxprep Essentials, Advanced and Pro
Ability to electronically transmit Schedule 89, Request for Capital Dividend Account Balance Verification
The electronic transmission of Schedule 89 is now available.
Schedule 89 is transmitted separately from the T2 return and from Form T2054. However, the electronic transmission of this schedule has been implemented in the program so that the T2 return and Schedule 89 can be transmitted at the same time.
Section Electronic filing has also been added in Schedule 89. The electronic status will be displayed at the end of this section. When the status is Eligible, you can transmit Schedule 89.
It is possible to attach supporting documents to Schedule 89 and to EFILE them. To attach supporting documents for EFILING purposes, click the Actions button, select EFILE attachments, and follow the instructions indicated in the EFILE attachments modal.
Ability to electronically transmit Form T2054, Election for a Capital Dividend Under Subsection 83(2)
The electronic filing of Form T2054 is now available.
Form T2054 is transmitted separately from the T2 return and from Schedule 89. However, the electronic transmission of this form has been implemented in the program so that the T2 return and Form T2054 (as well as Schedule 89, if applicable) can be transmitted at the same time.
Section Form T2054 filing methods has been added at the top of the form, allowing you to select the form for electronic filing.
It is possible to attach supporting documents to Form T2054 and to EFILE them. To attach supporting documents for EFILING purposes, click the Actions button, select EFILE attachments, and follow the instructions indicated in the EFILE attachments modal.
Note that the administrator’s resolution must always be attached to support Form T2054. You can attach it electronically within 24 hours of the form being accepted.
If you have never filed Form T2054 or Schedule 89 before, or if you disagree with either the amount shown in your CDA balance on the My Business Account website or with your recently received CDA balance from the Canada Revenue Agency, you should transmit Schedule 89 at the same time you transmit Form T2054.
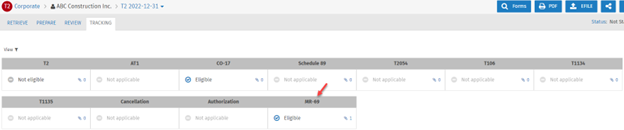
Ability to electronically transmit T2 MR-69
The electronic transmission of Form T2 MR-69 is now available.
A 2-step checklist has been added to the form to help you prepare and electronically transmit an MR-69 form. By providing answers to all statements in the checklist, you are making sure that the mandate is compliant and meets the requirements of Revenu Québec. This will prevent you from being prompted by an error code at the time of transmission.
The first step helps you complete the form correctly before printing it, so that the printed copy meets the requirements of Revenu Québec and contains a 2D bar code when the copy is signed by the taxpayer or representative. Revenu Québec requires Form MR-69 in French to be valid.
The second step covers the requirements that should be complied with to be able to electronically transmit the mandate and the attached document(s).
The electronic status will be displayed at the end of the checklist. When the status is Eligible, you can transmit the MR-69 form and attached documents.

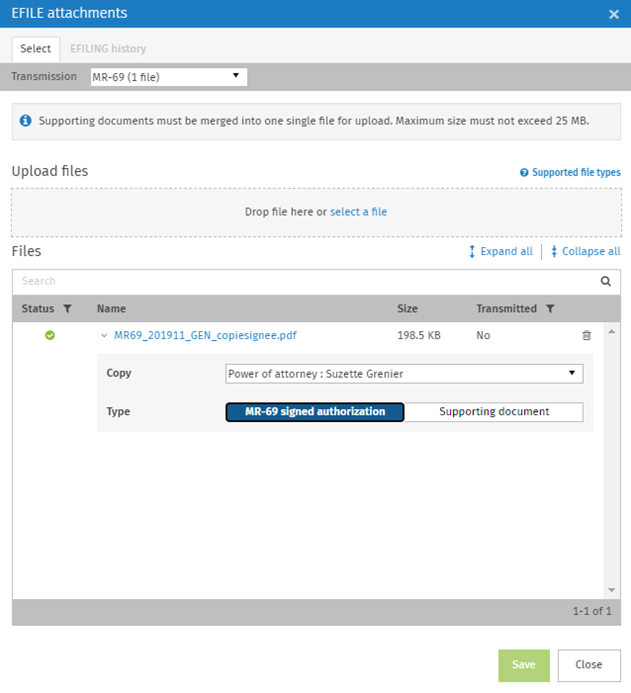
Revenu Québec requires that a PDF document of all four pages of the signed Form MR-69 be transmitted along with the authorization request. It is possible to attach supporting documents as well. To attach the PDF document for EFILING purposes, click the Actions button, select EFILE attachments, and follow the instructions indicated in the EFILE attachments modal.
As any other EFILE transmissions, MR-69 EFILE details can be viewed from the TRACKING view.
T1 and T2 Auto-fill (AFR) enhancements
Several enhancements have been made to the Auto-fill return feature:
Retrieve tab
-
The Annotations modal has been added to allow you to leave comments related to AFR.
-
The column Imported on indicates the date on which data was imported into the tax return, where applicable. The forms and slips already imported into the return will not be selected by default for another import. You can use this column to filter the results based on whether the forms and slips have been imported.
-
The column Reviewed allows you to track whether the downloaded data in the forms has been reviewed. You can filter this column to display only forms and slips that have been reviewed or not reviewed.
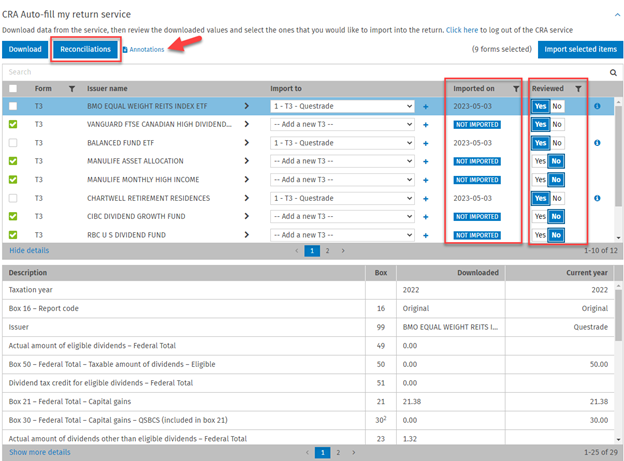
Reconciliations modal for T3, T5008 and RL-16 slips
-
Separate tabs have been created for each type of reconciliation (i.e., T3, T5008 and RL-16 slips). (See #1 in the image below.) The RL-16 tab can be found in section Import using the Tax data download service.
-
The number of columns displaying the values reported on the downloaded slips has been expanded to facilitate reconciliation. (See #2 in the image below.)
-
Different sections have been created:
Section Unreconciled slips lists all the downloaded slips that have not been reconciled yet. (See #3 in the image below.)
A separate section has been created for each consolidated slip. Each component of the downloaded slip is displayed, along with the consolidated totals for each column, which facilitates reconciling with the slip received by the taxpayer. When a section of a consolidated slip is selected, each component of the downloaded slip under that section will be selected for import to the return. (See #4 in the image below.)
Summary of reconciled slips. (See #5 in the image below.)
-
The column Import to allows you to easily select or modify the appropriate consolidated slip for each downloaded slip. (See #6 in the image below.) This selection can also be made in the main Auto Fill My Return screen.
-
The column Reviewed has been added to track whether the slips have been reviewed. This column can be filtered. (See #7 in the image below.)
-
The Annotations modal has been added to allow you to leave any comments related to the reconciliation of slips. (See #8 in the image below.)

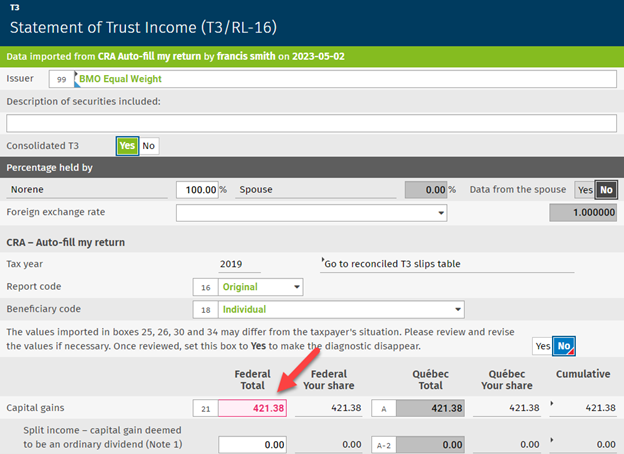
Forms
-
If a user changes data that has been imported from AFR, the display colour of the field value will change from green to pink, and the field’s background will be pink.
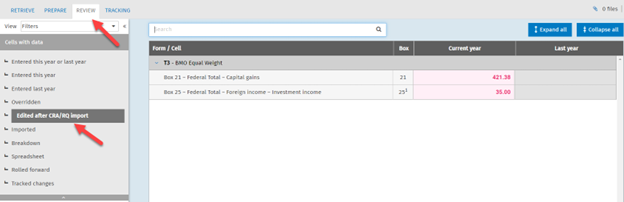
Review tab
-
The filter Edited after CRA/RQ import has been added in the Review tab. This filter will identify any value imported from AFR that has been changed by a user.
Customize the order of the columns in the return manager
The order of the columns in the return manager can be customized per user, per product and per year. Click the gear button and:
-
Click Edit column order.
-
Reorder the columns with the drag-and-drop function.
-
Save the changes.
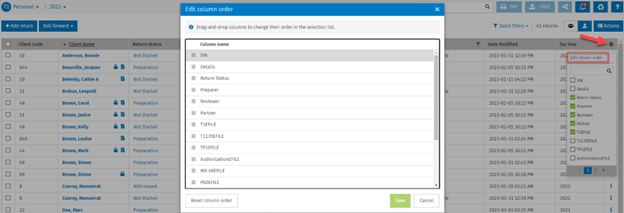
If a custom filter is applied, every custom column that is associated with that filter can be reordered as a block.
The button Reset column order allows you to reset the order of the columns to the predefined or initial order.
Note: The Client Code and Client Name columns cannot be reordered.
Addition of a review mark
A fifth review mark called Other has been added. The shortcut for this review mark is Ctrl+5. When applied to any field, the field will be surrounded by a red rectangle.
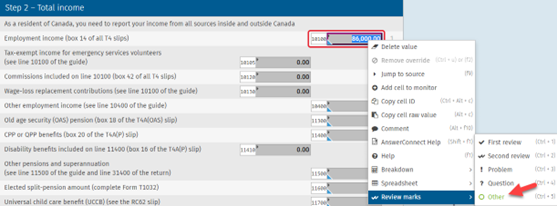
The following existing review marks can be applied to any tax field:
-
First review (Ctrl +1)
-
Second review (Ctrl +2)
-
Problem (Ctrl + 3)
-
Question (Ctrl + 4)
-
Other (Ctrl+5)
New roll forward option to retain last year’s open forms in Prepare tab
The option Keep the forms open has been added to the Roll Forward Settings, allowing you to decide if the opened forms need to be rolled forward to the subsequent taxation period. By default, Keep the forms open is not selected. It can be modified through Settings/Taxprep/Roll Forward Settings to be applied to all tax returns during the roll forward process or it can be modified from the Roll forward modal by clicking Roll forward setting.

If this new roll forward option is selected, all forms that were opened in the Prepare tab will remain open after the roll forward, and you will not need to reopen them in the current tax return.
Set a warning message for a user who overrides a calculated cell
From Settings/Taxprep/Tax Forms Settings, select Show a warning message whenever an automatically calculated cell is overridden.

If this option is selected, the following warning message will appear when a user overrides a calculated cell.
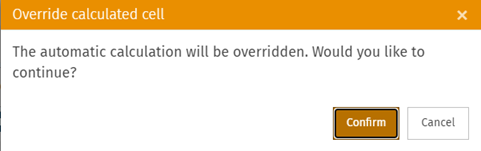
By default, this new option is not selected.
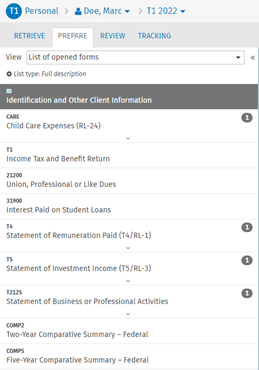
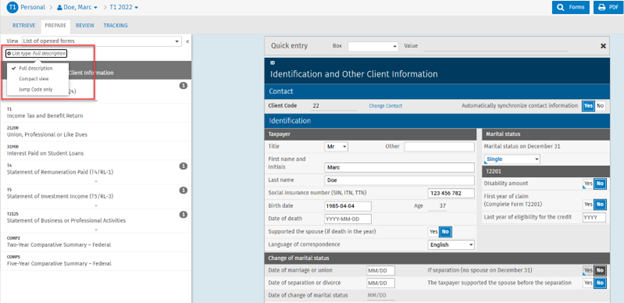
Choose between three different display options in the list of open and applicable forms of the Prepare tab
There are now three different display options for open and applicable forms in the Prepare tab:
-
Full description
-
Compact view
-
Jump Code only
To select the desired view, click List type:...
CCH iFirm Taxprep Pro Only
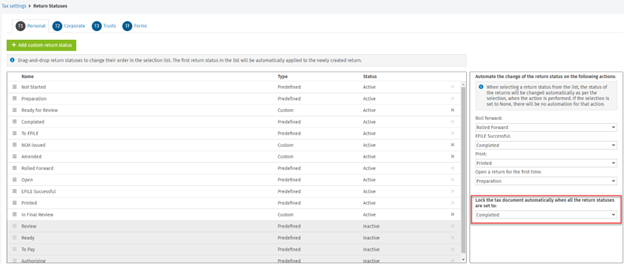
Automatically lock tax documents based on the return status
To automatically lock a tax document, go to Settings/Taxprep/Return Statuses and specify the return status that will trigger the automatic lock action for a return. Note that for the T1 application, the return status must be specified for every tax return for the family (e.g., Completed) in order for the tax document to be automatically locked.
A new security role that manages the application of custom filters from the return manager
The following security role has been added to manage users’ rights with respect to applying the custom filters from the return manager:
-
Tax – Return Manager – Custom Filters – Apply
Users with this security role can select and apply custom filters from the Quick filters drop-down menu of the return manager to filter the list of returns based on the conditions defined in the selected custom filter. Without this security role, users can’t see the Custom Filters section from the Quick filters view in the return manager.
Note that the Tax – Return Manager – Custom Filters – Apply security role will not be assigned by default to any users’ security profiles. You will need to assign this security role to any user that should be allowed to apply the available custom filters from the return manager.
There are now four available security roles relating to the Custom filter feature:
-
Tax – Return Manager – Custom Filters – Apply
-
Tax – Settings – Public Custom Diagnostics and Custom Filters – Add, Edit
-
Tax – Settings – Public Custom Diagnostics and Custom Filters – Delete
-
Tax – Settings – Public Custom Diagnostics and Custom Filters – Roll Forward
Web API additional endpoints
-
Return Assignees endpoint
The Return Assignees endpoint is now available, allowing you to apply or update the assignee(s) of the returns (preparer, reviewer or partner). See the list of endpoints in our Help system.
-
Recycle bin endpoint
The Recycle bin endpoint is now available, allowing you to obtain a list of all tax documents that have been deleted and are in the recycle bin. See the list of endpoints in our Help system.
January 27, 2023 Release
CCH iFirm Taxprep Essentials, Advanced and Pro
Digital signature feature – A T183 column added to the T3 return manager, allowing an easy way to monitor digital signature status
To streamline your signature process, a T183 column has been added to the T3 return manager, allowing you to easily keep track of the digital signature status of Form T183. This column already exists in T1 and T2 return managers.
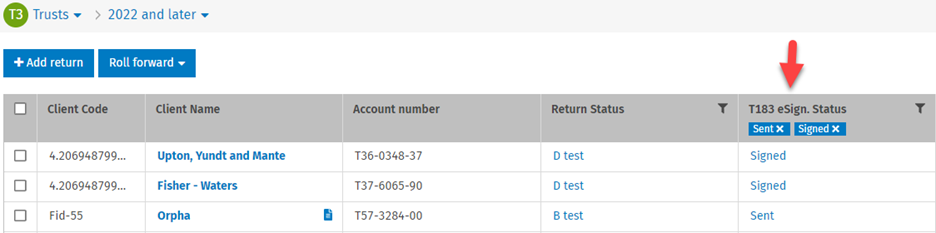
T183 – Digital signature time stamp automatically updated in the T3 product
If you are using the electronic signature feature in CCH iFirm Portal, the fields in the Electronic signature section of Form T183 of a T3 return are now automatically completed. The T183 Electronic signature section is automatically updated with the time stamp for T1, T2 and T3 products.
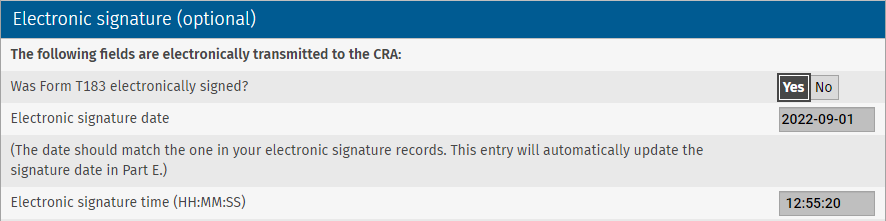
Electronic filing of T3RCA returns
As soon as the CRA transmission services will open in February, it will be possible to transmit a Retirement Compensation Arrangement (RCA) Part XI.3 Tax Return (Jump Code: T3RCA) using the EFILE service.
CCH iFirm Taxprep Advanced and Pro Only
Custom filters feature allows you to search for the tax returns based on user-defined specific conditions
In addition to custom diagnostics, now it is possible to also create the custom filters that will allow you to search for the taxpayers from the return manager based on user-defined specific conditions, for example, search for any taxpayer having the rental income or search for the 71-year-old taxpayers.
The custom filters can be created for each tax product (T1, T2, T3 and Forms). Once you have navigated to Settings/Taxprep/Custom Diagnostics & Custom filters, only a few easy steps are required to create custom filters or custom diagnostics and custom filters together:
-
Click Add custom diagnostic / custom filter.
-
Select a blank custom filter or an existing custom filter in the Create from drop-down list.
-
The Type of custom item drop down selection will depend on what you chose in Step 2. In the example below, Custom Filters will be selected, but it can be modified for Diagnostics or Custom diagnostics and filters.
-
Enter the custom filter name.
-
Enter the custom filter description.
-
Enter the custom filter conditions
-
Select the cells that will be displayed in the return manager as columns. Column name description can be modified, allowing you to enter your own description.

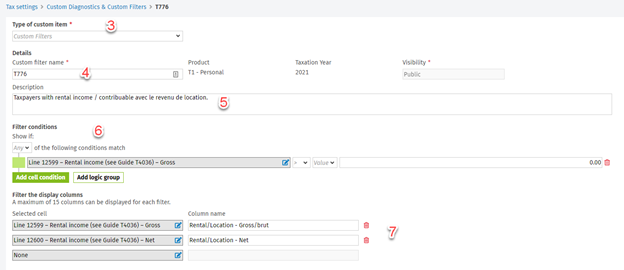
Note: The steps can be slightly different if you create a custom diagnostic and a filter together. In this case, additional fields need to be completed such as the Diagnostic text field.
The custom filters that you have created will be available in the return manager under the Quick filters menu. Once the custom filter is created, it will take up to one day to be available for use. The filter that is not available yet will be disabled and a hover message will indicate: This custom filter will be available tomorrow.

To apply a custom filter, click Quick Filters from the return manager and select the desired custom filter. The applicable tax returns will be displayed in the list, including the columns that you set to be displayed with the custom filter (Step 7). The columns displayed in the return manager can be hidden if you click the gear button.

If the Group list by family view is used for T1, family member tax returns that are not applicable for a particular filter will be displayed in the list, but the mention N/A will be displayed, and the information for the family members that are not applicable will be in light blue.
To display only applicable tax returns for a filter, it is recommended to use the Do not group list view:

The following security roles have been added to manage users’ rights for the Custom filters feature:
-
Tax – Settings – Public Custom Diagnostics and Custom Filters – Add, Edit
-
Tax – Settings – Public Custom Diagnostics and Custom Filters – Delete
-
Tax – Settings – Public Custom Diagnostics and Custom Filters – Roll Forward
December 16, 2022 Release
CCH iFirm Taxprep Essentials, Advanced and Pro
Import Statements of Self-Employed Individuals
Import tax data from the return of a taxpayer who is a self-employed individual into the return of his or her partner (a partner must not be the spouse, when the spouse’s return is being completed at the same time).
The data that can be imported is found in the following forms:
-
T776, Statement of Real Estate Rentals
-
T1163, Statement A - AgriStability and AgriInvest Programs Information and Statement of Farming Activities for Individuals
-
T1273, Statement A - Harmonized AgriStability and AgriInvest Programs Information and Statement of Farming Activities for Individuals
-
T2042, Statement of Farming Activities
-
T2121, Statement of Fishing Activities
-
T2125, Statement of Business or Professional Activities
To import data from the statement of a self-employed individual into the partner’s return, proceed as follows:
-
Click the RETRIEVE tab.
-
Select Import statements section.
-
Select from which return you want to import data.
-
Select from which statement you want to import data using the Form name column.
-
Select from which copy of the statement you want to import data using the Import from column.
-
Select to which copy of the selected statement you want to import data using the Import to column.
-
Click the Import button.
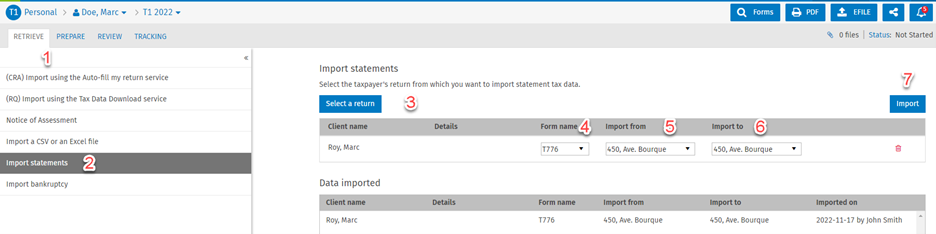
The Data imported section under the RETRIEVE tab will display the history of all statements’ imports.
Import Bankruptcy Data
Import pertinent tax data from a taxpayer’s pre-bankruptcy return into the post-bankruptcy return.
The imported data is inserted in the appropriate forms as well as in Form Bankruptcy Information of the current return.
In order to import data from the pre-bankruptcy return into the post-bankruptcy return, proceed as follows:
-
Click the RETRIEVE tab.
-
Select the Import bankruptcy section.
-
Select the return from which you want to import data.
-
Click the Import button.
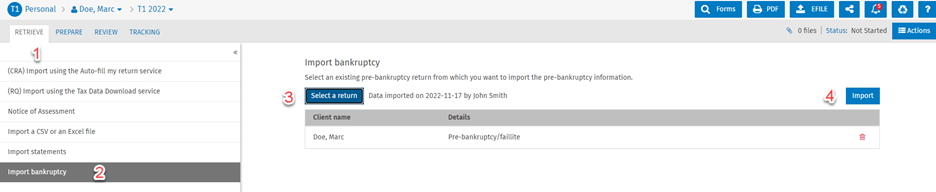
Note that you cannot import bankruptcy data from the spouse or dependant's return. You must be in the main taxpayer's return to import the bankruptcy.
Ability to electronically transmit T1 MR-69
The electronic transmission of T1 MR-69 form is now available.
A 2-step checklist has been added to the form to help you prepare and electronically transmit an MR-69 form. By providing answers to all statements in the checklist, you are making sure that the mandate is compliant and meets the requirements of Revenu Québec. This will prevent you from being prompted by an error code at the time of transmission.
The first step helps you complete the form correctly before printing it, so that the printed copy meets the requirements of Revenu Québec and contains a 2D bar code when the copy is signed by the taxpayer or representative.
The second step covers the requirements that should be complied with to be able to electronically transmit the mandate and the attached document(s).
The electronic status will be displayed at the end of the checklist. When the status is Eligible, you can transmit the MR-69 form and attached documents.
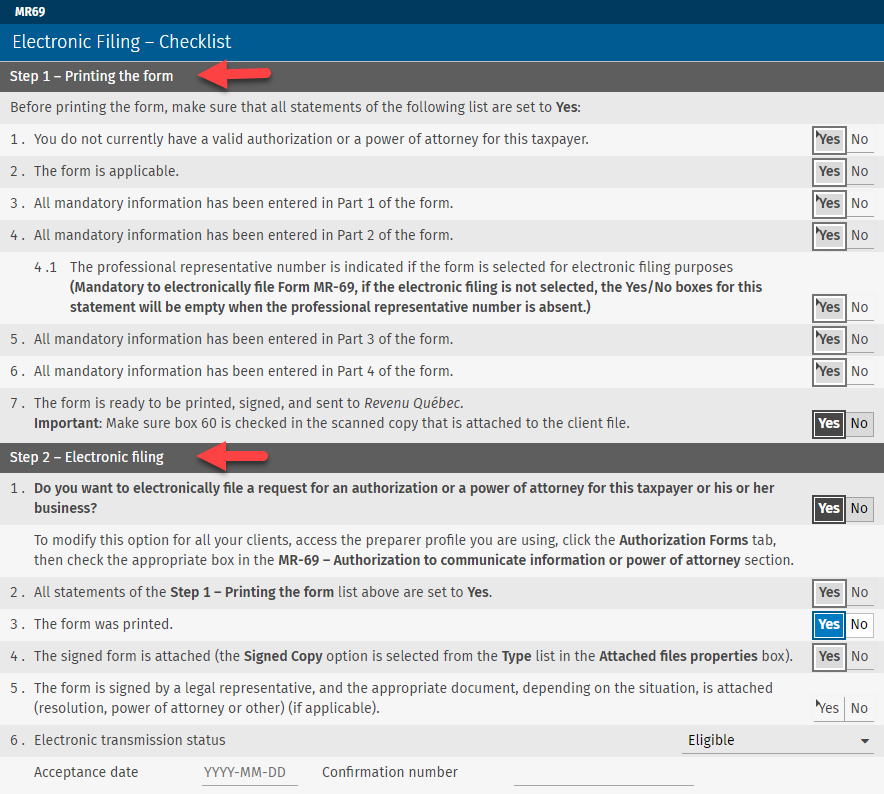
Revenu Québec requires that a PDF document of all three pages of the signed Form MR-69 be transmitted along with the authorization request. It is possible to attach supporting documents as well. To attach the PDF document for EFILING purposes, click the Actions button, select EFILE attachments, and follow the instructions indicated in the EFILE attachments modal.
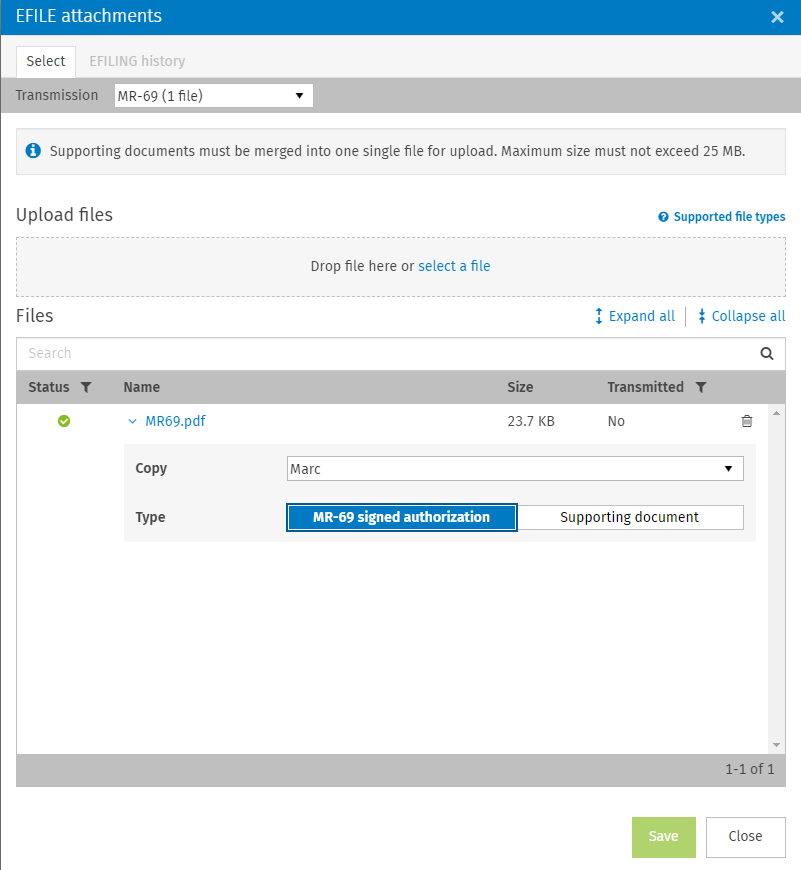
As any other EFILE transmissions, MR-69 EFILE details can be viewed from the TRACKING view:

Download the T2 Notice of Assessment from the CRA ‘‘T2 Auto-fill’’ service
It is now possible to download a corporation's notice of assessment. The notice of assessment can be downloaded from the RETRIEVE tab in the following section:
-
Import data using the T2 Auto-fill service. In this case, the notice of assessment can be downloaded along with the other data available for download. However, to view the downloaded notice of assessment, you must go to the Notice of Assessment section.
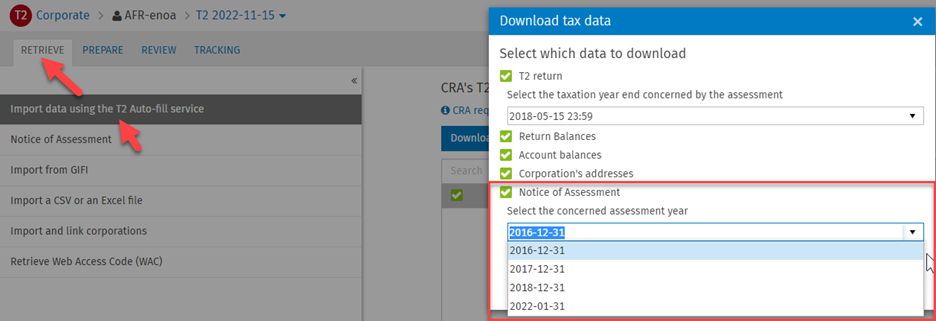
-
Notice of Assessment
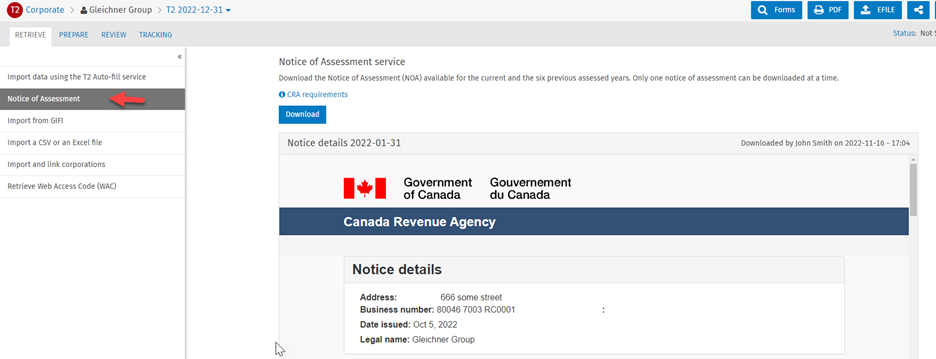
Please note that following the transmission of a current year tax return, it may take a minimum of three days before the notice of assessment is available for download. In addition, it is possible to download the current year notice of assessment, as well as the previous six taxation years. Downloaded notices of assessment can be viewed from the Notice of Assessment section.
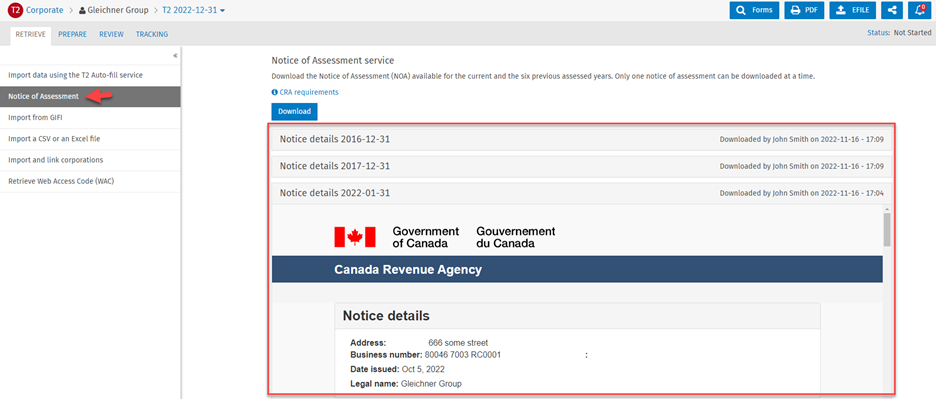
Click on the header of each notice of assessment to collapse or expand it.
The downloaded notice of assessment can be published or printed:
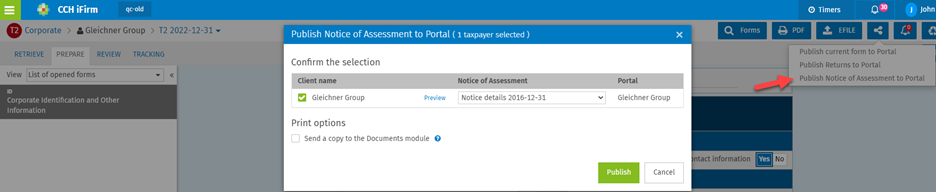
Finally, the Notice of Assessment column has been added to the return manager, allowing you to identify the returns for which the notice of assessment has been uploaded.
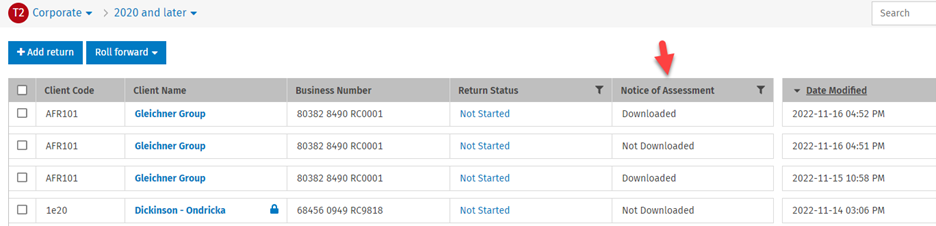
December 2, 2022 Release
CCH iFirm Taxprep Essentials, Advanced and Pro
CCH iFirm Documents now integrated with CCH iFirm Taxprep
CCH iFirm Documents and CCH iFirm Taxprep now offer integration, allowing users to access and store tax-related documents in CCH iFirm Documents directly from the CCH iFirm Taxprep interface.
-
A new Tax folder will now be visible under each contact in CCH iFirm Documents.
-
In the Tax folder, year folders will be created automatically.
-
Any document stored in the proper year folder will now be visible and accessible from the corresponding tax returns.
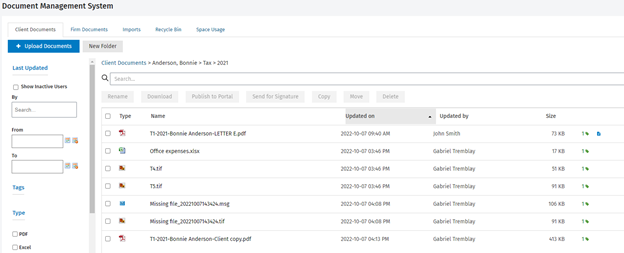
From a tax return, the tax-related documents added in the CCH iFirm Documents module can be viewed from the breadcrumb by clicking on the paper clip icon:
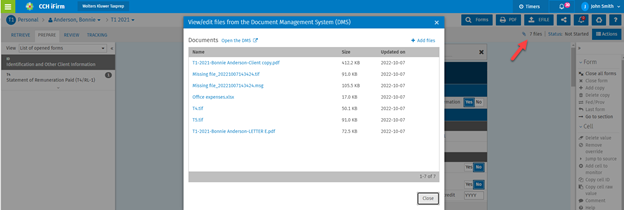
When you click on any of these documents, it will be open in a separate browser tab. The additional tax or other supported documents can be added to the CCH iFirm Documents Tax folder directly from the tax return by clicking on Add files from the View/Edit files from the Document Management System (DMS) modal.
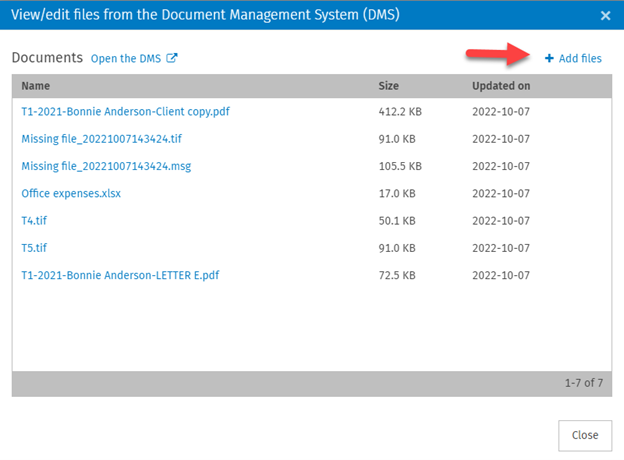
Moreover, when printing or publishing the tax return or a form, within the same dialog box, it is possible to send the same copy to the Document Management System.
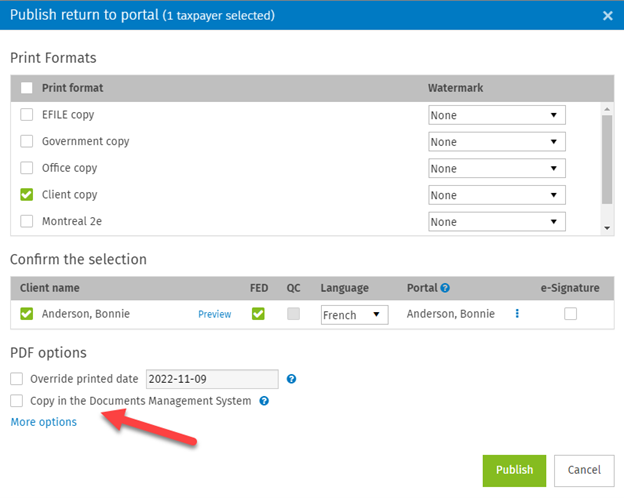
One of the following security roles is required to view the tax-related documents stored in CCH iFirm Documents directly from the CCH iFirm Taxprep interface (paper clip icon):
-
Documents - View
-
Documents - View and Delete
-
Documents - View and Download in bulk
-
Documents - View and Edit
-
Documents - View and Unlock
-
Documents - View and Upload
-
Documents - View, Edit, Copy and Move
The Documents - View and Upload security role is required to have the ability to:
-
add files from the View/Edit files from the Document Management System (DMS) modal;
-
copy data in the document management system while printing or publishing a tax return or a form.
The ‘‘Always’’ print option now available in print formats to print a form even if it is not applicable
Each custom print format offers three different choices, allowing you to decide when the form should be printed:
-
Yes, if applicable – The form will be printed only if it is applicable in a tax return (the applicable forms of a tax return are listed in the PREPARE tab under the List of applicable forms view.)
-
Always – The form will always be printed regardless the applicability of the form.
-
No – The form will never be printed.
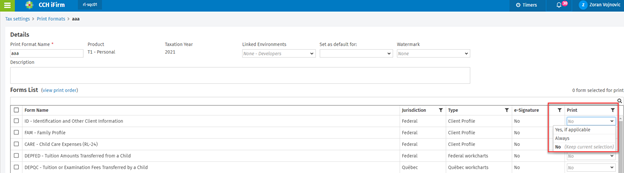
The T1 ‘‘Auto-fill my return’’ (AFR) reconciliations modal is now always displayed
The Reconciliation link that allows you to consult all reconciled slips in one single view is now always displayed, regardless of if reconciled slips are selected in the Auto-fill my return modal.
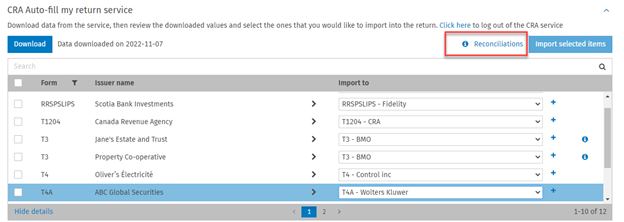
New roll forward option to retain the ‘‘Details” column content during the roll forward process
The option Keep the document details has been added to the Roll Forward Settings, allowing you to decide if the Details column content needs to be rolled forward to the subsequent taxation period. By default, Keep the document details is selected. It can be modified through Settings/Taxprep/Roll Forward Settings to be applied to all tax returns during the roll forward process or it can be modified from the Roll forward modal by clicking Roll forward setting.
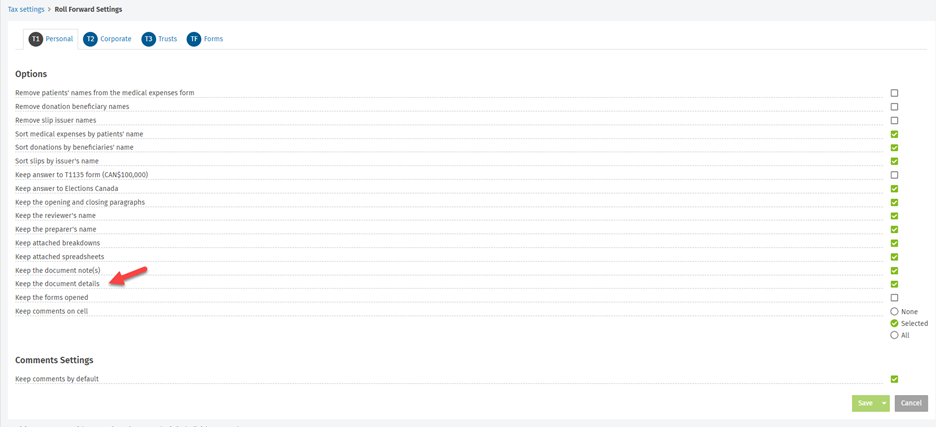

Digital signature feature improvements
Since last year, the digital signature status for Forms T183 and TP/CO-1000 is available from the return manager. With a single click, it is possible to know the status of these digital signatures (Signed or Sent).
In addition, it is now possible to click on the digital signature status to access the appropriate CCH iFirm portal folder, allowing you to see the PDF that was sent for digital signature or that a customer signed:

In addition, in Forms T183 and TP/CO-1000, a visual indicator was added, allowing you to know, from an open tax return, the status of the digital signature of these two forms. By clicking on this digital signature status indicator, it will also allow you to access the appropriate CCH iFirm portal folder to see the PDF that the customer signed or that was sent for digital signature.
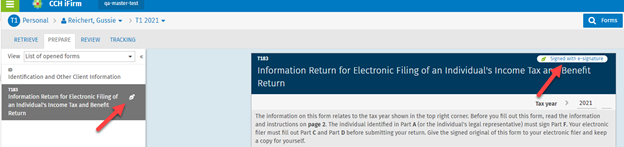
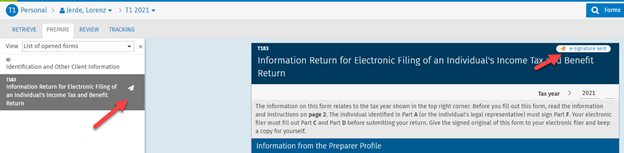
Review marks have different colours depending on the review mark severity
Review marks are identified with different colours, depending on the severity of the review mark:
-
First review (ctrl +1) – Green
-
Second review (ctrl +2) – Green
-
Problem (ctrl + 3) – Red
-
Question (ctrl + 4) – Orange
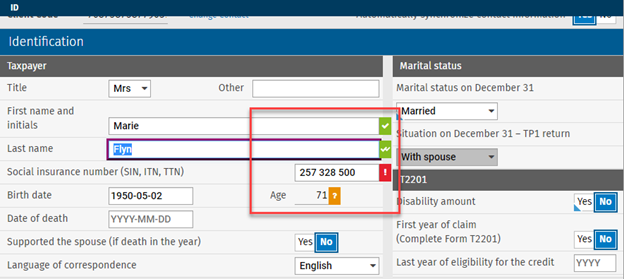
An existing comment can be edited or deleted
Any existing comment can be modified or deleted. There are two different ways to do it:
-
Hover the mouse pointer over an existing comment and click Edit or Delete.
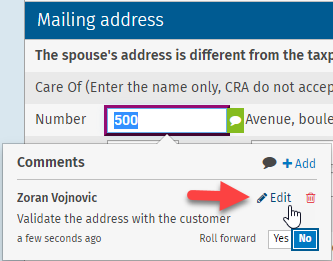
-
Right-click to open a contextual menu and click Comment. You can then click Edit or Delete in the mouse hover window.
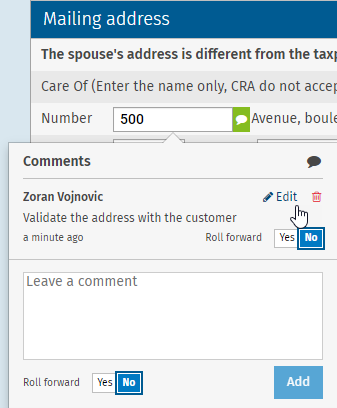
In addition, the comment text area is now larger, allowing you to see more text without scrolling inside the section.
The applicable letters for a tax return are now identified with a green check mark
In the REVIEW tab, all applicable letters for printing are now identified with a green check mark.
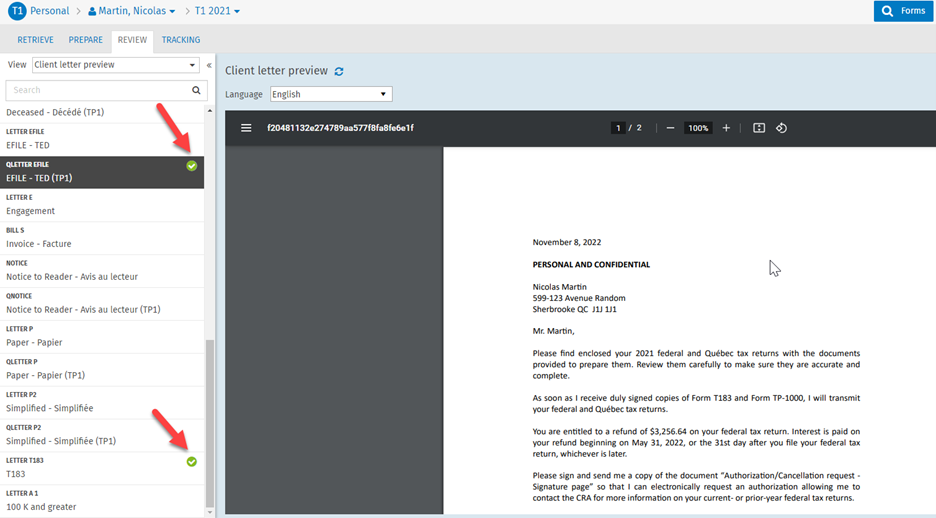
Ability to access a breakdown cell or a spreadsheet by hovering the mouse pointer over a tooltip when a tax return is locked
When a breakdown or a spreadsheet is added on a cell, it is now possible to access it from the mouse over tooltip even if a tax return is locked.
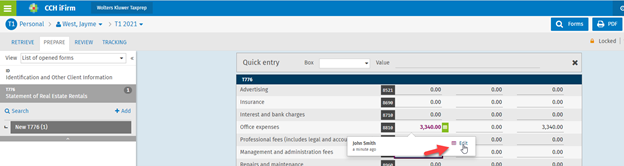
Note that by clicking Edit, when the tax return is locked, the breakdown cell or spreadsheet can only be viewed and cannot be modified.
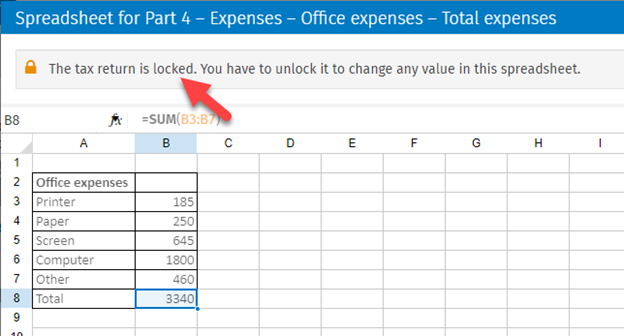
Improvements to the colour of the forms
The sides of the forms and the REVIEW tab were changed from white to:
-
blue for the main taxpayer;
-
green for the spouse;
-
purple for the dependant.
Main taxpayer’s tax return:
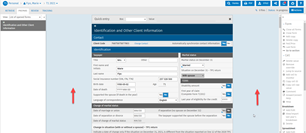
|

|
Spouse’s tax return:
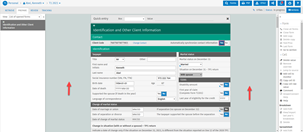
|
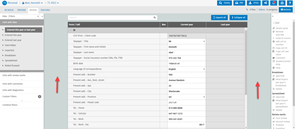
|
Dependant’s tax return:
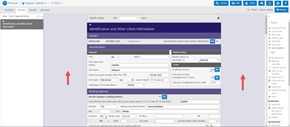
|
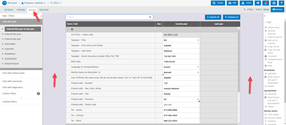
|
Return manager columns have a minimal width and a horizontal scroll bar
When several columns are displayed in the return manager, the horizontal scroll bar allows you to see all these displayed columns with the minimal width. This will allow you to see the content of all columns even if a large number of columns is displayed in the list of tax returns.
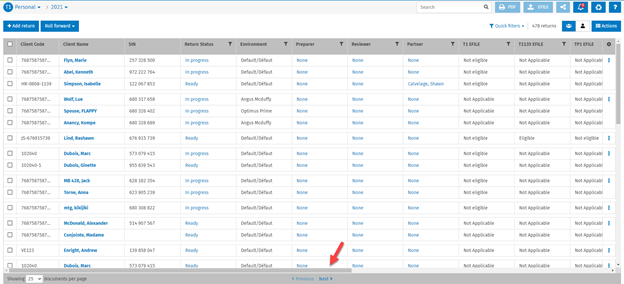
The status of the imported files is available from the ‘‘Import Report’’ under the user notification centre
For each Taxprep and Cantax* imported file, the import status is now detailed in a report available in the user notification centre. The status can be one of the following:
-
Success; or
-
Error – By consulting a tooltip over the Error status, the message will indicate why the file wasn’t imported.
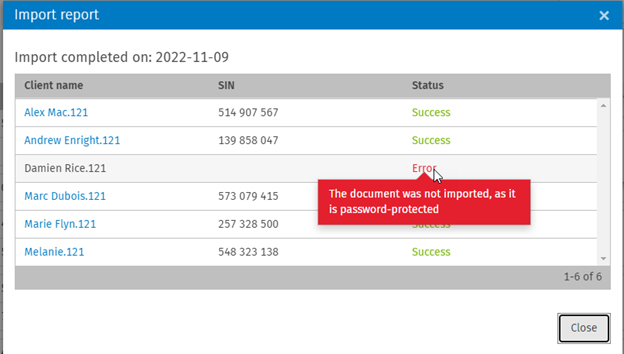
* Only Cantax T2 and Cantax FormMaster files can be imported in CCH iFirm Tax. Cantax T1 files can be only rolled forward in CCH iFirm tax.
CCH iFirm Taxprep Advanced and Pro Only
Batch Printing and Publishing of tax returns.
The printing and publishing of tax returns in batch from the return manager is limited to a maximum of 100 returns per batch.
CCH iFirm Taxprep Pro Only
Print order of forms can now be customized per print format
The print order of forms can now be customized per product, per year and per custom print format. You can decide in which order the forms will be printed based on the print format. Here are the steps to change the print order of forms:
-
For a given custom print format, change the form list in the print order view:
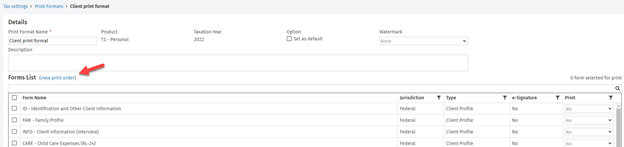
-
Click Edit Print Order.
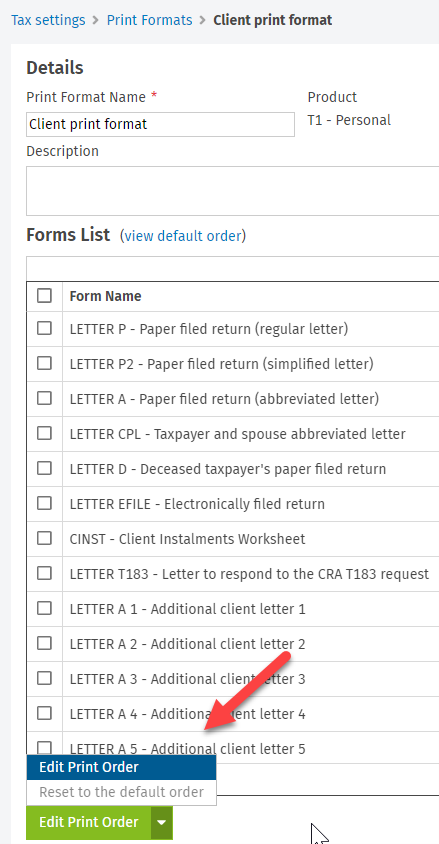
-
Select a form or all the forms for which you want to change the print order, and then select the new position in the print order (Above, Below, Start of the list or End of the list).
Note: Any linked child forms will always follow the parent form when the forms are reordered (e.g., Forms T2125 CCA, T2125ADD and T2125AUTO will follow the T2125 parent form).
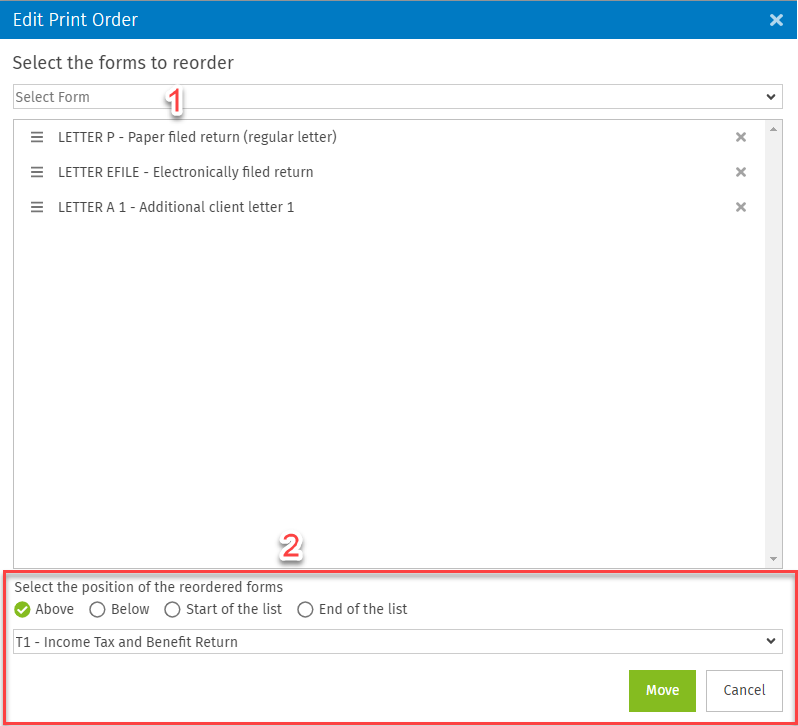
If you want to change the print order of many forms at the same time, instead of selecting the forms one by one, please proceed as follows:
-
Select the desired forms from the list view and then click Edit Print Order. The selected forms will appear in the Edit Print Order modal.
-
The selected forms can be reordered with a drag-and-drop by using the three horizontal lines beside the form name ( ).
-
Select the new position of the forms (Step 2 in the previous print screen).
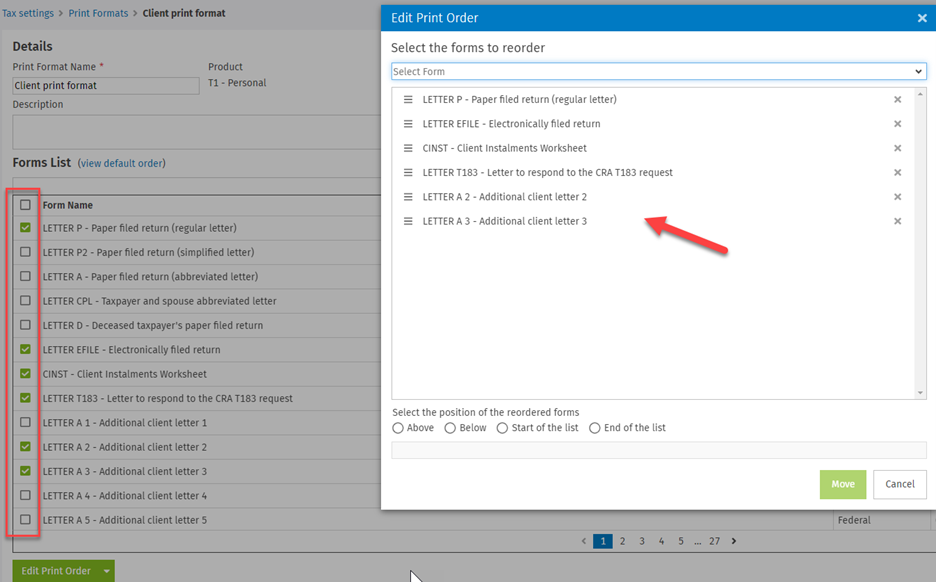
In each custom print format, it is possible to display the forms in two different views:
-
View default order – It displays the forms in the order appearing in the form selection dialog box.
-
View print order – It displays the forms in the order appearing when printing.
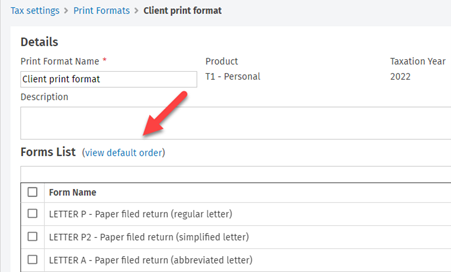
|
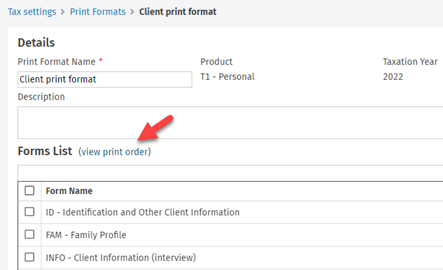
|
If the print order has been customized, it is always possible to reset it to the default print order by clicking on Edit Print Order/Reset to the default order.
The following security role is required to have the rights to edit the print order: Tax-Settings-Print formats-Add, Edit.
Automate the change of the tax return statuses based on performed actions
The change of the tax return status can be automated based on four different tax return actions:
-
Roll forward
-
Successful EFILE
-
Print
-
Open a tax return for the first time
To automate the change of a tax return status, go to Settings/Taxprep/Return Statuses and from there, do as follows:
-
Specify for which action the tax return statuses should be changed. If the selection is None, there will be no automation for that action.
-
Specify the tax return status that should be applied when the action is performed. All active tax return statuses are available for selection, including the custom tax return statuses that you have created.
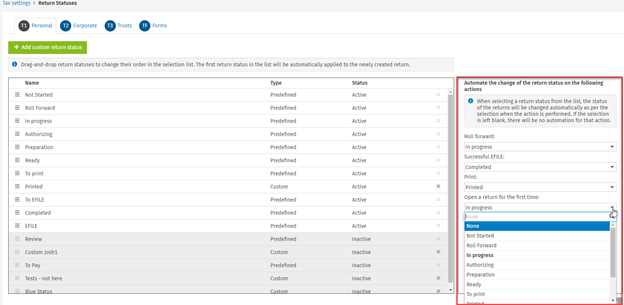
Four new return predefined statuses were made available:
-
Rolled forward
-
Open
-
EFILE Successful
-
Printed
Return manager content can be exported in CSV format
Return manager content can be exported in CSV format. This export can be done per product (T1, T2, T3 and Forms) and per taxation period of the return manager (e.g., T1 2021, T1 2020, T2 2020 and later…).
To export the return manager content, click the Actions button and then click Export Return Manager.
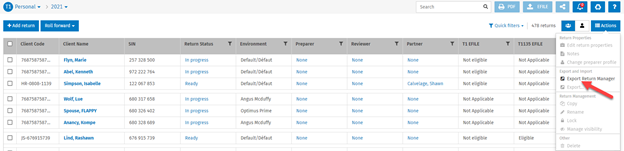
For the T1 product, the Include SIN in your export check box allows you to decide if the SIN column should be exported in CSV format:
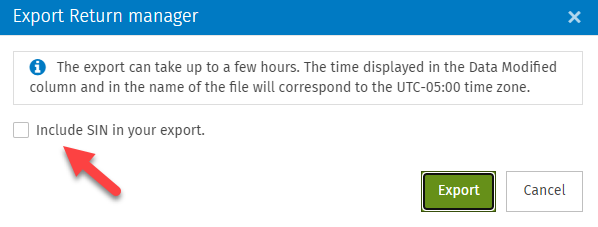
The time of Date Modified column is presented in the UTC-5:00 time zone in exported CSV file.
Once the export is completed, it can be downloaded from the Notifications centre.

Note: The return manager per product and per year (e.g., T1 2021) cannot be exported more than once per day. For example, if the T1 2021 return manager was already exported in the current day, you will need to wait until the next day to export it another time.
The following message will appear if you try to export the same return manager a second time in a row:
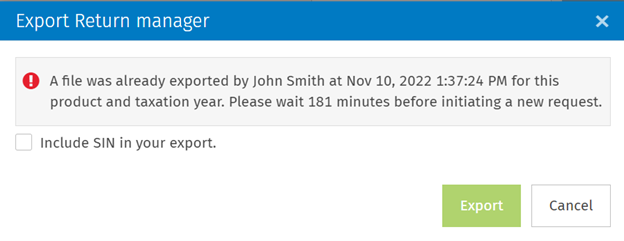
Note: Personalized columns defined in the custom filters are not included in the exported CSV file of the list of tax returns.
The following security role is required to have the rights to export return manager: Tax-Returns-Export return manager
Tax environments can now be matched only with Group 1
Tax environments allow you to associate tax returns with different templates. This association will facilitate the selection of the appropriate templates (i.e., electronic service identification, preparer profiles and print formats) per environment. The environment feature is related to the CCH iFirm filtering and group feature.
Now, you can decide if you want to match the tax environments to both groups created in Settings/Firm Settings/Firm Filtering & Group Settings or match it only with Group 1. The new option Keep only Group 1 mandatory while creating environments. Group 2 will be disregarded was added in Settings/Taxprep/Environments.
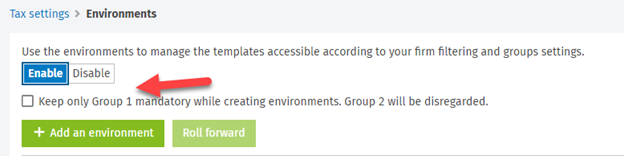
When Keep only Group 1 mandatory while creating environments. Group 2 will be disregarded is selected, the tax environments will match the contacts/returns based only on Group 1.
Web API - audit trail for data entered/modified endpoint
Audit trail endpoint is now available allowing you to retrieve all user data entered/modified in cells of a tax return (see the list of endpoints in our Help system).
A New security role to manage rolling forward and import of Taxprep password protected files
Password-protected Taxprep files cannot be imported or rolled forward without the Tax - Import and Roll forward password-protected Taxprep files security role.
The user who doesn’t have the Tax - Import and Roll forward password-protected Taxprep files security role but has the required rights to import Taxprep files or to roll forward files from another software program will see the following message in the Import or Roll forward modal:
Password-protected Taxprep files will not be rolled forward without the Tax - Import and Roll forward password-protected Taxprep files security role.
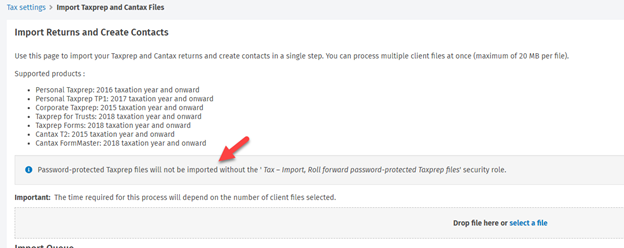
In addition, a notification report will also specify that the tax return wasn’t imported or rolled forward because Taxprep file is password-protected:
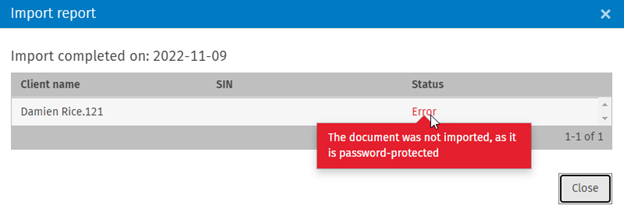
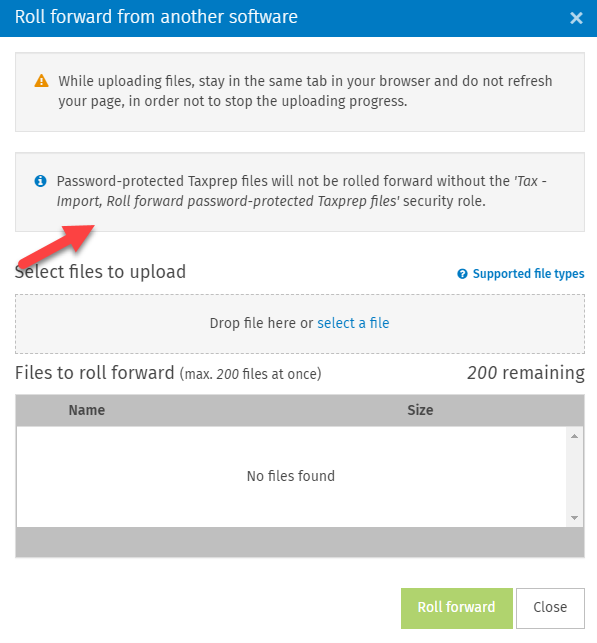
June 13, 2022 Release
CCH iFirm Taxprep Essentials, Advanced and Pro
More than 2,700 CCH AnswerConnect topics now integrated with CCH iFirm Tax
More than 2,700 CCH iFirm Taxprep form fields are now linked to the related topics in CCH AnswerConnect! These links provide you with direct access to supporting contextual information from a given cell, including access to expert commentary and links to related material.
You can quickly identify these links to CCH AnswerConnect by looking for the blue triangle icon located in the left corner of the form field. A preview of the content will appear when you hover over the link:
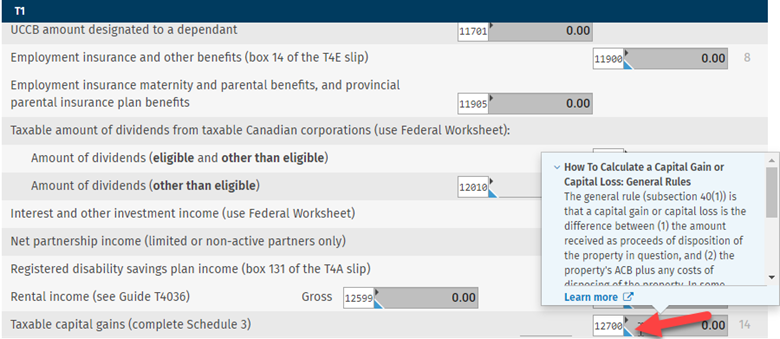
If you want to see the entire document in CCH AnswerConnect, you can use one of the following methods:
- Click on Learn more from the preview;
- Use the Shift + F1 shortcut from the field;
- Use the contextual menu (right-click) from the field;
- Use the left pane link.
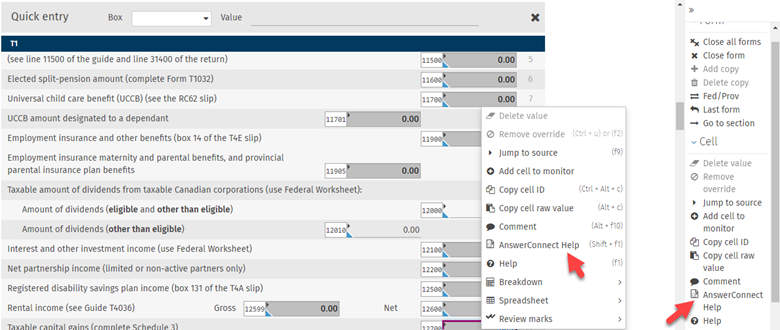
Please note that to use this feature, you will need to have a subscription to CCH AnswerConnect.
May 30, 2022 Release
CCH iFirm Taxprep Essentials, Advanced and Pro
Electronic transmission of supporting documents accompanying the T106, T1134 and T1135 forms in CCH iFirm Taxprep T2
In addition to supporting documents for T2 and CO-17 tax returns, it is now possible to electronically transmit supporting documents for Forms T106, T1134, and T1135 in CCH iFirm Taxprep T2.
EFILE support documents can be attached either from an open tax return or from the Returns Manager view:
From an open tax return
Click the Actions button and select EFILE Attachments view. Then, proceed as follows:
- Select the transmission for which you want to attach support documents.
- Drop or select a file you want to add (you can upload up to 200 files at once).
- Complete the mandatory fields.
- Click the Upload and save button (note that this button is disabled if all mandatory fields are not completed).
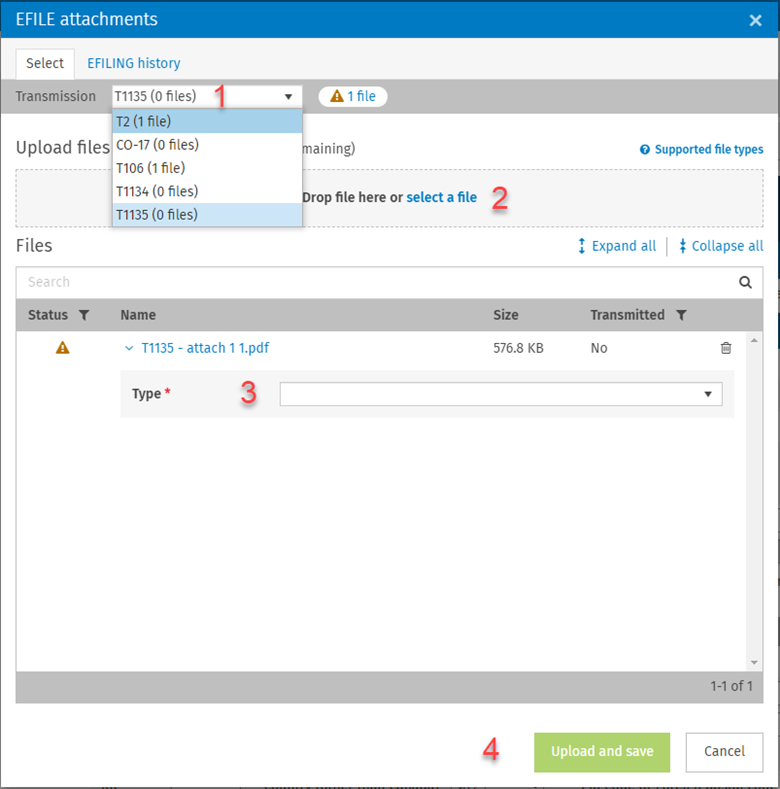
From the Returns Manager view
- Select the return for which you want to attach support documents.
- Click the EFILE button and select EFILE returns.
- Click on the number under the paper clip to open the EFILE attachments view.
- Follow steps 1 to 4 described in the From an open tax return section above.
Note: It is not possible to set slip/supplement types for T1134 and T106 EFILE attachments. It has to be done from an open tax return. Only the ‘‘Summary’’ type can be selected from the return manager view.
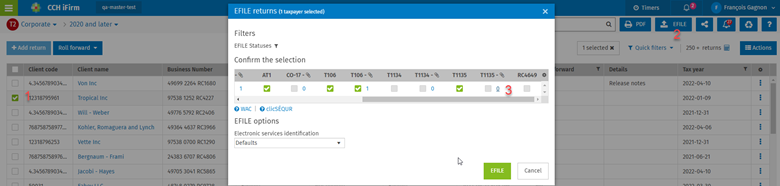
Once the support documents are added, the number of attached files eligible for EFILE will be shown in the Tracking and EFILE returns views:
Tracking view:

EFILE returns view:
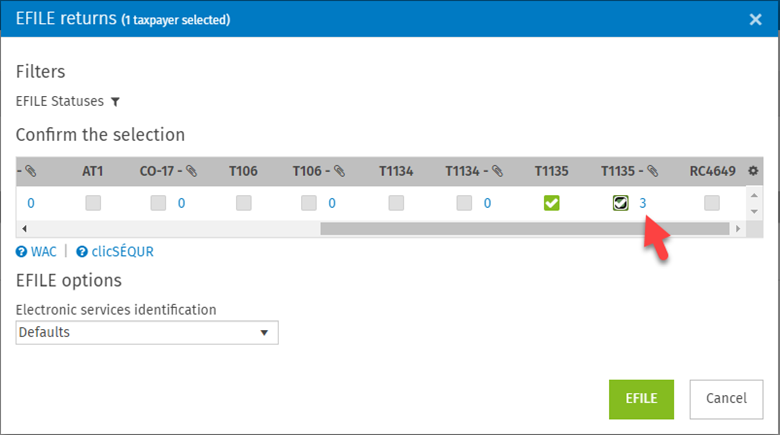
Once the support documents are transmitted, the transmission history can be viewed from the following sections:
- Transmission history
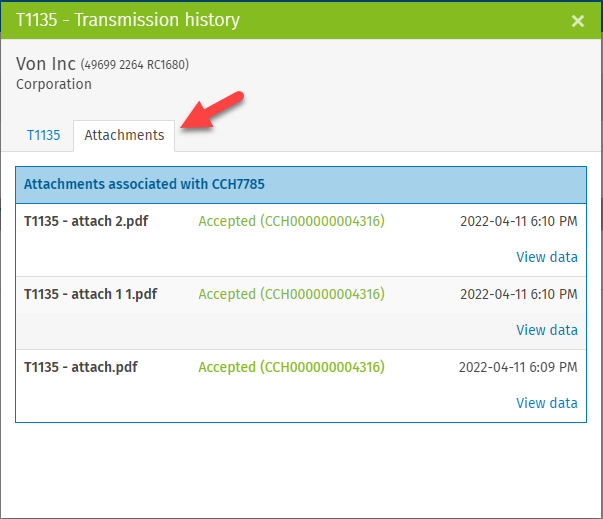
- EFILE attachments view
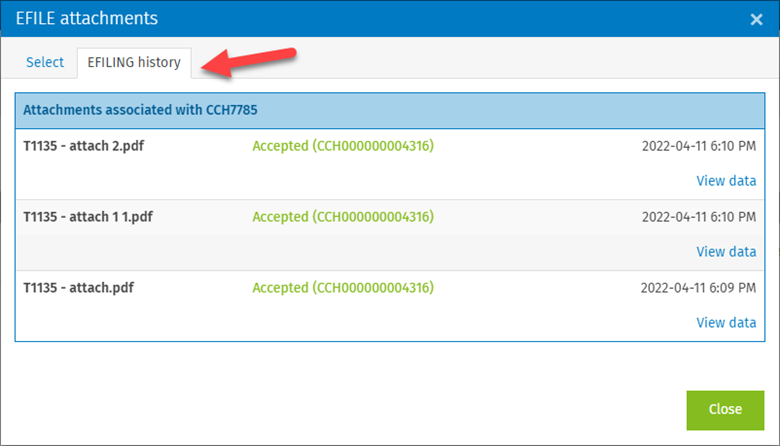
Info column in the Returns Manager now split into two columns
The Details and Tax year columns are now replacing the Info column in the Returns Manager for all Taxprep module products (T1, T2, T3, and Forms):

Any additional label added to a tax return (Rename) will be displayed under the Details column, while the taxation period information will be displayed under the Tax year column.
In addition, you can decide to display or not the Details and Tax year columns per product from a gear button:

Context-sensitive help (F1) provides quick access to a relevant online tax help topic
Online help covers over 950 tax topics. Context-sensitive help (F1) in CCH iFirm Taxprep allows you to quickly access a relevant tax help topic. To open a help topic for a specific tax subject from a tax form, please use one of the following methods:
- Use the F1 key;
- Use the contextual menu (right-click) from the field;
- Use the left pane link.
One of these actions will bring you directly to a relevant online tax help topic.
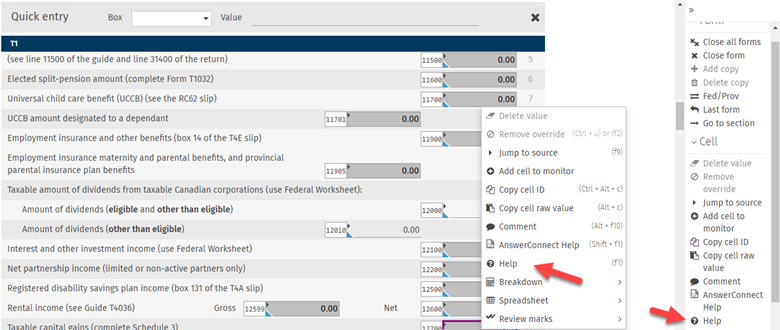
Improvement of the CCH iFirm Taxprep settings interface
Several changes were made to the user interface of the CCH iFirm Taxprep settings to improve usability and efficiency.
- Templates were grouped into the two following sections in order to facilitate the visibility:
- Firm Configuration
- Firm Templates
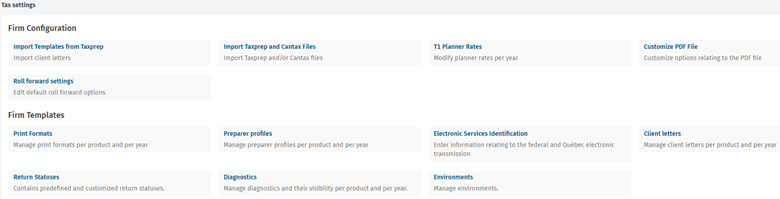
- Breadcrumb was added to each tax template to facilitate navigation between the pages. Simply click on a blue link of the breadcrumb to access a previous page:
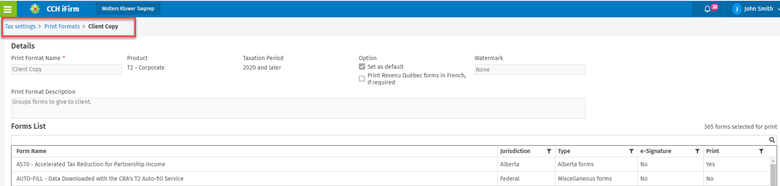
- Details section can be hidden in order to optimize the visibility of the letter editor. To collapse or expand the Details section, click on
 . With this improvement, it is now possible to hide the following sections:
- Details section
- Letter header section
Expanded sections:
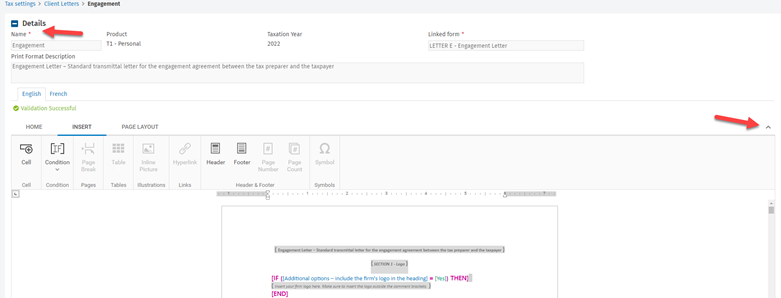
Collapsed sections:
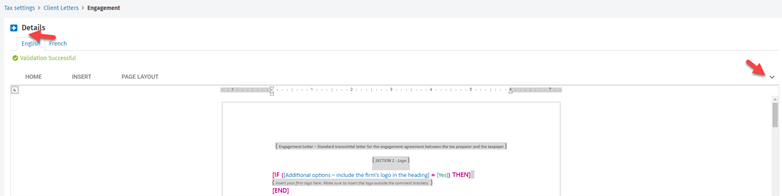
CCH iFirm Taxprep Pro Only
Ability to electronically transmit RC4649 return in CCH iFirm Taxprep T2
You can now EFILE a RC4649 return using either the EFILE credentials or a Web Access Code (WAC).
New tax security roles
The following security roles have been added or modified to manage user rights:
Roll forward
Tax – Returns – Roll Forward security role was split into two different security roles:
- Tax – Returns – Roll Forward from iFirm Tax
With this security role, users can roll forward CCH iFirm Taxprep returns from one taxation period to another. - Tax – Returns – Roll forward from other software
With this security role, users can roll forward returns prepared using another tax software program. Note: During a roll forward from other software, new contacts are created automatically when no match with an existing contact is found in CCH iFirm.
Note: The user to whom the Tax – Returns – Roll forward security role was assigned will have by default these two security roles assigned.
Tax – EFILE – Transmit, Transmission history security role was split into four different security roles (one per tax product):
- Tax – T1 - Returns – EFILE, Access transmission history
With these security roles, users can EFILE and consult the transmission history specific for T1 tax product. - Tax – T2 - Returns – EFILE, Access transmission history
With these security roles, users can EFILE and consult the transmission history specific for T2 tax product. - Tax – T3 - Returns – EFILE, Access transmission history
With these security roles, users can EFILE and consult the transmission history specific for T3 tax product. - Tax – TF - Returns – EFILE, Access transmission history
With these security roles, users can EFILE and consult the transmission history specific for Forms tax product.
Note: The user to whom the Tax – EFILE – Transmit, Transmission history security role was assigned will have by default these four security roles assigned.
Audit trail:
Audit trail now has two different security roles:
- Tax – Returns – Audit trail – Access
With this security role, users can access the audit trail. - Tax – Returns – Audit trail – Rollback
With this security role, users can perform a rollback on certain actions. Users must have the Tax – Returns – Audit trail – Access role assigned in order for the rollback to work.
Note: The user to whom the Tax – Audit trail – Access security role was assigned will have by default these two security roles assigned.
Custom filters under the Review tab
The Custom filters feature under the Review tab now has a new tax security role:
- Tax – Returns – Review – Custom Filters – Add, Edit
With this security role, users can add and edit the custom filters from Review tab.
Note: This security role will be assigned to all users.
January 31, 2022 Release
CCH iFirm Taxprep Essentials, Advanced and Pro
Electronic transmission of the T3 Trust Income Tax and Information Return using EFILE
Starting in February 2022, the CRA will make available the electronic transmission of T3, T3M and T3S returns using EFILE. These three returns can now be transmitted electronically in CCH iFirm Tax.
As a result, you will require an EFILE number as well as a password to electronically transmit a T3 return. Please note that you can no longer use the CRA’s Filing by Internet file transfer (XML) service to transmit T3, T3M and T3S returns.
All other transmission types must be made using the Filing by Internet file transfer (XML) service.
December 6, 2021 Release
CCH iFirm Taxprep Essentials, Advanced and Pro
Digital Signature Feature – Columns added to the Return Manager allowing an easy way to monitor digital signature status
The Digital signature feature is fully integrated between CCH iFirm Portal and CCH iFirm Tax. You can publish documents and forms that require your customer’s digital signature in a single click.
To streamline your signature process, a built-in tag was integrated to the forms to indicate where the digital signature must be affixed and the fields in the Electronic signature section of Form T183 are automatically completed when the signature is entered on the portal (these fields are mandatory in order to EFILE tax returns if the digital signature was used).
In addition, two columns have been added to the T1 and T2 Return Manager to allow you to easily keep track of the digital signature status of T183 and TP-1000 forms for personal income tax returns (T1) and T183 and CO-1000 forms for corporate income tax returns (T2).
These new columns contain three different statuses:
- Signed – the customer signed the form;
- Sent – the form was sent, but the customer did not sign it yet;
- None – the form was not sent to be digitally signed.
From these two columns, you can easily use filters to find and review the digital signature status. You can also filter on the Signed status, which will facilitate the electronic batch transmission (EFILE) of returns. For example, by displaying returns for which the T183 or/and TP-1000 forms are signed and eligible for EFILE. Once this filter is applied, you can select the returns that you want to electronically transmit in a single step.

Note: This functionality will be available in the CCH iFirm Taxprep T1 product which is scheduled to be released on December 17. Please consult the products calendar for the release dates.
T183 – Digital signature time stamp automatically updated
If you are using the electronic signature feature in CCH iFirm Portal, the fields in the Electronic signature section of Form T183 will now be automatically completed when the signature is entered on the portal in the T1 and T2 products. These fields are mandatory in order to EFILE tax returns if the digital signature was used.
T1 product (available since the 2020 tax season):
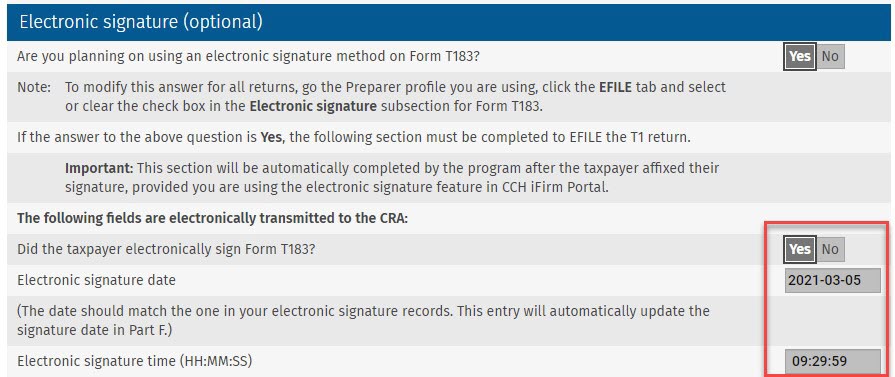
T2 product:
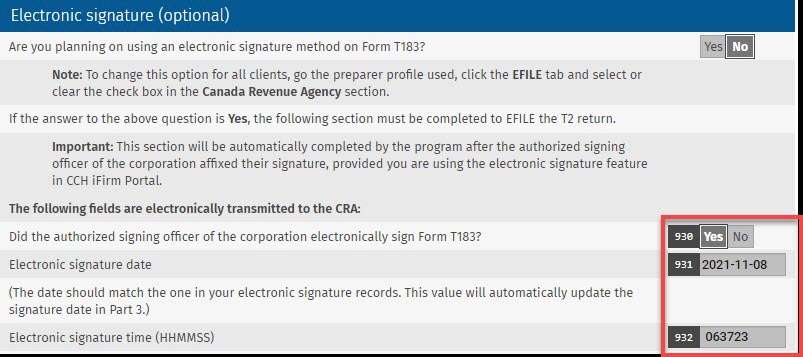
All custom letters are now supported for digital signature
Previously, only the Engagement letter was supported for digital signature. Now, all custom letters can be digitally signed. Customer letters do not have default e-tags integrated. To add an e-tag, you can copy digital signature tags from the Engagement letter and, where applicable, make the required adjustments. Here is the Digital Signature section in Engagement letter:
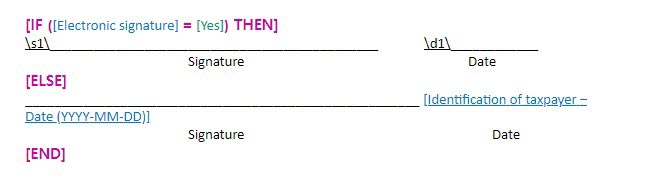
Where:
\s1\ corresponds to the e-tag; and
\d1\ corresponds to the date of signature.
Note: This functionality is available in the CCH iFirm Taxprep T2 product and it will be available in the first release of the year for T1, T3 and Form products. Please consult the products calendar for the release dates.
The T2 Auto-fill service for corporations is now available. This service allows you to download available data when using the CRA’s electronic services.
From the RETREIVE tab, select Import data using the T2 Auto-fill service from the left pane and download the available data from the CRA site.
You can download all available data or select a subset of the available information. In addition, you can select the taxation year for which you want to download data. The T2 Auto-fill service gives you access to data in the returns up to seven most recent assessed years.
However, note that you can import the downloaded data to the return only if the taxation year covered by the return starts immediately after the taxation year related to the downloaded data or if the data and the return refer to the same taxation year. For the prior taxation years, you can still download data for review purposes.
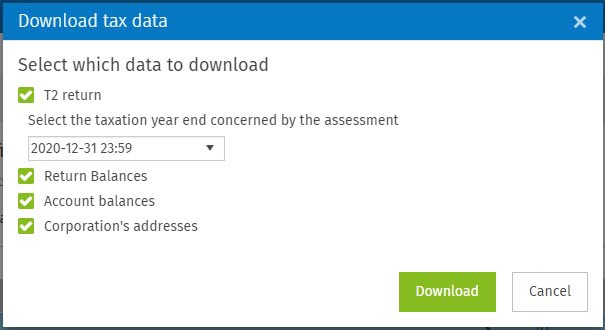
You can then import the information into the tax return by clicking the Import button.
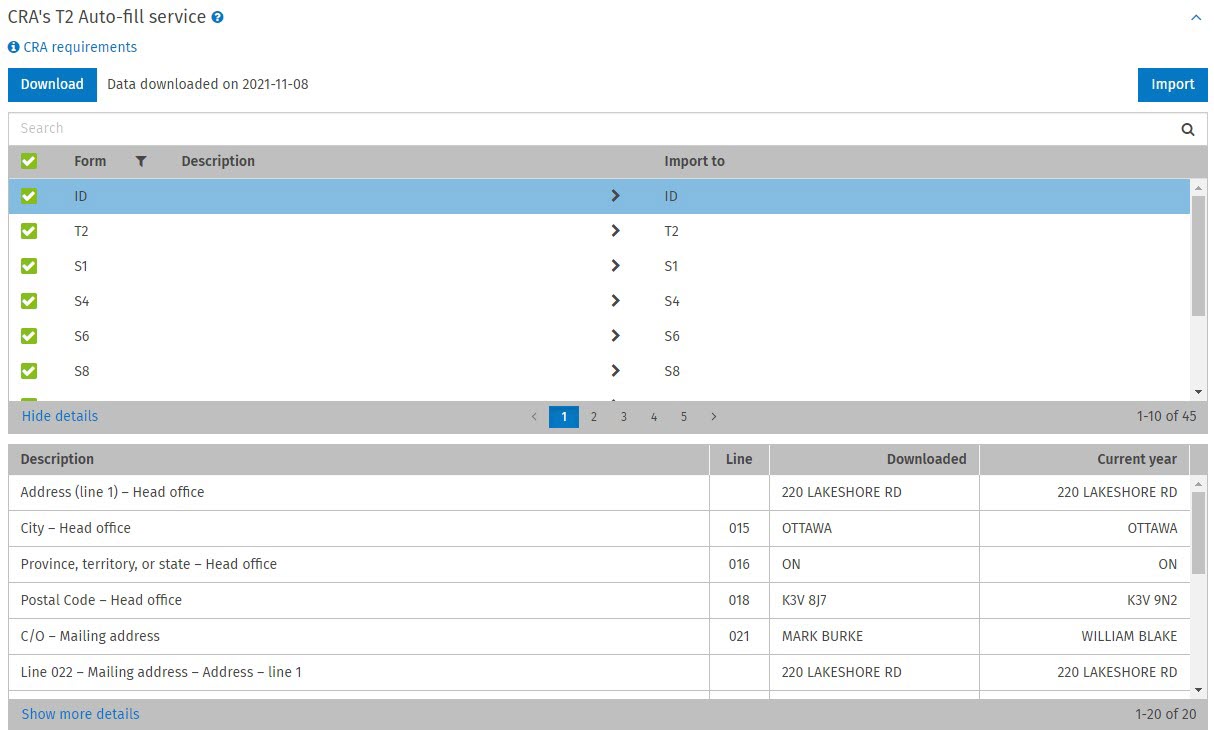
Auto-fill my return (AFR) enhancements
Downloaded data is always kept in the RETREIVE tab
The latest downloaded data is now kept in the RETREIVE tab even if it was imported into the tax return.
The Auto-fill my return view can now be further customized
You can now display only the view with downloaded data without showing the details and vice versa.
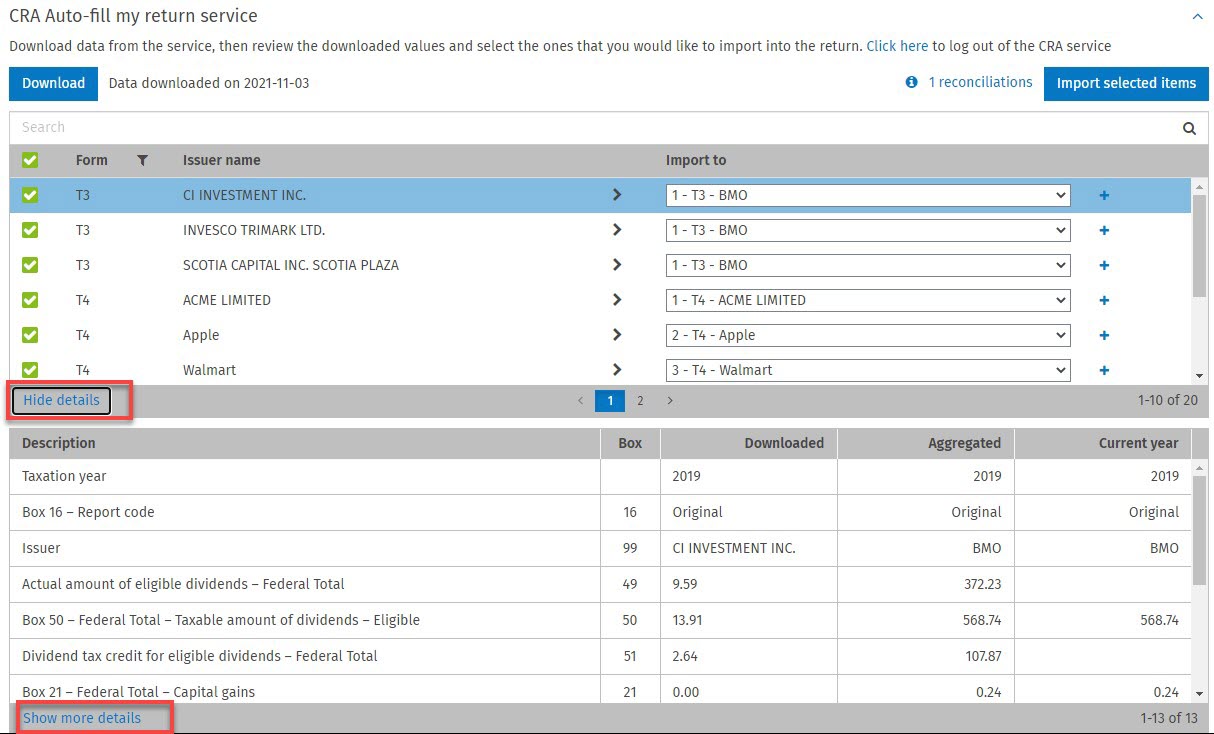
View without the details:
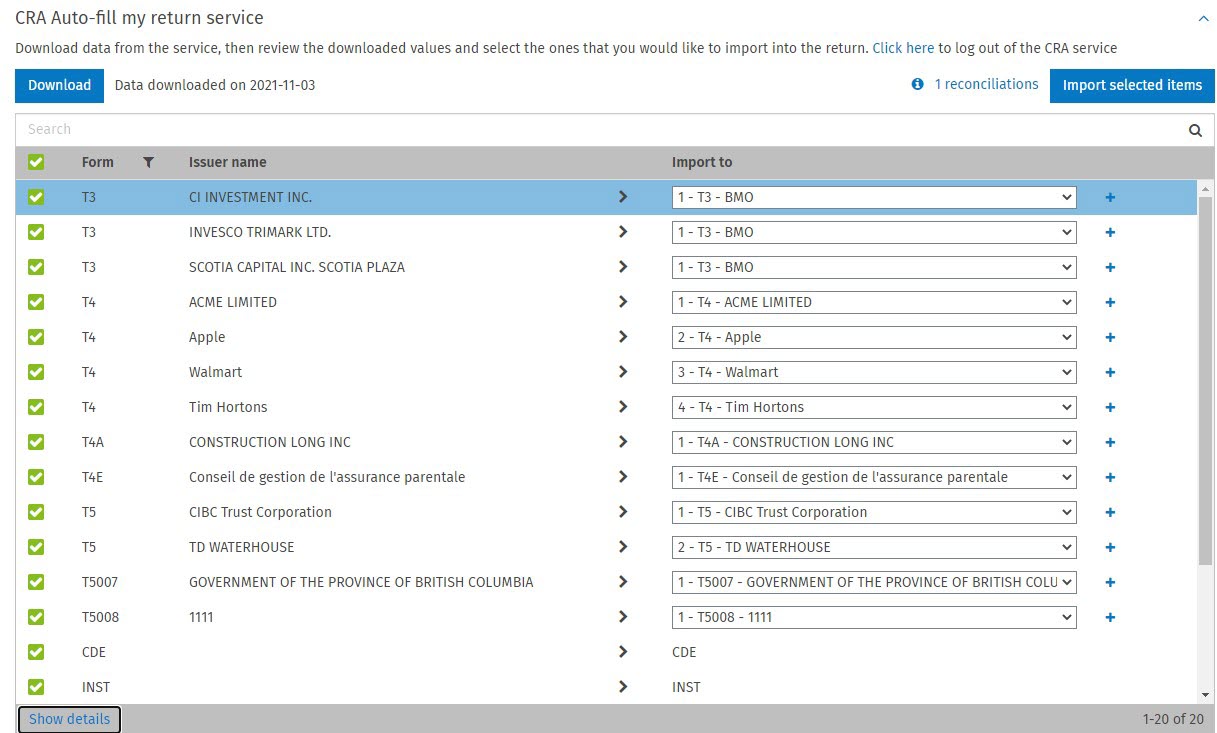
The view focusing on the details section allows you to easily switch from one downloaded slip and/or form to another by clicking different page numbers or the right and left arrows:
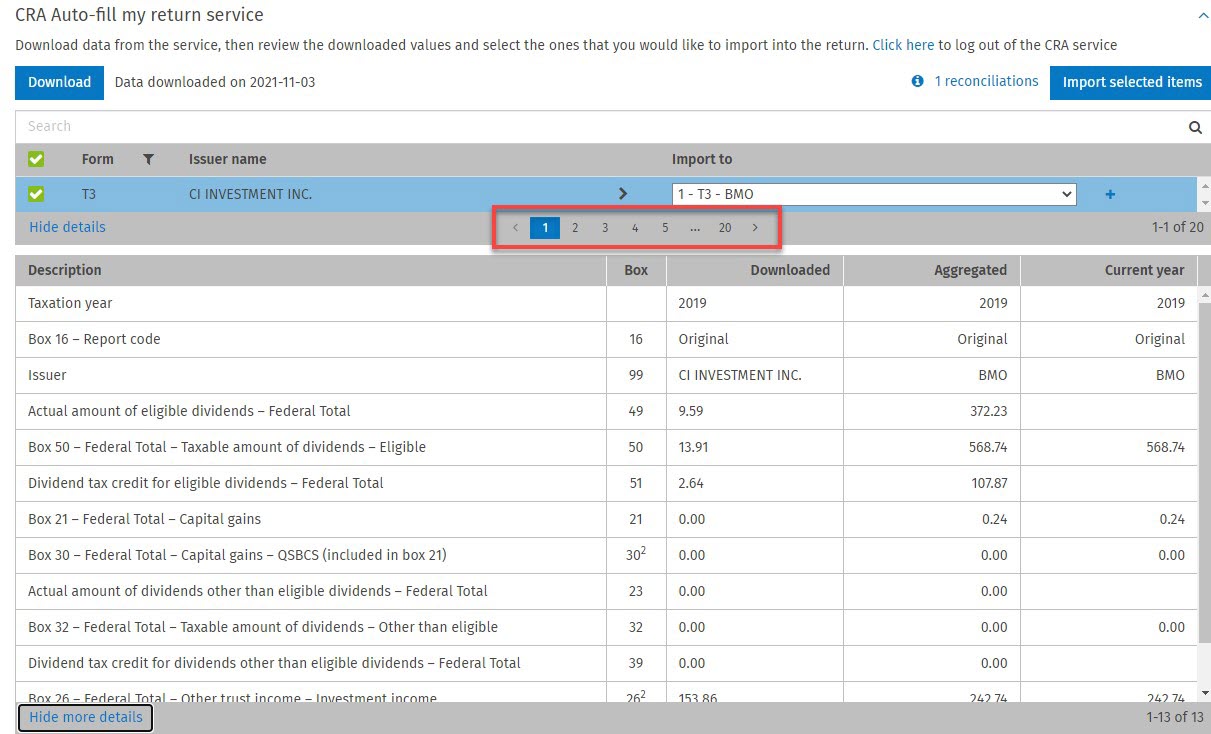
New reconciliation feature to allow you to view a reconciled data summary
When you reconcile data for slips such as the T3 and T5008 slips, a new feature now allows you to review the reconciled data summary:
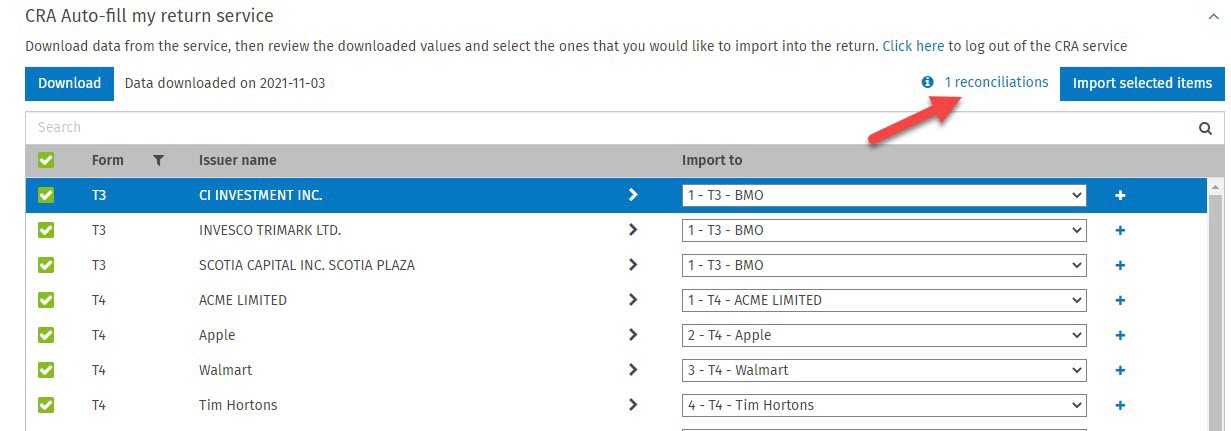

In addition, in T3 and T5008 slips, a section has been added in forms that will show the same summary once the reconciled data has been imported into the return:
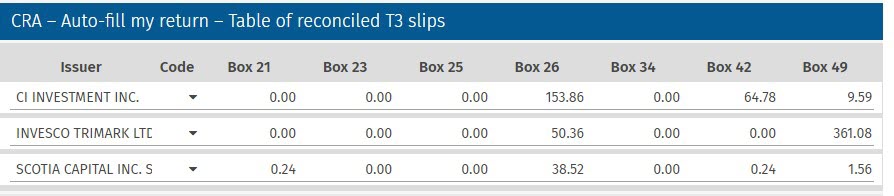
Ability to filter on downloaded forms and slips to optimize displayed information

A new filter now allows you to easily filter the returns based on tax year-end date
A filter has been added specifically for the Info column in the T2, T3 and Forms products. This will allow you to easily filter tax documents based on the tax year-end date.
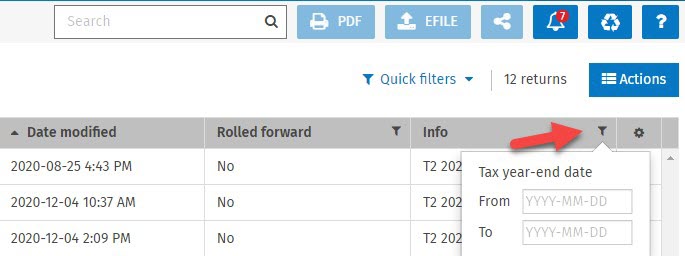
Taxprep custom letters (*.clt) can be now imported into CCH iFirm Tax
The custom letters (.clt format) that you created in Taxprep On-premise can be imported into CCH iFirm Tax. To import the custom letters, go to Settings/Taxprep/Import Taxprep templates and proceed as follows:
- In the page that displays, click the product for which you want to import the customer letter.
- Select the taxation year to which the letter will be imported.
- Select the custom Taxprep letter that you want to import.
- Click the Import button.
The imported letter will be displayed with all existing CCH iFirm Taxprep letters (Settings/Taxprep/Client Letters).
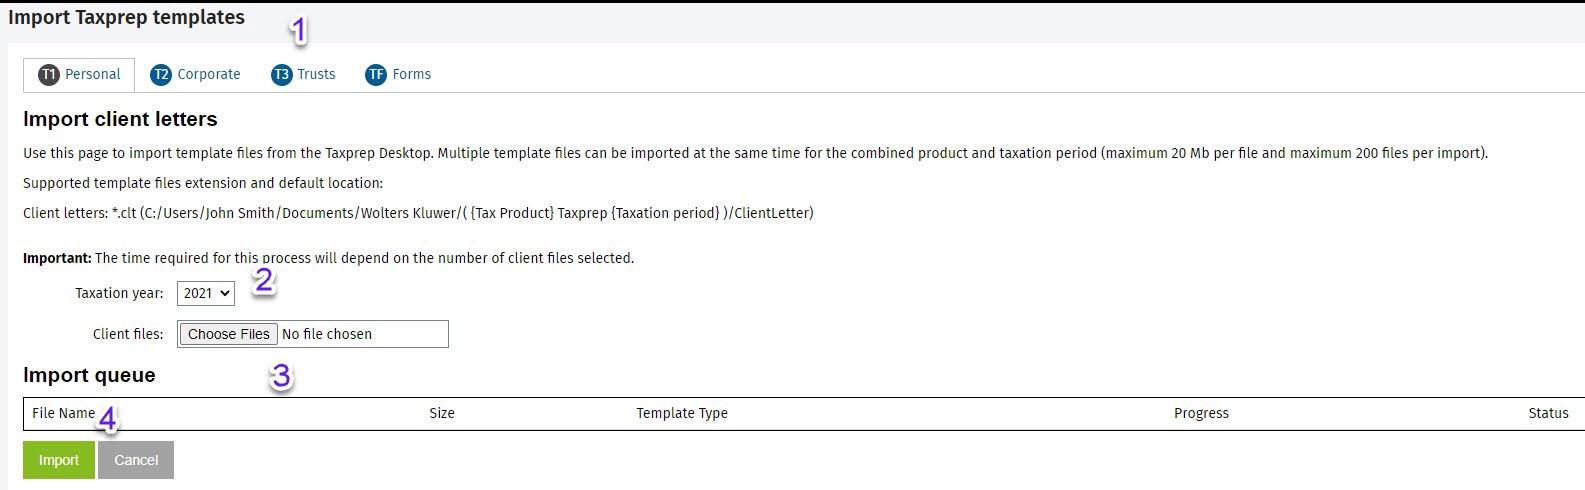
New or modified shortcuts
New keyboard shortcuts:
- Close a document / Back to Return Manager: Shift+Alt+C
- Add return: Alt+N
- Activate Review Mode: Ctrl+0
- Display the Diagnostics view in the left menu: Alt+D
- Display the Return properties dialog box: Shift+F11
- Search in slips: Shift+F4
Modified keyboard shortcuts:
- First review: changed from Ctrl+7 to Ctrl+1
- Second review: changed from Ctrl+8 to Ctrl+2
- Insert a mark to flag a problem: changed from Ctrl+9 to Ctrl+3
- Insert a mark to flag a question: changed from Ctrl+0 to Ctrl+4
CCH iFirm Taxprep Pro Only
Tax Environments – Group returns per environment and apply the appropriate templates
Tax environments allow you to associate returns with different groups. This association will facilitate the selection of the appropriate templates (i.e., electronic service identification, preparer profiles and print formats) per environment. The environment functionality is related to the CCH iFirm filtering and group feature. For more details on creating different groups, please consult the CCH iFirm video Firm Filtering & Group Settings.
To create the environments, navigate to Settings/Taxprep/Environments.
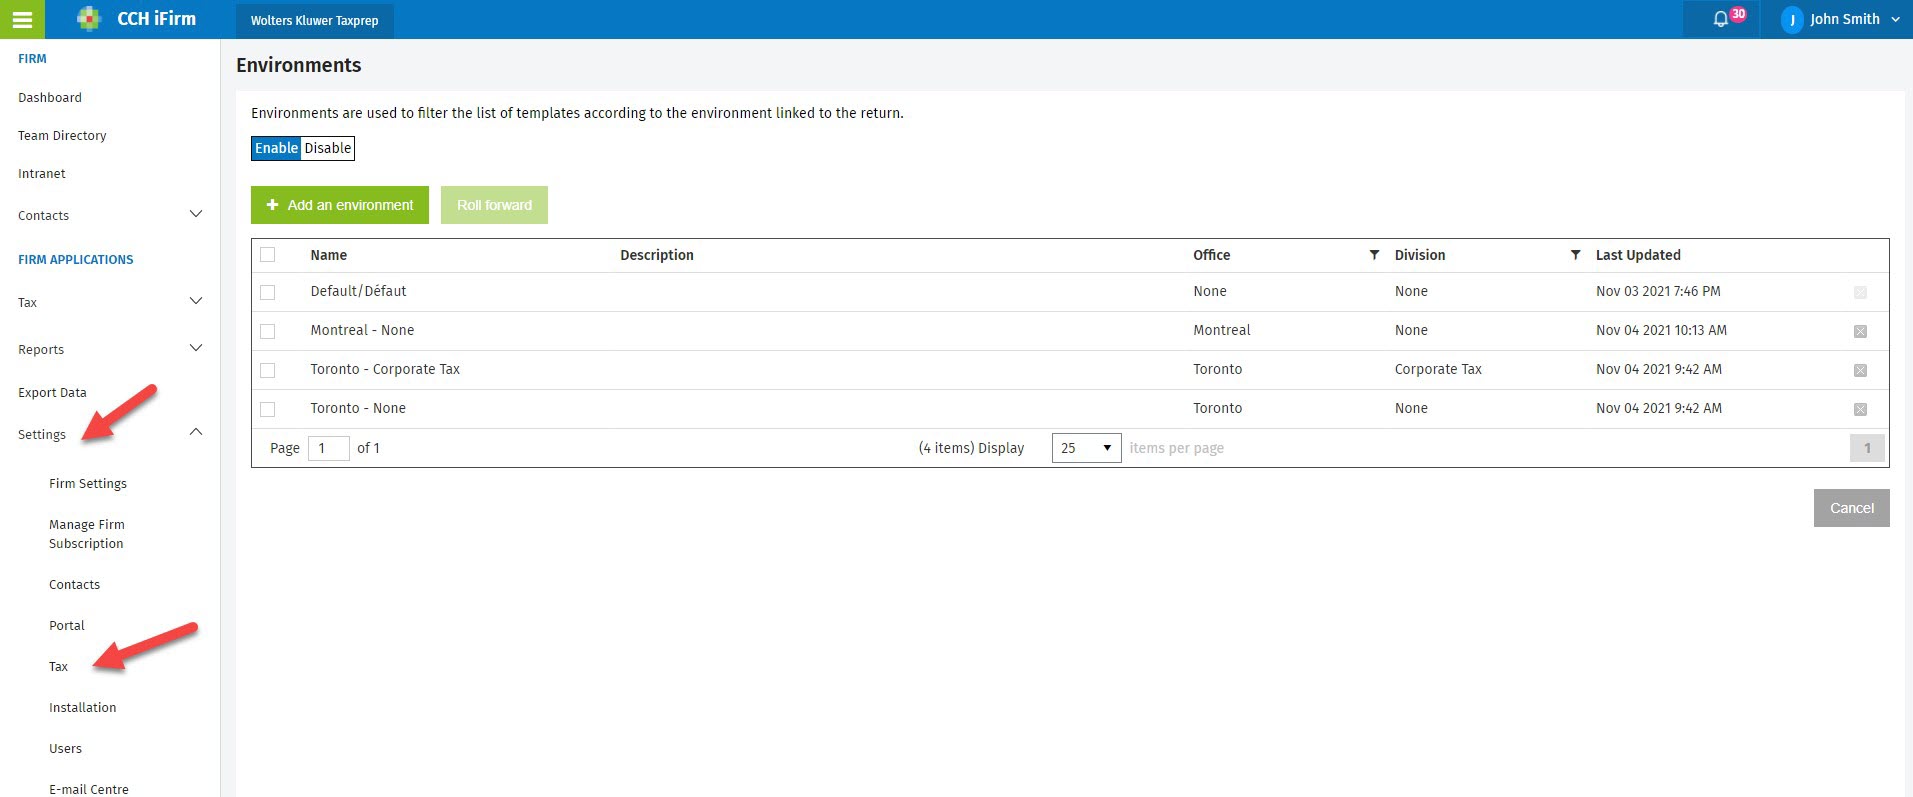
Then you can create a number of environments that would match the groups applied to your contacts.
For example:
- In Settings/Firm Settings/Firm Filtering & Group Settings, there are two different groups: Office and Division. Under each of these groups, different offices and divisions are listed.
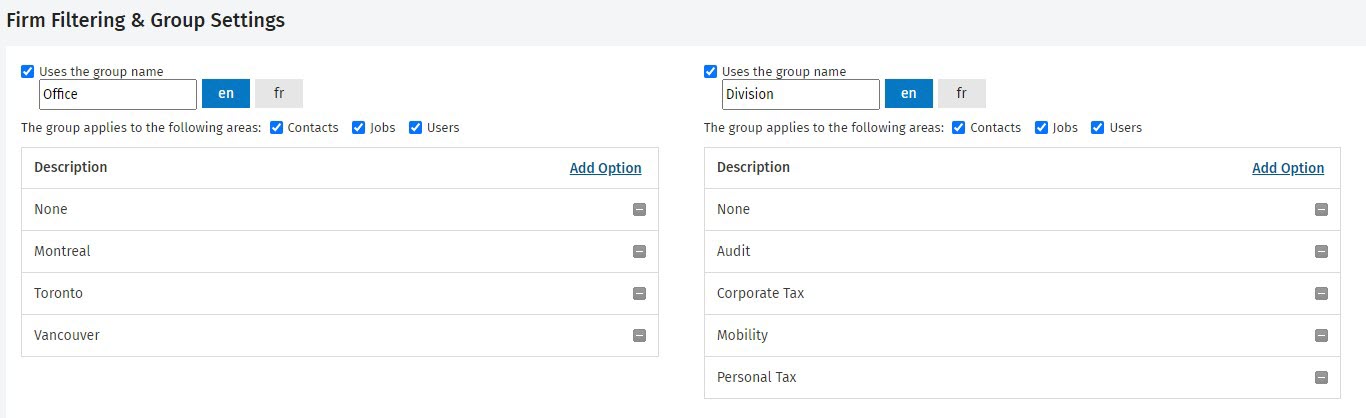
- In the contacts, the groups created in the previous step can be assigned.
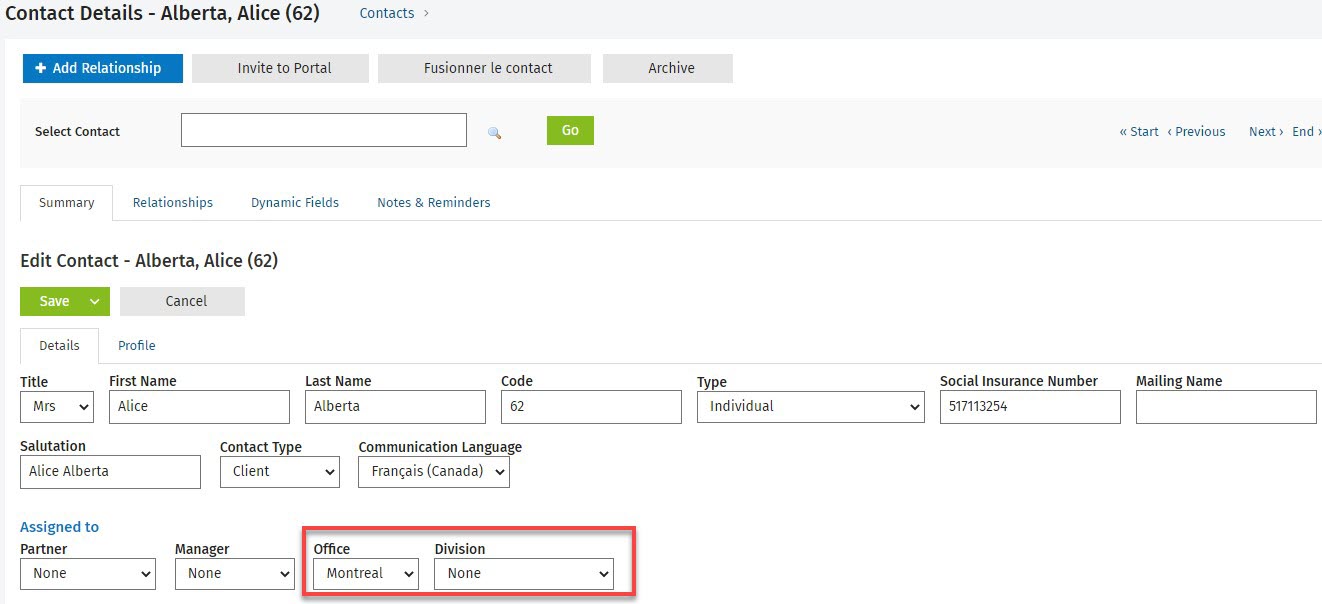
- In the Environments section, the environments created will cover all group combinations defined in Contacts.

Once the environments are created, all tax returns will be automatically grouped in one of the existing environments. If the perfect match is not found between the Environment and the Contact (related to groups), the tax returns will be grouped in the Default/Défaut environment.
A column has been added to the Return Manager to enable you to filter per environment:

Note: This column can be added by clicking the gear button in the top right corner of the Return Manager and selecting the Environment option.
In each environment, you can select the templates (i.e., electronic service identification, preparer profiles and print formats) that will be applied to each return associated with an environment.
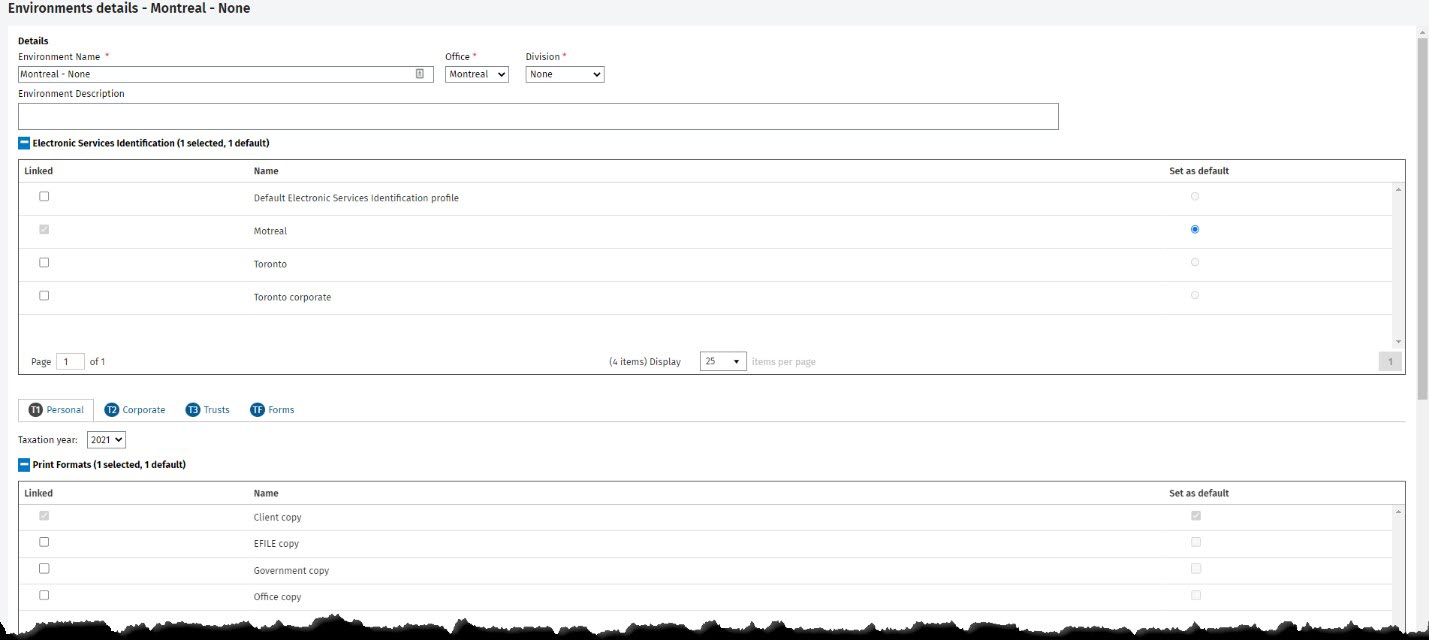
July 23, 2021 Release
CCH iFirm Taxprep Essentials, Advanced and Pro
Return Manager Enhancements
Quick filters
In addition to all filters already available in the Return Manager, Quick filters are now available to make the search for returns even more efficient. The Quick filters section contains two filters:
- Assigned to me
- Eligible for EFILE
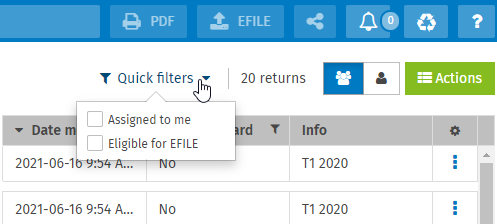
New roll forward process and addition of the Rolled forward column
To roll forward existing CCH iFirm tax returns to the next taxation year, you must now select the desired returns in the Return Manager and click Roll forward selected documents:
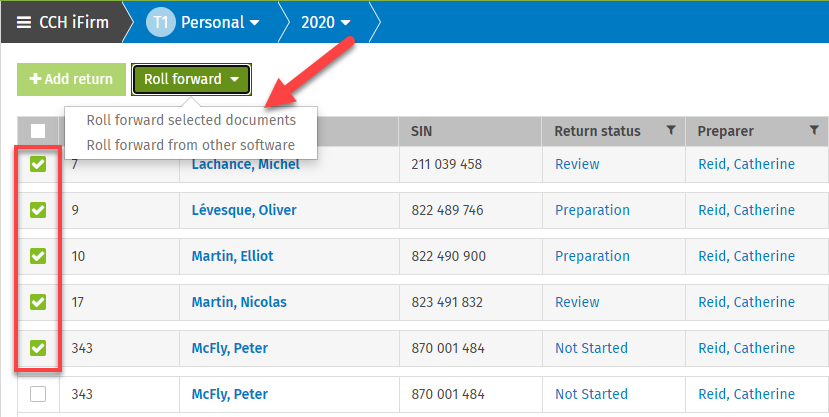
In addition, the Rolled forward column has been added to the Return Manager to indicate whether the return has been rolled forward to the next year (e.g., from 2020 to 2021).
This new column also allows you to filter on returns and display only those that have not been rolled forward to the next taxation year:
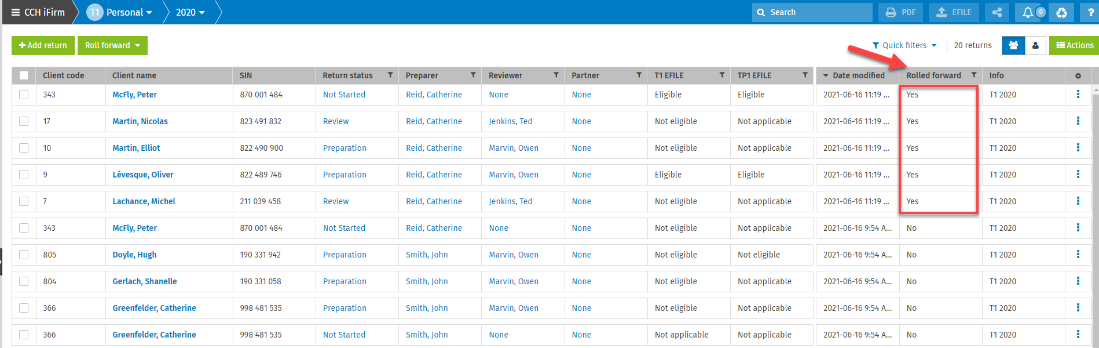
Additional EFILING forms (T3 product)
The following additional forms are now supported for the EFILE process for trusts:
- T3M
- T3GR
- T3RI
- T3P
- T3D
- T3S
- T1061
- T2000
Edge based on Chromium – New supported browser
CCH iFirm Taxprep can be opened with the Chrome and Edge browsers.
CCH iFirm Taxprep Pro Only
Web API enhancement
Additional endpoints are available to automate your process (see the list of endpoints in our Help system).
March 15, 2021 Release
CCH iFirm Taxprep Essentials, Advanced and Pro
T183 – Digital signature timestamp automatically updated
If you are using the electronic signature feature in CCH iFirm Portal, the fields in the Electronic signature section of Form T183 will now be automatically completed when the signature is entered on the portal. These fields must be completed to EFILE tax returns if the digital signature was used.
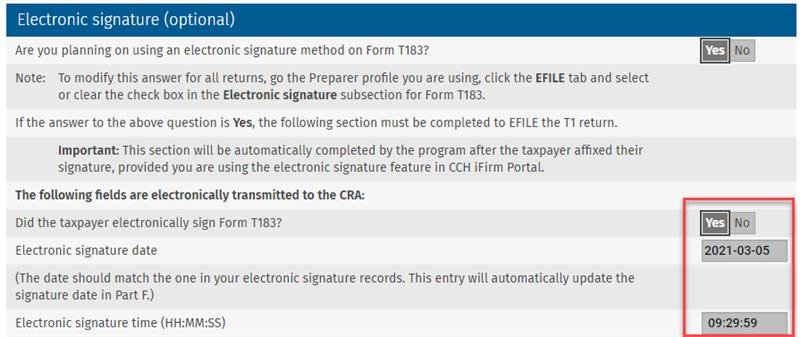
February 22, 2021 Release
CCH iFirm Taxprep Essentials, Advanced and Pro
Access Cells Metadata from Tool Tips
Where metadata has been added to a cell, such as review marks, comments, cell breakdowns or spreadsheets, this information can now be accessed or modified more easily.
Hovering the pointer over the applicable tool tip will provide access to the relevant commands.

Retaining Return Labels
When a label is added to a return, it will now be retained when the return is rolled forward.

Rolling forward predefined letters
In addition to being able to roll forward any new letters you created last year, you can now also roll forward a predefined letter that was customized last year.
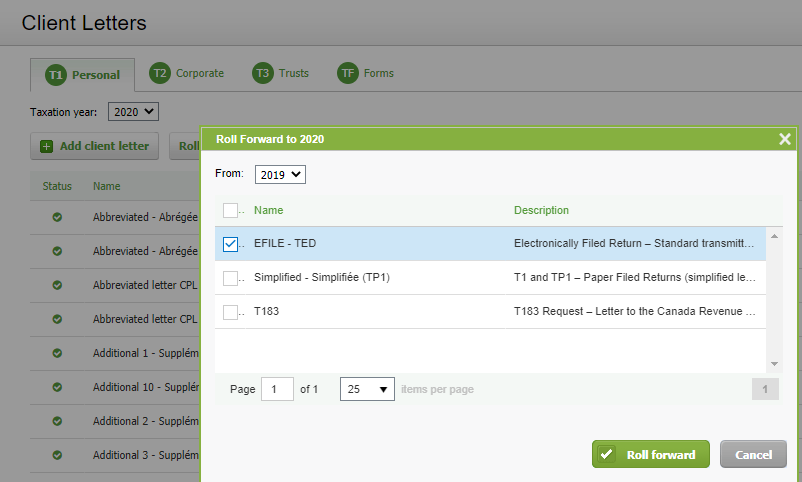
CCH iFirm Taxprep Advanced and Pro Only
Hiding Diagnostics for all Returns
Many diagnostics provide warnings or reminders in addition to identifying errors. For example, diagnostics providing details of specific filing requirements. These diagnostics can be hidden if desired, e.g., to expedite subsequent reviews.
Where the same diagnostic appears in multiple returns, and it is not something that individual preparers need to be aware of, you may prefer to hide it for all returns.
When you click a diagnostic, the Hide diagnostic option appears below the diagnostic. This option will now have a drop-down list where you can choose between Hide for this return only and Hide for all returns.
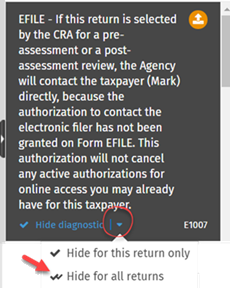
Note that you must have the appropriate security role to use this feature. The following security roles have been added to manage users’ rights for the Hide diagnostics for all returns feature:
- Tax – Returns – Diagnostics – Hide diagnostics for all returns
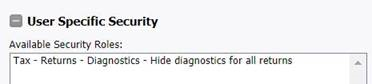
CCH iFirm Taxprep Pro Only
Displaying a list of comments from the REVIEW tab
On the REVIEW tab, you are now able to view the list of comments in the return, as well as their content.
This functionality is particularly useful when using the comments as part of a paperless review.
CCH iFirm Taxprep will display the content of the comment, the current-year value of the cell to which the comment applies, and whether the comment will be rolled forward.
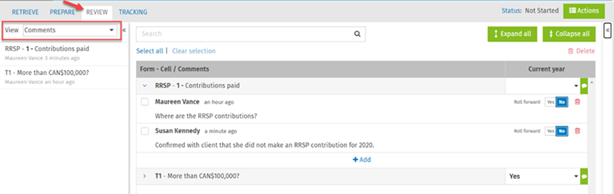
Add a response to a comment by clicking the Add button.
The current-year value of the cell to which the comment applies can be changed directly in this list. If you are using comments as review notes, this may allow you to make a correction without having to access the tax form. In addition, you can choose whether or not the comment will be rolled forward. CCH iFirm will indicate the name of the user who added each comment/response along with an indication of when the comment/response was made.
Use the Search field at the top of the list to find a specific comment or comments. You can search for any text that appears in the list of comments: e.g., form name, part of a cell description, text within the comment or the name of the person who added or responded to the comments.
Comments can be deleted by selecting the check box beside the appropriate comment and then clicking the Delete icon at the top of the list.
New tax security roles
The following security roles have been added to manage users’ rights:
- Tax – Return – Edit all cells of the contact
- With this security role, users can modify all fields on the Identification form that are synchronized with the corresponding contact.
- Tax – Return – Edit specific cells of the contact
- With this security role, users can modify specific fields on the Identification form that are synchronized with the corresponding contact. Please click here to know which contact-synchronized fields can be modified in the Identification form.
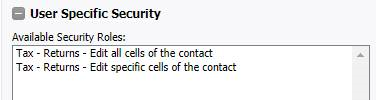
Note: For more information on which fields are synchronized in the Identification form between the Taxprep module and the Contact module, click the following link: https://support.cchifirm.ca/en/content/cch_ifirm/tax/tax_-_sync_contact.htm.
Those security roles are assigned by default to existing users, but not to new users. Authorized users can assign or remove tax security roles from the Security tab of a given user.
For the entire list of available security roles, consult the Learn about Tax security roles help topic.
January 22, 2021 Release
CCH iFirm Taxprep Pro Only
Web API – Automate your firm’s processes with the Web API integration
A Web API is available to help you automate your firm’s processes. For more information, consult the Web API help topic. (This is a separate module. Please contact your solution consultant.)
December 18, 2020 Release
CCH iFirm Taxprep Essentials, Advanced and Pro
Creating and transmitting a pre-authorized debit (PAD) agreement (CCH iFirm Taxprep T1)
To transmit eligible PAD agreements, access the EFILE returns view. You can choose to transmit the PAD agreement together with the T1 return or choose to transmit it separately.

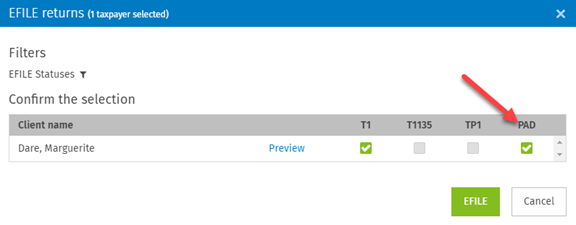
Like any other type of transmission, you can batch-transmit PAD agreements using the Return Manager.
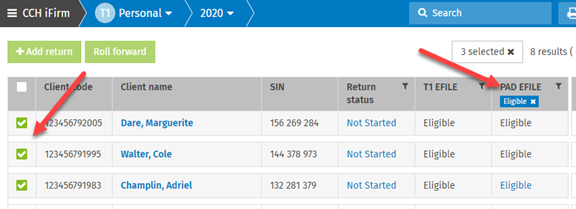
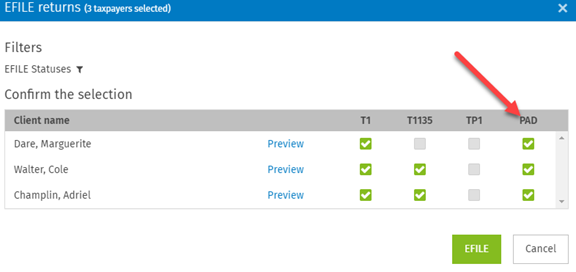
Use Form T185 to authorize the electronic transmission of a PAD agreement.
It is important to understand that the T1 return and the PAD agreement are subject to separate background transmissions. Therefore, there is an “T1 EFILE” status and a “PAD” status.
To be able to electronically transmit a PAD agreement, first ensure that the answer to the question Do you want to create and transmit an electronic pre-authorized debit agreement? is set to Yes on Form T185, otherwise, the value of the PAD status will be “Not applicable.”
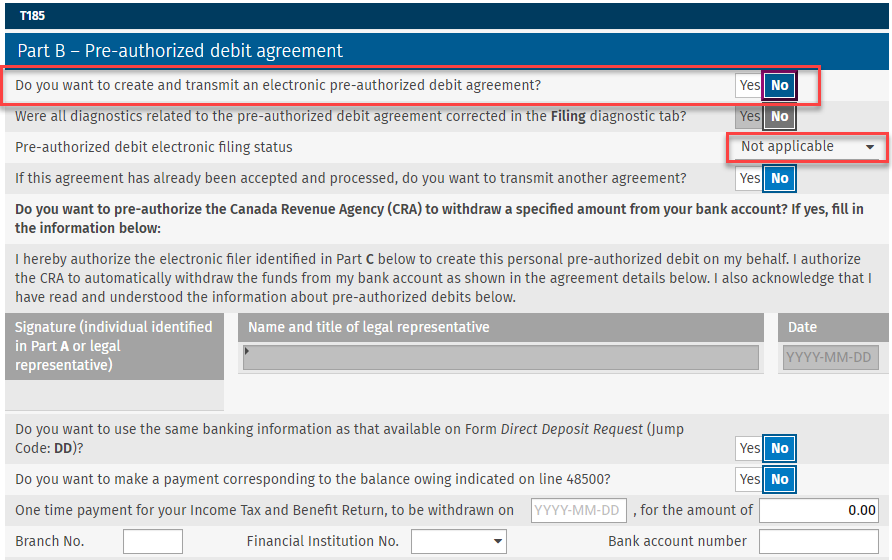
Once you have indicated that you want to create a PAD, make sure that the corrections required by the diagnostics T185 have been made in the Filing tab so that the value of the PAD status becomes “Eligible.” Otherwise, you will not be able to transmit the PAD agreement.
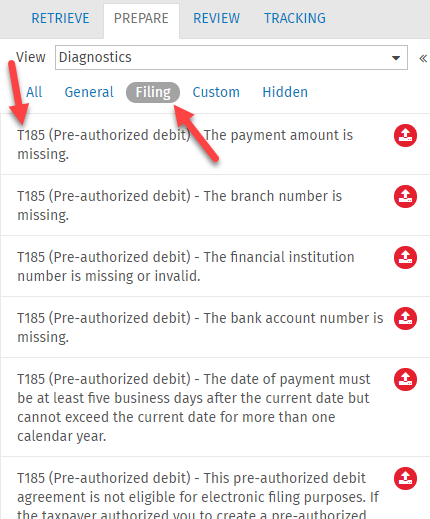
Like a T1 transmission, confirm that your client is authorizing you to transmit a PAD agreement. To do so, answer Yes to the first statement at the top of the T185 form.
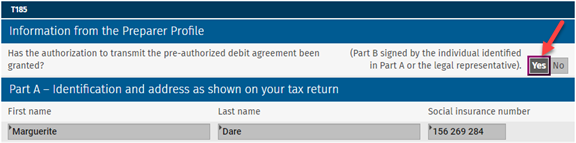
You can set your Preparer Profile (go to Settings >Taxprep>Preparer Profiles, click a profile, then the EFILE tab) so that the answer to this question always defaults to Yes.

Two options are available to help you maximize your productivity and limit the risk of errors.
- If the return contains banking information for direct deposit on Form Direct Deposit Request, you can transfer this information to the section of Form T185 relating to pre-authorized debit.
- You can also indicate that the taxpayer wants to make a payment corresponding to the balance owing indicated on line 48500 of the T1 return.
To make either one of these choices, set the desired boxes to Yes:
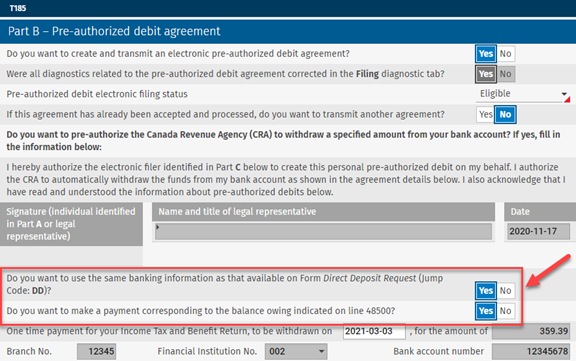
The T1 return EFILE status does not have to be “Eligible” to transmit a PAD agreement.
Printing T2200 and TP64.3 slips to separate PDF files (CCH iFirm Taxprep Forms)
The T2200 and TP64.3 slips can now be printed with the Print Slips functionality. To do so, click PDF button, then Print slips to PDF. The Print slips to PDF dialog box opens. In the Form drop-down list of the Select a form section, select the T2200 or TP64.3 slip.
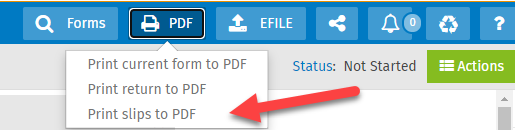
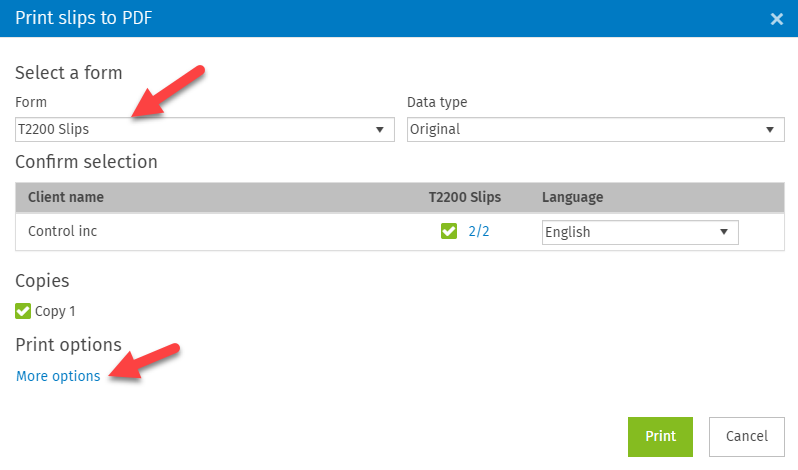
This addition allows you, in particular, to save the T2200 and TP64.3 slips in separate PDF files. To do so, click More options in the Print slips to PDF dialog box. The Print options dialog box opens. Clear the check box Merge PDF files into a single file. However, note that the electronic signature is not yet supported using the Print slips to PDF dialog box (the electronic signature is only supported using the Print current form to PDF or Print return to PDF dialog boxes).
You can, however, print the T2200 and TP64.3 slips from the Print slips to PDF dialog box in separate PDF files and add electronic signature tags from CCH iFirm Portal. To learn how you can add electronic signatures, watch the following video:
https://go2.wolterskluwer.ca/training-vid-en-ifirm-taxprep-digital-signatures
December 4, 2020 Release
CCH iFirm Taxprep Essentials, Advanced and Pro
Rolling forward settings – Select the options that you would like to keep in the roll forward process
The roll forward settings feature allows you to select roll forward-related options per tax product. To access the feature, go to Settings/Taxprep/Roll forward settings. The selected options will apply to all CCH iFirm Taxprep returns that are rolled forward.
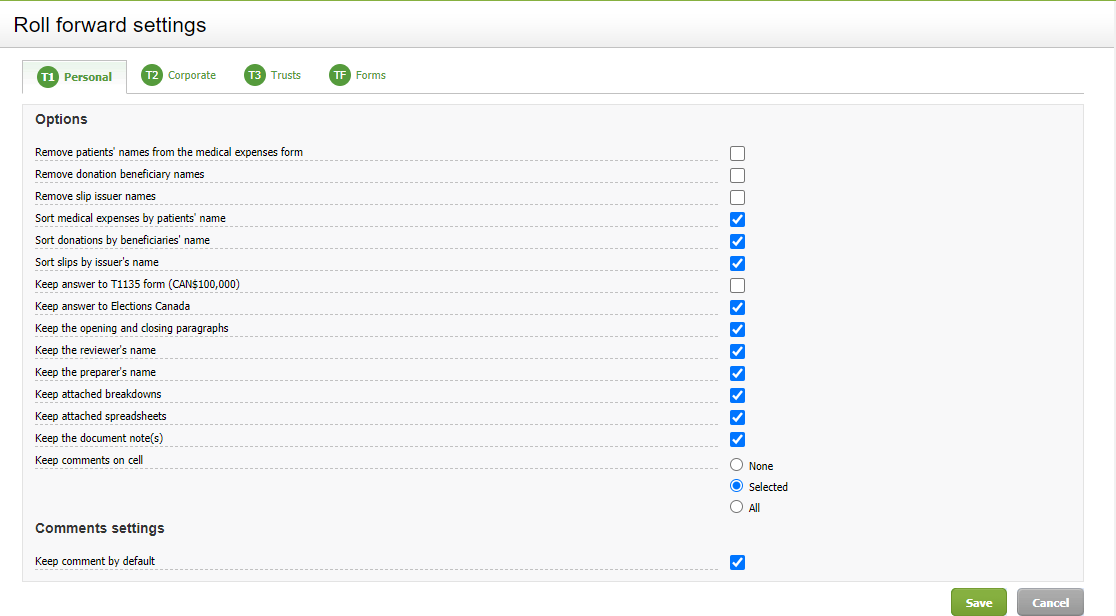
Those options can be modified during the roll forward process by clicking the Roll forward settings link in the Roll forward dialog box.
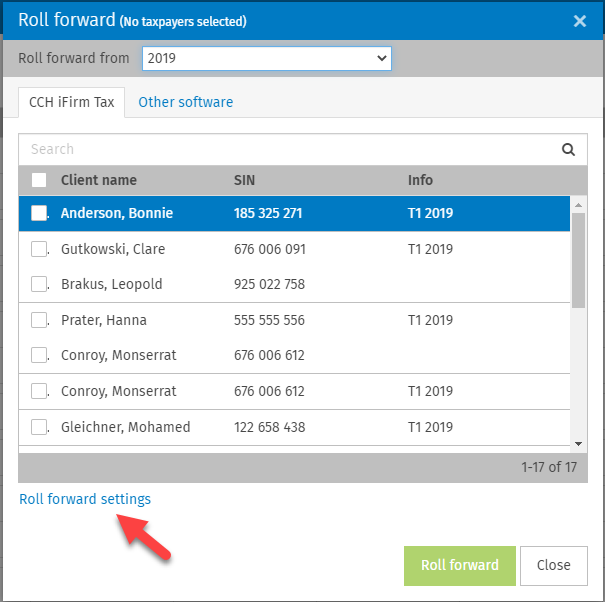
Rolling forward the metadata of a cell – Roll forward comments, attached breakdowns and spreadsheets
Roll forward comments, spreadsheets and cell breakdowns to the next tax year.
Select which comment should be rolled forward by clicking Yes or No for each comment, as shown below:
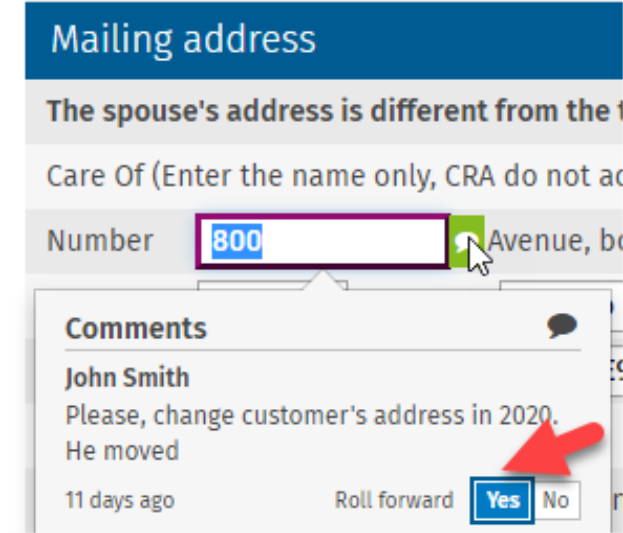
From Settings/Taxprep/Roll forwardsettings, select the option that you would like to apply to all tax returns:
- None – No comments will be rolled forward.
- Selected – Only comments with the Roll forward option set to Yes will be rolled forward.
- All – All comments will be rolled forward.
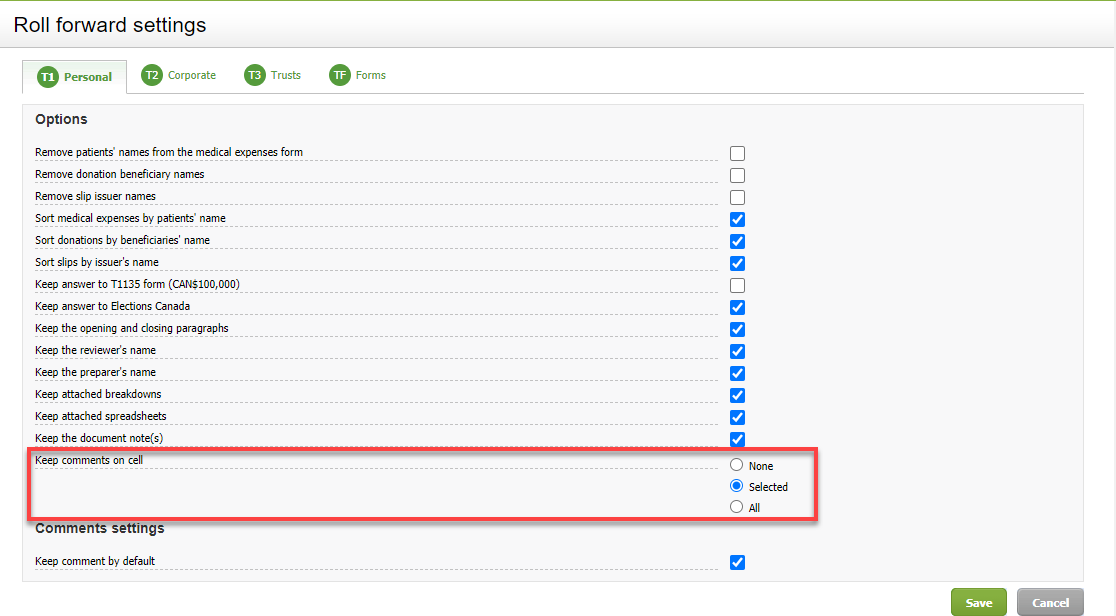
From Settings/Taxprep/Roll forward settings, choose whether the spreadsheets or attached breakdowns should be rolled forward:
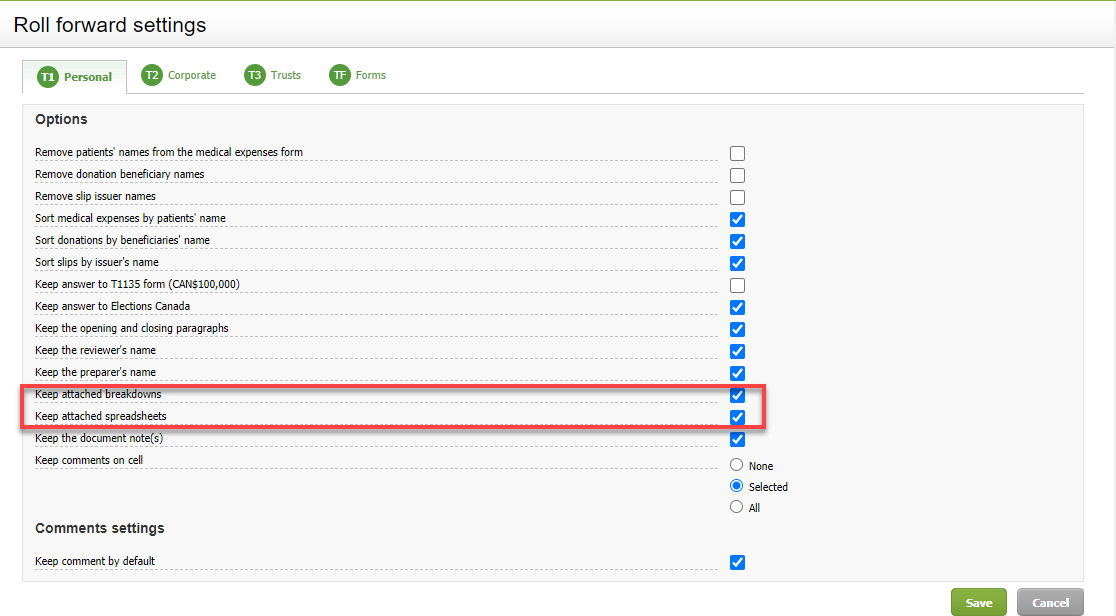
When selecting the option Keep attached breakdowns and/or Keep attached spreadsheet in the Roll forward settings page, a cell indicator will appear on the cell once the document is rolled forward.
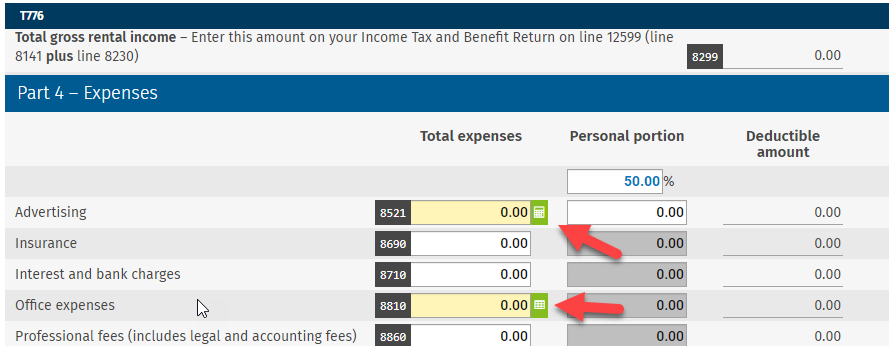
You can view and/or import the breakdown or the spreadsheet by using the option View/Import last year’s breakdown or View/Import last year’s spreadsheet from the contextual menu or the right-side menu bar.
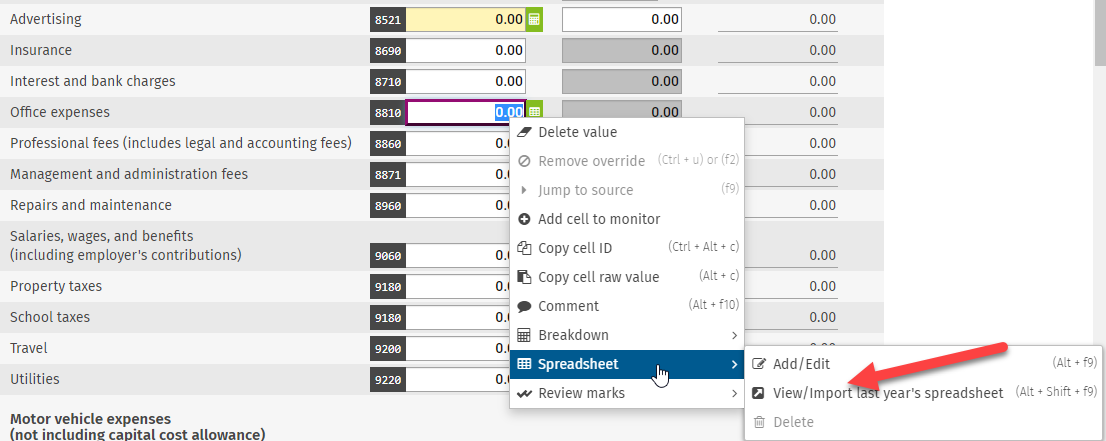
By clicking this option, the spreadsheet/breakdown from the previous year will display. This will allow you to easily review last year’s data. If relevant, click the Import button to import the spreadsheet/breakdown value in the current tax return.
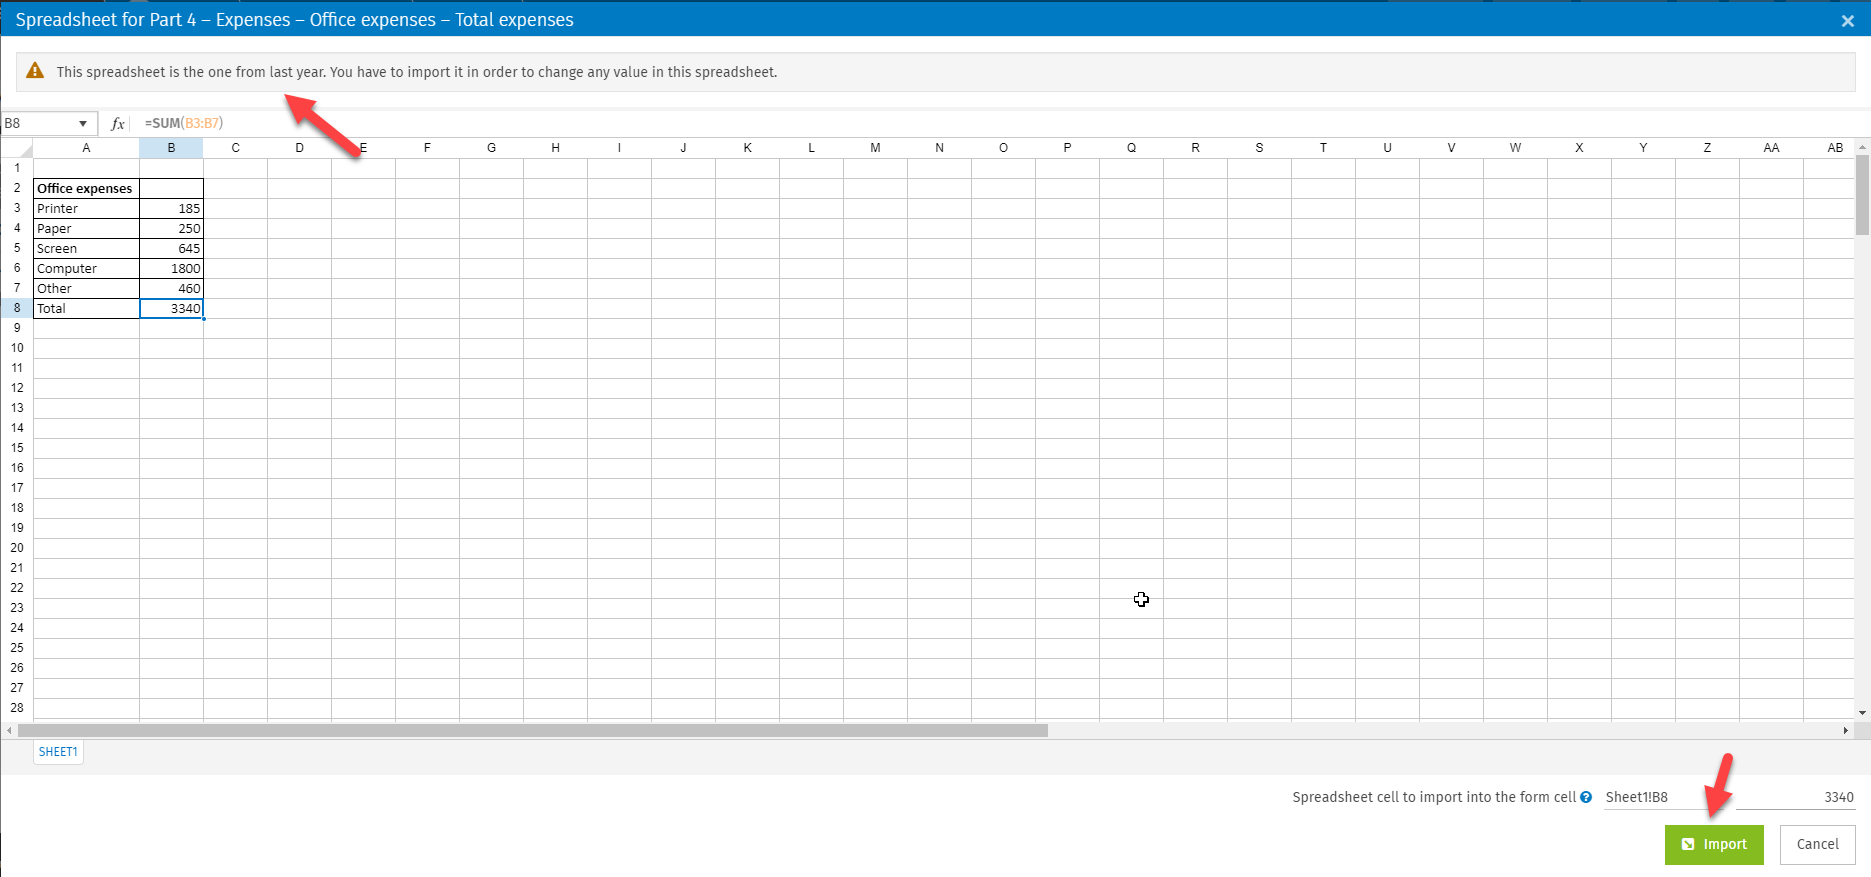
Rolled forward values display in blue – The text in the rolled forward fields is now identified in blue.
All rolled forward values are now identified in blue to easily differentiate the rolled forward value from an input value.
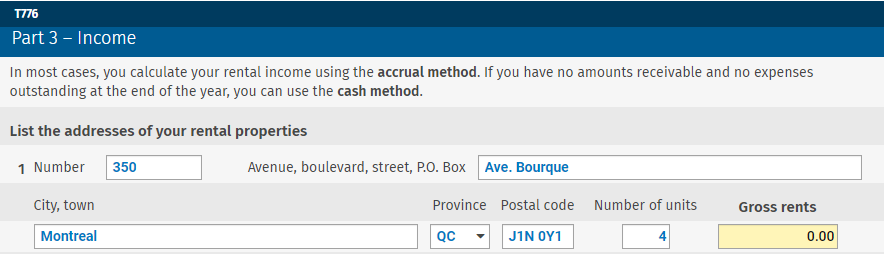
Close all forms – Close all forms in a single click with the Close all forms option in the right side menu bar.
Close all open forms in a single click by selecting Close all forms from the right-side menu bar or by using the Shift + Esc keyboard shortcut.
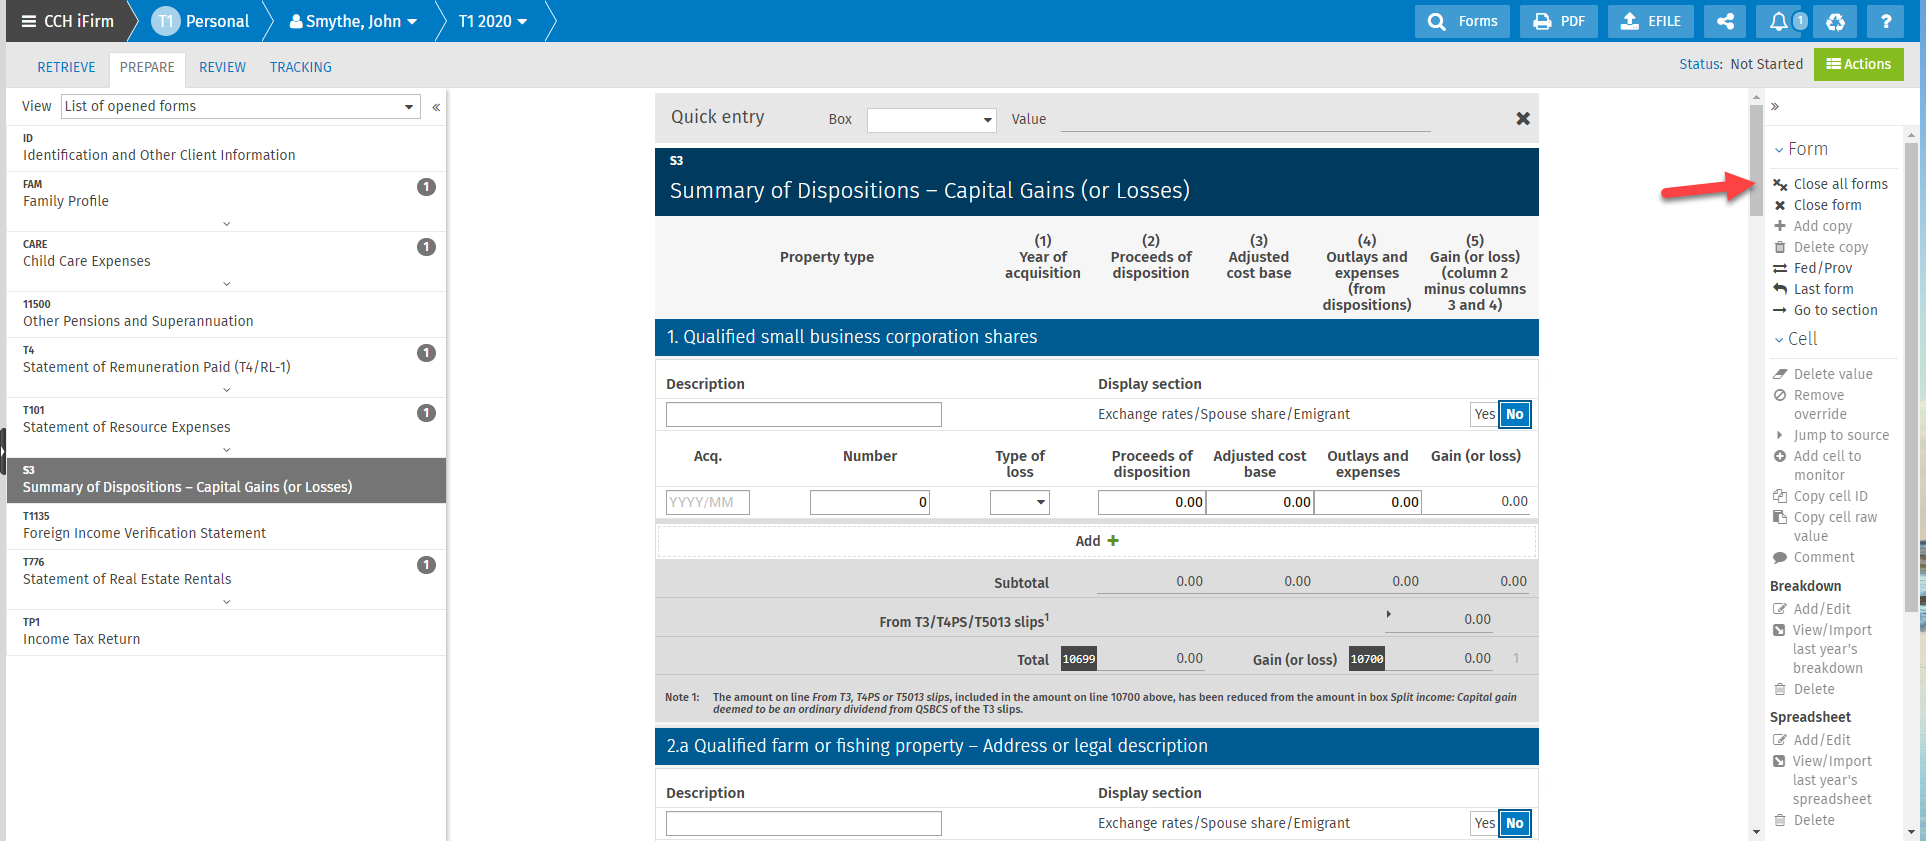
Tag colours – The different product tags (T1, T2, T3 and TF) now have specific colours for better visibility purposes.
Each tax product is identified with a different tag colour allowing for a clear visual differentiation between them.
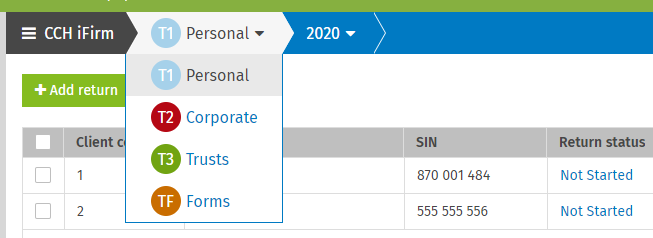
clicSÉQUR CO-17 return transmission – clicSÉQUR credentials can now be used to electronically transmit CO-17 returns.
clicSÉQUR and NetFile Québec credentials can now be used to electronically transmit CO-17 returns. Select which credentials should be used from Settings/Taxprep/Electronic Services Identification:
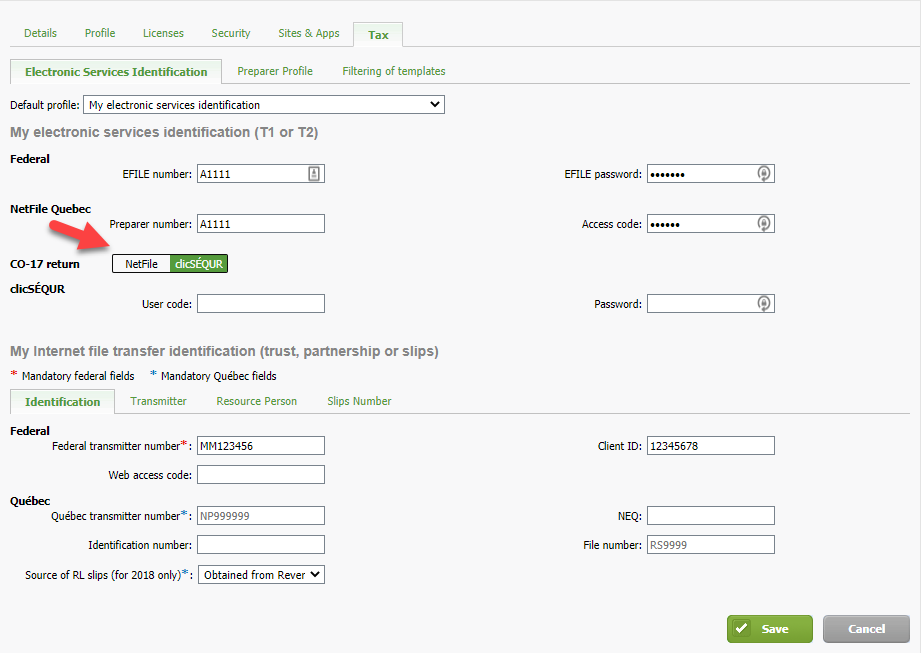
Contact security support – Manage who can see what for each user in your firm based on your firm’s contacts.
You can now use the Contacts Security functionality to restrict user access to your contacts in CCH iFirm applications including CCH iFirm Tax, Jobs & Billing, Contacts, Portal & Documents. User access can be removed from contact records associated with specific Managers, Partners, Contact Groups, Firm Filtering & Group Settings (e.g. Office & Divisions) and by using the Override Access for Specific Client(s) option. To review and update contact security, you must have the Settings – Contacts security role.
The following Contact Security video will provide you with an overview of this new functionality:
https://go2.wolterskluwer.ca/training-vid-en-ifirm-taxprep-office-division
To enable Contact Security for your firm, go to Settings/Contacts/General Settings, select Enable Contact-Based Security Access and click Save. The default setting for each user is full access to all records. To review users’ access, go to Settings/Contacts/Contact Security. All current system users are listed in this screen. From that screen, you can select a user to review their access. For example, if a user should not have access to contact records associated with a specific office (e.g. Sherbrooke), from the Edit Contact Security screen for this user you can remove the Sherbrooke office from the associated office(s). Then, this user will no longer be able to access contact records associated with the Sherbrooke office when browsing or searching for records in CCH iFirm and in the Taxprep module of CCH iFirm. As a result, the user will not be able to see tax returns associated with those contacts. To learn more on how to create groups such as Office and Division in contact records, please watch the CCH iFirm video Firm Filtering & Group Settings.
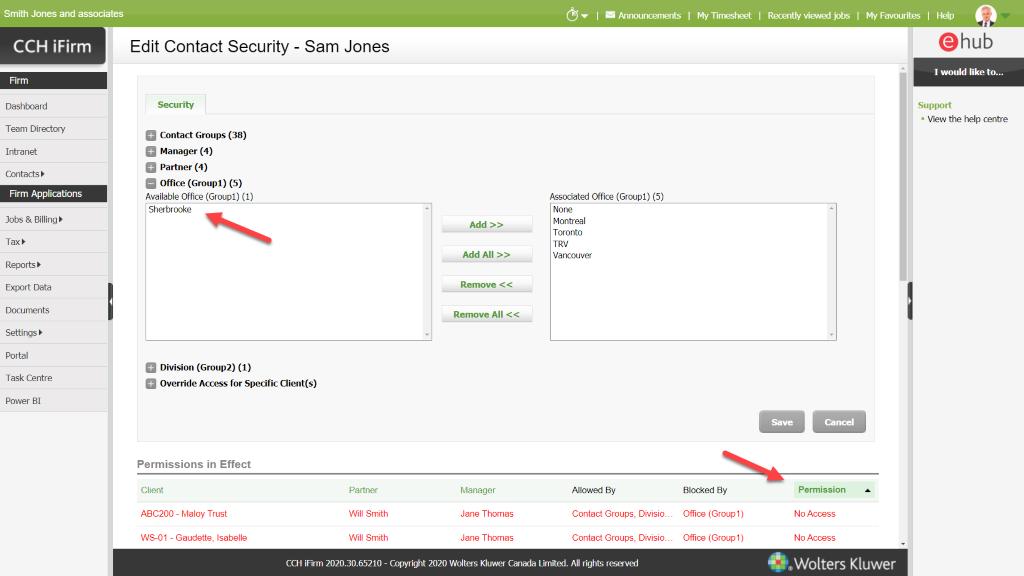
EFILING Forms T1134 and T106 − Ability to electronically transmit data for Forms T1134 and T106 from the CCH iFirm Taxprep T2 Product
You can now EFILE Forms T1134 and T106 from the CCH iFirm Taxprep T2 product.
CCH iFirm Taxprep Advanced and Pro Only
REVIEW tab – A right-side menu bar is now available in the Filters view of the REVIEW tab to manage different actions.
The right-side menu allowing you to manage different actions can be displayed from the PREPARE and REVIEW tabs.
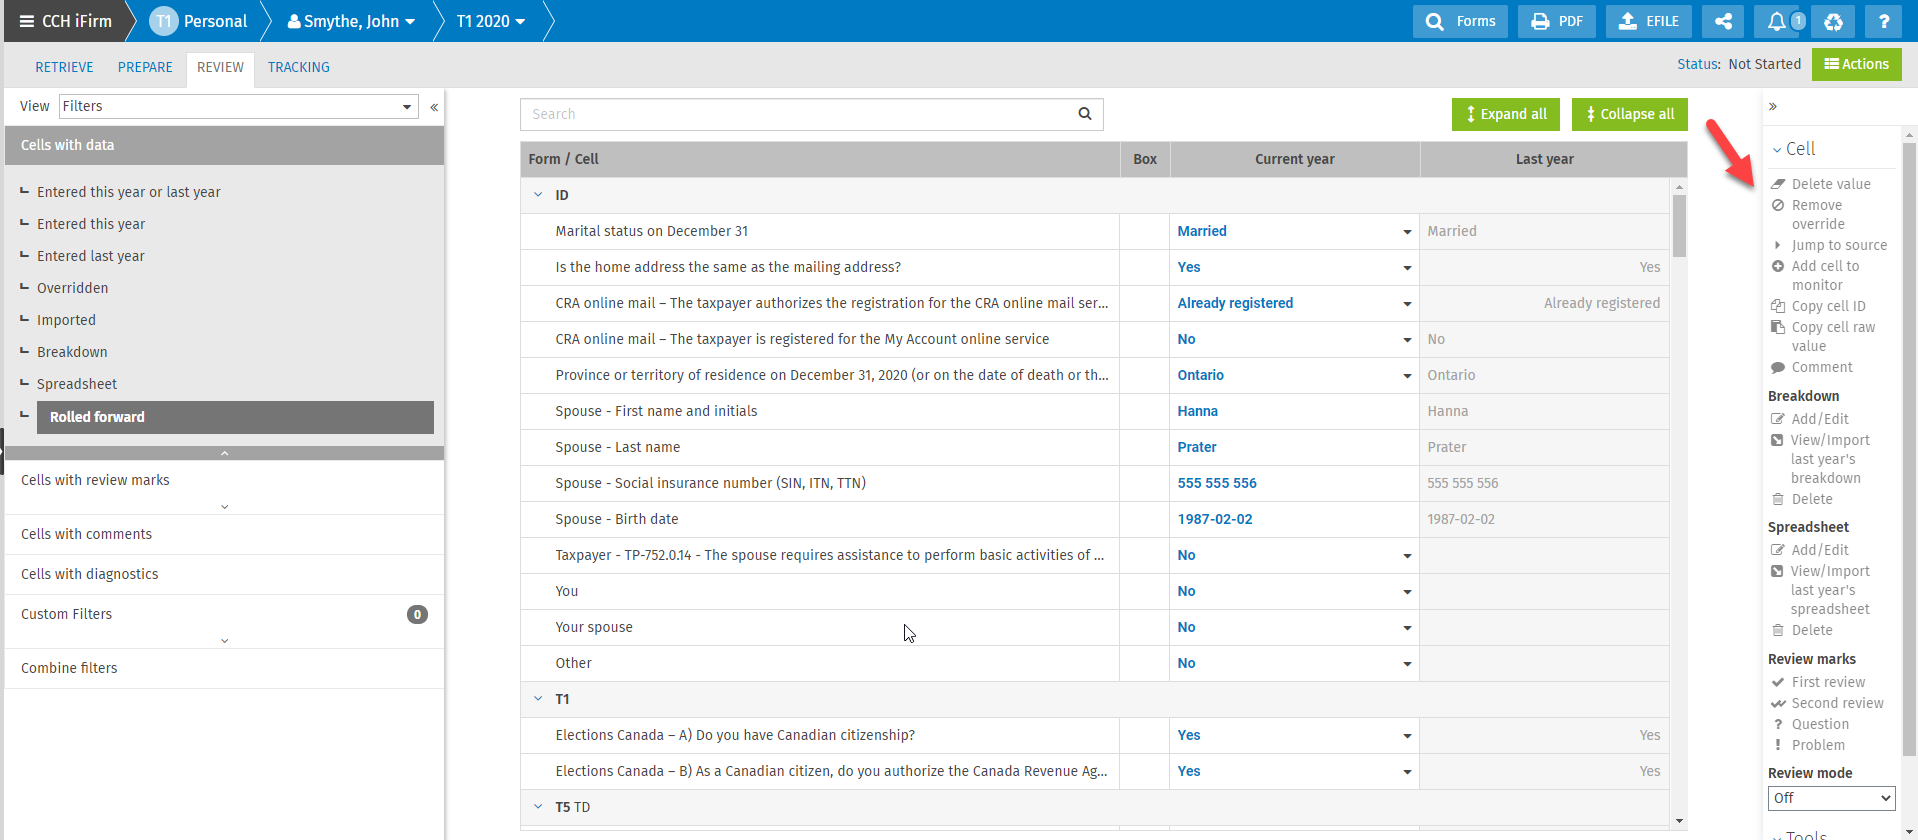
CCH iFirm Taxprep Pro Only
Customizing return statuses – Create custom return statuses to reflect the unique workflow of your firm
Create your own custom return statuses for each tax product (T1, T2, T3 and Forms) to reflect the unique workflow of your firm. The custom returns statuses can be created from Settings/Taxprep/Return statuses. Click Add a custom return status for each tax product and add the name of the return status in English and in French. Reorder the list of return statuses by using the three-line icon in the first column of this section.
Predefined return statuses cannot be deleted. However, they can be set as inactive and the inactive return statuses will not display in the list once the return status is ready to be assigned to any tax document.
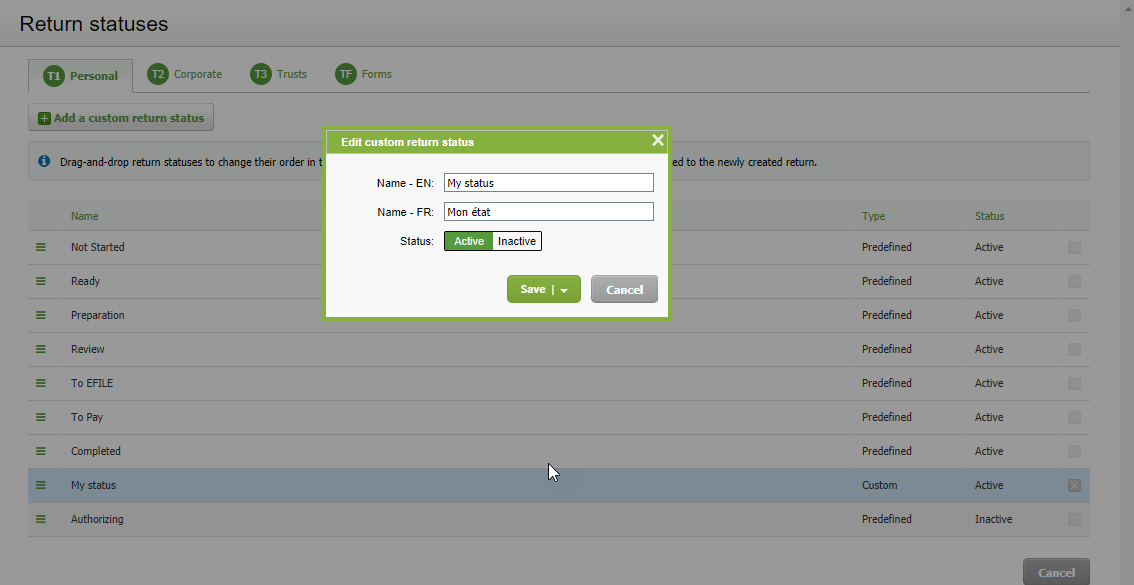
Once custom return statuses are created, you can assign any active return status to any tax document.
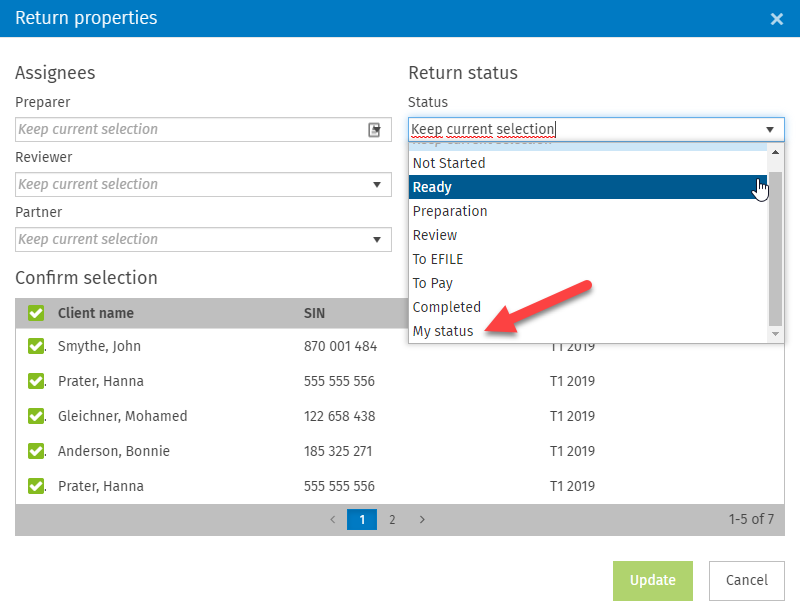
The following security roles have been added to manage users’ rights for the custom returns statuses feature:
- Tax-Settings-Custom return status – Add, edit
- Tax-Settings-Custom return status – Delete
For more information, please watch the CCH iFirm video:
https://go2.wolterskluwer.ca/training-vid-en-ifirm-taxprep-custom-statuses
Office segmentation – Decide who can use which Preparer Profiles and EFILE credentials per user in the firm
If you firm requires different preparer profiles or electronic services credentials, you can now assign Preparer Profiles or EFILE credentials to different groups and per user. You can also decide which user can use which Preparer Profiles or EFILE credentials. To do so, proceed as follows:
- Create groups such as Office and Division in the contact records. Please watch the CCH iFirm video Firm Filtering & Group Settings.
- Assign the Preparer Profiles and EFILE credentials to the groups created in step 1.
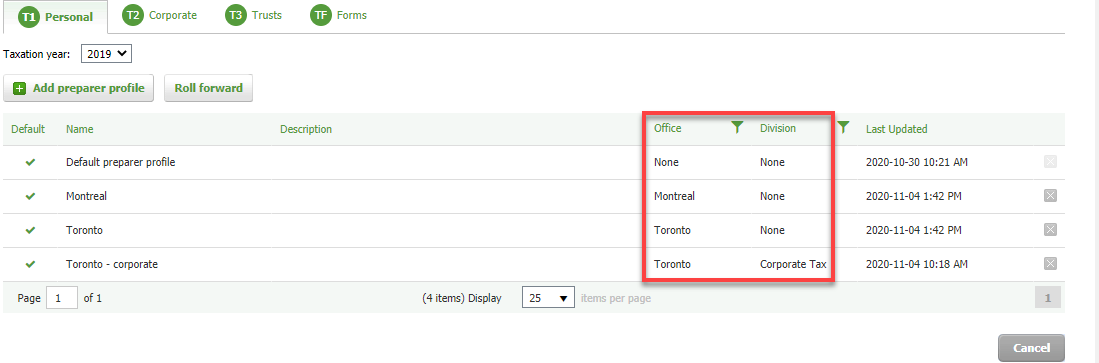
- Go to Settings/Users/Name of the user/Taxprep/Filtering of templates and select which group will be assigned to the user for electronic services identification and Preparer Profile. Based on this selection, the user will only be able to use the EFILE credentials and Preparer Profile that are assigned to the user’s selected groups from the Taxprep module.
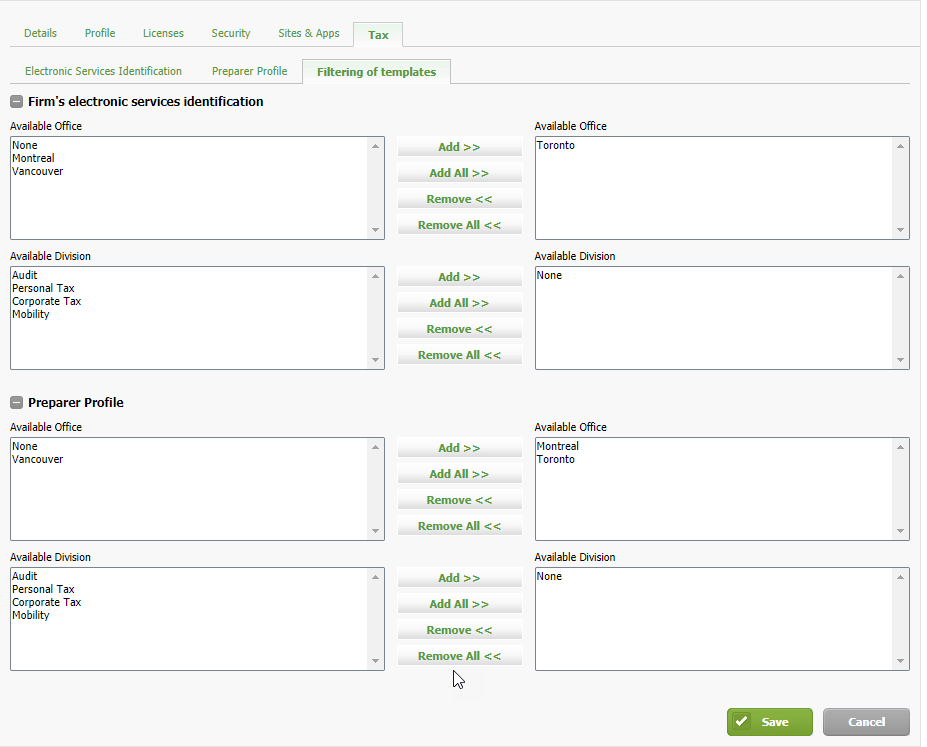
- Go to Settings/Users/Name of the user/Taxprep/Electronic Services Identification or Preparer Profile and select the default template per user.
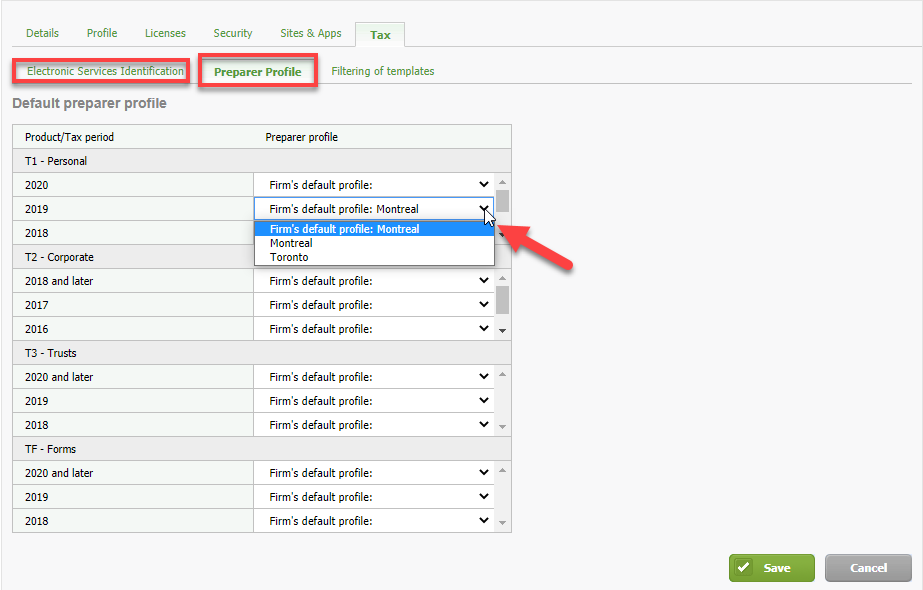
The following security role have been added to manage user’s rights for EFILE credentials and Preparer Profiles filtering:
- Tax-Settings-User-Edit templates filtering options
For more information, please watch the CCH iFirm video:
https://go2.wolterskluwer.ca/training-vid-en-ifirm-taxprep-office-division
July 17, 2020 Release
CCH iFirm Taxprep Pro Only
Audit trail – Track who did what and when in a tax return
The audit trail allows you to track all changes made in a tax return and who made them.
To access the audit trail, click the Actions button in the top right corner from the open tax return, then select Audit Trail from the drop-down menu.
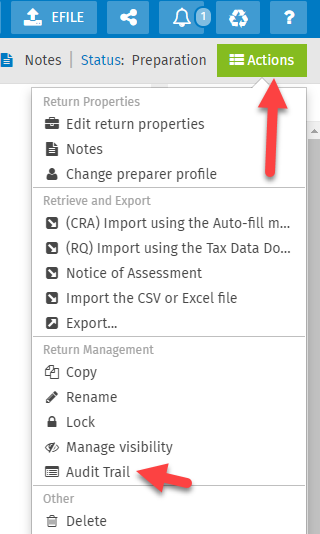
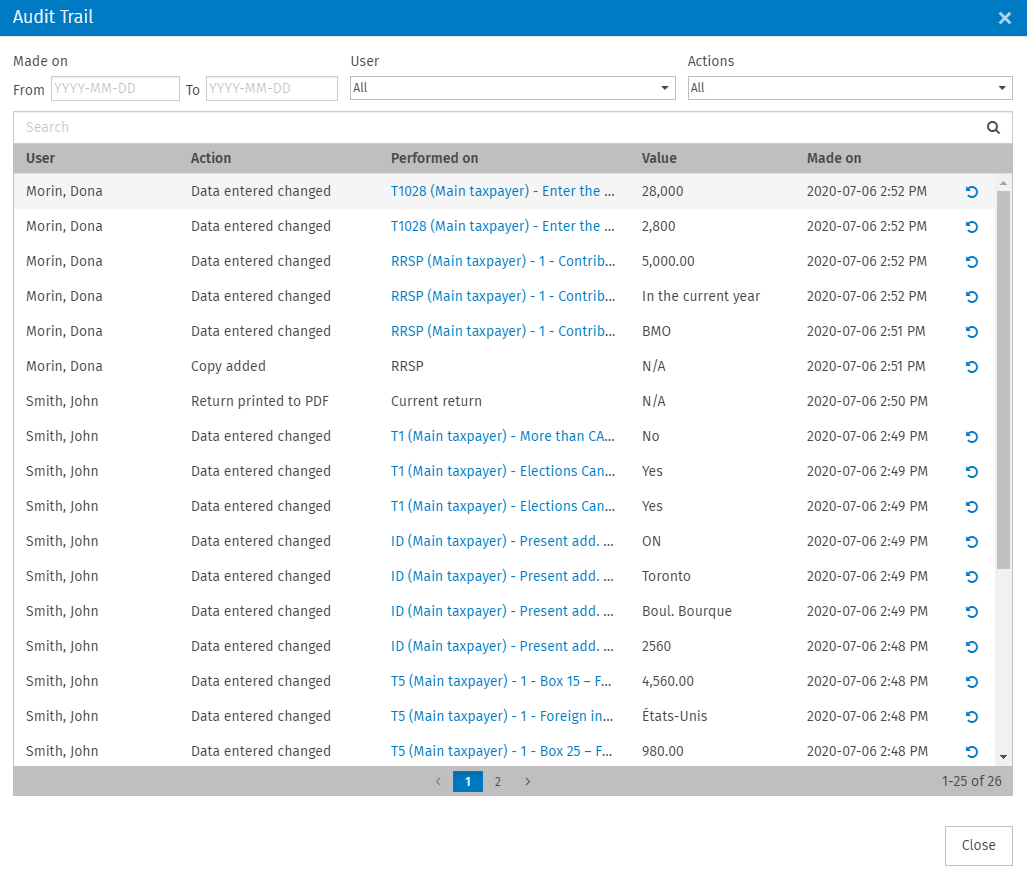
The data shown in the table can be filtered by date, users and actions.
This feature also allows you to revert changes back to a previous version of the return.
Clicking the Revert button ( ) will revert data back to the previous version of the return.
The Audit trail – Access security role was added to allow you manage which user can have access to the Audit Trail feature.
Note: For existing returns, the audit trail will only include the data and the actions performed starting on July 18, 2020, i.e., the date on which the Audit Trail functionality was made available.
June 5, 2020 Release
CCH iFirm Taxprep Essentials, Advanced and Pro
Scenarios form – Planning tool that allows you to evaluate the current and future tax situation of your clients (T1 only)
The Scenarios form has been enhanced to increase your productivity when you plan the tax situations of your clients for this year or the next.
From the Scenarios form, you can now create different scenarios by either entering data in the current return’s forms or by directly entering data in the Scenarios form without impacting data in the return.
In addition, you can choose to use the current-year rates or the subsequent-year rates. As a result, you can now create different planner scenarios from the Scenarios form directly in the current return without using the Planner mode. The purpose of this enhancement is to provide you with more flexibility when preparing tax planning for your clients.
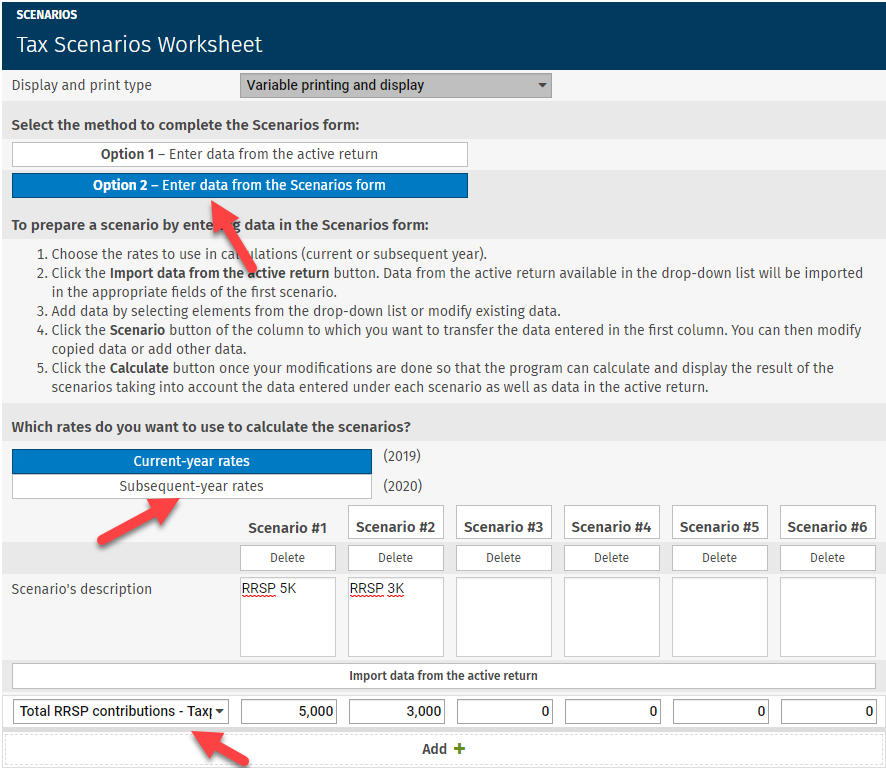
Customizing name conventions for printed or published PDF files
The Customize PDF File section has been added to the tax settings section (Settings/Taxprep). In this section you can customize the name of printed/published PDF files with multiple built-in parameters such as the form name, client code, date, etc. You can customize per tax product.
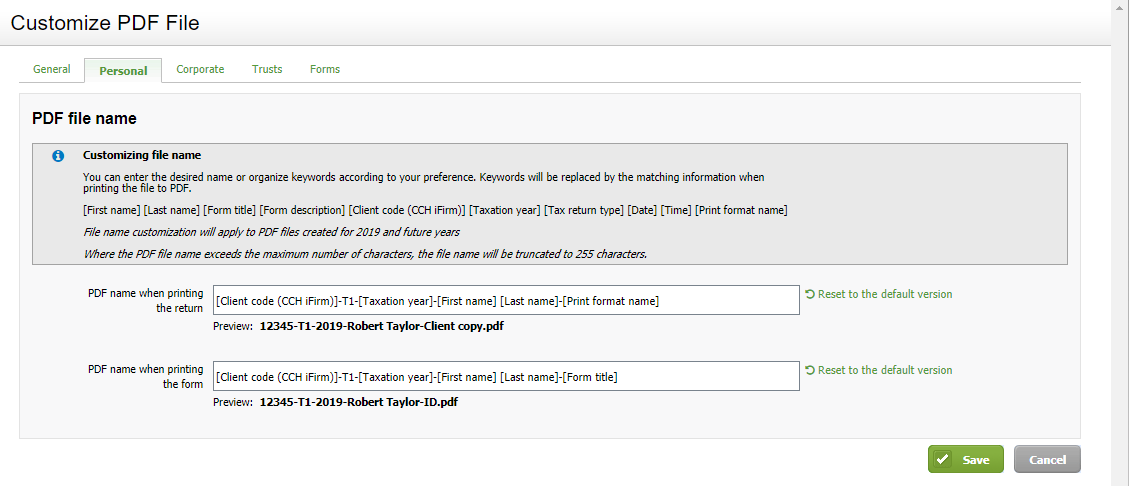
PDF password – Secure the printed PDF file with a password
The Customize PDF File section has been added to the tax settings section (Settings/Taxprep). In this section, you can add a password to any printed PDF file by using the contact identifier as the password, i.e. the SIN for T1, BN for T2 and Account number for T3 and Forms. Note that this new option is not available when publishing the PDF document to the secure CCH iFirm Portal.
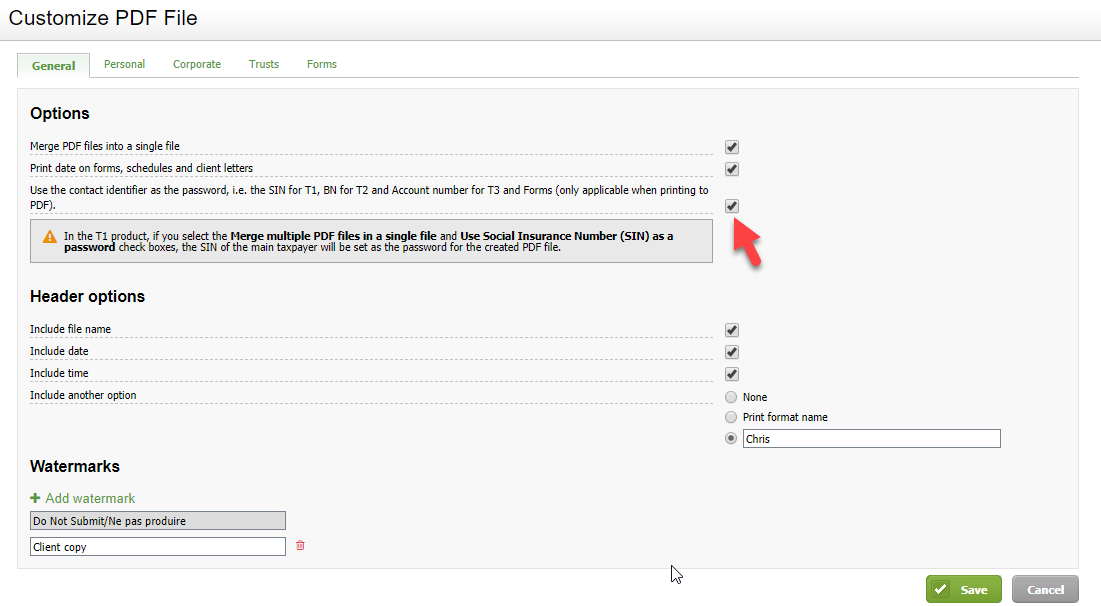
Return Manager enhancements – View and edit the Notes, Unlock and Manage visibility options
As part of the Return Manager enhancements you can now, in a single click:
- open tax document notes;
- unlock a document; and
- assign/manage visibility for a given tax document.
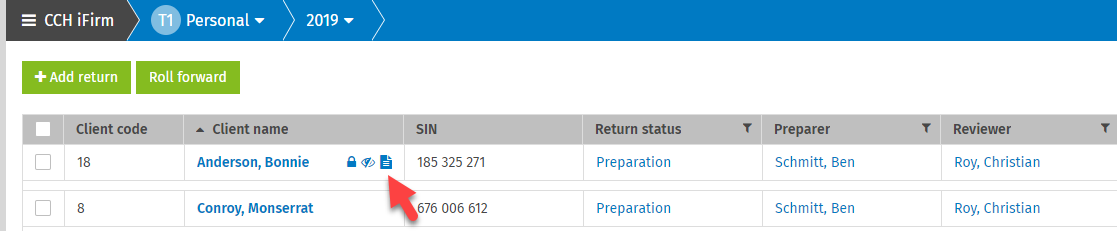
Delete returns in bulk from the Return Manager
The program now allows you to delete the returns from the return manager in bulk. To do so, in the Return Manager, select the returns that you want to delete, click the Actions button and select the Delete option.
You can restore documents that were deleted by error from the Recycle Bin available by clicking the breadcrumb ( ) icon.
Note: After 90 days, returns in the Recycle Bin will be permanently deleted.
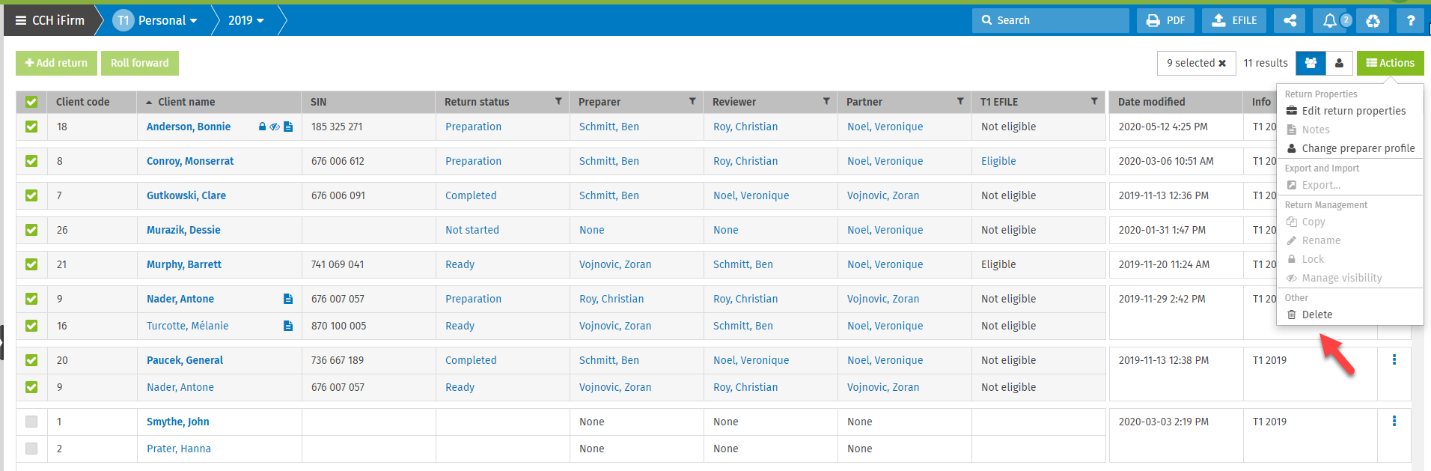
CCH iFirm Taxprep Advanced and Pro Only
Custom diagnostics – Create your own diagnostics to meet your firm’s needs
Create your own custom diagnostics for each tax product (T1, T2, T3 and Forms). Once you have clicked Settings/Taxprep/Diagnostics, only four easy steps are required to create a custom diagnostic:
- Diagnostics Details
- Click the Add diagnostics button.
- Select Blank custom diagnostic or an existing diagnostic in the Create from drop-down.
- Enter the diagnostic name, severity type (Info, Warning or Error) and indicate if the diagnostic will be public (visible to all firm’s users) or private (visible only for you).
- Diagnostic conditions
- Define the diagnostic conditions using any cell from any form.
- Diagnostic text
- Write the diagnostic text in English and/or in French. This text will be displayed in the return when the diagnostic becomes applicable.
- Diagnostic cell destination
- Determine to which cell the diagnostic will be linked from the Diagnostic pane when the diagnostic becomes applicable.
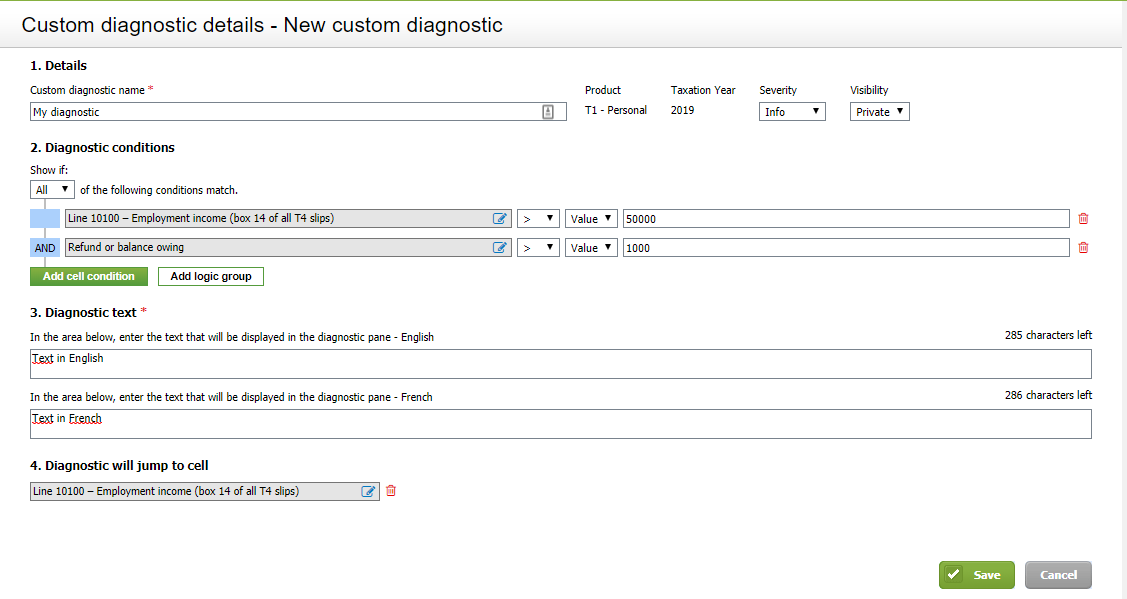
The applicable custom diagnostics will be displayed in the Diagnostics pane of the tax document, under the Custom diagnostics filter.
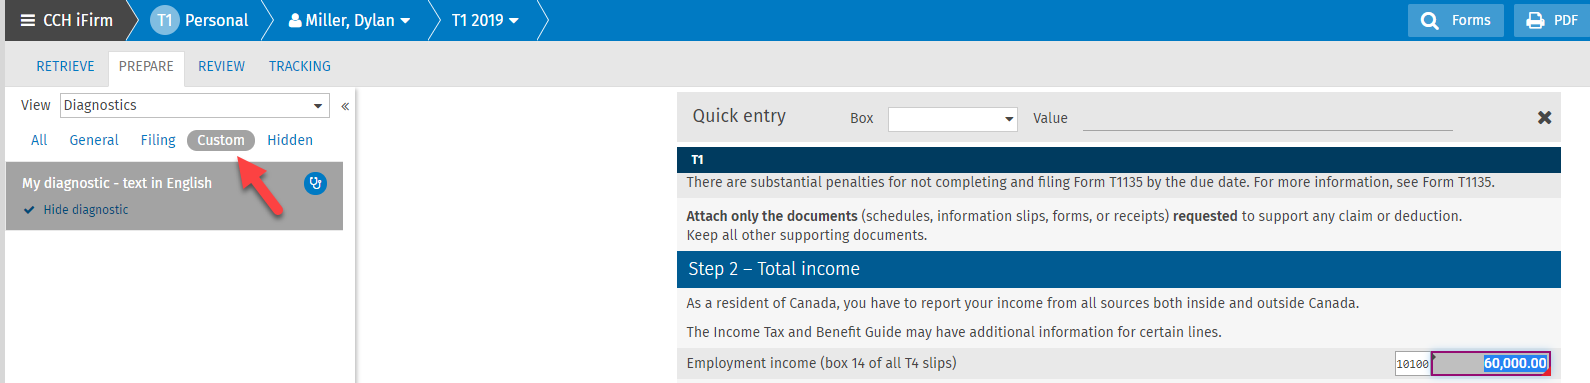
T1 Planner tax document – Powerful planning tool that allows you to evaluate the tax situation of your clients for the coming year (T1 only)
The Planner mode allows you to plan scenarios for subsequent taxation years.
The program allows you to create a planner document by rolling forward the current-year tax return. To roll forward a tax return to a planner mode, click the Roll forward button from the Return Manager, then select the latest taxation year to Planner and select the tax return to be rolled forward.
If desired, you can also import data entered in the current-year tax return to the Planner document. To do so, select the Import data entered this year after roll forward check box in the Roll forward dialog box.
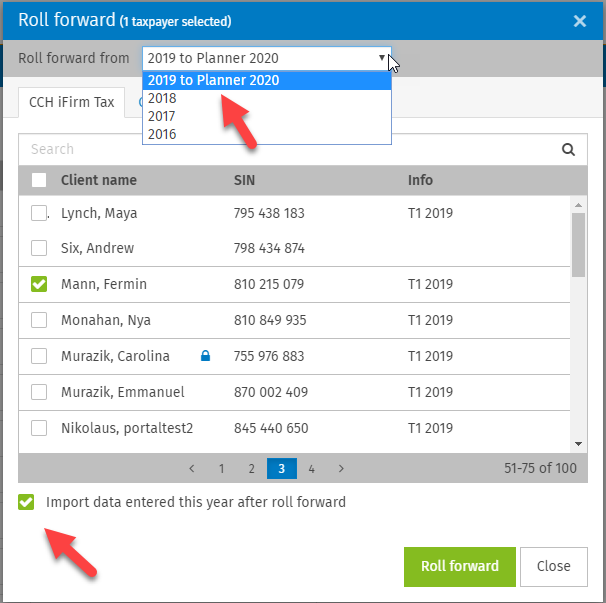
After the current-year tax return is rolled forward, a new Planner document will be created and will appear as Planner in the Info column.

Once the T1 planner document is open, the indicators in the breadcrumb and in the header of each form are added to identify that the active document is in Planner mode:
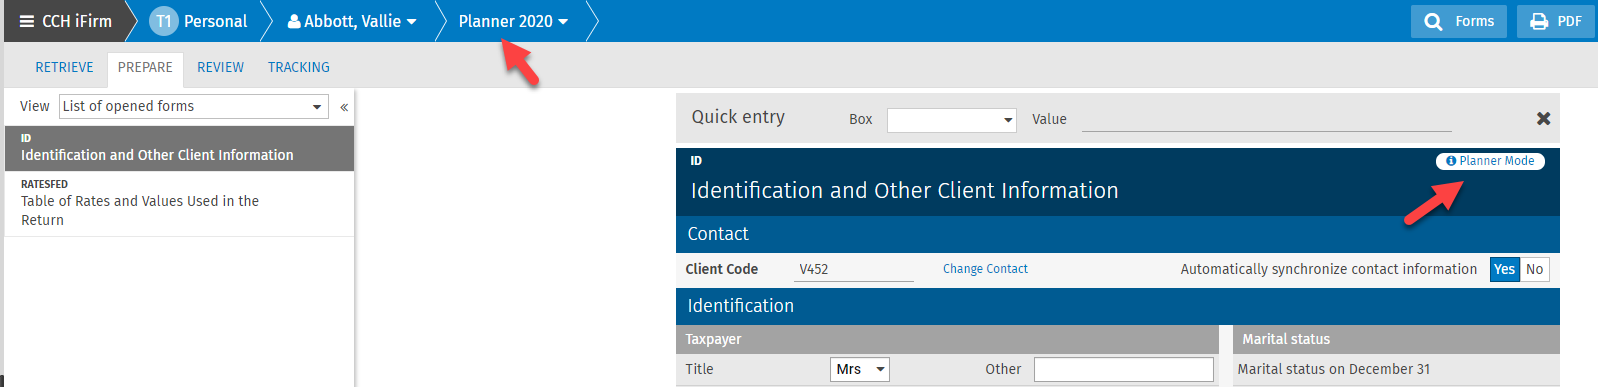
Note that the planner tax document cannot be electronically transmitted to the Canada Revenue Agency and Revenu Québec.
The T1 Planner Rates section has been added to the tax settings section (Settings/Taxprep). In this section you can find the T1 Planner Rates table which contains tax, credits and deductions rates as well as other important basic data for the coming taxation year that you can modify.
All created planner documents are linked to the T1 Planner Rates table.
March 9, 2020 Release
CCH iFirm Taxprep Essentials, Advanced and Pro
Tax Data Download service – Download tax data from the Revenu Québec Web site (T1 only)
Speed up your tax preparation process by downloading federal and provincial tax data for your clients. In addition to the CRA’s Auto-fill my return (AFR) service, Québec tax data can now be downloaded using the Tax Data Download service. To download federal or provincial tax data, click the RETRIEVE tab.
Slips best match – Tax data downloaded from the CRA is now associated with data in existing copies (T1 only)
The program will now match the data in slips downloaded through the Auto-fill my return service with the data in the rolled forward copies of the associated forms. This feature is available for the T3, T4, T4A, T4A(P), T4RIF, T4RSP, T5 and T5007 slips.
In addition, the T5008 slips are now automatically matched by the program to group several downloaded T5008 slips into a single copy to reconcile the downloaded data with data provided by securities brokers.
The Overridden data filter was added to the PREPARE tab – List of cells with overridden data
The Overridden data filter can be selected from the View drop-down list of the PREPARE tab to view the list of cells with overridden data.
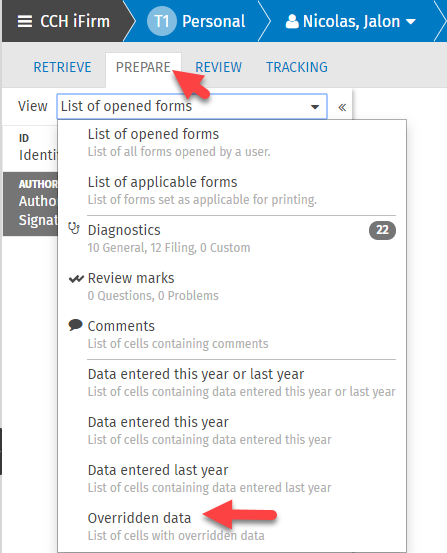
February 17, 2020 Release
CCH iFirm Taxprep Essentials, Advanced and Pro
Digital Signature Feature – Publish a form to be digitally signed in a single click
The e-signature feature is now fully integrated between CCH iFirm Portal and CCH iFirm Tax. You can publish documents or forms that require your customer’s digital signature in a single click.
To streamline your signature process, a built-in tag was integrated to the forms to indicate where the digital signature must be affixed.
To send a document or form to be digitally signed, click Publish to Portal icon and select Publish current form to Portal or Publish Returns to portal.
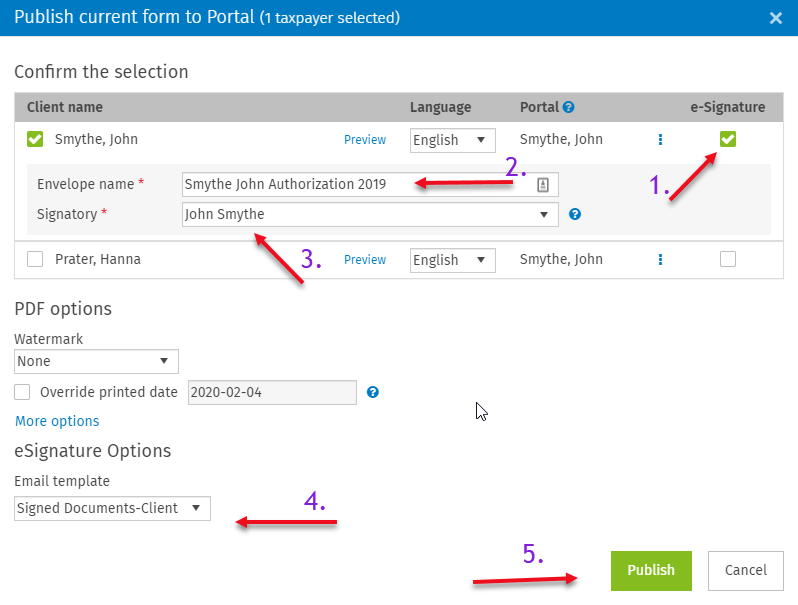
To have documents digitally signed, proceed as follows:
- Select the e-Signature check box.
- Modify the envelope name, if required.
- Select the signatory’s name.
- Select the e-mail template that will be used to advise the customer that they are required to electronically sign the form.
- Click the Publish button.
After publishing a document, the customer will receive an e-mail inviting them to log in to their portal and complete the digital signature process:
Once the document is signed, the preparer will receive an e-mail advising them that the document is digitally signed. The preparer will be able to access the signed document on the customer’s portal:

For more information, consult the Set Up the Digital Signature Feature help topic.
The following tax forms can currently be electronically signed:
T1 product:
- Form AUTHORIZATION, Authorization/Cancellation request – signature page (formerly T1013)
- Form NR Support, Support of Non-Resident Spouse and Children
- Form ECL, Engagement Letter
T2 product:
- Form AUTHORIZATION, Representative authorization request (formely RC59)
- Form CANCELLATION, Request to cancel authorization for a representative (formely RC59X)
T3 product:
- Form ECL, Engagement Letter
Forms product:
- Form ECL, Engagement Letter
- Form AUTOTAX, Personal Use of Employer’s Automobile
Auto-fill my return slips reconciliation (T1 product) – Group downloaded slips into a single slip
The reconciliation feature allows you to group downloaded slips into a single slip. For example, from the CRA Auto-fill my return service you can download many T3 and T5008 slips, which in turn, can be combined per financial institution using the slips reconciliation feature.
Once data is downloaded from the CRA Auto-fill my return service, from the RETRIEVE tab, select the existing copy (or create a new one) in the return where the downloaded data should be imported. This selection will be retained for subsequent downloads using the CRA Auto-fill my return service.
In the following example, three downloaded T3 slips will be imported into the T3-BMO copy:
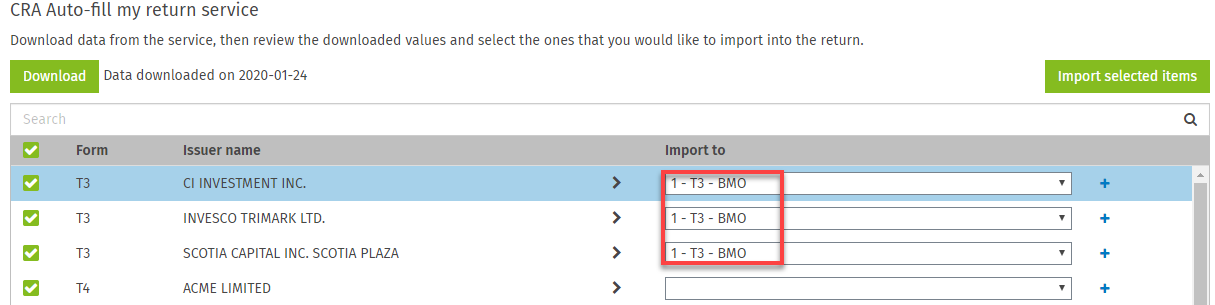
Moreover, it is possible to create a new copy where the data will be imported. To do so, click the + icon and create the new copy:
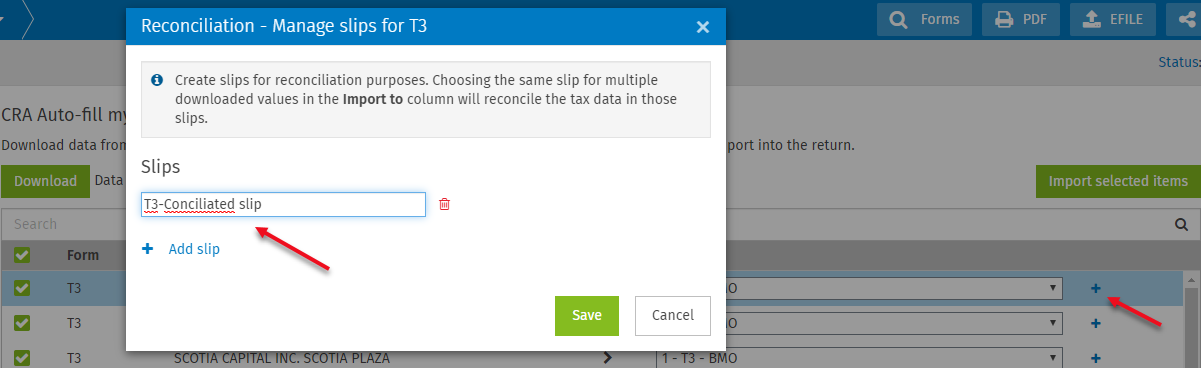
This newly created slip will appear in the Import to column and can be selected to reconcile the downloaded slips into a new slip :
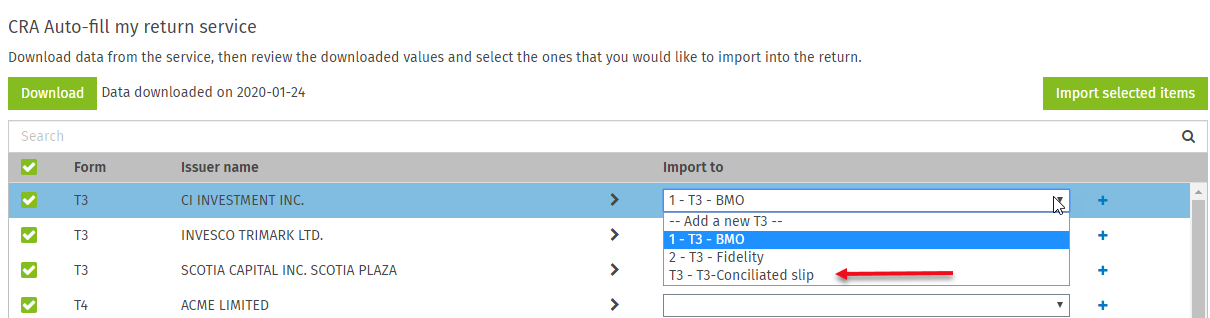
Custom monitor – Customize the monitor by adding cells from a return
You can now customize the monitor status bar, at the bottom of your screen, by adding any cell from a tax return.
To add a cell to the monitor, right-click the cell that you want to add and click Add cell to monitor, or use the panel to the right of the screen to access the same option:
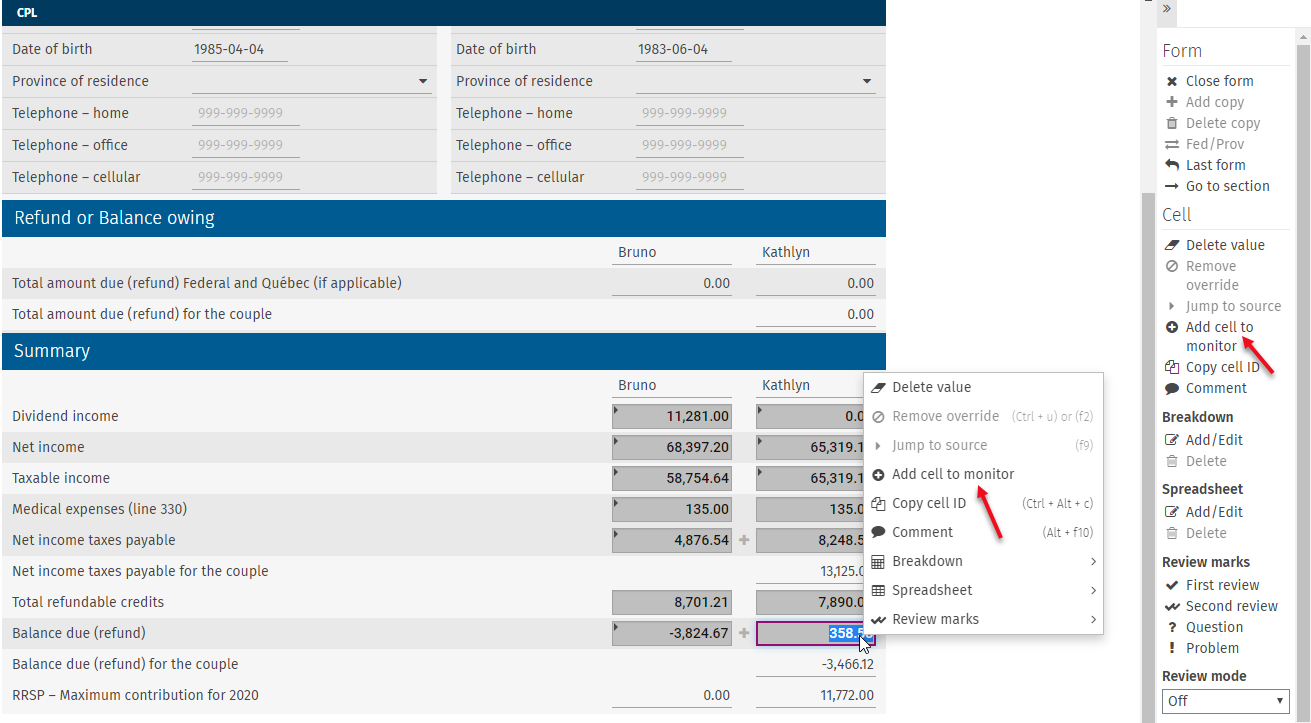
Reorder cells in the monitor by right-clicking them and moving them left or right. You can also decide which predefined cells should always display in the monitor by clicking the gear icon.

Forms Section Navigation (F10) – Quickly jump to a specific section in a form
This feature allows you to quickly access specific sections in a form by pressing F10 or use the panel to the right of the screen and select the Go to section option:
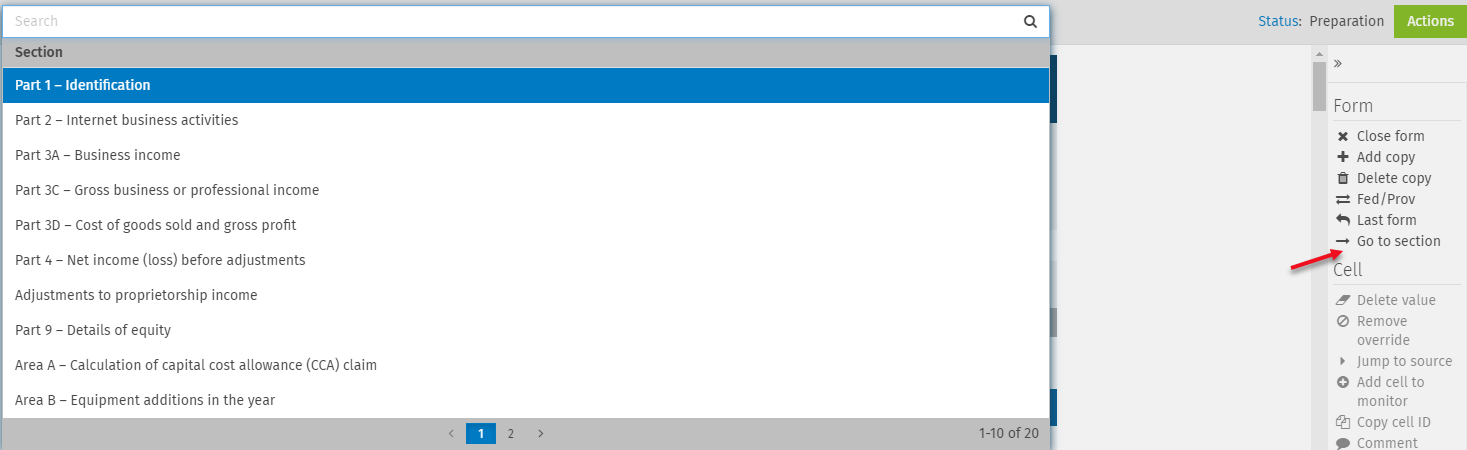
Actions button – Multiple actions grouped and accessible from a single location
To facilitate navigation and improve accessibility, actions that can be performed on returns have been grouped under the Actions button drop-down menu in the top-right corner of the screen.
From the return manager:
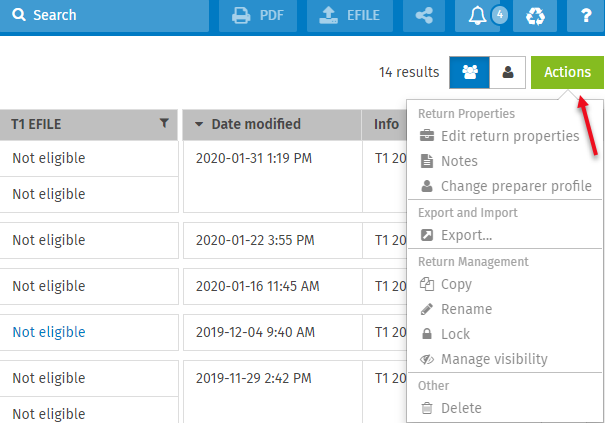
From the opened document:
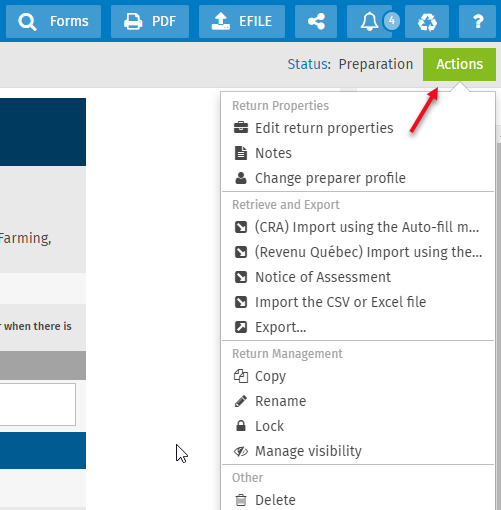
Note that the Print to PDF, EFILE and Publish to Portal options are still accessible in the breadcrumb menu.
Forms Search (F4) – The last selection made in the Jurisdiction and Type columns is retained.
With this release, the last filter selected in the Jurisdiction and Type columns will be retained depending on tax documents, users and workstations:
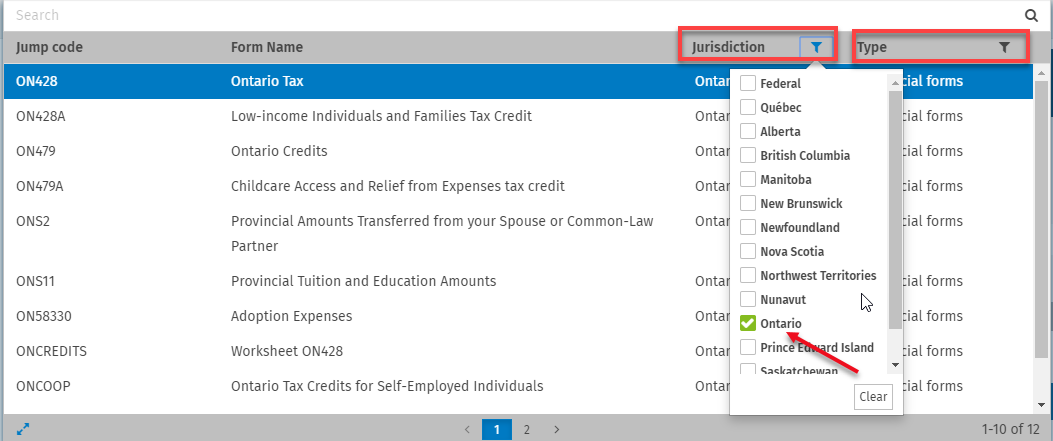
In the above example, the user chose to filter the forms associated with the Ontario Jurisdiction.
The next time they open the same document and search for a form, they will only see Ontario forms.
CCH iFirm Taxprep Pro Only
Additional Tax Security Roles – Control who can do what in your firm
With this release, firm administrators can grant or limit access to features in the Taxprep application for individual users.
Here are some examples of the added tax security roles:
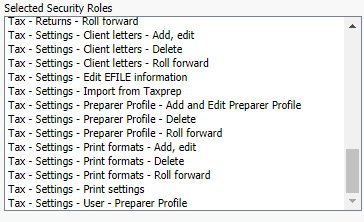
Security roles can be assigned from the User Manager page (Settings > Users). The administrator can assign or remove tax security roles from the Security tab of a given user.
For the entire list of available security roles consult the Learn about CCH iFirm Taxprep module security roles help topic.
Import/Export – Export or import tax data using Excel
With this release, you can use Excel to import or export tax data.
This is a complement to the CSV format, which is already supported.
December 2, 2019 Release
CCH iFirm Taxprep Essentials, Advanced and Pro
Cell Breakdown feature
A new feature was introduced to create a cell breakdown on any numeric field. It provides you with a detailed calculation of the amount and allows you to create your own calculations.
To add a cell breakdown, when in a numeric cell, you can use the option Breakdown > Add/Edit from the contextual menu or from the right panel by clicking Add/Edit from the Breakdown section.
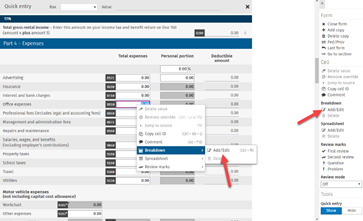
In addition, a predefined filter was added in the Review tab to identify any cell containing a breakdown:
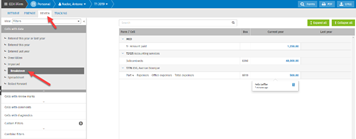
Enhancements to the Print and Publish PDF options
Ability to customize PDF header options - from the tax settings or from the Print return to PDF dialog box, you can now customize options that will print in the header of the PDF printout.
The following header options can be customized:
- Include file name;
- Include date;
- Include time;
- Include another option: Print format name or custom text.
To customize the PDF header options, access Settings > Taxprep > Print settings. The options selected from the Print settings page will apply to all applicable tax returns.
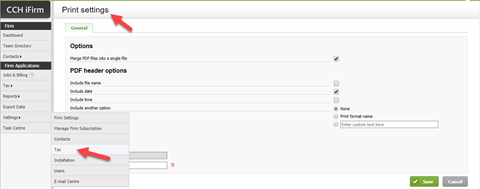
In addition, to facilitate customization, the default selection in Print settings page can be overridden during the print/publish operation by clicking More options from the Print return to PDF dialog box.
Note: This modification will not be saved. For all other tax returns, the selection will continue to be applied.
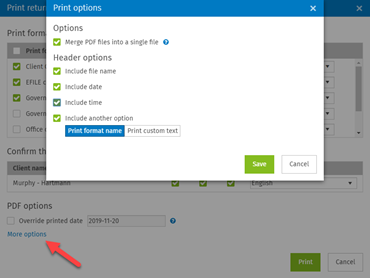
Ability to create and apply custom watermarks – from the Print settings page (Settings > Taxprep > Print settings), you can create your own watermarks and apply them to any of your print formats.
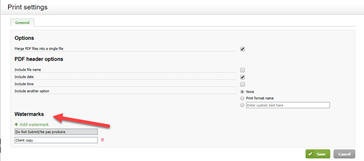
Watermarks can be applied immediately when printing or publishing from the Print settings page:
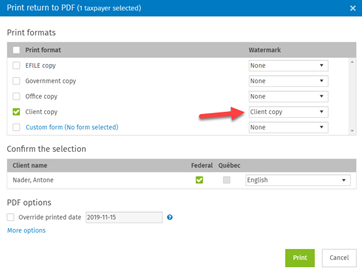
Ability to print or publish a return using multiple print formats in a single action - more than one print format can be selected when printing or publishing a tax return.
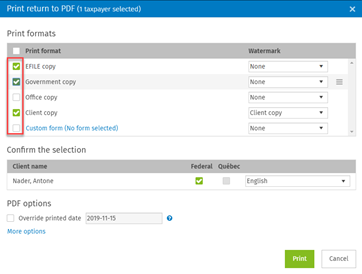
Ability to modify the print order of print formats – When printing tax returns, the print order of the print formats can be selected by dragging and dropping the print format to the desired location:
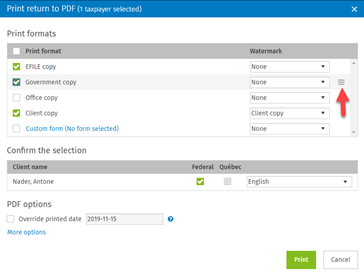
In addition, the option Merge PDF files into a single file can now be set in the Print settings page (Settings > Taxprep > Print settings), so that it applies to all tax returns.
Ability to add a spouse or a dependant who has an existing return
Spouses or dependants who have an existing return can now be added to a main taxpayer’s return.
To do so, proceed as follows:
- Open the return of the main taxpayer.
- From the breadcrumb menu, click Add spouse or Add dependant.

- From Existing contact tab, select the contact that you want to add, then select the corresponding return:
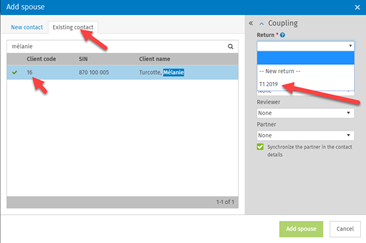
Note: The tax year of the existing return must be the same as that of the taxpayer return.
Once the return is added (coupled) to the main taxpayer’s return, the initial return of the spouse or dependant is kept in return manager. Depending on your firm’s workflow, you will be able to keep or delete the initial return.
Ability to close forms using the Esc shortcut key
The Escape shortcut key now allows you to close the opened form in the Preparer tab.
Ability to access previously opened form using the shortcut F6 key
You can now use the F6 shortcut key to open the last accessed form.
Return manager - EFILE Status automatic update
If you electronically transmit (EFILE) a tax return from the return manager, the EFILE status will be automatically updated in the return manager once the transmission is complete.
Separate Security Roles for Tax Products
With this release, firm administrators can grant or limit access to each tax products by selecting from the following new Security Roles:
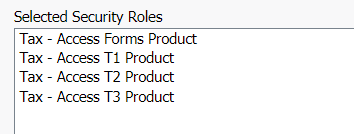
Security roles can be accessed from the User Manager section via Settings > Users. From the Security tab of a given user, the administrator can grant or remove tax security roles.
The Quick entry feature is now available in the right panel
The Quick entry feature can be enabled or disabled from the right panel:
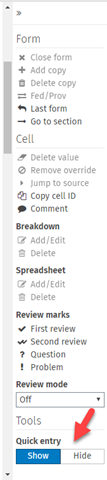
Tax Help
Tax Help is now available in the CCH iFirm Help Centre. To access and consult the CCH iFirm Taxprep Help Centre, click the Help > Help Centre link.
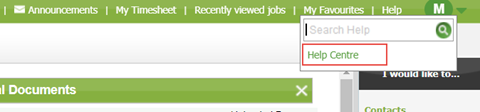
Once on the CCH iFirm Help Centre homepage, click the link for the product from which you want to consult the Help under the CCH iFirm Taxprep Help Centre section.
Note that for the current release, only the CCH iFirm Taxprep T2 Help Centre is available. The CCH iFirm Taxprep Help Centres for the T1, T3 and Forms applications will be available in the next releases.
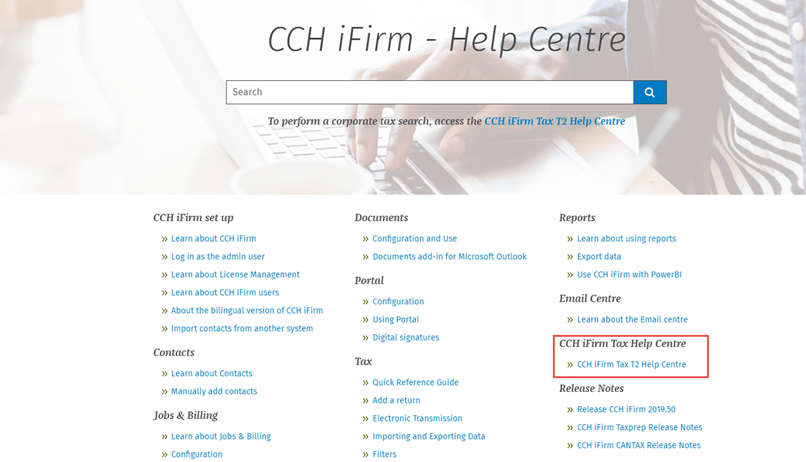
If you want to search for tax information, perform the search from the Search bar available in the CCH iFirm Taxprep Help Centre.

CCH iFirm Taxprep Advanced and Pro Only
Corporation Linking – Link associated or related corporations for purposes of sharing data
This functionality allows you to link the current return with other associated or related corporations to:
- eliminate duplication of information and prevent data entry errors;
- create links between associated or related corporations for purposes of sharing data;
- automatically calculate the optimal allocation between associated or related corporations;
- export data from one completed linked tax return to all other linked returns in a single click.
- From the Retrieve tab, click Import and link corporations and select the corporations from which you want to import tax data and create a link.
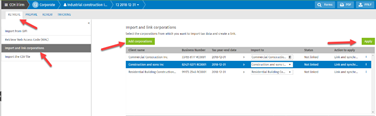
In Schedule 9 Workchart, it is indicated whether the corporation is linked, while the status of the link is indicated in the header (Synchronized or Not synchronized).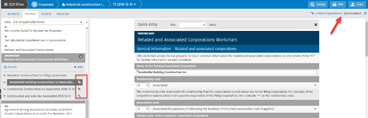
If the data is not synchronized, i.e. data was modified in any linked return, click Linked corporations in the header and reimport data by clicking Import the corporations’ tax data.
- The optimal allocation between linked corporations can be found in many forms by entering different scenarios and clicking Calculate button.
Example for Schedule 23: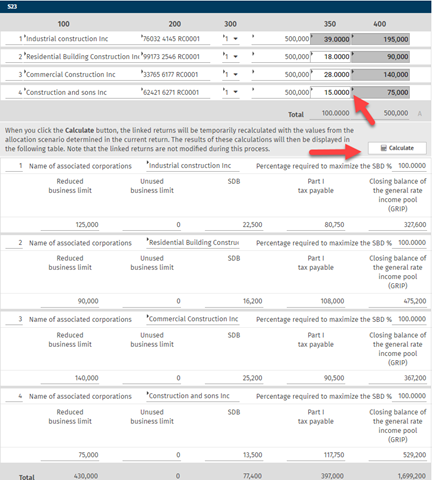
- When an associated or related return is completed, export data to all other linked returns by clicking on Linked corporation/Export links and data of the associated returns.

For more details, consult the Import and link corporations Help topic.
Preparer Profile – Create an unlimited number of preparer profiles for each tax product
Starting with this release, you can create an unlimited number of preparer profiles for each tax product. Therefore, if you have multiple partners or if you work from multiple offices, you can create a different preparer profile for each partner or office.
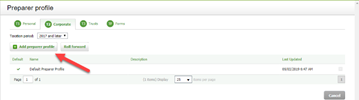
In addition, you can set one default preparer profile for CCH iFirm user per product. This can be done from the Preparer Profile tab in your user settings (Settings > Users > Add User > Tax > Preparer Profile).
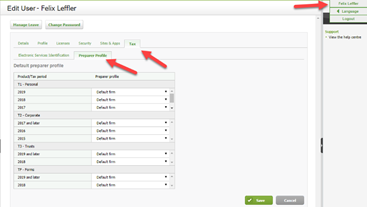
CCH iFirm Taxprep Pro Only
Workflow – Assign partners, preparers or reviewers to any tax return
This new feature helps you keep track of your tax season by allowing you to assign tax documents to the following roles: preparer, reviewer or partner and allows you to see the firm’s workload in real time.
To assign the return to any user in the firm, proceed as follows:
Creation of the new tax return – in the right panel, you can assign one CCH iFirm user per role as depicted in the following capture:
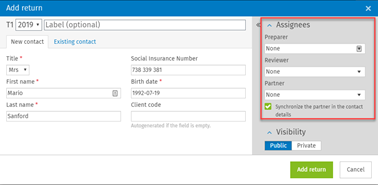
Assign the existing tax returns to a user from the return manager – from the return manager, one or more existing tax returns can be assigned to the user by clicking More actions > Edit return properties.
In addition, you can easily filter and sort tax returns from the Return Manager based on assigned users and return statuses. As a result, you can easily identify over assigned or under assigned employees and redistribute the workload.
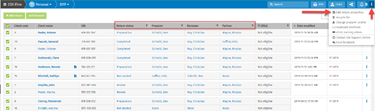
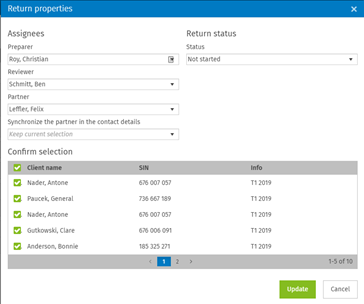
Assign the open tax document to the user – click More actions > Edit return properties to modify a tax document or assign it to a user.

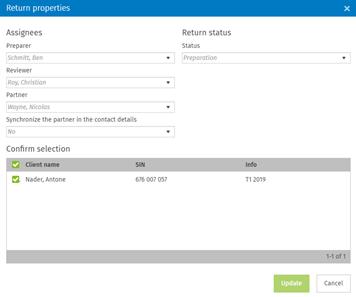
September 16, 2019 Release
CCH iFirm Taxprep Essentials, Advanced and Pro
Deleted returns are now kept in a Recycle Bin for 90 days
A recycle bin was integrated into the application so that deleted returns can be retained in the recycle bin for a maximum of 90 days after deletion. The recycle bin will allow you to restore returns that were deleted by error or permanently delete other returns.
To access the recycle bin, click the More actions menu, located in the top-right corner of the screen.

Form search feature – Now more user friendly
As the form search feature is one of the most used, we enhanced its efficiency when searching for forms. Navigating between forms is also more user-friendly. Also, in addition to enhancing the search performance, we added filters to the Jurisdiction and Type columns to help you further refine your search results.
Quickly access your last form in a single click (or by pressing F6)
When working in a tax return, you can now easily access the last form that you displayed by clicking Last form under the Form menu on the right panel or by pressing F6. This will allow you to easily navigate to the last form displayed without having to search for it.
Edit the predefined print format directly instead of creating copies
Starting with this new version of the application Tax, you can now edit any predefined print format. For example, if you want to add forms to or remove forms from the “Client copy” print format, simply:
- access the print format that you want to edit;
- click the Edit the predefined print format button in the bottom-left corner of the Print Format Details – Client copy window;
- make the desired modifications to the list of forms that will be printed using this print format;
- click the Save or the Save and close button.
This will allow you to modify any predefined print format without having to first copy it. This will reduce the chances of error when printing a return to PDF as the list of available print formats will only include the print formats you can use.
To discard your modifications, click the Reset to the default version button in the bottom-left corner of the Print Format Details – Client copy window. The print format will be reset to its original state.
Enhancements to help you discover new features
This latest version of the application can now provide you with tips on how to use new or existing features. This will allow us to introduce, directly in the application, new features or explain how to use a feature. For example:
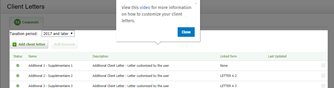
Note that in the meantime, a guided tour was created for new users only. As a result, only users created after this new release will be able to access this tour.
June 3, 2019 Release
CCH iFirm Taxprep Essentials, Advanced and Pro
Client letter customization – Now available in the latest version of the Corporate (T2) product
Starting with this new version of the application, you can customize client letters provided or simply create your own. With this new feature, you will be able to easily add your personal touch or the logo of your firm to any letters printed with the returns.
The Client Letters link is now enabled when you access the Settings > Taxprep page. Clicking this link will open the Client Letters Manager, which lists all available client letters.
This feature is currently only available for the T2 product for returns that have a taxation year start in 2017 and later. It will be available for the other products before the end of 2019.
To provide you with all the tools required to create or modify client letters, we added all the related documentation in our Help Centre.
Click here to see the training videos about this feature and many more.
Client letter preview – Now available in the Corporate (T2) product
Starting with T2 returns that have taxation year start in 2017 and later, you can preview the client letter from
any opened tax return. This can be done from the Client letter preview view in the Review tab.
Access federal/provincial (F8) equivalent forms
To access a federal or a provincial equivalent form, use the Fed/Prov button (or press the F8 key) that was added to the right panel of the application. This will automatically toggle to the equivalent form. As a result, it will save you time when preparing tax returns with provincial forms.
Note that this new feature is available for all products (T1, T2, T3 and Forms) and for all supported tax years.
Add notes to tax returns
Starting with this version of the application, you can add notes to your tax returns. This new feature allows you to keep notes added to tax returns even after they have been rolled forward.
In addition, each time a note is added, the application records who added the note and when it was added. This will help you track the many notes added to a document.
To add a note or to access existing notes, you can:
click the Notes option in the  menu icon of the Return Manager; or
click the Notes option in the tax return menu, located on the breadcrumb bar when you are in an opened tax return.
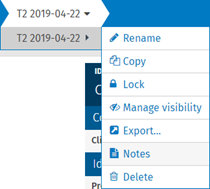
Once a note is added to a tax return, the  icon will be displayed next to the taxpayer’s name in the return manager to indicate that the tax return contains notes.
Please note that the attached notes are not EFILED.
March 4, 2019 Release
CCH iFirm Taxprep Essentials, Advanced and Pro
Import slips – Now available in the Trusts (T3) product
There is a powerful feature in CCH iFirm Taxprep T3 that will allow you to import multiple slips of the same type (from a CSV file) using the Import Slips feature found under the Retrieve tab of the current return.
In addition, using this feature to import all slips for your beneficiaries will significantly speed up the process and prevent users from having to manually enter data in hundreds of slips when most of the time this data can be exported to a CSV file format from other software. Streamlining the process will prevent errors resulting from manual data entry from occurring.
Click here to see the training videos about this feature and many more.
Internet File Transfer Identifications – User Settings – Now available in the Trusts (T3) product
A section is now available under the Taxprep tab of the user profile to enter credentials and other mandatory information required to generate and submit the XML files for trusts returns, partnerships returns, or slips to the federal and Québec governments. Mandatory fields are identified with an asterisk (*).
In addition, you will find the Slip Number tab where you can enter the slip number ranges that Revenu Québec authorize you to prepare slips.
You can set your credentials by accessing the Taxprep tab in your user profile, or by clicking Settings/Taxprep, then EFILE Information.
Click here to see the training videos about this feature and many more.
Internet File Transfer – Now available in the Trusts (T3) product
With CCH iFirm Taxprep T3, it will be easy for you to submit generated XML files to the federal or Québec governments using the Internet File Transfer system. The application is providing you with all the tools you need to generate the XML files and streamlines the process to easily submit those files to government authorities.
Once the mandatory fields in your user settings fields are correctly completed and the EFILE status of the given slip or form is “Eligible,” you will be able to generate the XML file by using the EFILE button.
Note that you will always be able to retrieve or print the confirmation number from the Details button of any given form in the Tracking tab. Otherwise, it can be done by clicking the EFILE status of the form in the return manager. The Transmission history dialog box also allows you to visualize the XML file that you already sent through the Internet File Transfer process using the View data button.
Click here to see the training videos about this feature and many more.
Print slips to PDF – Now available in the Trusts (T3) product
A Print slips to PDF menu item is now available when clicking the PDF button in CCH iFirm Taxprep T3 to make it easier to generate PDF slips for a given data type (Original, Amended, Cancelled). This will allow you to create separate PDF files for the multiple slips copies your client needs to send to all beneficiaries. In addition, if you have the CCH iFirm Portal module, you will be able to send those slips automatically to your client’s portal.
Click here to see the training videos about this feature and many more.
February 18, 2019 Release
CCH iFirm Taxprep Advanced and Pro Only
Combine filters under the Review tab or in the Export to CSV feature
Another addition to this version of the application is the Combine filters feature, which allows you to create complex filters that can be combined to include and exclude fields associated with the selected filters.
In other words, you could use the Combine filters feature to quickly identify cells matching the desired combination of filters. For example, if based on your firm’s internal process, you must add a comment to all cells with diagnostics that you do not want to clear, you can easily identify cells with diagnostics but no comments using the Combine filters feature. A list including all cells with diagnostics where you did not add comments will display in the grid under the Review tab.
Note that the Combine filters feature is available under the Review tab and as an export filter in the Export to CSV feature.
For more information about this feature, consult the Combine filters topic. You can also access the online Help by clicking Help in the top-right corner of the application.
CCH iFirm Taxprep Pro Only
Add custom filters to the Review tab and the Export to CSV feature
Starting with this version of the application, you can add Custom Filters that will display under the Review tab and that will allow you to export data using the Export to CSV feature.
When adding a custom filter, the fields associated with this filter will be displayed under the Review tab to help you implement the review process of cells in the return.
Those custom filters are also available in the Export to CSV feature. Those filters can be used to build an export template of cells to complete from outside of the application, for example, when you are working with an SR&ED consultant who needs to complete part of the tax return.
When a custom filter is created, it becomes available to all staff using your Taxprep module for the tax product and the tax year associated with the tax return for which the filter was created.
Even if those filters are associated with a tax product and a tax year, you can always click the Convert tab in the Add a custom filter dialog box to convert a custom filter from another tax year of the current tax product.
For more information about this feature, consult the Create a custom filter topic. You can also access the online Help by clicking Help in the top-right corner of the application.
Export tax returns to CSV files
You can now export a CCH iFirm Taxprep return to a CSV file format, which will allow you to export tax data in a standardized format that can be edited in many software programs (e.g. Microsoft® Excel®). With the export filters, you can easily export all data entered in a tax return for the current year or simply export data when using the custom filters.
The export functionality can be used when working with external service providers or to exchange tax data with your client. Simply create the CSV file containing the fields to be completed and send it to the provider or your client. They will be able to edit the file in a software program like Microsoft Excel and then return the file to you for import in the tax return.
For more information about this feature, consult the Export data topic. You can also access the online Help by clicking Help in the top-right corner of the application.
Import data from CSV files
With this new version of the application, you can import data into tax returns from a CSV file. This will allow you to update data into a tax return without having to manually change the values in the fields.
To be imported, the CSV file must comply with a certain format. To obtain the appropriate format, use the Custom Filters feature and create a filter using the desired fields. You can then export the tax return to a CSV file. This exported file will be your CSV template.
For more information about this feature, consult the Import data from a CSV file topic. You can also access the online Help by clicking Help in the top-right corner of the application.