CCH iFirm Tracking Releases Notes
Reintroducing Telephone Support
As announced on February 18, 2026, you can now contact our support teams directly by phone Monday to Friday, from 10:00 a.m. to 5:00 p.m. (ET), when a live conversation is preferred.
Reintroducing phone support adds another way for you to engage with us, ensuring flexibility while maintaining the high level of service you expect.
To help you navigate the phone menu, we invite you to read the following article, which details all the available options: What are the phone menu options for 1-800-268-4522?
Digital support remains available
Our Knowledge Base, Support Platform, Virtual Agent, and Live Chat continue to provide convenient, efficient, and prioritized ways to get help.
Register for our Support Platform and log in to our virtual agent to find answers, submit a support ticket or chat with a live agent.
For more details about the web ticketing system and best practices, watch the following “How to” videos:
Modifications Made to Version 2025 v.1.0
New drag-and-drop functionality for CCH iFirm Tracking cards
You can now drag and drop CCH iFirm Tracking cards in two views:
-
Cards view: Move cards between existing steps to update their return status.
-
Details view: Dragging and dropping a card will change its assignee.
Note: The return status for all family members will be changed if the cards of a dashboard are displayed based on the family.
Updates made to security roles
Changes in bulk
The new Tracking – Cards – Changes in bulk security role now determines who can perform actions on multiple cards at once using the Change in bulk button.
Deleting Tracking cards
The new Tracking – Cards – Delete security role now determines who can delete cards from a dashboard.
Printing and exporting
The new Tracking – Print/Export security role now determines who can print a list of returns that have not yet been started and who can export information from the summary view into a CSV file.
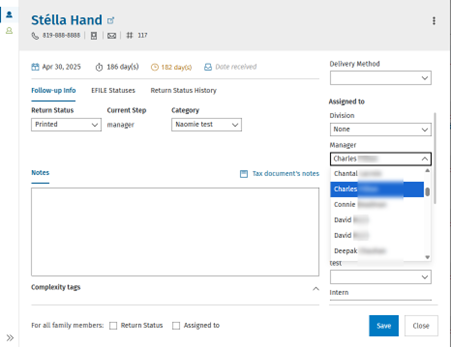
Alphabetical order in the Assigned to drop-down lists of a card
To make searching easier for users, the content of the various drop-down lists in the Assigned to section of a card is now displayed in alphabetical order.
Note: Searches can be made in drop-down lists by entering the first few letters of the name of the person you want to select. For example, enter the letters “char” to search for the first name “Charles”.
Improvements made to filters
Multiple updates have been made to filters:
-
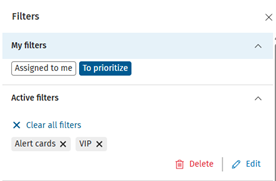
Filters can now be created and saved to be reused. These filters are saved in the My filters section.
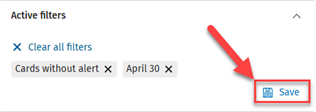
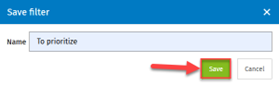
To create a filter:-
Select the settings that you want to use to create the filter.
-
Click Save.
-
Enter a name for your filter, then click Save.
-
Cards can be filtered using the personalized roles created in CCH iFirm.
It is now possible to use the filters in every view of CCH iFirm Tracking.
The Sort by option has been removed from the filters and replaced with the button.
Synchronized information with the contact in CCH iFirm
Contact information in CCH iFirm is now synchronized with CCH iFirm Tracking cards. Therefore, when a change is made in the Contacts module, that change is also made in the CCH iFirm Tracking card associated with that contact, and vice versa. Here are the synchronized fields and the security roles required to modify them:
|
Fields |
Security roles |
|
Partner |
Contacts – Edit Assignee |
|
Manager |
Contacts – Edit Assignee |
|
Group1 |
Contacts – View, Add and Edit Contacts |
|
Group2 |
Contacts – View, Add and Edit Contacts |
|
Delivery method (only for 2025 dashboards) |
N/A |
Note: This functionality is only available for CCH iFirm Taxprep dashboards.
Addition to the general settings
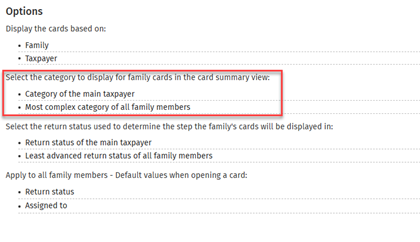
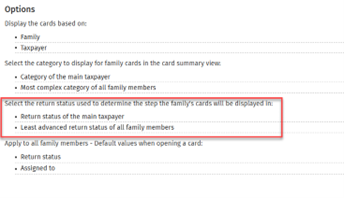
Two options have been added under Settings > Tracking > General.
The Select the category to display for family cards in the card summary view option allows you to display the category of the main taxpayer or the most complex category of all family members in the summary view.
The Select the return status used to determine the step the family's cards will be displayed in option allows you to display the cards in the dashboard based on the return status of the main taxpayer or the least advanced return status of all family members.
Roll forward of returns
The following information is now retrieved in the cards when rolling forward a return from the previous year:
-
The categories
Note: The categories are retrieved if they have been overridden. Otherwise, the information used is taken from the return of the previous year or the return of the current year. -
The reception date from the previous year
Note: This value was already retrieved when rolling forward returns in Taxprep on-premise. It is now retrieved in CCH iFirm Taxprep. -
The date on which the return was finalized the previous year
-
VIP client
Modifications Made to Version 2024 v.2.0
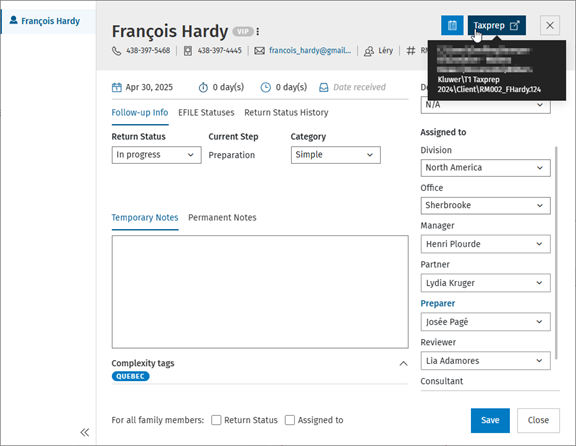
Client code added to the cards
The client code has been added to open cards. Additionally, a tooltip has been added to each icon in the area that holds the client’s information (phone number, email address, group and client code).
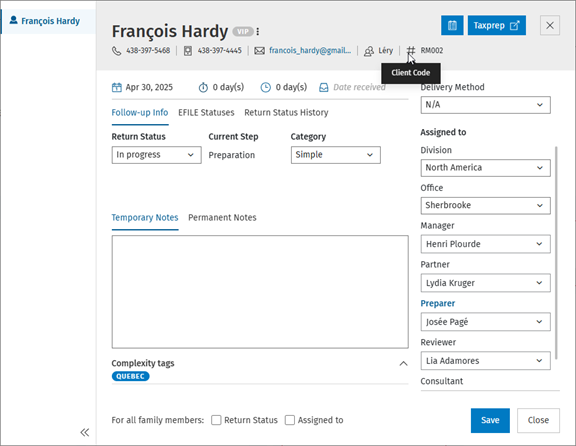
Note: With respect to cards that are linked to a Taxprep on-premise dashboard, the name of the client file and its location have been moved from the area that holds the client’s information to the message displayed when hovering over the Taxprep button.
Modifications Made to Version 2024 v.1.0
The user interface of the Tracking module has been enhanced
The CCH iFirm Tracking user interface has been enhanced. Enhancements include a modernized user interface, an improved Statistics section, customizable columns, all views that can now be viewed in Cards mode, and much more. See below for more details.
Statistics section improvements
Significant improvements have been made to the Statistics section to enhance its functionalities and usability. Here is an overview of the changes:
-
The section can be collapsed or expanded, allowing you to see more cards in the dashboard. To collapse or to expand the Statistics section, click the arrow that appears beside the name of the view.
-
The At a glance graph allows you to quickly view the number of cards per step. Each column in the graph is labelled with the first letter of the step. For example, if the step or the column is named Preparation, the column in the graph will display the letter P.
-
The Alert Center provides a quick overview of how many active returns have a warning or an alert. Note that the Alert Center is available only in the Active view.
![]()
Collapsible columns allow you to customize the view and display the columns that are relevant to you
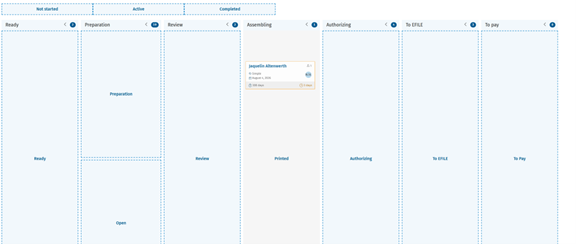
The columns in the Not started, Active and Completed views can now be collapsed when the view is displayed in Cards mode. To collapse or to expand a column, click the arrow that appears in the header of the column.
![]()
Note: The column customization is saved for your user and will be kept when you access the dashboard subsequently.
Taxpayers can now be displayed in Cards mode with Not started, Active and Completed views
In addition to the Active view, the Not started and Completed views can now be displayed in Cards mode, allowing you to configure the views based on your needs by adding any step or column you need. The Not started and Completed views continue to support the List mode.
To configure the Not started and Completed views in Cards mode, click the Display button in the top right corner, then click Cards. To return to List mode, simply click List from the Display button.
![]()
Details mode improvements facilitate the tracking of assignments by step and by user
The Details mode allows you to visualize user assignments by step. This mode can be accessed by clicking the Display button in the top right corner. The Details mode now includes all steps and return statuses from the left pane, allowing you to see assignments per step from the same view. The left pane can be collapsed by clicking the arrow in the bottom left corner, allowing you to see more of the assignees’ columns.
![]()
Filters section improvements
The Filters section is now located next to the search bar, and the filter options have been divided into two sections: General and Assignees.
![]()
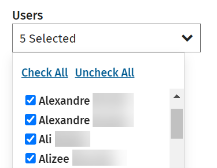
The filters related to the different roles have been regrouped into the Assignees section, which contains two filters: Roles and Users.
-
By default, the Users filter contains all users who have access to CCH iFirm Tracking.
-
When at least one role is selected in the Roles filter, the Users filter displays all users who have access to CCH iFirm Tracking and who are assigned to the role.
![]()
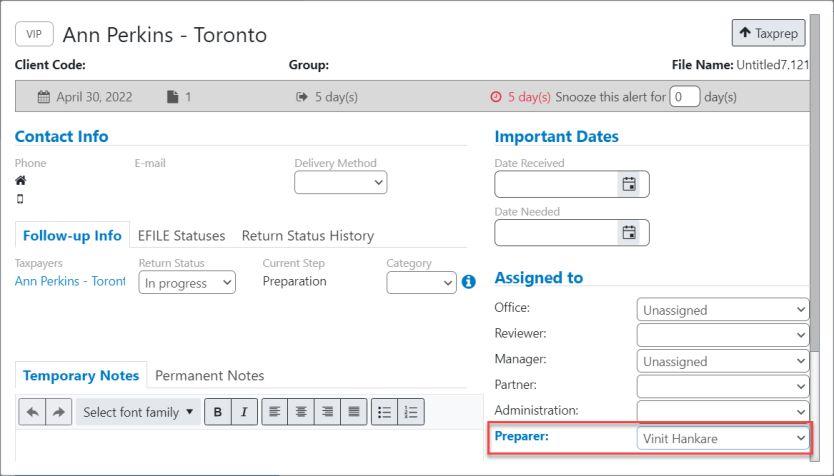
Viewing information for each family member has been simplified through open card enhancements
The following improvements have been made to open cards:
-
Family members: This section allows you to navigate across the different members of a family. To collapse or to expand the section, click the arrow that appears at the bottom right of the section.
-
Family return status indicator: This visual warning informs you that not all family members are in the same step.
-
Dates header: This section contains the key dates and the key days counter for the tax season.
-
Audit Trail: The Audit Trail button has been moved to the upper right corner of the card.
-
Options that apply to all family members: This section allows to quickly apply a change made in an open card to all other family members.
The default value for these options can be configured by accessing Settings > Tracking > General settings > Apply to all family members.
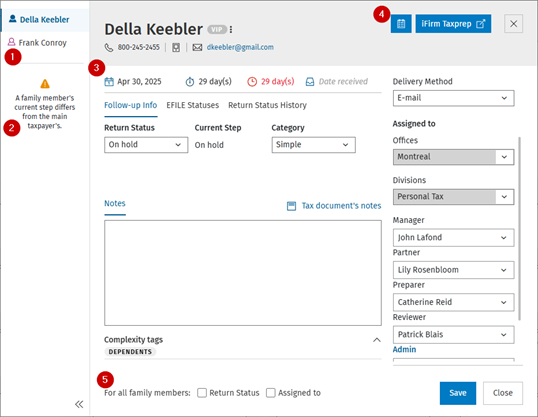
The following key dates and the key days counter can be modified by using the integrated calendar:
-
The deadline
-
The alert related to the number of days in this step. It can be snoozed by selecting a date in the future.
-
The date received
![]()
Access to CCH iFirm Tracking dashboards now handled with a security role, simplifying onboarding for new users
The process to onboard users into CCH iFirm Tracking has been simplified. To onboard a user into CCH iFirm Tracking, the user only needs:
-
A CCH iFirm Tracking license
-
The Tracking – Access to Tracking security role
The Dashboard Management section has been added to Settings > Tracking, allowing you to handle user access per dashboard if you have more than one CCH iFirm Tracking dashboard. By default, all users who have a CCH iFirm Tracking license and the Tracking – Access to Tracking security role will have access to all existing dashboards on your site. To change the access for a single user, you simply need to modify the access rights in the Access column and save your changes.
![]()
To change user access in bulk:
-
Select the concerned users. Note that it is possible to filter on columns to easily identify the users (e.g., filter on the columns pertaining to groups).
-
Click the Change access in bulk button.
-
Select the desired option and click Save.
-
Click Save.
![]()
The following security role is required to manage rights from the Dashboard Management section: Tracking – Settings – Dashboard Management.
Modifications made to the Tracking – Settings – Access security role
The Tracking – Settings – Access security role has been renamed Tracking – Settings – General configuration.
When a user has the Tracking – Settings – General configuration security role, the user can:
-
Access all sections of the settings sections, except the Dashboard Management page that requires the Tracking – Settings – Dashboard Management security role.
-
Use the Link Client Files and Link Users functionalities in the CCH iFirm Tracking menu of Taxprep on-premise.
![]()
CCH iFirm Tracking cards can now be created when rolling forward a tax return
For CCH iFirm Taxprep users, the CCH iFirm Tracking section will be available in the Roll forward selected documents modal only if you have a CCH iFirm Tracking license and the Tracking – Access to Tracking security role.
![]()
Configuring the Displaying Taxprep Client File Info in the firm settings (applicable for Taxprep on-premise integrations only)
It is possible to configure the moment when the client file information opens during the preparation process. Firms can now set this setting from Settings > Tracking > General Settings > Displaying Cards. The setting will be applied to every user of your site.
Note that this setting is applicable only for dashboards linked to Taxprep on-premise.
Modifications Made to Version 2023 v.2.0
Integration with CCH iFirm roles CCH iFirm Tracking is now integrated with CCH iFirm user roles.
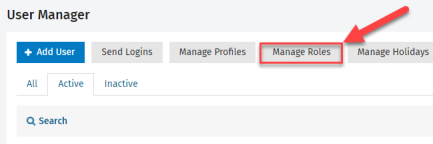
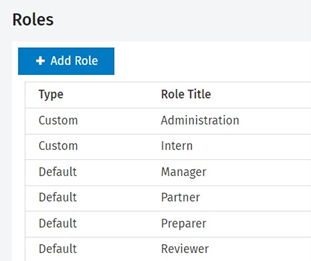
You are now able to configure roles and assign them to your users. Four default roles are defined in CCH iFirm: Manager, Partner, Preparer and Reviewer. You can also choose to add a custom role by clicking Manage Roles under Settings > Users.
Following this addition to CCH iFirm, CCH iFirm Tracking is now integrated with the CCH iFirm user roles for dashboards from 2023 onwards. This means that the roles that were previously configured in CCH iFirm Tracking > Tracking must be configured again for each user in Settings > Users > Manage Roles.
To configure the roles, follow the steps below:
-
Access Settings > Manage Roles and create additional roles, as needed. Consult the Knowledge Base article for more information.
-
In the Roles area (Settings > Manage Roles), click the role for which you want to add users.
-
In the Users field, select all the users that you want to add to the selected roles and click Save.
-
Access Settings > Tracking > Mapping of Statuses and configure the roles for each status, as needed. Consult the Mapping of Statuses topic for more information.
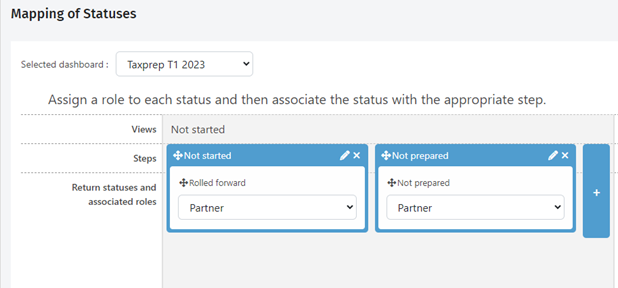
Note that the status assignment for Administration roles and all CCH iFirm Tracking custom roles performed in previous dashboards was not retained. -
Check the remaining CCH iFirm Tracking configurations and make any required changes.
-
Roll forward the tax returns and create the cards in CCH iFirm Tracking.
CCH iFirm Tracking now integrated with CCH iFirm Taxprep T1
CCH iFirm Tracking is now integrated with CCH iFirm Taxprep T1. For more information on the integration with CCH iFirm Taxprep, click the following links:
The new All view allows you to display all cards and generate reports
It is now possible to display all the cards contained in all the views (Not started, Active, Completed) allowing a better overview and facilitating the creation of reports.
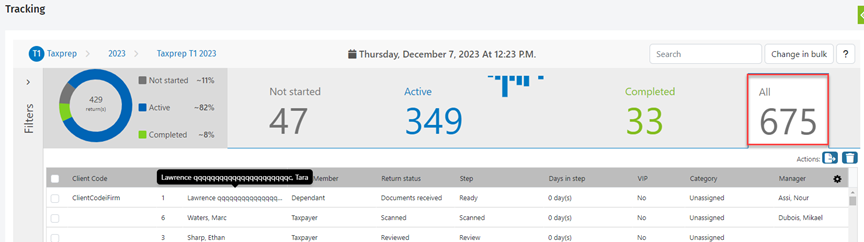
Among other things, this view lets you see all the cards included in the 2023 dashboard and select the columns to display with the  button. The cards in the grid can be sorted in ascending or descending order by clicking the
  column header. The columns can also be ordered using the drag-and-drop function.
Batch actions can also be performed from the All view by selecting the returns you want to modify.

The All view allows you to export all cards from the view in .csv format for in-depth reporting and analysis. To do this:
-
Click the
 button.
 -
Click the Export button.
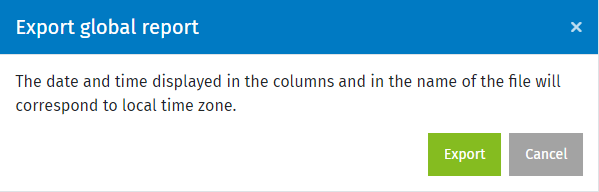
-
A notification is displayed when the export is complete. The .csv file is available for your use.
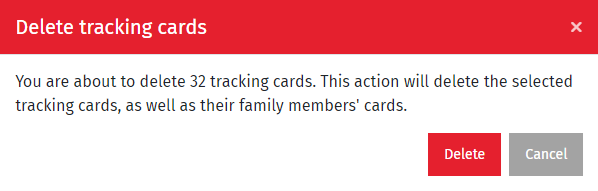
The button  is used to delete the selected tracking cards.
Warning: It is not possible to restore tracking cards that have been deleted.
The Audit Trail allows you to retrace the actions carried out on a tracking card
It is now possible to perform detailed monitoring of each card using the Audit Trail functionality.
This feature can be accessed through the Audit Trail link that is displayed on the card:
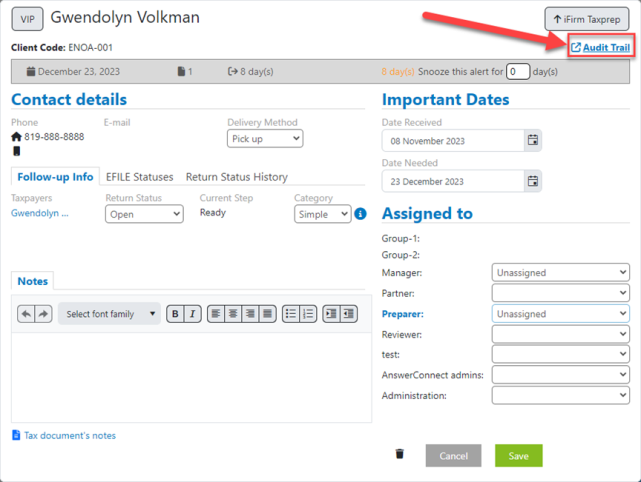
The Audit Trail provides a history of the various actions carried out on a tracking card since its creation. The list of actions can be filtered by date, user or action type.
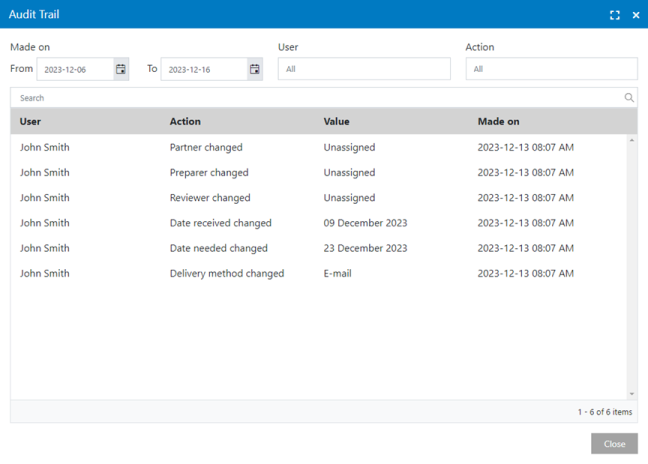
Note that the Audit Trail feature in the CCH iFirm Tracking settings is still available if you wish to view the actions carried out in your firm’s dashboards.
Role Management option removal
Roles are managed in the Settings > Users module for dashboards from 2023 onwards. For this reason, the Settings > Tracking > Role Management option displays only when you have a dashboard from a year prior to 2023. Consult the Role Management topic for more information.
Office Management option removal
Groups (previously offices) are managed in the Settings > Firm Settings > Firm Filtering & Group Settings module for dashboards from 2022 onwards. For this reason, the Settings > Tracking > Office Management option displays only when you have a dashboard from a year prior to 2022. Consult the Set up firm groups topic for more information.
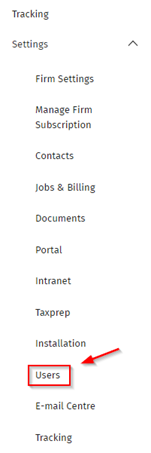
Tracking module user settings
It is important to define the Tracking module user settings in the Tracking tab of Settings > Users and to click the Save button; otherwise, the user will not be able to use the Tracking module.
![]()
Multi-site
It is now possible for CCH iFirm Tracking users to use a single e-mail address to connect to several CCH iFirm sites.
To do so, the Manage iFirm site access functionality has been added to the General Settings of CCH iFirm Tracking.
![]()
To enable the use of multiple CCH iFirm sites, select the Multi-site option on each CCH iFirm site. Your CCH iFirm Tracking users will be able to log in to the various CCH iFirm sites with a single e-mail address. Please note that you will need to define the user rights and roles for each CCH iFirm site.
Important: By selecting the Multi-site option, synchronization between CCH iFirm Tracking and Personal Taxprep will only be activated for 2022 onwards. In this case, synchronization with Personal Taxprep 2020 and 2021 will be deactivated. Please note that it will no longer be possible to return to Single site mode once this change has been made.
Modifications Made to Version 2023 v.1.0
Multi-site
It is now possible for CCH iFirm Tracking users to use a single e-mail address to connect to several CCH iFirm sites.
To do so, the Manage iFirm site access functionality has been added to the General Settings of CCH iFirm Tracking.
![]()
To enable the use of multiple CCH iFirm sites, select the Multi-site option on each CCH iFirm site. Your CCH iFirm Tracking users will be able to log in to the various CCH iFirm sites with a single e-mail address. Please note that you will need to define the user rights and roles for each CCH iFirm site.
Important: By selecting the Multi-site option, synchronization between CCH iFirm Tracking and Personal Taxprep will only be activated for 2022 onwards. In this case, synchronization with Personal Taxprep 2020 and 2021 will be deactivated. Please note that it will no longer be possible to return to Single site mode once this change has been made.
Modifications Made to Version 2022 v.4.0
Taxprep Dashboard name change
CCH iFirm Taxprep Dashboard is now known as CCH iFirm Tracking. This new name better reflects the product's function. The various menus and options that were available in CCH iFirm have been renamed to reflect this change.
Please note that the name change will take effect in Personal Taxprep beginning with version 2023 v.1.0.
Modifications Made to Version 2022 v.2.0
Taxprep Dashboard 2022 can now be used with Personal Taxprep 2022
With the Personal Taxprep 2022 release, you can now use Taxprep Dashboard 2022 with your personal tax program.
Taxprep Plus is now integrated with the Personal Taxprep installation
Taxprep Dashboard is now part of the CCH iFirm ecosystem.
The separate installation of the Taxprep Plus add-in is no longer required, as Taxprep Dashboard will now automatically be installed with Personal Taxprep.
To activate Taxprep Dashboard for a user, you must:
-
Register with Taxprep (see Figure 1);
-
Restart Personal Taxprep;
-
Select the Taxprep Dashboard checkbox in the Options > Add-Ins section of the Options and Settings dialog box in Personal Taxprep;
-
Enter the CCH iFirm site address in the CCH iFirm > General section of the Options and Settings dialog box (see Figure 2);
-
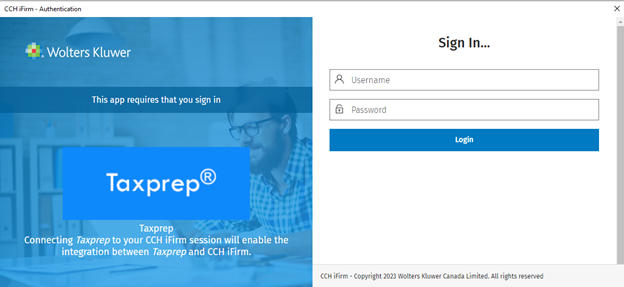
Connect to CCH iFirm (see Figure 3).
Consult the release note in the Modifications Made to Version 2022 v.1.0 section below for more information on the integration of Taxprep Dashboard in the CCH iFirm ecosystem.
Figure 1
Figure 2
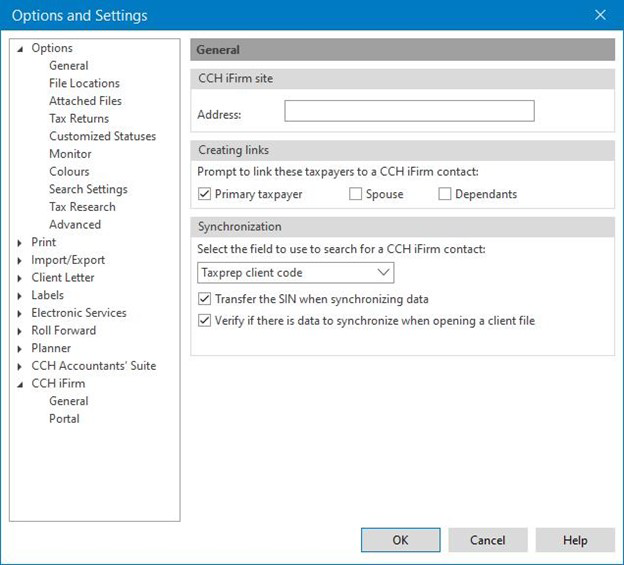
Figure 3
Modifications Made to Version 2022 v.1.0
Taxprep Dashboard is now part of the CCH iFirm ecosystem
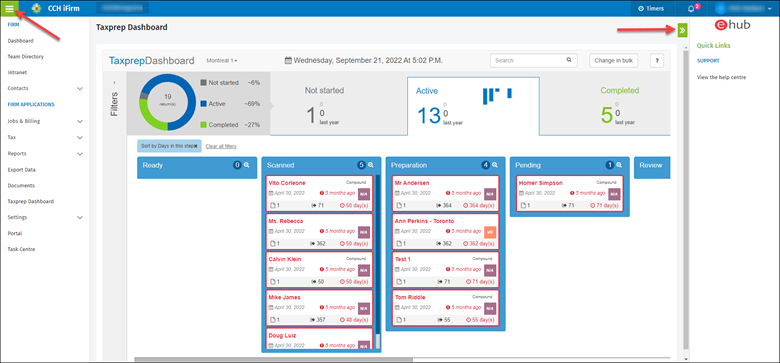
Taxprep Dashboard, now part of the CCH iFirm ecosystem, allows you to benefit from the advantages of this platform. To access Taxprep Dashboard, please log in your CCH iFirm site and click the Taxprep Dashboard module.
Note: If you already have a CCH iFirm site with other modules, the Taxprep Dashboard module will be available from your existing site. If you do not have a CCH iFirm site, one will be created for you and the information related to this site will be communicated to you.
Taxprep Dashboard works as usual. However, it must be accessed via CCH iFirm.
Login
If you try to log in Taxprep Dashboard without connecting to CCH iFirm, the following message will be displayed.

The CCH iFirm login page will be displayed as follows.

When logging in CCH iFirm, the user will be directed to the landing page, where he or she will need to click the Taxprep Dashboard option present in the left-handed menu, as highlighted below.
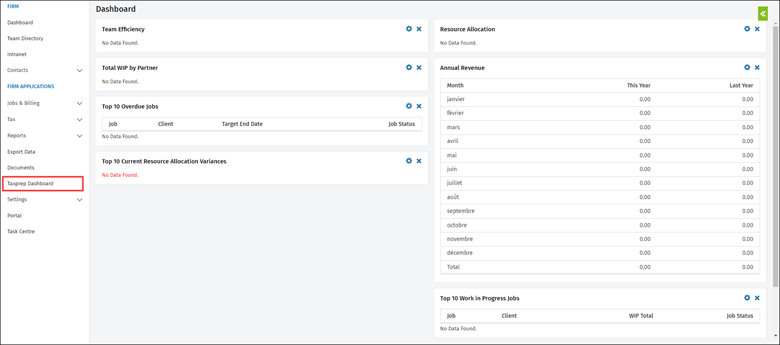
The user will then be directed to the Taxprep Dashboard landing page.
The user can click to minimize the sidebars, and the dashboard will be displayed as below. (When viewing in Chrome or Edge, switch to Full mode [F11 on keyboard] to have a fuller view.)
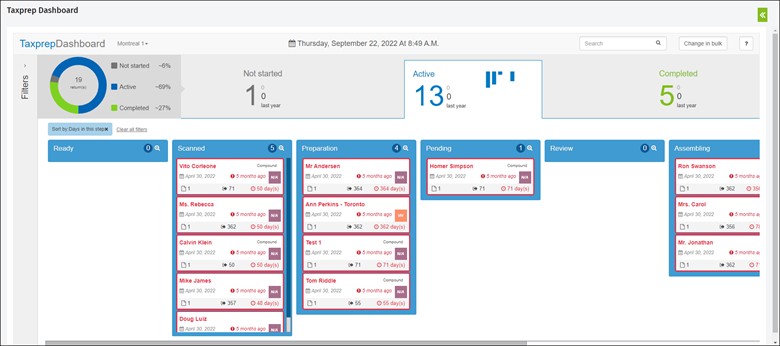
In this view, there is no drop-down menu to select the language, to log out, etc.
To do so, the user needs to access the CCH iFirm drop-down menu, as shown below.
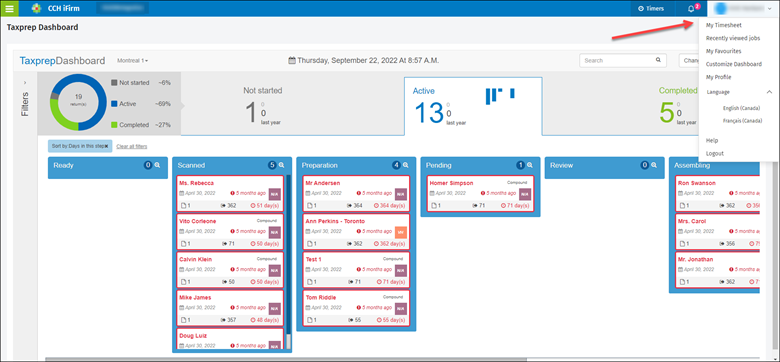
Note: The Customize Dashboard option in this drop-down menu is related to CCH iFirm Dashboard and NOT to Taxprep Dashboard.
In order to access the Taxprep Dashboard Help, the user can click the Help icon on the main Taxprep Dashboard page.
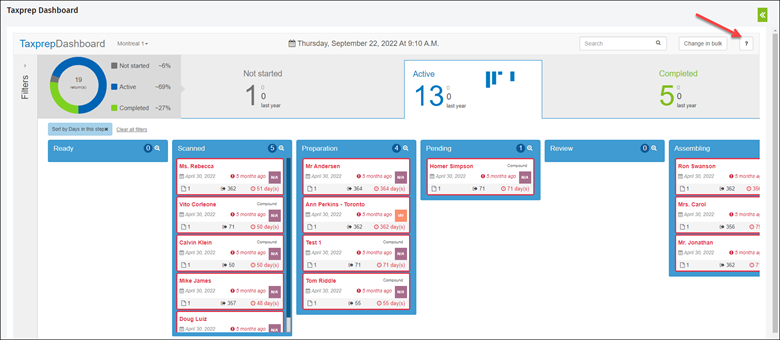
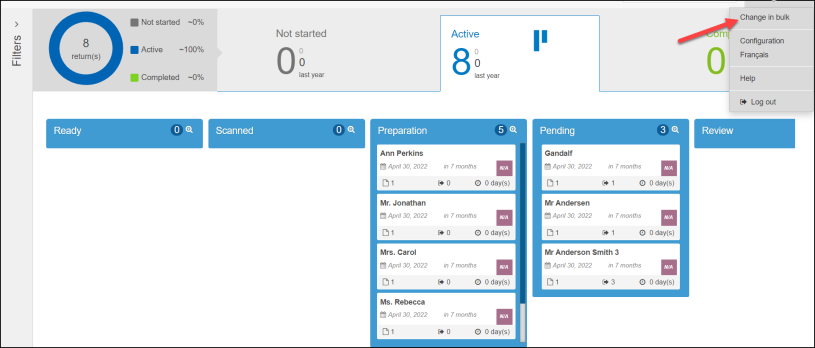
The Change in bulk button is now accessible from the main Taxprep Dashboard page, as shown below.
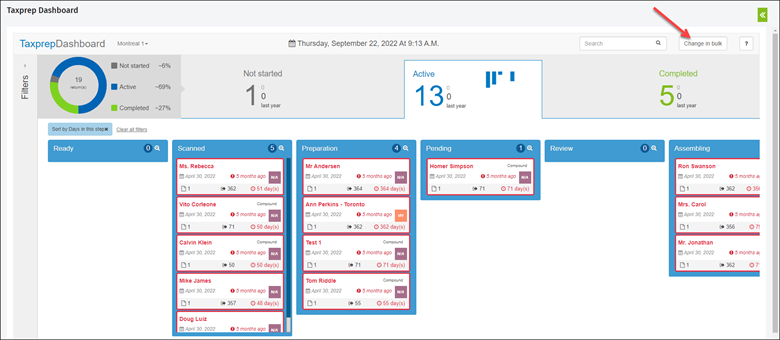
The rest of the functionality on this screen remains as is and functions as before.
Settings
The Taxprep Dashboard settings in CCH iFirm are now accessible from Settings > Taxprep Dashboard.
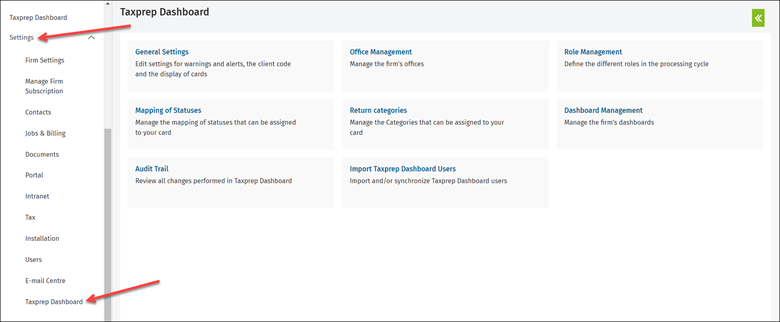
With the exception of the Users settings and the newly added Import Taxprep Dashboard Users settings, the rest of the settings remain the same.
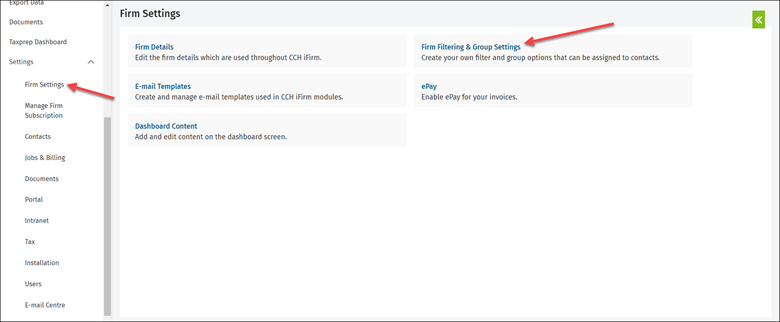
Office Management
The Office Management settings remain the same.
Note: The Office Management settings are used with the Taxprep Dashboard 2021 version and prior versions. With the Taxprep Dashboard 2022 version and subsequent versions, the Firm Filtering & Group Settings that are present in the Firm settings are used, rather than the Office Management settings.
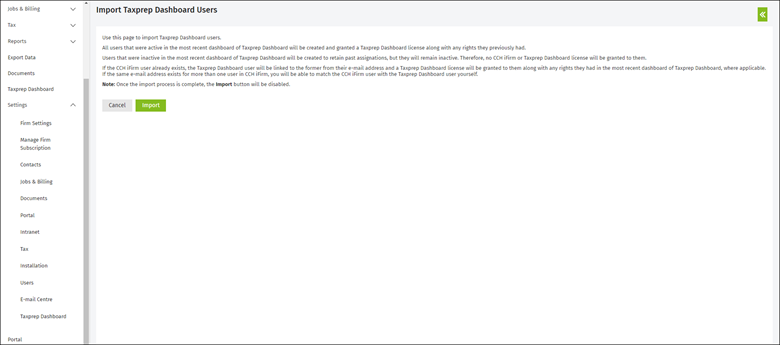
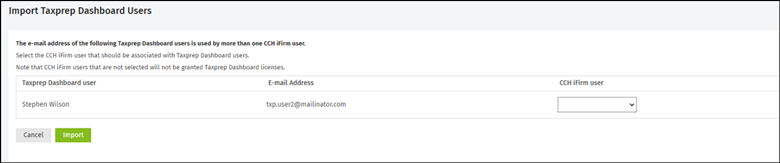
Import Taxprep Dashboard Users
Now that Taxprep Dashboard is integrated in CCH iFirm, Taxprep Dashboard users must be imported in CCH iFirm.
All of this can be done by simply clicking a button. The user must access the Taxprep Dashboard settings and click Import Taxprep Dashboard Users, as shown below.

As for prerequisites for user import, the CCH iFirm user must:
-
Use the same email address in both CCH iFirm and Taxprep Dashboard
-
Be an admin user in Taxprep Dashboard
-
Have an adequate number of Taxprep Dashboard licenses in CCH iFirm
-
Have the following security roles in CCH iFirm:
Security – View, Add and Edit Users
Security - Manage User Security
Taxprep Dashboard - Access to Taxprep Dashboard
Taxprep Dashboard – Settings
When clicking the Import button, all Taxprep Dashboard users are imported into CCH iFirm and are given a Taxprep Dashboard license, as well as the respective user rights they had in Taxprep Dashboard.
-
If a user does not already exist, a new user will be created in CCH iFirm based on the user’s email address.
-
If a user with the same email address already exists in CCH iFirm, that user will be mapped with the relevant Taxprep Dashboard user.
-
If multiple users with the same email address exist in CCH iFirm, the mapping screen will be displayed to synchronize the relevant users.
When a new user is imported into CCH iFirm, the CCH iFirm username that will be created will consist of the first letter of the first name and the last name. For example, if the name is Alice Mathews, then the CCH iFirm username will be amathews.
The username can be easily modified later if needed by accessing the Users module and by changing the username in the Details tab.
When a new user is imported in CCH iFirm, he or she will receive a new user creation email from CCH iFirm to set a new password.
It is important to note that if a user is disabled in Taxprep Dashboard, he or she will be imported as an inactive user.
Also, if the user is not an admin in Taxprep Dashboard, the created user in CCH iFirm will have the security role Taxprep Dashboard - Access to Taxprep Dashboard only.
Users Settings
The Users settings can be accessed via the CCH iFirm settings, as shown below.

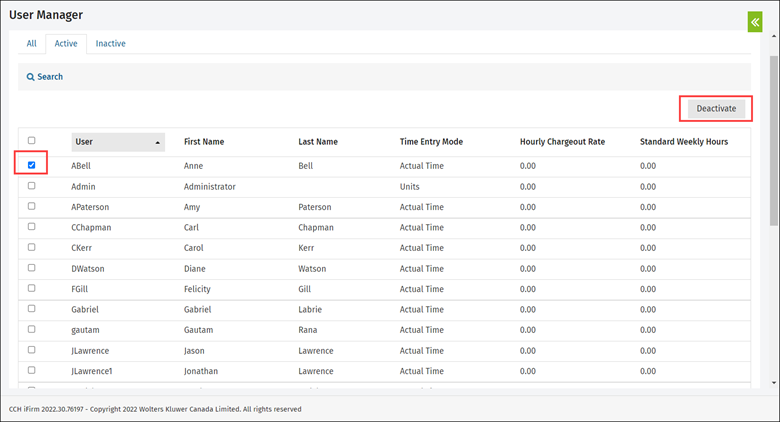
When accessing the User Manager window, a list of users present in CCH iFirm is displayed in two tabs: one for Active users and another one for Inactive users.
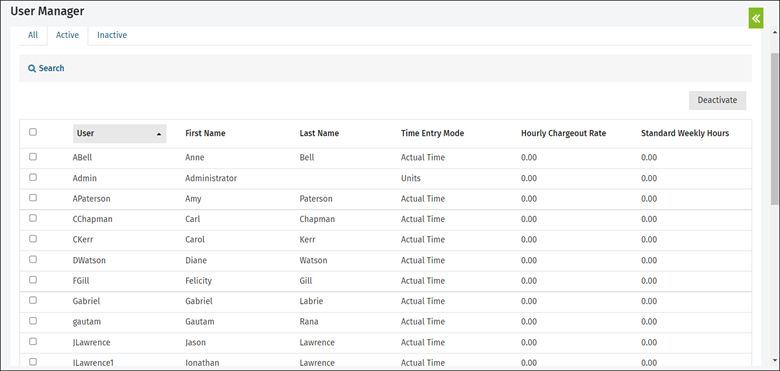
New users can be created in this module.
When creating new users, a Taxprep Dashboard license must be given to them, as shown below.
This video also gives you a glimpse of user creation in CCH iFirm:
https://www.youtube.com/watch?v=QRKOXsFclwc

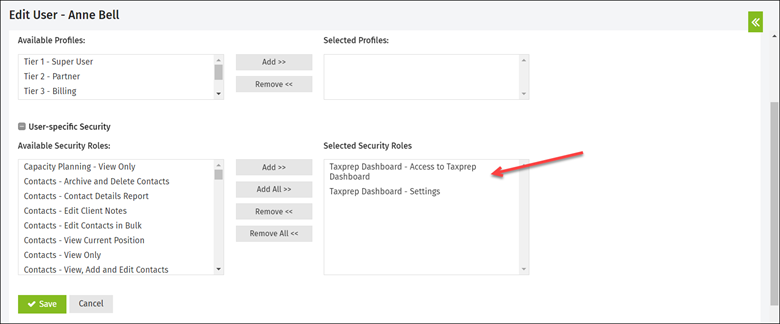
In the Security tab, two security roles related to Taxprep Dashboard can be associated with the user, as needed:
Taxprep Dashboard – Access to Taxprep Dashboard: This security role gives Taxprep Dashboard access rights to the user.
Taxprep Dashboard – Settings: This security role gives access to the Taxprep Dashboard settings to the user.
In the absence of these security roles, the user will not be able to see the respective section. For example, if the user does not have the Taxprep Dashboard – Settings security role, the user will not have access to the Taxprep Dashboard Settings section.
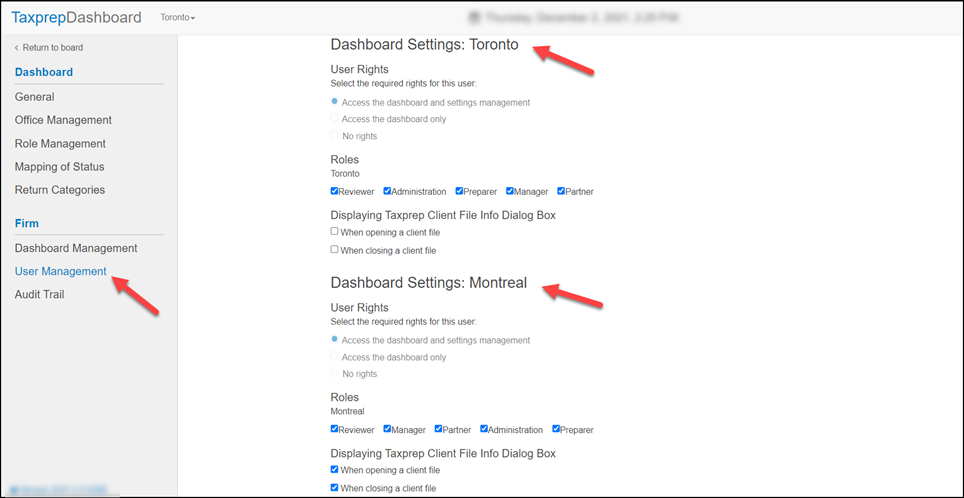
The Taxprep Dashboard tab in the user settings is accessible to Taxprep Dashboard admin users only.
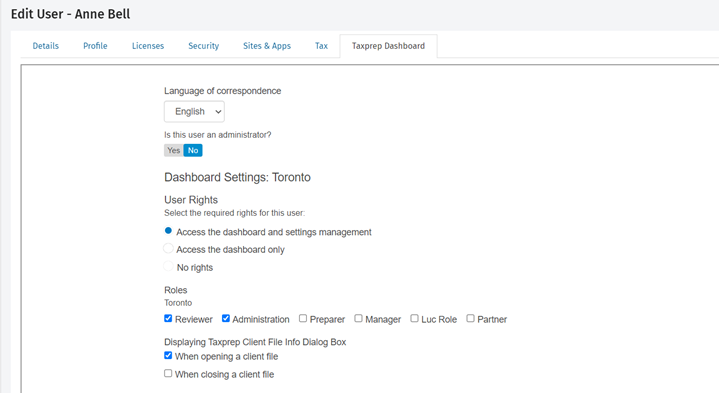
Here, the admin can give users access to dashboards, as required. For example, an admin user can give user access to the dashboard settings for the Montréal dashboard in addition to the security roles, as security roles are not dashboard specific.
Assigning roles must also be done in this tab.
Note: In order to deactivate or disable a user, the admin will have to navigate to Settings > Users, select the user, and click the Deactivate button.
Also, in order to disable the user from Taxprep Dashboard, the admin will have to select that user, navigate to the Taxprep Dashboard tab, and click the Disable button.

The opposite is also true; if the admin wants to activate a user that was deactivated in the past, that user will have to be deactived in the User settings and disabled in the Taxprep Dashboard tab.
Modifications Made to Version 2021 v.2.0
Multiple dashboards – Manage cards more easily using multiple dashboards
Using multiple dashboards allows you to conveniently and efficiently manage your cards. Only users who have security rights to a particular dashboard will be able to access that dashboard. In addition, users can have rights to multiple dashboards and can select which dashboard they want to access. As a result, the cards will be displayed accordingly, which means that there is no need for an additional login or access.
For example, users can define a dashboard for Toronto, and another one for Montréal, which makes the card management very efficient.
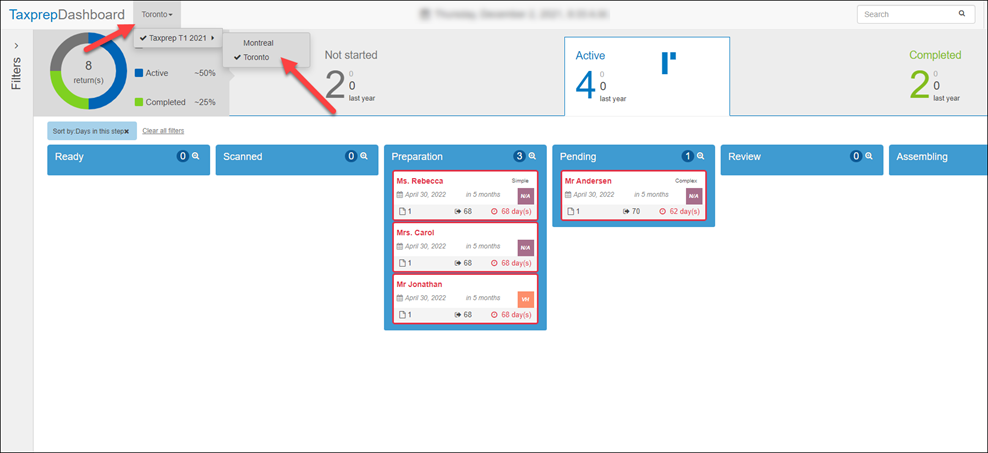
Multiple dashboards are available for selection using a drop-down list. The drop-down list displays the dashboards for which the user has security rights.
In the following example, the user can select between two dashboards (Montréal and Toronto) and the name of the selected dashboard (Toronto) appears at the top of the screen and is identified by a check mark.
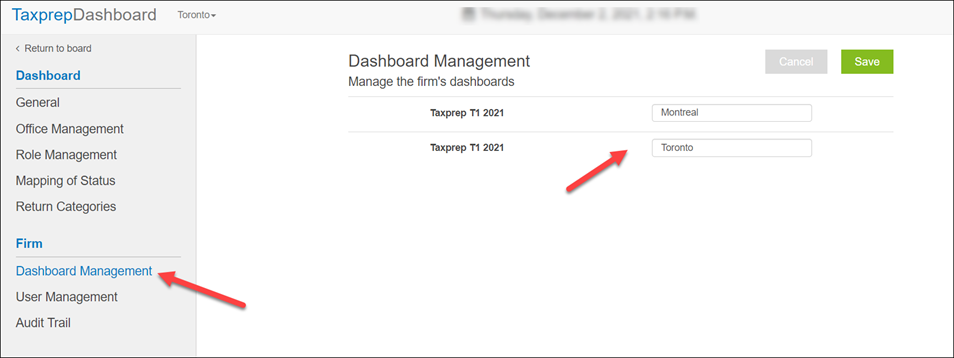
The user can rename the dashboard using the Dashboard Management feature as depicted below. If no name has been entered by the user, the default dashboard name will be displayed.
The user rights for access to multiple dashboards can be set using the User Management feature. In the following capture, all dashboards available for a particular user are displayed under the User Rights section. In addition, we can see that the user has security rights for both the Toronto and Montréal dashboards.
Using the filters and the Search field only display results for the selected dashboard.
For example, in the Montréal dashboard selected below, if the user searches for a card entitled Carol, the result of the search will display Mrs. Carol, which is a card in this dashboard.
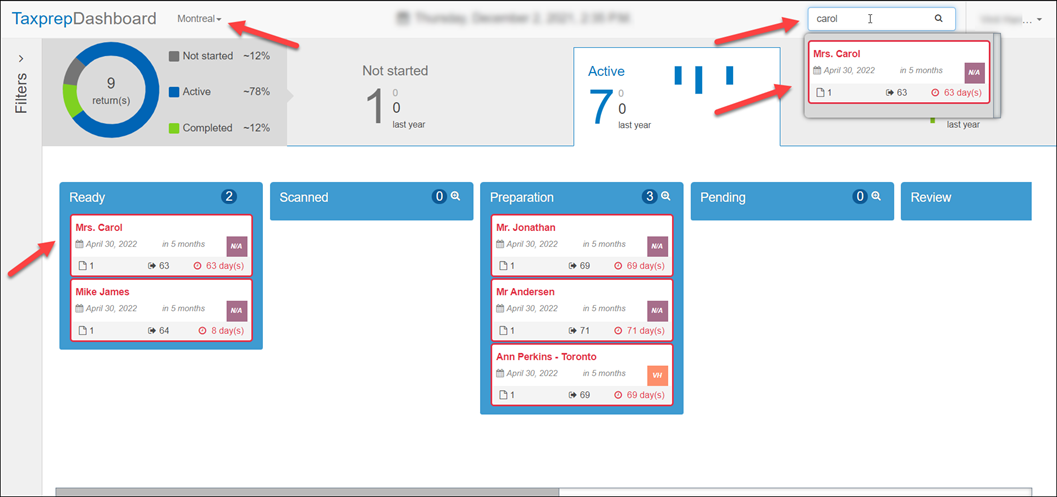
If the user were to search for a card that is not part of this dashboard but part of another, the search results would be blank.
All other dashboard functionalities work the same way in multiple dashboards and in a single dashboard.
Note: Only one dashboard has been created by default in 2021. To have more than one 2021 dashboard, please submit a support ticket at http://support.cch.com/oss/canada.
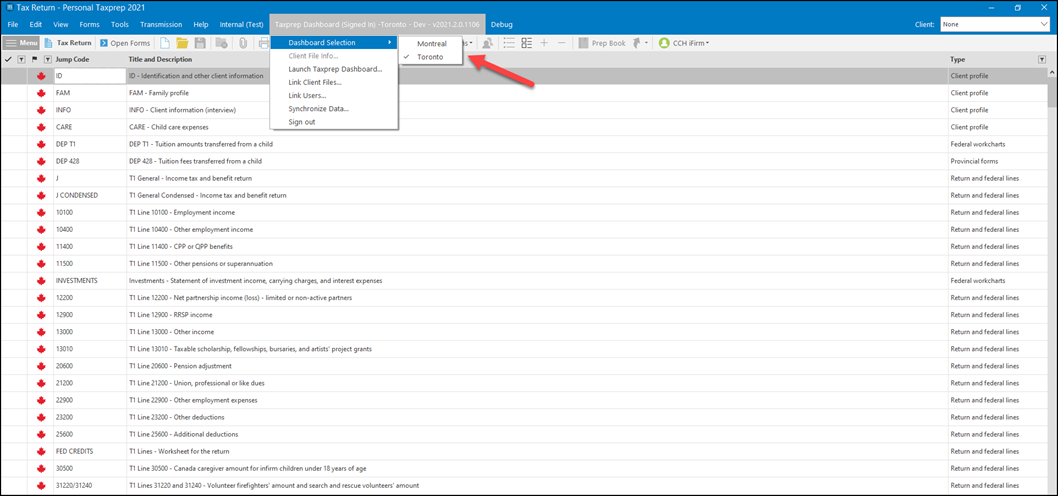
The Taxprep Add-in displays the list of multiple dashboards which are named in the same manner as in the Dashboard Management feature. Otherwise, default names would be displayed. The selected dashboard will also be identified by a check mark.
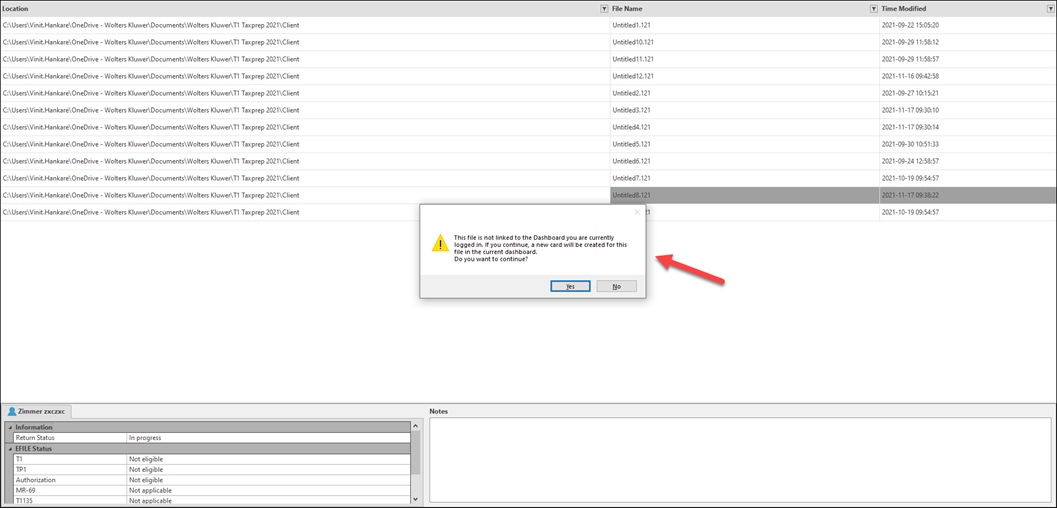
If the user opens a client file that is not linked to the dashboard he or she is currently logged in, once the file is opened, the application will verify if the file is linked with the dashboard. If this is not the case, the user will be prompted with the following message: This file is not linked with the currently logged Dashboard. If you continue, a new card will be created for this file in the current dashboard. Do you want to continue?'
When the user clicks Yes, a new card will be created in the active dashboard. If the user clicks No, the pop-up will close, and the user will remain on the same screen. The user can then select the appropriate dashboard.
For example, if the user logged in on the Toronto dashboard and opens a file from Montréal dashboard, the application will validate before creating a card in the Toronto dashboard.
All other dashboard functionalities work the same way in multiple dashboards and in a single dashboard.
Modifications Made to Version 2021 v.1.0
Change in Bulk – Change the value of multiple cards in a single step
The Change in Bulk feature allows you to choose the value that you want to replace, the value with which you want to replace it and for which cards.
To access this new feature, click Change in Bulk from the drop-down menu at the top right corner. This feature will be accessible to the Admin as well as to all users who have the Access the dashboard and settings management right.
If the user does not have this right, the option will not be visible in the menu.
In the following example, we will be changing the return status for all cards whose office is set as Montreal.
The following dialog box will display once you click Change in Bulk.

In the displayed dialog box, you can select the settings to which you want to change from the desired drop-down menus.
The Update drop-down menu contains a list of fields that can be changed in bulk. The fields are the following:
- Return Status
- Category
- Office
- Each role present in the system (Including custom roles)
The Change to drop-down menu is populated by the values based on the selection made in the Update drop-down menu.
For example: If Category is selected from the Update drop-down menu, the Change to drop-down menu will be populated with values for the categories present in the system.
If you select the Return Status filter, the Change to drop-down menu will be populated with the system return status as shown below.
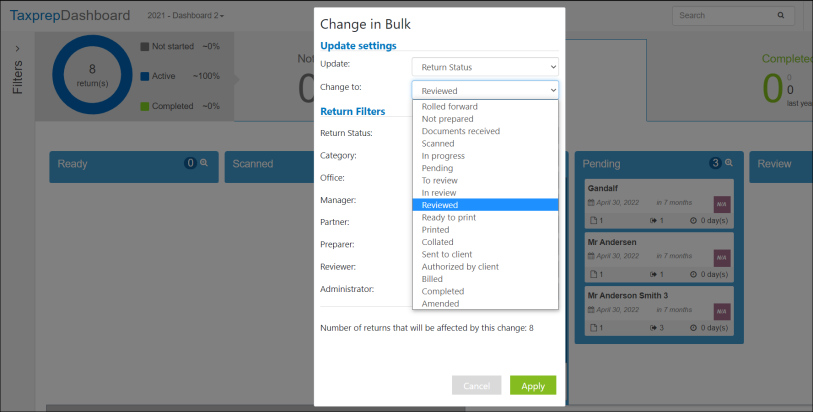
For this example, let us select Reviewed as the return status to which we want to change.
- As depicted in the above image, the number of returns concerned by this change is displayed near the bottom.
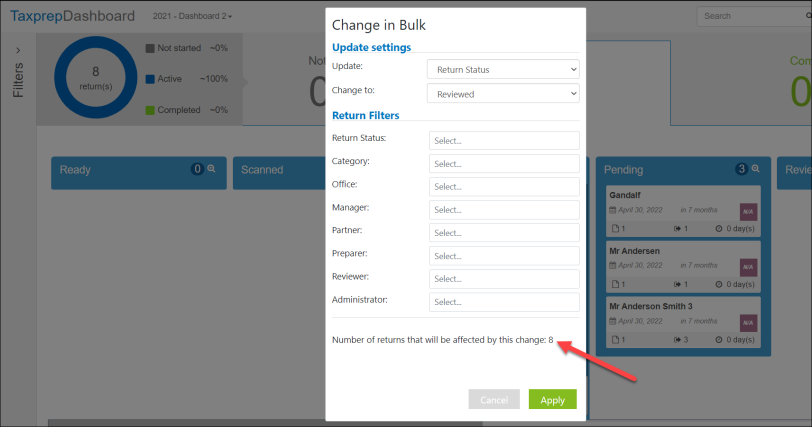
The Return Filters section can be used to filter the number of cards to which this change should be applied to. The Return Filters section contains drop-down menus for:
- Return Status
- Category
- Office
- Each role present in the system (Including custom roles)
The drop-down menus for each filter will be populated from system values.
For this example, let us select Montreal from the Office drop-down menu.
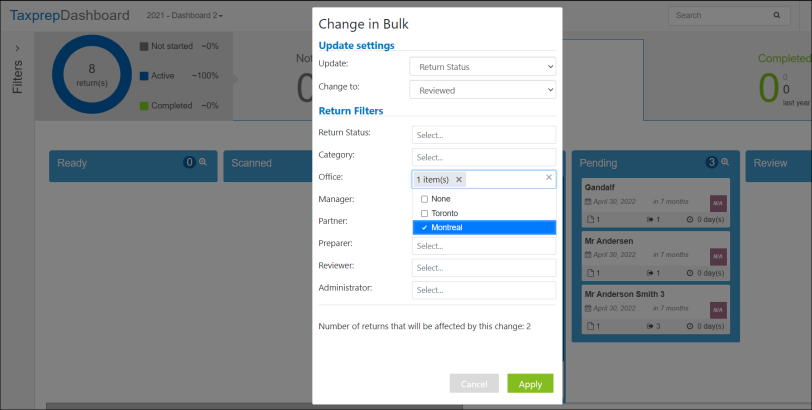
As depicted in the above image, you can see that the number of returns concerned by this change has changed.
Once you click Apply, the return status of all the cards that have Montreal as an office will be changed to Reviewed.
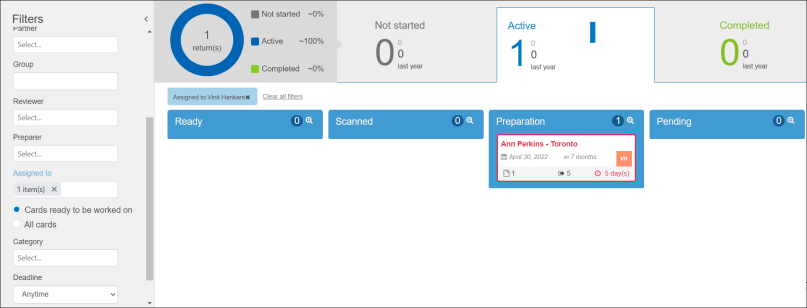
The “Assigned to” section of the Filters will now display the “All Cards” accordingly
In the Filters section, once a user is selected in the Assigned To drop-down menu, we have the All cards options, which when selected, will display all the cards assigned to the selected user.
When the Cards ready to be worked on radio button is selected, the only cards that display are those in which the user has a role assigned.
For example: A user is selected in the Assigned to filter and the All Cards radio button is also selected. As depicted in the following image, four cards are assigned to the selected user.
The user has been assigned roles in the Ready step but has only been assigned the appropriate role for the Preparation step. Therefore, four cards are available for that user based on the selected All Cards option for that user.
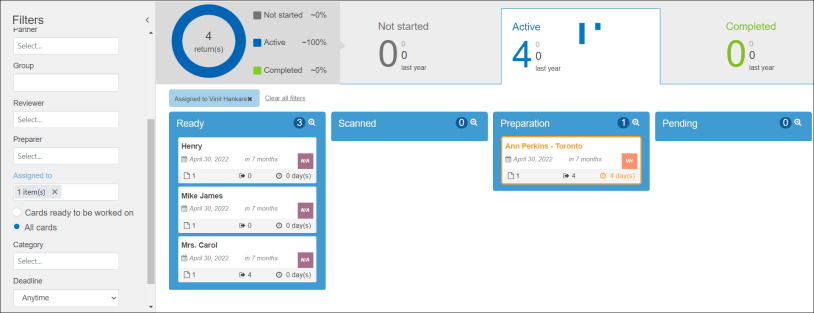
Now, if we select Cards ready to be worked on, only the cards where the user has been assigned the appropriate role for the Preparation step would be displayed as shown below.
Accordingly, only one card is displayed as per the filter applied as depicted below.
Dashboard Management
Dashboard Management allows the user to rename the Dashboard.
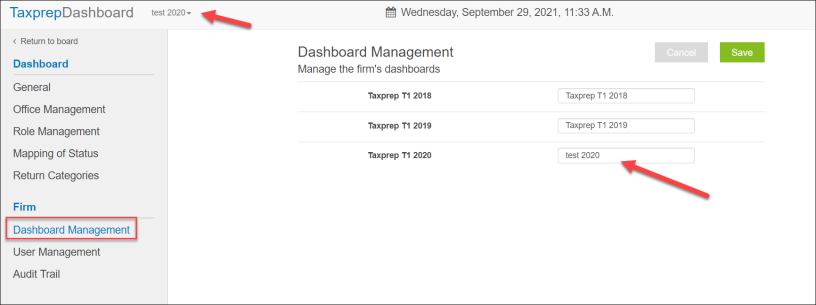
To access the Dashboard Management page, select Configuration from the drop-down menu under your name, then click Dashboard Management on the left of your screen.
From there, rename the Dashboard and click Save. The change will be reflected in the Dashboard selection menu at the top left of the screen.
Note:
This feature is available in CCH iFirm Tracking v.2021.1.0.
This feature will be available for the Dashboard Add-in for Taxprep in the 2021 version.
Security Enhancement: User locked out after five successive incorrect login attempts
As a part of our security enhancement, if a user has five successive incorrect login attempts, the account will be temporarily blocked for 15 minutes. Once the block is lifted after 15 minutes, the user can login again.
Modifications Made to Version 2020 v.2.0
The following modifications have been made to this version of CCH iFirm Tracking:
- Multiple options can now be selected in the Category and Office filters.
- The Personal Taxprep Cellular field is now synchronized and visible in CCH iFirm Tracking.
Modifications Made to Version 2020 v.1.0
The following modifications have been made to this version of CCH iFirm Tracking:
- The import of notes is now automatically performed during the card creation process in CCH iFirm Tracking. Therefore, the different options to import notes into the Link Client Files dialog box are no longer available. Please note that only the permanent notes will be imported.
- Multiple options can now be selected in the Manager, Partner, Reviewer, Preparer and Assigned to filters.
Note that following some significant changes in Taxprep Plus, we recommend to all our clients using Taxprep Plus on a Remote Desktop Services environment with RemoteApp (RDS) to manually install the latest version of Taxprep Plus. To download Taxprep Plus, click the following link: https://taxdash-storage-cdn.taxprepplus.ca/bin/taxprepplus.prod/taxprepplus.exe.
For users who would like to install Taxprep Plus and CCH iFirm Tracking on a Remote Desktop Services environment with RemoteApp (RDS), we recommend following the new installation steps available at the following address: https://www2.taxprepdashboard.ca/help/en-ca/Content/Firm%20Setup/Install_RDS.htm.
Changes made in version 2019.23
The following changes have been integrated in this version of CCH iFirm Tracking :
- CCH iFirm Tracking is now compatible with the enhanced version of Personal Taxprep 2019.
- The notes field was split into two tabs: the first tab contains a temporary note whose content will be retained for the current year while the second tab contains a permanent note whose content will be retained year-over-year.
- When another user makes a modification on an opened card in CCH iFirm Tracking, you will be prompted by a message and you will be able to refresh data with the latest changes.
- Each change made in CCH iFirm Tracking is now recorded in the Audit Trail section of the settings and makes it possible to, for example, review all changes made on the cards during the season. This section is only accessible to users who have an admin account.
Note that, for performance reasons, we will end support of Internet Explorer 11.0 in the first version of CCH iFirm Tracking compatible with Personal Taxprep 2020. Starting in December 2020, only Internet Microsoft Edge or Google Chrome browsers will be supported.
Changes made in version 2019.04
The following changes have been integrated in this version of CCH iFirm Tracking :
- When creating cards, you can now import notes at a later date. In addition, you can clear the notes imported from last year's cards that were not modified since they were imported.
- When deleting the receipt date in a card, you should now confirm the operation before it is performed.
Changes made in version 2019.02
The following changes have been integrated in this version of CCH iFirm Tracking :
- Deactivated users' accounts will no longer be permanently deactivated. In the User Account page, the Enable button allows you to reactivate a user account and, as a result, reestablish the user's access to CCH iFirm Tracking
- When a client file is renamed or copied in the same folder and the name of the file is modified, CCH iFirm Tracking creates a duplicate of the card linked to the renamed or copied client file. This new card will be identified by the
 tag so that you can easily locate duplicate cards. To remove this tag, delete the card and open the corresponding Taxprep client file to synchronize the card again. For more information on the creation of cards by CCH iFirm Tracking, consult the page Questions and Answers.
Changes made in version 2018.24
The following changes have been integrated in this version of CCH iFirm Tracking :
- If you were using CCH iFirm Tracking last year, it is now possible to consult the dashboard cards of CCH iFirm Tracking 2017. To display the dashboard from last year or this year, click the dashboard selector located in the top-left portion of the page, then click the appropriate dashboard. It is also possible to set different rights for the respective users of the dashboards.
- Import the notes of last year's cards: the import is now performed during card creation in CCH iFirm Tracking. The check box Import notes from last year's cards in the Link client files dialog box is selected by default. If you clear the check box, you cannot import the notes from last year's cards later.
Changes made in version 2018.05
The following changes have been integrated in this version of CCH iFirm Tracking :
- You can now keep track of a group of clients whose tax returns must be processed at the same time using the Group field in Form Identification, Identification and Other Client Information (Jump Code: ID) of Personal Taxprep 2017 v.3.0.
A name or a key word indicated in that field will be displayed in the client card and you can filter the cards according to the name of this group by using the new Group filter available in all CCH iFirm Tracking views.
You can also search for a card by using the name of a group as a search criteria. - Synchronizing data: In addition to return statuses, EFILE statuses and the notes, CCH iFirm Tracking will synchronize many other data. This enhancement is intended to allow you to consult the most recent information specific to the follow up with CCH iFirm Tracking in linked client files and also, to import more data when creating cards next tax season. For more information on synchronizing data, consult the page Synchronize data on client files.
- To allow you to efficiently process returns without tags using the categories to order the cards in the dashboard, CCH iFirm Tracking will order these returns by default in the category with the lowest complexity level, i.e., in the category located to the far right of the Return Categories page.
If you do not want this automatic ordering to be performed, indicate, in the Return Categories page, that the returns without tags should not be ordered in any category.
Changes Made to Version 2018.04
The following changes have been integrated in this version of CCH iFirm Tracking :
- When linking client files (cards creation) or at a later time, you can import notes from last year's cards if you were using CCH iFirm Tracking last year.
- Availability of the Assignees view: this view is available from the Active view and allows you to assess the workload for each of the users assigned to a specific step of the processing cycle and, this way, balance the overall workload.
- Availability of the Completed view: this view provides you with pertinent information for each of the completed returns that allow you to assess your efficiency compared to your efficiency last year. The content in this view is printable.
- The user interface has been enhanced to make it easier to configure the different CCH iFirm Tracking functionalities under the Configuration menu.
Changes Made to Version 2017.26
This new version of CCH iFirm Tracking provides an integration with the Personal Taxprep 2017 program; this way you can manage your 2017 tax season workflow. This version of CCH iFirm Tracking provides several enhancements:
Overall stability and speed
CCH iFirm Tracking has been completely updated to provide increased stability and speed. It has been enhanced and redesigned according to the latest cloud technology to provide you with smooth, uninterrupted scrolling through thousands of cards. In fact, CCH iFirm Tracking can now support up to 10,000 tax returns (cards) with speed and ease.
Faster (even with a less than optimal Internet connection)
CCH iFirm Tracking now caches the cards loaded on your computer’s hard drive, which means:
- Your computer does not need to continually retrieve cards from the cloud.
- CCH iFirm Tracking is quick to load up at the beginning of each day or anytime you reopen your browser. It will even open during an Internet outage.
Additionally, CCH iFirm Tracking now requires less Internet bandwidth and Chrome’s requests for a reCaptcha are also reduced.
Faster client file opening
The Client File Info dialog box is important to ensure that CCH iFirm Tracking has up-to-date information about each return. We have increased the speed at which the Client File Info dialog box appears when opening a client file by 200% and added an option to allow you to choose when you want it to appear. You can choose to show it at the opening or closing of a client file, or both.
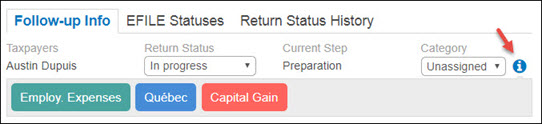
Enhanced user interface
The user interface has been redesigned to leave as much as possible space to the cards. As a result, the filters have been moved to the left of the dashboard.
The card presentation has also been enhanced to present the follow up information, the EFILE status as well as the return status history under three different tabs. In the Follow-up tab, where the client file contains the returns of several taxpayers, you may access the cards of the returns of the other taxpayers by clicking their name from the card of any other taxpayer in the client file. The tags assigned to the return are also displayed in this tab: click the icon to display them.
More secure
CCH iFirm Tracking users now need to log in in order to access your firm’s cards. Your clients’ information will be as safe as it is on Taxprep and only designated users will be able to access it.
The CCH iFirm Tracking administrator have to create users accounts and for each, define the user rights. The CCH iFirm Tracking administrator can define which user accounts have the rights to manage user accounts, modify the settings or only have the right to update cards' content.
Linking client files (creating the cards)
When creating cards, CCH iFirm Tracking will attempt to link to the user accounts created for CCH iFirm Tracking the persons designated as partner, reviewer and preparer identified in the client files.
Where correspondences cannot be established automatically by CCH iFirm Tracking, the Link Users dialog box will allow you to immediately correct the situation.
To take advantage of this new feature, it is important that the CCH iFirm Tracking administrator first create the user accounts.
Configuring CCH iFirm Tracking
Configuration and management of user accounts are now performed using the CCH iFirm Tracking Web application. To perform these operations, sign in to CCH iFirm Tracking, click your name and finally, click the Configuration command.
In addition, you can define which will be the source of the client code displayed in the cards, i.e., the code for the Taxprep client, the customized identification number and the the code for the CCH iFirm client or the CCH Practice client ID.
Changes Made to Version 2017.3.6 (hotfix available on request)
With this version you can now update the statuses modified in the Taxprep cards to closed Taxprep client files. As a result, you are no longer required to open each client file to synchronize the statuses. You must now use the Synchronize Statuses command available in the CCH iFirm Tracking menu of Personal Taxprep.
In addition, with the hotfix, importing role assignments from last year no longer generates the automatic creation of users.
Change Made to Version 2017.3.5
With this version, you can import last year's categories defined in last year's cards if you have used CCH iFirm Tracking last year.
Changes Made to Version 2017.3.3
The following changes have been integrated in this version of CCH iFirm Tracking:
- when linking client files (creation of cards), it is now possible to not associate cards to an office. This allows you to not replace the office indicated on a card when you have to link your client files again.
- new selection criteria allowing you to filter the content of CCH iFirm Tracking sections based on the category, the reviewer and/or the preparer associated with the cards.
Changes Made to Version 2017.5
The following changes have been integrated in this version of CCH iFirm Tracking:
- Enhancement of the appearance of the cards for which a warning has been set to mute : during the period where the mute is activated, the red border around these cards no longer displays.
- new printable report providing an overview of the progress of the different cards created in CCH iFirm Tracking.
Changes Made to Version 2017.3
The following functionalities have been integrated into this new version of CCH iFirm Tracking:
Search a card based on a client's e-mail address
In this version of CCH iFirm Tracking, a client's e-mail address can be used to search the client's card and quickly obtain information relating to the tax return processing. The other search criteria that can be used are the client's last name, first name and telephone number.
Import last year's offices and assignments of roles
If you have used CCH iFirm Tracking last year, you can import last year's offices and assignments of roles defined in last year's cards.
Managing the synchronization of information on client files
You may now disable the automatic synchronization of information on client files between Personal Taxprep and CCH iFirm Tracking for users that do not have to regularly perform this operation.
Possibility of tagging the cards of VIP clients
A tag  can now be selected in the cards of the client files to which you want to pay a particular attention. Once selected, the
  tag can be used as a filter in the different sections of CCH iFirm Tracking to follow-up on the progress of these client files.
Displaying EFILE statuses in the cards
To allow you to modify the returns status from a card and, this way, allow you more accurately keep track of the completed returns, the EFILE statuses of the returns are now displayed in the cards.
Additional data in the Completed section
Allows you to create printable reports listing more useful data to help you improve your firm's processing of returns, new information is available in the Completed section. As a result, for each of the returns displayed in this section, you will now see the number of days spent in the Active section, i.e., the number of days between the moment the return left the Not started section and the moment it has been transferred into the Completed section. The average number of days spent in the work cycle is also displayed in the lower part of the table.
Changes Made to Version 2016.24
This new version of CCH iFirm Tracking provides an integration with the Personal Taxprep 2016 program; this way you can manage the 2016 tax season workflow and compare the progress of the current tax season with last year's. This version of CCH iFirm Tracking provides several enhancements:
- a user-friendly interface. The different menus have been replaced with a single menu represented by a wheel icon;
- the addition of a functionality allowing you to exclude folders when creating and updating the CCH iFirm Tracking database. From Personal Taxprep, you can choose to exclude folders containing client files that you want to keep confidential. These client files will not be scanned by CCH iFirm Tracking.
- the use of a unique PIN by the CCH iFirm Tracking administrator; this additional security measure allows the administrator to manage the list of users and prevent non-authorized users to modify the CCH iFirm Tracking configuration.
- a more exhaustive management of the user list; the administrator can now deactivate or delete user accounts, which provides increased security when using CCH iFirm Tracking.
- the possibility of splitting all cards in a single step. By creating one card per taxpayer rather than by client file, you can more precisely manage the income tax returns prepared by your firm.
- the conversion of settings defined in the preceding year version of CCH iFirm Tracking.
- the printing of reports complying with you firm's specific information requirements through the availability of filters in the Not started and the Completed sections of the dashboard.
Because the deployment and the configuration are important steps for an efficient use of CCH iFirm Tracking, we have designed a guide presenting best practices relating to the deployment and configuration of CCH iFirm Tracking. We recommend that you consult this guide before installing CCH iFirm Tracking.